


Any Android Application has a front-end (user interface) and the back-end (the codes and database). Whenever a user uses the application, he interacts with the user interface.
So, making a clean and immersive user interface becomes pretty essential. Android UI testing helps you to test your built user interface with various parameters.
Let’s start!!!
What is Android UI Testing
Android UI Testing is an essential part of the development process. Think of a scenario where you launched your app for millions of users, and the next day, the users reported tons of bugs. Therefore, it’s always encouraged for any developer to test his application before he or she releases it.
UI Testing allows you to analyze your application in-depth and know if any bugs are there. Moreover, it provides your app flexibility, flawless experience, smoothness and makes it user-friendly. You can even keep a check and monitor if all your desired functions are working correctly or not.
Some of the UI testing benefits can be listed as follows:
- Flawless and smooth user experience.
- Proper monitoring of the functionalities.
- The stable release of the application
- Early detection of failures and malfunctioning
- A deeper understanding of your application.
- Building a user-friendly and bug-free User Interface.
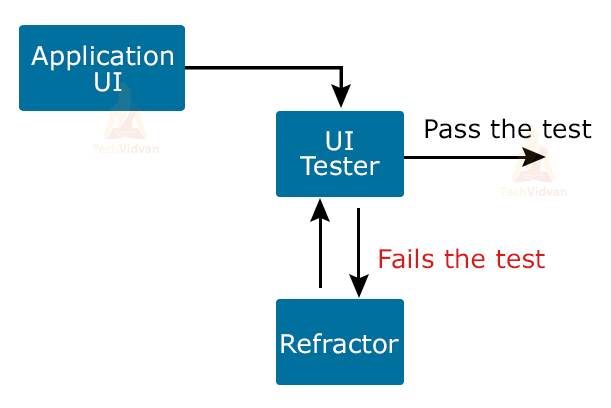
Below is a picture that describes how the testing process works in general.
Methods involved in UI Testing
We got to know what Android UI testing is. Now it’s time for us to understand how you can test your built applications. Mainly, we have two methods to test our applications. The two methods are as follows:
1. Manual Testing
2. Automated Testing
Manual Testing
Manual Testing, also known as the human approach of testing, is a method to test our application. This method is somewhat good but not primarily used in practical scenarios due to its less reliableness.
We as humans may not be able to go in-depth to check our applications. Many a time, we tend to overlook or forget to test on few things. This lack of consciousness may lead our application to be still in a state of bugs.
Also, this method is time taking as the tester needs to spend a lot of time checking each function and feature.
Automated testing
Automated testing is like a simulation kind of approach, where our app undergoes all the testing in less time. Compared to Manual testing, this method is more reliable and fast. Using this method, you don’t need to worry about every detail as every detail will be handled by the tool that we use.
Indeed, we prefer Automated Testing over Manual Testing. Further, you will see the frameworks and tools which you can use to test your application.
Which Android UI Testers to use?
Currently, in the market, there are many Android UI testers. Therefore, it becomes pretty difficult for a developer to choose from the list.
However, the below list makes your task of selection easy. In addition, you can find several parameters which you should keep in mind while choosing a tester.
1. Compatibility: You should always check whether the UI tester is compatible with test applications built on higher or lower android versions.
2. Regular Updates: You should check whether or not the application is regularly updated or not. The outdated applications are not well worse to keep a track of the current features.
3. Easy to Handle: You should make sure that the tool you use is easy to handle and does not involve complex steps.
4. Features: You should always make sure the features of the tester satisfies your requirements.
5. Pricing: You should always select the tool which satisfies your requirements and also your pocket.
6. Customization: You should be able to customize your tool according to your needs.
7. Greater Community: It’s always encouraged to choose a tool that many developers commonly use. Also, you should see that there should be a larger community to support you if you get stuck.
Types of UI Testing Tools
We have two types of testing tools. Those are as follows:
- Native UI Testing Tool
- Cross-Platform Testing Tool
Native UI Testing Tool
The Native UI Testing Tool is only used on Native applications. Native Applications are the applications that are only supported in one operating system. These applications are built thinking of specific Operating applications.
Android Applications are also an example of native apps. However, the android applications are only supported in the android operating system.
To test a native application, we can use the native UI testing tools. The apps which we develop using android Studio are native.
Cross-Platform Testing Tool
Cross-Platform Testing tools are used to test applications that are supported on multiple systems. We term such an application as Cross Platform applications.
Unlike native applications, these applications are more versatile. These applications are usually developed using JS frameworks like React JS, Angular JS, Vue JS, etc.
In addition, we have React Native and Flutter, which are the two standard tools that are used for cross-platform application development.
Android UI Testing Tools and their Features
Now, as you got some idea about UI testing and the various parameters of choosing a framework. So, now it’s time to throw some light on some of the existing frameworks you can use.
You are going to know five UI testing tools and their features. Based on their features, you can easily decide upon the tool which you require.
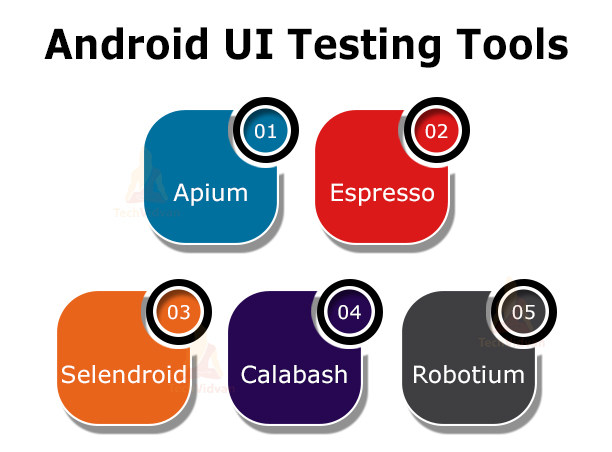
1. Apium
The first tool on the list is Apium. Apium is a cross-platform UI tester tool. It’s open-source, and its source code is freely available on the web. You can use this tool to test both Android and Ios based applications.
In Android, the testing is done with the help of the UI Automator library provided in Android SDK tools.
Apium has an extension for both API and web drivers. Using these extensions, you can efficiently perform a simulation of your application.
Furthermore, the Apium tool is supportive in all selenium-based client libraries, such as Java, Python, Ruby, PHP, etc. Apium is compatible with almost all the android versions starting from Android 2.3.
Features of Apium
- Compatible with most of the Android versions.
- Easy installation and setup of the tool.
- Easy customization and easy to handle tool
- Feature to analyze all the Android Components.
- Available for both android and Ios applications.
- Web driver and API support for all web-based languages.
Cons of Apium
- It is a bit slow. The test cases take more time to execute.
- The minimum supportive Android version is 2.3.
- The test code generated and the application code are stored separately.
2. Espresso
Another tool for UI testing is Espresso. Espresso is supportive of Android applications built on the above Android 2.3 version. In addition, the Espresso tool provides automatic synchronization of the test action with the user interface.
Features of Espresso
- Compatible with most of the Android Versions.
- The testing is fast and reliable.
- Web components can also be tested.
- Test recorder already present.
- Extensive community and highly supportive team
Cons of Espresso
- At any one moment, you can only test one application.
- Only android apps can be tested.
- Test cases are required to be written in Kotlin or Java.
3. Selendroid
Selendroid is based on Selenium 2 Framework and supports JSON parser. It is free and open-source. You can use this tool to test multiple android applications at a time. Hardware devices are also recognizable if plugged in.
Features of Selendroid
- It supports hardware plugging and gesture control. You can even test whether the gestures are working
- correctly in your application or not.
- Multiple Android applications are tested at a time.
- Easy customization and easy-to-handle tools.
- Can figure out the UI elements by themselves by using the locators.
- An inspector is available to simplify your testing.
- You can inspect the currency state of your application UI.
Cons of Selendroid
- You don’t have any built-in facility to compare images.
- It takes time to learn this tool as it uses Selenium.
4. Calabash
Calabash is based on Cucumber Framework. Most of the testing is done on clouds. You can test both native and cross-platform applications. It works perfectly with Java, Ruby, .NET, and other languages. The tool is free and open source.
Features of calabash
- Supportive for both Android and Ios Applications
- Open source and accessible tool.
- Most of the languages support such as Java, Ruby, .NET, and other languages.
- API support for touch-responsive applications.
- It is based on the Cucumber framework that is easy to learn.
Cons of Calabash
- Line-by-line testing is done, and if any line testing fails, then all other lines are skipped.
- Your emulator takes time to load.
- The tool requires a set of complete codes to identify the ID of each element.
5. Robotium
It’s also an open-source and accessible tool. It has broader support for most of the applications. Almost all android applications can be tested using this tool.
It supports android applications above the Android 1.6 version. This tool doesn’t require any extra information. called black-box testing.
Features of Robotium
- First, it’s open-source and free.
- Most of your android applications can be tested.
- You don’t require to have much information to generate the test cases.
- In pre-installed applications, you can efficiently run your test cases.
- Larger community and support are available.
Cons of Robotium
- You can’t have a lock and unlock device facility.
- There is no way to keep a record of tests.
Summary
Through this article, you understood what Android UI testing is and why a developer must know it. Moving forth, you came across the two methods of testing your application.
Along with this, you came across several parameters which you can use to judge which tester is good for you. Finally, you saw the various frameworks and tools which you can use to test the Android UI.