


We know that artists create paintings on a canvas. But what if we can paint on air just by waving our hands. So, in this project, we are going to build an air canvas using OpenCV and Python.
OpenCV is an open-source computer vision library for performing various advanced image processing tasks.
We’ll use color detection and segmentation techniques to achieve this objective.
Here, we’re going to use a green object to simulate a pencil for the canvas.
So what is Color Detection and Segmentation in Image Processing?
- Color detection is an image processing technique where we can detect any color in a given range of HSV color space.
- Image segmentation is the process of labeling every pixel in an image, where each pixel shares the same certain characteristics.
Project Prerequisites:
1. Python – 3.x (We used 3.8.8 for this project)
2. OpenCV – 4.4
- Run “pip install opencv-python opencv_contrib-python” to install the package
3. Numpy – 1.20.1
Download Air Canvas OpenCV Python Code
Please download the source code of python air canvas project: Air Canvas OpenCV Project Code
Steps to develop air canvas project using opencv:
- Import necessary packages.
- Read frames from a webcam
- Create the canvas window
- Detect the green color
- Draw on the canvas
Step 1 – Import necessary packages and pre-define some settings:
To build this project, we need only two packages, OpenCV and Numpy. So first we’ve to import these.
# Import necessary packages.
import cv2
import numpy as np
Step 2 – Read frames from a webcam:
# Create videocapture object
cap = cv2.VideoCapture(0)

while True:
    # Read each frame from webcam
    success, frame = cap.read()

    # Flip the frame
    frame = cv2.flip(frame, 1)

    cv2.imshow("Frame", frame)

    # Open the OpenCV window until 'q' is pressed
    if cv2.waitKey(1) == ord('q'):
        break

cap.release()
cv2.destroyAllWindows()
- First, we created a VideoCapture object and defined the object as cap.
- cap.read() function reads each frame from the webcam.
- cv2.flip() flips the frame. The arguments are input image/frame and axis. 0 is for flip vertically, and 1 for flip horizontally.
- cv2.imshow() function shows frame in a new window.
- cv2.waitKey(1) == ord(‘q’) keep open the window until ‘q’ is pressed.
Step 3 – Create the canvas window:
# Define various colors
colors = [(255, 0, 0), (255, 0, 255), (0, 255, 0), (0, 0, 255), (0, 255, 255)]
color = colors[0]
- First, we define some colors that we’ll be using during this project.
width = int(cap.get(3))
height = int(cap.get(4))

# Create a blank canvas
canvas = np.zeros((height, width, 3), np.uint8)
- Then we create an empty blank canvas the same size as the camera frame.
- np.zeros() create a matrix containing all 0’s.
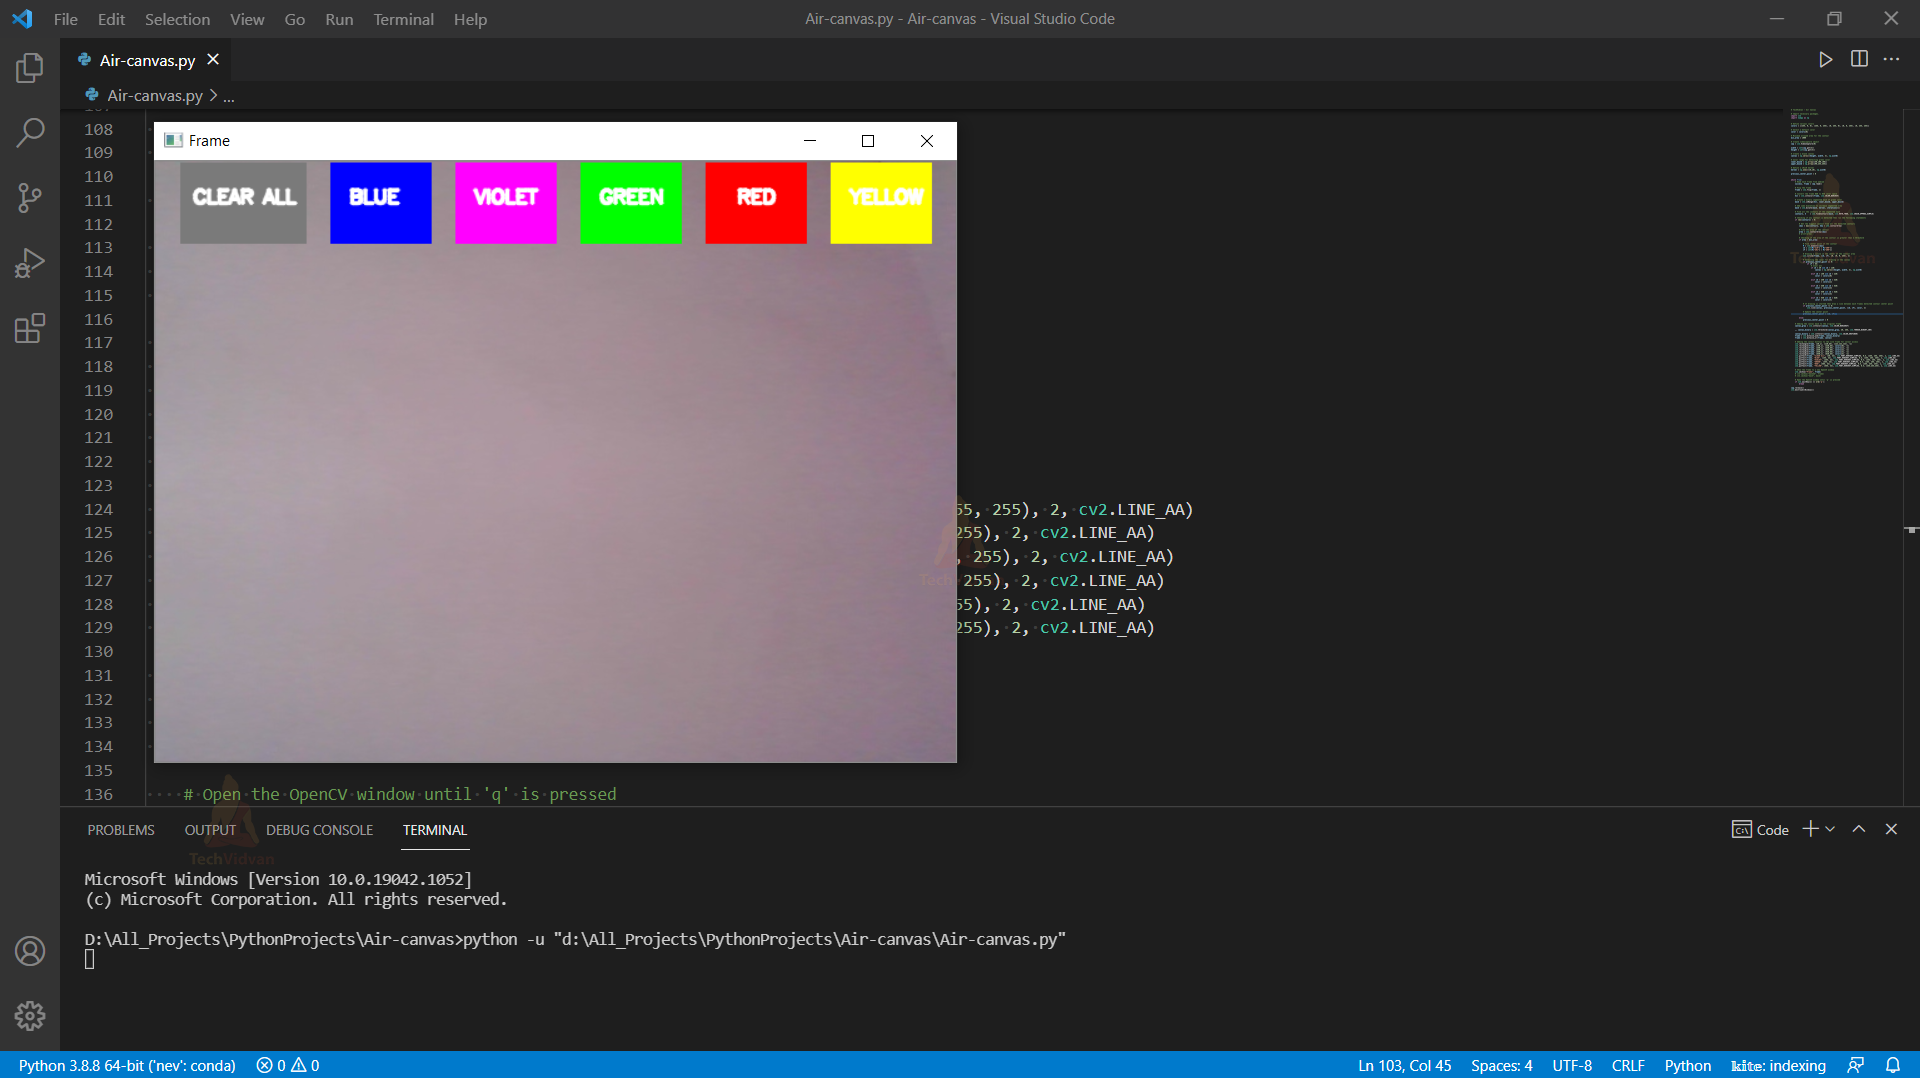
We want to change the pencil color during painting, That’s why we have to create some buttons in the frame. Using those buttons we can select the pencil color during painting in real-time.
# Adding the colour buttons to the live frame for colour access
    cv2.rectangle(frame, (20,1), (120,65), (122,122,122), -1)
    cv2.rectangle(frame, (140,1), (220,65), colors[0], -1)
    cv2.rectangle(frame, (240,1), (320,65), colors[1], -1)
    cv2.rectangle(frame, (340,1), (420,65), colors[2], -1)
    cv2.rectangle(frame, (440,1), (520,65), colors[3], -1)
    cv2.rectangle(frame, (540,1), (620,65), colors[4], -1)
    cv2.putText(frame, "CLEAR ALL", (30, 33), cv2.FONT_HERSHEY_SIMPLEX, 0.5,
(255, 255, 255), 2, cv2.LINE_AA)
    cv2.putText(frame, "BLUE", (155, 33), cv2.FONT_HERSHEY_SIMPLEX, 0.5,
 (255, 255, 255), 2, cv2.LINE_AA)
    cv2.putText(frame, "VIOLET", (255, 33), cv2.FONT_HERSHEY_SIMPLEX, 0.5,
 (255,255, 255), 2, cv2.LINE_AA)
    cv2.putText(frame, "GREEN", (355, 33), cv2.FONT_HERSHEY_SIMPLEX, 0.5,
(255, 255, 255), 2, cv2.LINE_AA)
    cv2.putText(frame, "RED", (465, 33), cv2.FONT_HERSHEY_SIMPLEX, 0.5,
 							(255, 255, 255), 2, cv2.LINE_AA)
    cv2.putText(frame, "YELLOW", (555, 33), cv2.FONT_HERSHEY_SIMPLEX, 0.5,
(255,255,255), 2, cv2.LINE_AA)
- Using cv2.rectangle(), we draw some rectangles of different colors that we’ve defined before.
- cv2.putText() draws texts on a frame. Using this function we put each of the names of the colors to their corresponding rectangle box.
Output:
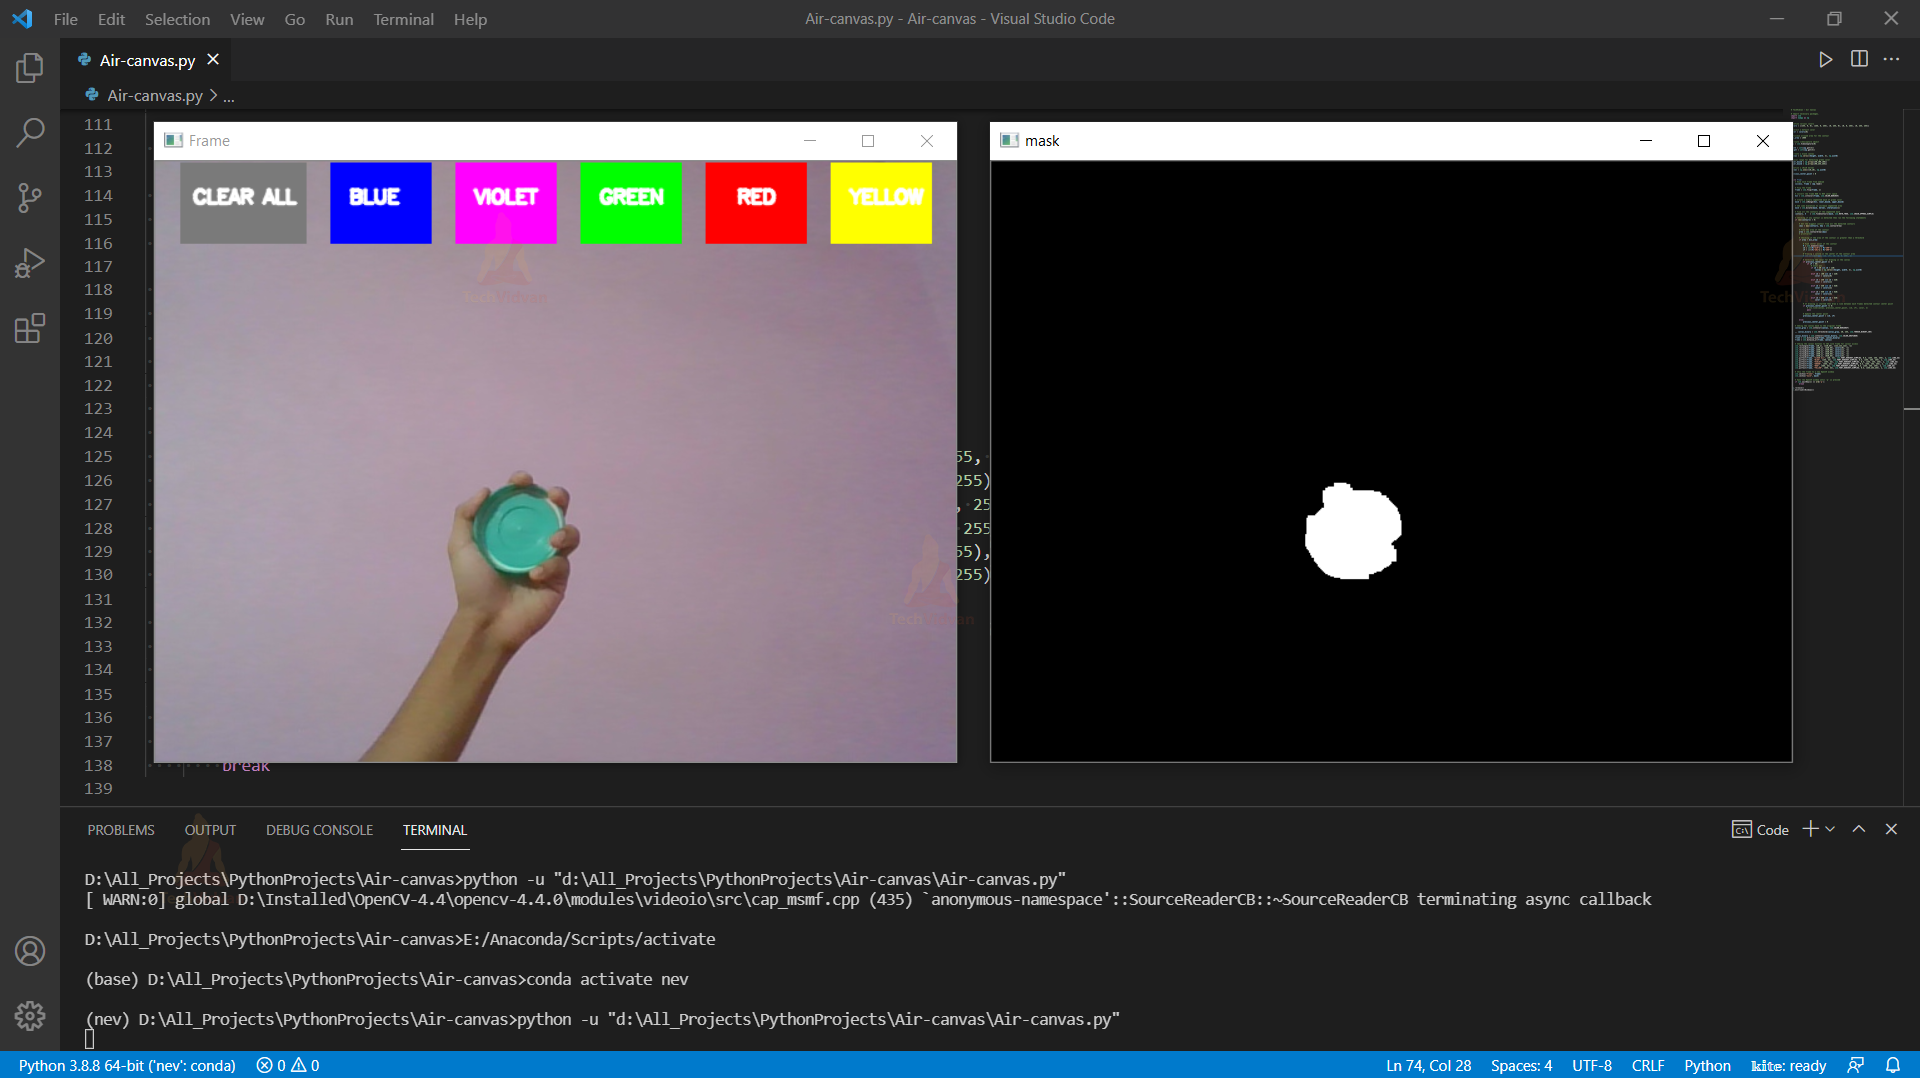
Step 4 – Detect the green color:
Here we’re using a green object to simulate the pencil of our canvas. OpenCV reads frames as BGR color space. But to detect colors, we have to convert the frame to the HSV color space.
But what is HSV color-space?
HSV stands for HUE, SATURATION, and VALUE (or brightness). It is basically a cylindrical color space.
Note: This image is taken from google.
- HUE – The hue encodes color information in angular dimension.
- SATURATION – Saturation encodes the intensity of color.
- VALUE – Value represents the brightness of the color.
So let’s detect the green object:
# Color range for detecting green color
   lower_bound = np.array([50,100,100])
   upper_bound = np.array([90,255,255])

     # Convert the frame BGR to HSV color space
   hsv = cv2.cvtColor(frame, cv2.COLOR_BGR2HSV)

   # Create a binary segmented mask of green color
   mask = cv2.inRange(hsv, lower_bound, upper_bound)

   # Add some dialation to increase segmented area
   mask = cv2.dilate(mask, kernel, iterations=1)
- cv2.cvtCOLOR() function converts the color-space of an image.
- cv2.inRange() function returns a binary segmented mask containing a white region where the color is detected and the rest of the region as black.
- Cv2.dilate() increases the area of the segmented white region.
Output:
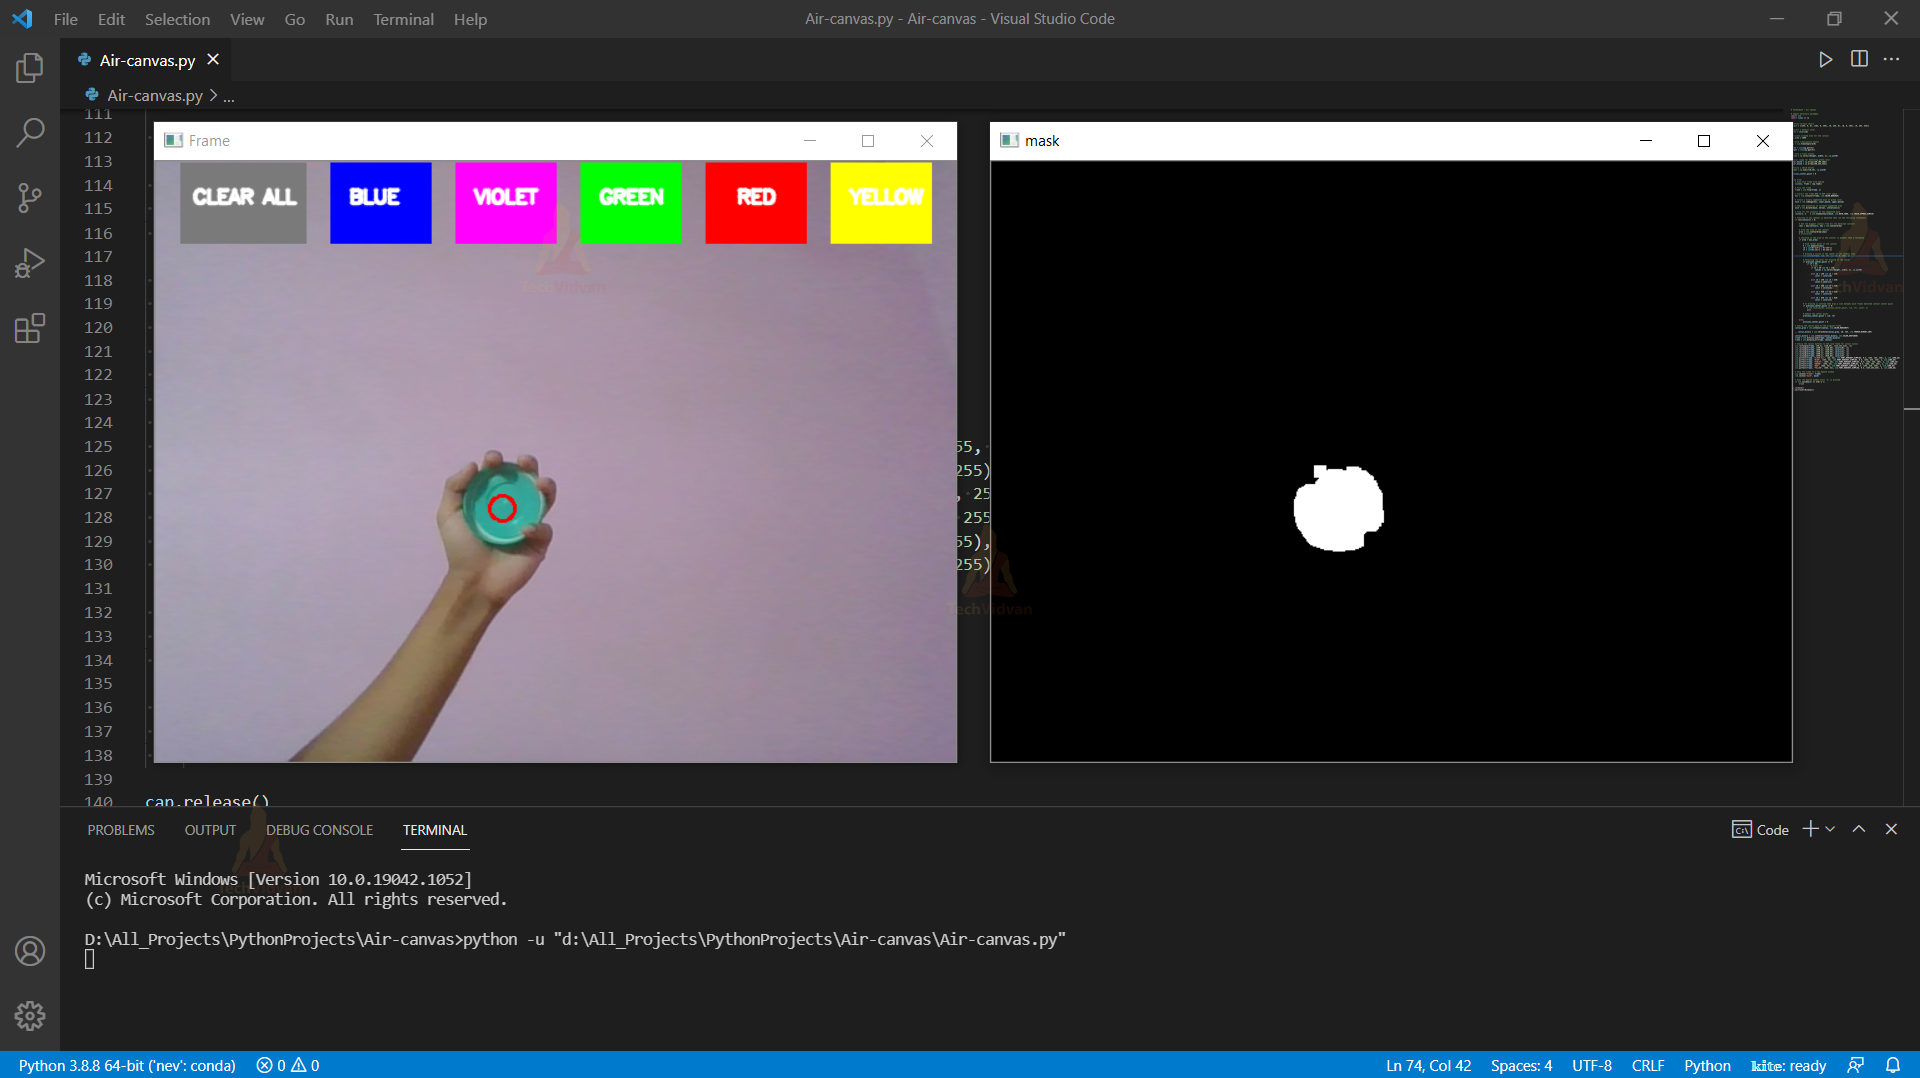
 # Find all the contours of the segmented mask
    contours, h    = cv2.findContours(mask, cv2.RETR_TREE,
cv2.CHAIN_APPROX_SIMPLE)
- cv2.findContours() finds all the continuous points along the boundary having the same intensity or color. In our case, we are finding points along the segmented white region of the mask.
Now, let’s find the center of the detected object. The center point will be the reference point with which we’ll be painting something on the canvas.
# Checking if any contour is detected then run the following statements
    if len(contours) > 0:

        # Get the biggest contour from all the detected contours
        cmax = max(contours, key = cv2.contourArea)

    else:
        previous_center_point= 0
- First, we check if any contour is detected or not.
- If any contour is detected then we pick a contour that has maximum area among all other contours in the list.
- Otherwise, we set previous_center_pointto 0. The previous_center_pointbasically stores the center point of a contour in a frame.
# Find the area of the contour
        area = cv2.contourArea(cmax)
- After picking the biggest contour we get the area of the contour using cv2.contourArea() function.
It may be possible that the main object is not present in the frame but some noises are detected. So to fix this we need to filter that as well.
min_area = 1000
          # Checking if the area of the contour is greater than a threshold
        if area > min_area:

            # Find center point of the contour
            M = cv2.moments(cmax)
            cX = int(M["m10"] / M["m00"])
            cY = int(M["m01"] / M["m00"])

            # Drawing a circle in the center of the contour area
            cv2.circle(frame, (cX, cY), 10, (0, 0, 255), 2)
- First, we check if the area of the contour is greater than the defined min_area.
- cv2.moments() function finds the center coordinate of the contour.
- Using cv2.circle we draw a circle in the center of the detected object.
Output:
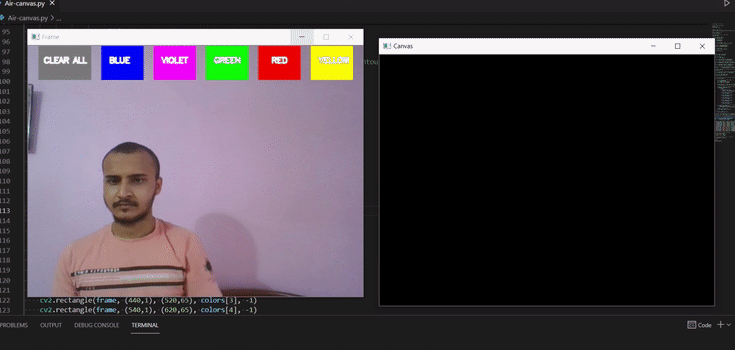
Now we’ve successfully detected our pencil. So let’s do the most exciting thing of the project.
Step 5 – Draw on the canvas:
To draw on the canvas first we’ve to select a color for drawing.
# Selecting the color for drawing in the canvas
            if previous_center_point== 0:
                if cY < 65:
                    # Clear all
                    if cX > 20 and cX < 120:
                        canvas = np.zeros((height, width, 3), np.uint8)

                    elif cX > 140 and cX < 220:
                        color = colors[0]

                    elif cX > 240 and cX < 320:
                        color = colors[1]

                    elif cX > 340 and cX < 420:
                        color = colors[2]

                    elif cX > 440 and cX < 520:
                        color = colors[3]

                    elif cX > 540 and cX < 620:
                        color = colors[4]
- First, we check if the previous_center_point is 0, which means nothing is detected in the previous frame.
- But in the current frame, if something is detected, we already know the coordinates of the color selection buttons. So we checked in which button the center point of the contour is detected first. And then set the color accordingly.
- The first button is for clearing the canvas, that’s why if the center point is detected in the first button, then we reset the canvas to a blank canvas using np.zeros() function.
# If drawing is started then draw a line between each frames detected contour
#  center point
            if previous_center_point!= 0:
                cv2.line(canvas, previous_center_point, (cX, cY), color, 2)

            # Update the center point
            previous_center_point= (cX, cY)
- Now we check if the previous_center_point is not 0, which means a contour is detected in the previous frame, then we draw a line between the previous_center_point and the current center point.
- After that, we update the previous_center_point to the current center point.
But we want to show the drawings in the original frame. So let’s see how we can do that also.
# Adding the canvas mask to the original frame
            canvas_gray = cv2.cvtColor(canvas, cv2.COLOR_BGR2GRAY)

            _, canvas_binary = cv2.threshold(canvas_gray, 20, 255,
 cv2.THRESH_BINARY_INV)

            canvas_binary = cv2.cvtColor(canvas_binary, cv2.COLOR_GRAY2BGR)

            frame = cv2.bitwise_and(frame, canvas_binary)
            frame = cv2.bitwise_or(frame, canvas)
- Using cv2.cvtCOLOR() function we convert the canvas to grayscale image.
- Then using cv2.threshold() we create a binary mask of the canvas.
- Then again we convert the binary mask to BGR color space. Because in order to add two images, the shape of the two images needs to be the same.
- cv2.bitwise_and() is true if both pixels are greater than zero.
- cv2.bitwise_or() is true if one of the pixels is greater than zero.
Air Canvas OpenCV Output
Summary:
In this project, we’ve built an Air canvas using OpenCV – Python. We’ve learned about color detection and segmentation techniques, thresholding techniques, some logical operations, and some other image processing techniques through this project.