
In the realm of Java programming, threads play a pivotal role in enabling concurrent execution, optimizing resource utilization, and harnessing the full potential of modern multi-core processors.
Thread creation is a fundamental concept that empowers developers to design efficient, responsive, and highly parallel applications. This article provides a comprehensive introduction to thread creation in Java, exploring the basics, benefits, and practical implementation of threads in Java.
Thread:
“A thread is a flow of execution. For every thread, a separate independent job is there”.
Threads are widely used to perform various tasks in parallel, such as handling user input, managing network connections, performing background calculations, and more.
They play a crucial role in modern software development, enabling developers to create applications that can efficiently utilize multi-core processors and deliver better user experiences.
Main Thread:
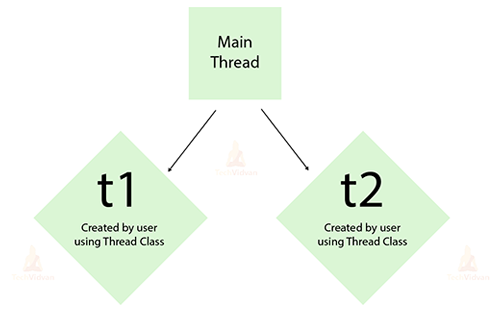
Whenever we write a class and main method, one thread will be created automatically, which is the main thread. It is the thread from which the main method of the program is invoked, and it serves as the entry point for the program’s execution.
Here’s a breakdown of the Main thread’s key characteristics:
Entry Point: When a Java program is started, the Java Virtual Machine automatically creates the main thread. It’s the first thread that runs, which is a starting point for program execution.
Main Method: When starting the Java application, the main thread will execute the main method of a class. The primary logic and instructions of the program are contained in this method.
Single Thread: Initially, the Main thread is the only thread running in the program. As it encounters instructions in the main() method, it will execute sequentially, line by line.
Creating Other Threads: The Main thread can create additional threads if the program requires concurrent or parallel execution. These new threads will be able to carry out tasks on their own without the use of a main thread, thus making more efficient use of CPU resources.
Thread Termination: The Main thread’s lifecycle is tied to the completion of the main() method. The main thread completes the execution of the program and ends the entire program when the main() method is finished or encounters a return statement.
Shutdown Hooks: When the JVM is about to shut down, Java Shutdown Hooks allow you to register threads to be executed. This might be helpful for finishing off chores before the program ends.
Thread Class Constructor:
- Thread()
- Thread(Runnable target)
- Thread(Runnable target, String name)
- Thread(String name)
- Thread(ThreadGroup group, Runnable target)
- Thread(ThreadGroup group, Runnable target, String name)
- Thread(ThreadGroup group, Runnable target, String name, long stack size)
Each of these constructors provides different ways to create threads with varying degrees of customization. The constructors that accept a Runnable target are often preferred because they promote better separation of concerns and allow you to define the thread’s behaviour independently from its instantiation.
Example Program:
class ThreadConstructorExample {
    public static void main(String[] args) {
        // Using Thread() constructor
        Thread thread1 = new Thread() {
            public void run() {
                System.out.println("Thread 1: Hello from " + getName() + " - TechVidvan");
            }
        };

        // Using Thread(Runnable target) constructor
        Thread thread2 = new Thread(new Runnable() {
            public void run() {
                System.out.println("Thread 2: Hello from " + Thread.currentThread().getName() + " - TechVidvan");
            }
        });

        // Using Thread(Runnable target, String name) constructor
        Thread thread3 = new Thread(new Runnable() {
            public void run() {
                System.out.println("Thread 3: Hello from " + Thread.currentThread().getName() + " - TechVidvan");
            }
        }, "MyThread3");

        // Using Thread(String name) constructor
        Thread thread4 = new Thread("MyThread4") {
            public void run() {
                System.out.println("Thread 4: Hello from " + getName() + " - TechVidvan");
            }
        };

        // Using Thread(ThreadGroup group, Runnable target) constructor
        ThreadGroup threadGroup = new ThreadGroup("MyThreadGroup");
        Thread thread5 = new Thread(threadGroup, new Runnable() {
            public void run() {
                System.out.println("Thread 5: Hello from " + Thread.currentThread().getName() + " - TechVidvan");
            }
        });

        // Using Thread(ThreadGroup group, Runnable target, String name) constructor
        Thread thread6 = new Thread(threadGroup, new Runnable() {
            public void run() {
                System.out.println("Thread 6: Hello from " + Thread.currentThread().getName() + " - TechVidvan");
            }
        }, "MyThread6");

        // Using Thread(ThreadGroup group, Runnable target, String name, long stackSize) constructor
        Thread thread7 = new Thread(threadGroup, new Runnable() {
            public void run() {
                System.out.println("Thread 7: Hello from " + Thread.currentThread().getName() + " - TechVidvan");
            }
        }, "MyThread7", 4096);

        // Start all threads
        thread1.start();
        thread2.start();
        thread3.start();
        thread4.start();
        thread5.start();
        thread6.start();
        thread7.start();
    }
}
Output:
Thread 2: Hello from Thread-1 – TechVidvan
Thread 3: Hello from MyThread3 – TechVidvan
Thread 4: Hello from MyThread4 – TechVidvan
Thread 5: Hello from Thread-2 – TechVidvan
Thread 1: Hello from Thread-0 – TechVidvan
Thread 6: Hello from MyThread6 – TechVidvan
Thread 7: Hello from MyThread7 – TechVidvan
Methods of the Thread Class in Java:
| S.No | Method | Description |
| 1. | start() | By calling its run() method, it initiates the thread’s execution. The thread will move from the “New” state to the “Runnable” state and compete for CPU time. |
| 2. |
run() |
Defines the code that’s going to be executed by the thread. In order to specify a thread’s behaviour, you must override that method in your custom thread class. |
| 3. | sleep(long millis)
and sleep(long millis, int nanos) |
The execution of the current thread shall be suspended for a specified duration. This is useful for introducing delays or waiting periods. |
| 4. | join() | Waits for the thread on which the method is called to complete its execution. The calling thread will wait until the target thread finishes. |
| 5. |
join(long millis) |
This version of the waiting thread can keep running after a specified time period if it has a timeout. |
| 6. | isAlive() | Check whether the thread’s still running, i.e. if it hasn’t reached the “Terminated” state yet. |
| 7. | setName(String name) | To set the name of a thread in a multi-threaded environment, this method will be useful. |
| 8. |
getName() |
It can be useful for identifying and debugging the thread by retrieving its name. |
| 9. | getId() | Returns a unique identifier of the thread. |
| 10. | getPriority()
and setPriority(int priority) |
Determines and assigns priority to a thread, which could influence how it is scheduled by the operating system. |
| 11. | interrupt()
and isInterrupted() |
Interrupts the thread, typically to gracefully terminate its execution. The isInterrupted() method checks if the thread has been interrupted. |
| 12. | yield() | Suggests that the current thread yields its current use of the CPU, allowing other threads to be scheduled. |
| 13. | currentThread() | This method is typically used to obtain a reference to the currently executing thread in a multi-threaded program. |
| 14. | getState() | Retrieves the current state of the thread, which can be useful for debugging and monitoring. |
| 15. | suspend() | In a Multithreaded Environment, suspend() is used for the temporary discontinuation of thread execution. |
| 16. |
resume() |
The resume method shall be applied to revive the operation of a thread that’s been stopped by suspend(). |
| 17. | stop() | To force an end to a thread execution. |
| 18. | isDaemon() | To ascertain whether a thread is a daemon thread or not. |
| 19. | setDaemon(boolean b) | To set the daemon status of a thread. |
Defining a Thread:
- By extending thread class.
- By Implementing Runnable Interface.
By extending the thread class:
Step 1: Create a Subclass: Create a new class that extends the Thread class. This subclass will represent your custom thread.
Step 2:Override the run() Method: In the subclass, override the run() method. This is where you define the code that the thread will execute when it is started.
Step 3:Instantiate and Start: Create an instance of your custom thread subclass and call its start() method. This will initiate the execution of the run() method in a new thread.
Example:
class MyThread extends Thread {
    public void run() {
    	for (int i = 1; i <= 2; i++) {
            System.out.println("Welcome to Techvidvan");
    	}
    }
}
public class Main {
    public static void main(String[] args) {
    	MyThread t=new MyThread();
        t.start();
    	for(int i=1;i<=2;i++){
            System.out.println("Learn coding with Techvidvan ");
    	}
    }
}
Output:
Welcome to Techvidvan
Welcome to Techvidvan
Learn coding with Techvidvan
Learn coding with Techvidvan
Program Explanation:
In the above example, An instance of the MyThread class is created, and the variable t references it. The start() method is called on the t thread object, which in turn calls the run() method defined in the MyThread class.
The start() method is used to initiate the execution of the run method on a separate thread of execution. The run() method of the MyThread class is executed, and the message ” Learn coding with Techvidvan ” will be printed twice.
The output will be non-deterministic, meaning the exact order in which ” Welcome to Techvidvan ” and ” Learn coding with Techvidvan ” messages are printed may vary each time the program is run.
By implementing the Runnable interface:
Step 1: Create a Runnable Class:
- A class that implements the Runnable interface.
- Implement the run() method in this class. This is where you define the code that the thread will execute when started.
Step 2: Instantiate and Start the Thread:
- Create an instance of the runnable class.
- Create a Thread instance, passing the runnable object as a parameter to the Thread constructor.
Example:
class MyRunnable implements Runnable {
    public void run() {
for(int i=1;i<=3;i++){
        	System.out.println("Techvidvan");
    	}
}
public class Main {
    public static void main(String[] args) {
        MyRunnable r=new MyRunnable();
    	Thread t=new Thread(r);
        t.start();
    	for(int i=1;i<=3;i++){
            System.out.println("Java Course");
    	}
    }
}
Output:
Java Course
Java Course
Java Course
Techvidvan
Techvidvan
Techvidvan
Program Explanation:
In the above example, An instance of the MyRunnable class is created, and the variable r references it. A new Thread object, t, is created, and the MyRunnable instance r is passed as an argument to its constructor.
This associates the MyRunnable object with the Thread object t. The start() method is called on the t thread object, which initiates the execution of the run() method on a separate thread of execution.
The run() method of the MyRunnable class is executed in the new thread, and the message “Techvidvan” will be printed twice. The output will be non-deterministic, meaning the exact order in which “Java Course” and “Techvidvan” messages are printed may vary each time the program is run.
Should you choose to invoke the run() method directly?
public class DataFlairThreadDemo{
    public static void main(String[] args) {
        MyThread t=new MyThread();
        t.run();
    }
}
By invoking the run() method directly, the thread doesn’t acquire a new call stack; instead, it commences execution within the existing call stack, which belongs to the main thread. As a result, the benefits of multithreading, such as parallelism and independent execution, are not achieved.

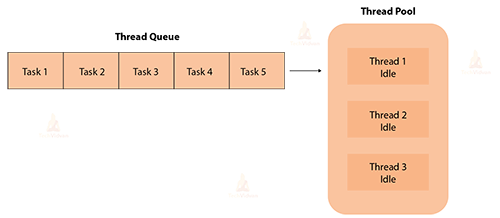
Thread Pool:
A thread pool in Java is a managed pool of worker threads that are used to execute tasks concurrently.By recycling threads rather than starting a new thread for every job, which can be expensive in terms of speed and resource usage, thread pools are frequently used to increase the efficiency of multi-threaded systems.
Example:
class ThreadPoolExample {
        public static void main(String[] args) {
            // Create a thread pool with 3 threads
            ExecutorService executor = Executors.newFixedThreadPool(3);

            // Submit tasks to the thread pool
            for (int i = 1; i <= 5; i++) {
                final int taskId = i;
                executor.submit(new Runnable() {
                    public void run() {
                        System.out.println("Task " + taskId + " executed by " + Thread.currentThread().getName()+" - TechVidvan");
                    }
                });
            }

            // Shut down the thread pool after tasks are submitted
            executor.shutdown();
        }
}
Output:
Task 2 executed by pool-1-thread-2 – TechVidvan
Task 3 executed by pool-1-thread-3 – TechVidvan
Task 4 executed by pool-1-thread-3 – TechVidvan
Task 5 executed by pool-1-thread-2 – TechVidvan
Task 1 executed by pool-1-thread-1 – TechVidvan
Conclusion
In conclusion, creating a thread in Java can be achieved by either extending the Thread class or implementing the Runnable interface. Both approaches allow you to define the code that the thread will execute in the run method. Implementing the runnable to create a thread is recommended because we can extend another class also but in the extending the thread class approach, we can’t able to extend another class.