
Displaying the coordinates of points clicked on an image is a common task in computer vision and image processing applications.
In this project, we will explore how to use OpenCV, a popular computer vision library, to display the coordinates of points clicked on an image using Python. This technique can be useful for tasks such as annotating images, selecting regions of interest, and measuring distances between points. We will cover the steps needed to load an image, display it using OpenCV’s imshow() function, capture mouse clicks using setMouseCallback(), convert the click coordinates to image coordinates and display the clicked coordinates on the image using putText().
By the end of this project, you will have a working Python program that can display the coordinates of points clicked on any image.
How do we get clicked Coordinates?
When we click on an image in OpenCV, we get the pixel coordinates of the click which may not accurately represent the actual location of the click on the original image. This is because the image may have been resized or cropped. To accurately determine the location of the click on the original image, we need to apply a scaling factor to the pixel coordinates. This factor is calculated by dividing the dimensions of the displayed image by the dimensions of the original image.
Prerequisites for Displaying the coordinates of the points clicked on the image using Python OpenCV
It is important to have a solid understanding of the Python programming language and the OpenCV library. Apart from this you should have the following system requirements.
- Python 3.7 (64-bit) and above
- Any python editor (VS code, Pycharm)
Download Python OpenCV Displaying the coordinates of the points clicked on the image Project
Please download the source code of Python OpenCV Displaying the coordinates of the points clicked on the image Project from the following link: Python OpenCV Displaying the coordinates of the points clicked on the image Project Code
Installation
Open windows cmd as administrator
1. To install the opencv library run the command from the cmd.
pip install opencv-python
Let’s Implement
1. We need to import some libraries that will be used in our implementation.
import cv2
2. This code creates a function that captures mouse clicks on an image using OpenCV’s setMouseCallback() function. The function takes five inputs, including the type of mouse event, the x and y coordinates of the mouse click, and any relevant flags or parameters. If the mouse event is a left button down event, the function prints the x and y coordinates of the mouse click to the console in the format (x, y) using an f-string and also prints it over the image. This function can be used to capture mouse clicks on an image and display their coordinates on the image.
def point_capture(event, x, y, flags, params):
    if event == cv2.EVENT_LBUTTONDOWN:
        print(f"Coordinate of Image: ({x}, {y})")
        cv2.putText(image, f'({x}, {y})', (x, y), cv2.FONT_HERSHEY_SIMPLEX, 1, (0, 0, 255), 2)
        cv2.imshow('TechVidvan', image)
3. This line of code reads an image file called “image.jpg” from the specified file path using the OpenCV function cv2.imread().
image = cv2.imread("C:/Users/yoges/OneDrive/Desktop/dataflair/Displaying_the_coordinates_of_the_points_clicked_on_the_image_using_Python_OpenCV/image.jpg")
4. This line of code displays the image stored in the variable “image” using OpenCV’s imshow() function. The first argument “TechVidvan” is the name of the window that will display the image. The second argument “image” is the image data that we want to display.
cv2.imshow("TechVidvan", image)
5. This line of code sets a function to be called when a mouse event occurs on a window called “TechVidvan”. The function is called “point_capture” and will receive information about the event, such as the type of event, the x and y coordinates of the mouse cursor, and any flags associated with the event. In this example, the function prints the x and y coordinates to the console when a left mouse button is clicked.
cv2.setMouseCallback('TechVidvan', point_capture)
6. cv2.waitKey(0) waits for a key event to occur and returns the ASCII code of the key pressed. Passing 0 means it waits indefinitely until a key is pressed. cv2.destroyAllWindows() is called to close all OpenCV windows when a key is pressed or when the program is terminated. This function destroys all the HighGUI windows and removes all event callbacks
cv2.waitKey(0)
cv2.destroyAllWindows()
Output:
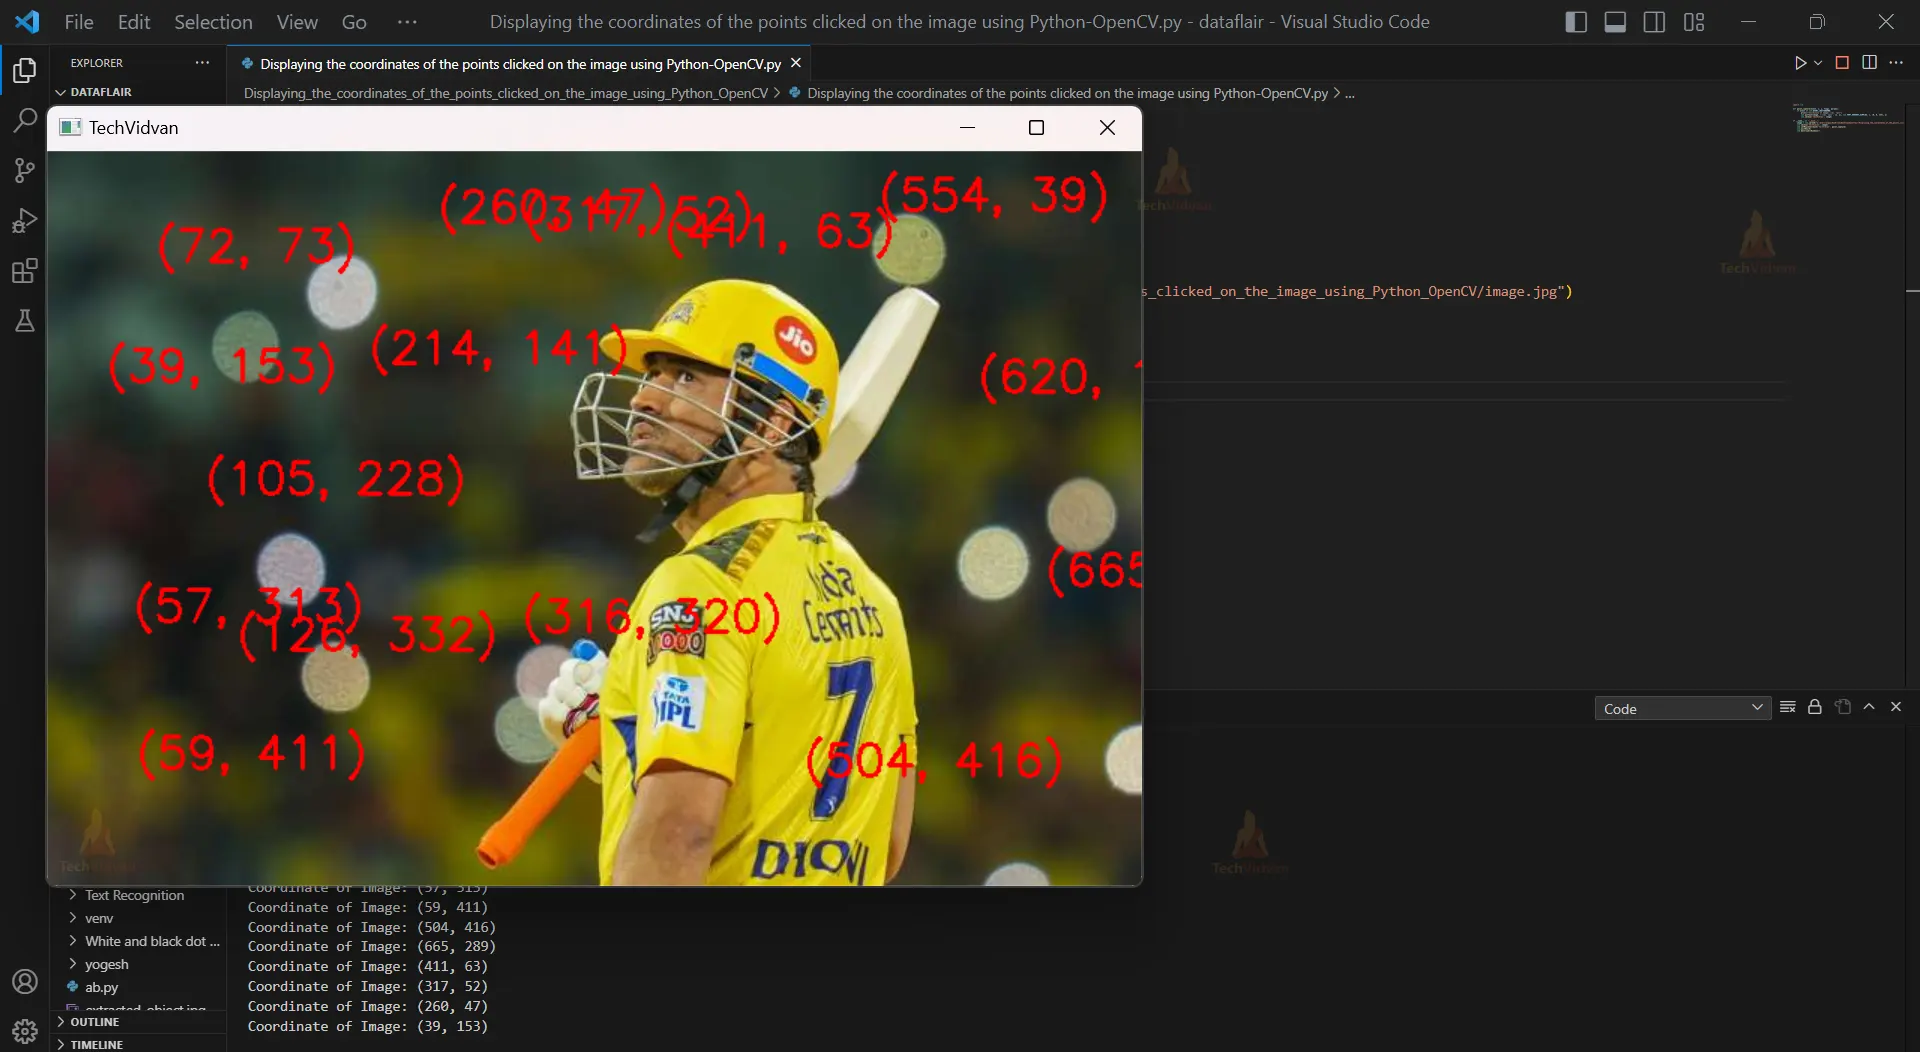
[Running] python -u “c:\Users\yoges\OneDrive\Desktop\dataflair\Displaying_the_coordinates_of_the_points_clicked_on_the_image_using_Python_OpenCV\Displaying the coordinates of the points clicked on the image using Python-OpenCV.py”
Coordinate of Image: (72, 73)
Coordinate of Image: (105, 228)
Coordinate of Image: (214, 141)
Coordinate of Image: (554, 39)
Coordinate of Image: (620, 160)
Coordinate of Image: (316, 320)
Coordinate of Image: (126, 332)
Coordinate of Image: (57, 313)
Coordinate of Image: (59, 411)
Coordinate of Image: (504, 416)
Coordinate of Image: (665, 289)
Coordinate of Image: (411, 63)
Coordinate of Image: (317, 52)
Coordinate of Image: (260, 47)
Coordinate of Image: (39, 153)
Conclusion:-
OpenCV provides a powerful set of tools for working with images in Python. By using the setMouseCallback() function, we can capture mouse clicks on images and use them for a variety of applications.
In this project, we have shown how to display the coordinates of clicked points on an image using OpenCV in Python. We also discussed the importance of converting click coordinates from pixel values to image coordinate values to accurately reflect the location of clicks on the original image. This is a useful technique for a wide range of applications, including object detection, image segmentation, and computer vision research. With OpenCV, it is easy to capture mouse clicks on images and use them to build powerful image processing and analysis applications.