Digital Image Processing in Java with Examples
Is Digital Image processing in Java possible?
The answer is YES!!!
Let’s move to this interesting topic that is, Java Image Processing. In General, Image processing is a critical component of computer graphic systems. It is a method of performing some operations on an image and getting an enhanced image from a given image.
Image processing is a very advanced feature and you need to learn to implement it in a programming language. We will learn how to perform Image processing in Java.
We will discuss various operations that can be performed on an image in Java along with the real implementation of algorithms.
Java Image Processing
Java is a widely used high-level programming language in the modern world. It provides various functions to handle digital image processing.
Using Image Processing in Java, we will learn to convert colored Image in –
- Grayscale
- Red
- Green
- Blue
- Sepia image
- Negative image
So, let’s start learning – How to Convert Colored Image in Java.
1. Converting Colored Image to Grayscale image in Java
We can convert the colored image to a grayscale image using the following algorithm.
Algorithm
Step 1
Get the RGB value of the pixel using the getRGB() method.
Step 2
Find the average of RGB with formula, average = (R + G + B) / 3
Step 3
Replace the R, G and B values of the pixel with the average calculated in the previous step.
Step 4
Repeat Step 1 to Step 3 for each pixel of the image.
Code to convert a colored image to a grayscale image:
package com.techvidvan.imageprocessing;
import java.io.*;
import java.awt.image.BufferedImage;
import javax.imageio.ImageIO;
public class Greyscale
{
  public static void main(String args[])throws IOException
  {
    BufferedImage image = null;
    File file = null;
    try
    {
      file = new File("/home/techvidvan/Desktop/color.jpeg");
      image = ImageIO.read(f);
    }
    catch(IOException e)
    {
      System.out.println(e);
    }
    int width = image.getWidth();
    int height = image.getHeight();
    for (int y = 0; y < height; y++)
    {
      for (int x = 0; x < width; x++)
      {
        int p = image.getRGB(x,y);
        int a = (p>>24) & 0xff;
        int r = (p>>16) & 0xff;
        int g = (p>>8) & 0xff;
        int b = p & 0xff;
        int avg = (r+g+b)/3;
        p = (a<<24) | (avg<<16) | (avg<<8) | avg;
        image.setRGB(x, y, p);
      }
    }
    try
    {
      file = new File("/home/techvidvan/Desktop/greyscale.png");
      ImageIO.write(image, "png", file);
      System.out.println("Successfully converted a colored image into a grayscale image");
    }
    catch(IOException e)
    {
      System.out.println(e);
    }
  }
}
Output:
Successfully converted a colored image into a grayscale image
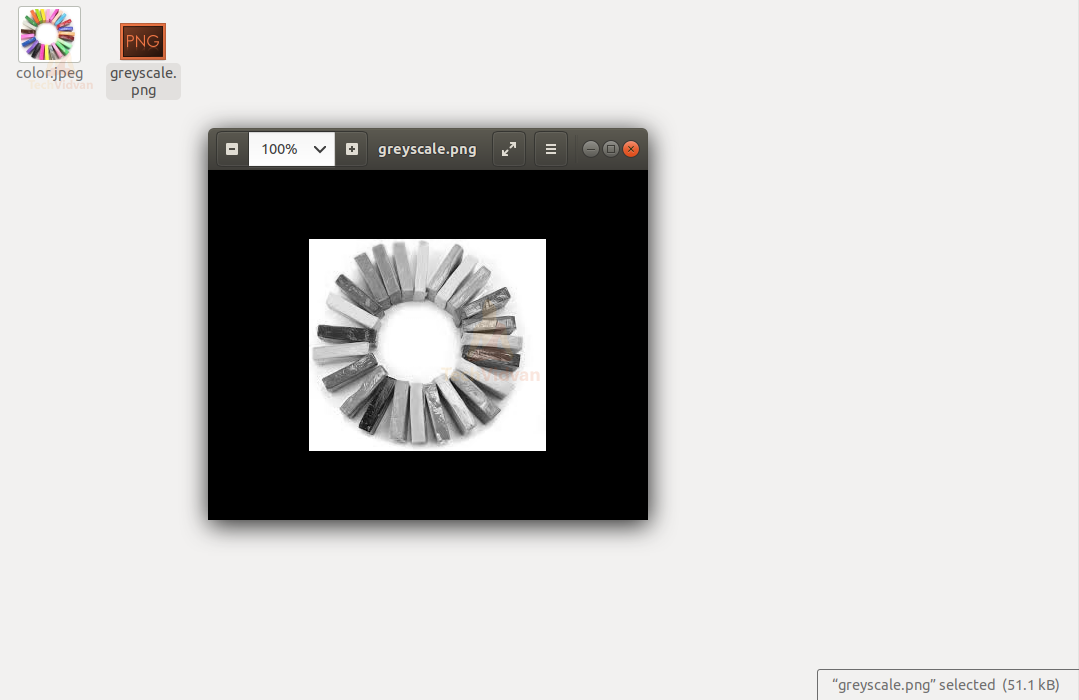
After the execution of the program we could see the converted image of the given image:
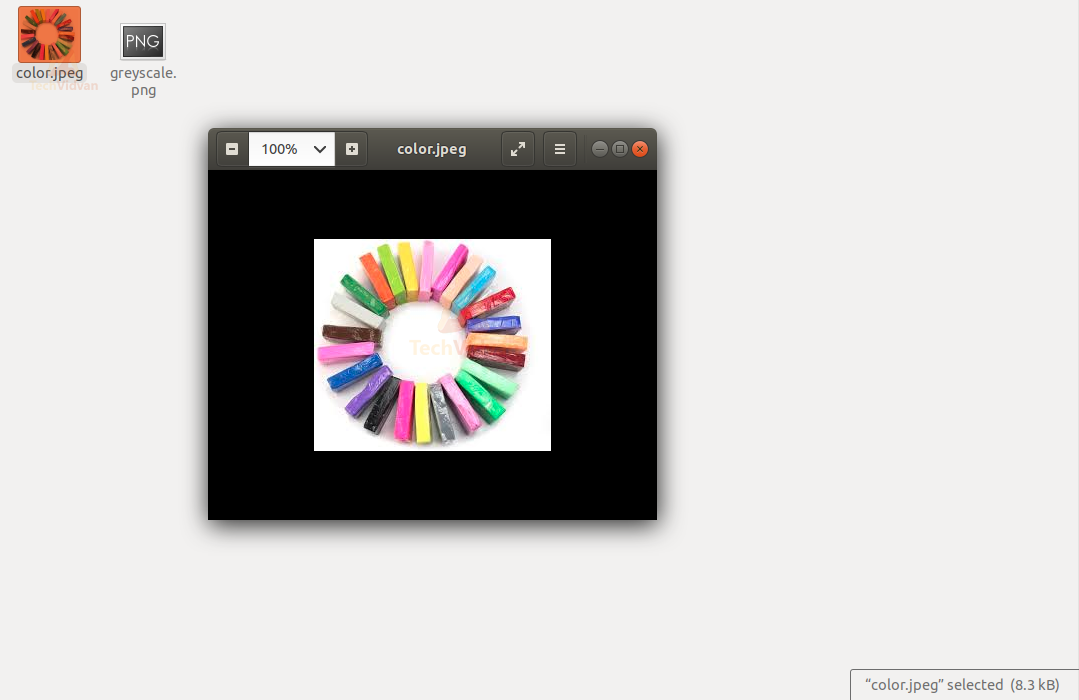
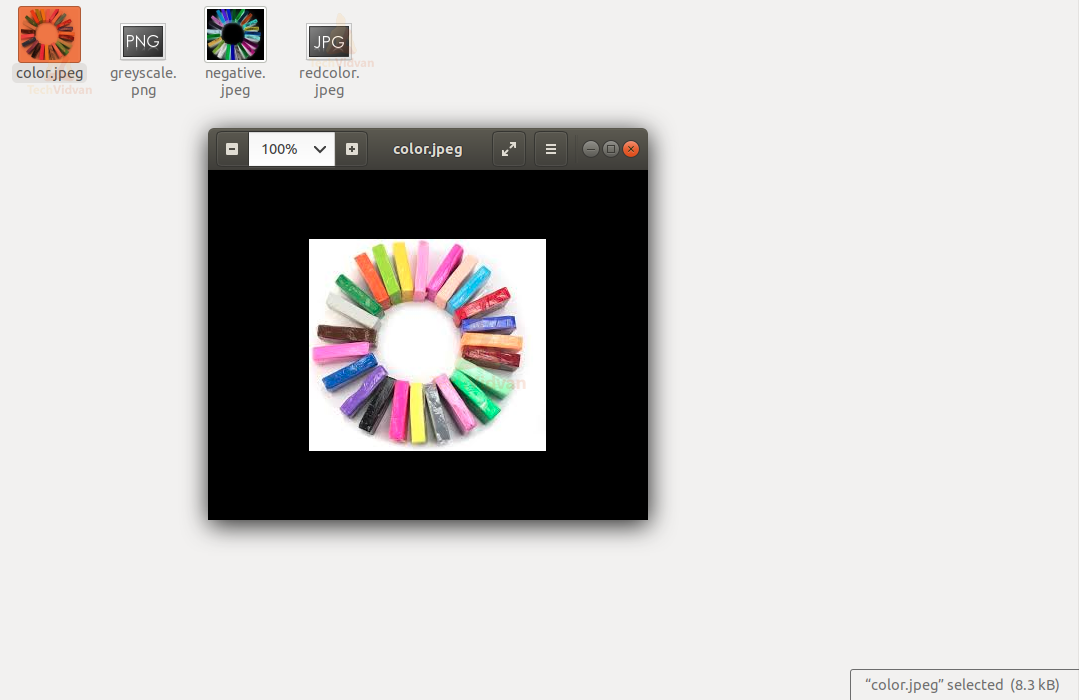
Original Image: color.jpeg
Converted Image: greyscale.png
2. Converting Colored Image to Negative Image in Java
We can also convert the colored image into a negative image using the following algorithm.
Algorithm
Step 1
Get the RGB value of the pixel using the getRGB() method.
Step 2
Calculate new RGB values as follows:
- R = 255 – R
- G = 255 – G
- B = 255 – B
Step 3
Replace the values of R, G, and B of the pixel with the values of R, G, and B calculated in the previous step.
Step 4
Repeat Steps 1 to 3 for each pixel of the image.
Code to convert a colored image to a negative image:
package com.techvidvan.imageprocessing;

import java.io.File;
import java.io.IOException;
import java.awt.image.BufferedImage;
import javax.imageio.ImageIO;
public class Negative
{
  public static void main(String args[])throws IOException
  {
    BufferedImage image = null;
    File file = null;
    try
    {
      file = new 		File("/home/techvidvan/Desktop/color.jpeg");
      image = ImageIO.read(f);
    }
    catch(IOException e)
    {
      System.out.println(e);
    }
    int width = image.getWidth();
    int height = image.getHeight();
    for (int y = 0; y < height; y++)
    {
      for (int x = 0; x < width; x++)
      {
        int p = image.getRGB(x,y);
        int a = (p>>24) & 0xff;
        int r = (p>>16) & 0xff;
        int g = (p>>8) & 0xff;
        int b = p & 0xff;

        r = 255 - r;
        g = 255 - g;
        b = 255 - b;

        p = (a<<24) | (r<<16) | (g<<8) | b;
        image.setRGB(x, y, p);
      }
    }
    try
    {
      file = new File("/home/techvidvan/Desktop/negative.jpeg");
      ImageIO.write(image, "jpg", file);
      System.out.println("Successfully converted a colored image into a negative image");
    }
    catch(IOException e)
    {
      System.out.println(e);
    }
  }
}
Output:
Successfully converted a colored image into a negative image
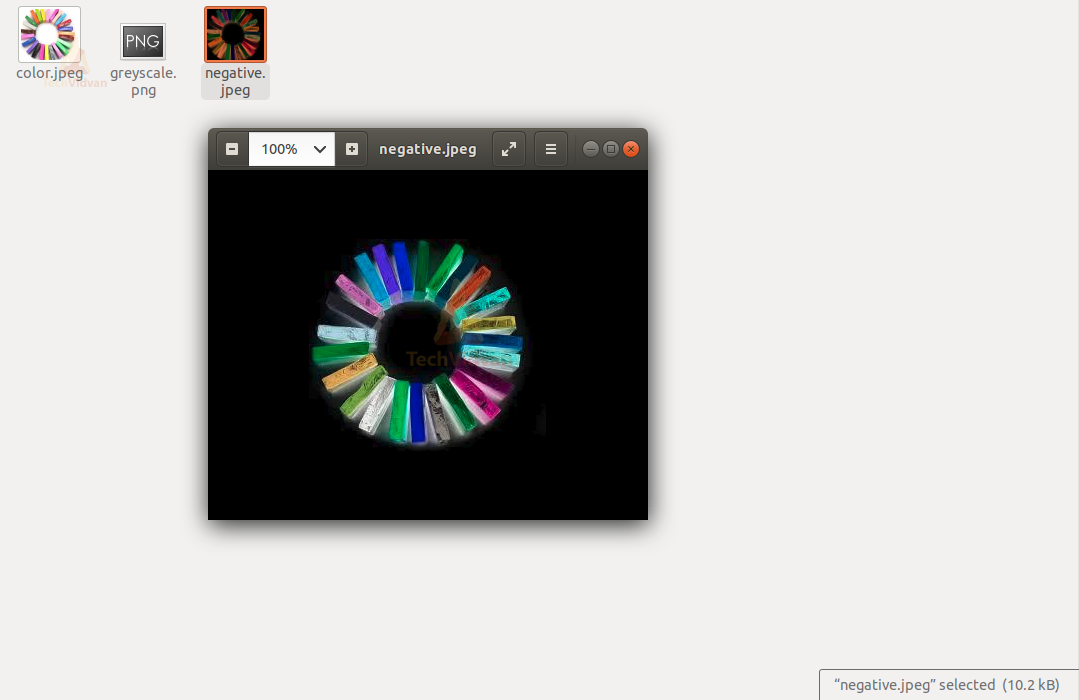
After the execution of the program we could see a converted image of the given image:
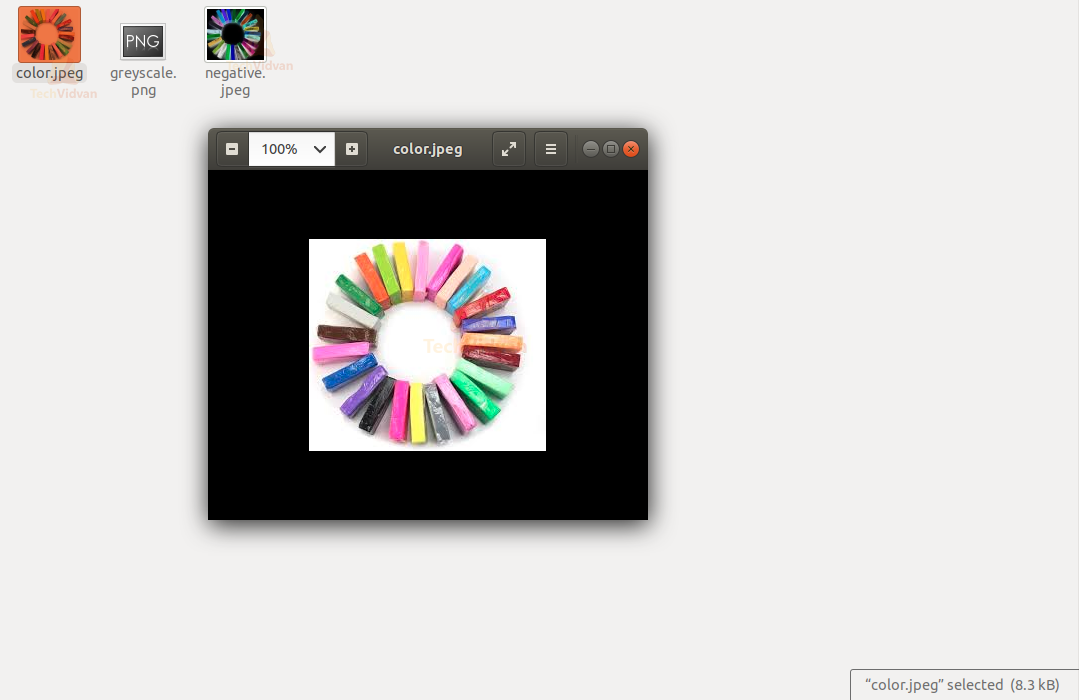
Original Image: color.jpeg
Converted Image: negative.jpeg
3. Converting Colored Image to Red Green Blue Image in Java
To convert the colored image to a red-colored image, we use the following algorithm.
Algorithm
Step 1
Get the RGB value of the pixel to a red-colored image.
Step 2
Set the values of R, G, and B as follows:
- R: No Change
- G: Set to 0
- B: Set to 0
Step 3
Replace the values of R, G, and B with the values calculated in the previous step.
Step 4
Repeat Steps 1 to 3 for each pixel of the image.
Code to convert a colored image to a red-colored image:
package com.techvidvan.imageprocessing;
import java.io.File;
import java.io.IOException;
import java.awt.image.BufferedImage;
import javax.imageio.ImageIO;
public class RedImage
{
  public static void main(String args[])throws IOException
  {
    BufferedImage image = null;
    File file = null;
    try
    {
      file = new File("/home/techvidvan/Desktop/color.jpeg");
      img = ImageIO.read(f);
    }
    catch(IOException e)
    {
      System.out.println(e);
    }
    int width = image.getWidth();
    int height = image.getHeight();
    for (int y = 0; y < height; y++)
    {
      for (int x = 0; x < width; x++)
      {
        int p = img.getRGB(x,y);
        int a = (p>>24) & 0xff;
        int r = (p>>16) & 0xff;
        p = (a<<24) | (r<<16) | (0<<8) | 0;
        image.setRGB(x, y, p);
      }
    }
    try
    {
      file = new File("/home/techvidvan/Desktop/redcolor.jpeg");
      System.out.println("Successfully converted a colored image into a red image");
      ImageIO.write(image, "jpeg", file);
    }
    catch(IOException e)
    {
      System.out.println(e);
    }
  }
}
Output:
Successfully converted a colored image into a red image
After the execution of the program we could see a converted image of the given image:
Original Image: color.jpeg
Converted Image: redcolor.jpeg

4. Converting Colored Image to Sepia Image in Java
We can convert a colored image to Sepia image by the following algorithm
Algorithm
Step 1
Get the RGB value of the pixel with the getRGB() method.
Step 2
Calculate new values of R, G, and B of the pixel.
Step 3
Set the new values of R, G, and B value of the pixel as per the following condition:
- If newRed value > 255, then set R = 255 else set R = newRed
- If newGreen value > 255, then set G = 255 else set G = newGreen
- If newBlue value > 255, then set B = 255 else set B = newBlue
Step 4
Replace the values of R, G, and B with the new values calculated for the pixel in the previous step.
Step 5
Repeat Steps 1 to 4 for each pixel of the image.
Code to convert a colored image to a sepia image:
package com.techvidvan.imageprocessing;
import java.io.*;
import javax.imageio.ImageIO;
import java.awt.image.BufferedImage;
public class Sepia
{
  public static void main(String args[])throws IOException
  {
    BufferedImage image = null;
    File file = null;
    try
    {
      file = new File("/home/techvidvan/Desktop/color.jpeg");
      image = ImageIO.read(file);
    }
    catch(IOException e)
    {
      System.out.println(e);
    }
    int width = image.getWidth();
    int height = image.getHeight();
    //converting to sepia
    for(int y = 0; y < height; y++)
    {
      for(int x = 0; x < width; x++)
      {
        int p = img.getRGB(x,y);
        int a = (p>>24) & 0xff;
        int R = (p>>16) & 0xff;
        int G = (p>>8) & 0xff;
        int B = p & 0xff;

        int newR = (int)(0.393*R + 0.769*G + 0.189*B);
        int newG = (int)(0.349*R + 0.686*G + 0.168*B);
        int newB = (int)(0.272*R + 0.534*G + 0.131*B);
        if (newR > 255)
          R = 255;
        else
          R = newR;

        if (newG > 255)
          G = 255;
        else
          G = newG;

        if (newB > 255)
          B = 255;
        else
          B = newB;

        p = (a<<24) | (R<<16) | (G<<8) | B;
        image.setRGB(x, y, p);
      }
    }
    try
    {
      file = new File("/home/techvidvan/Desktop/sepia.jpeg");
      System.out.println("Successfully converted a colored image into a sepia image");
      ImageIO.write(image, "jpg", file);
    }
    catch(IOException e)
    {
      System.out.println(e);
    }
  }
}
Output
Successfully converted a colored image into a sepia image
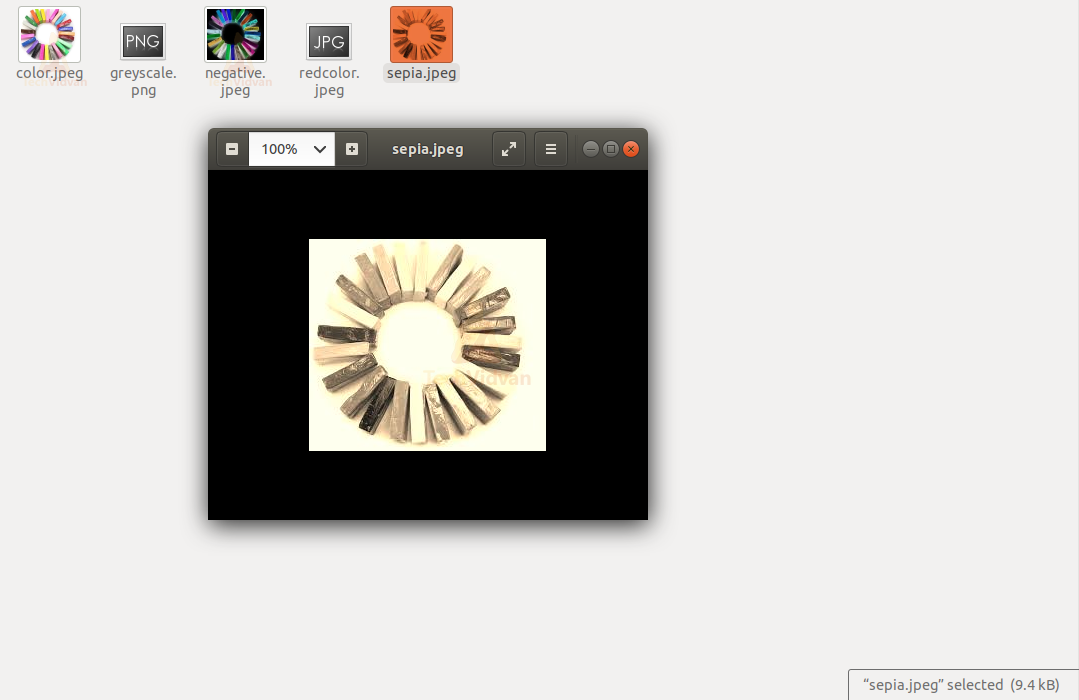
After the execution of the program we could see a converted image of the given image:
Original Image: color.jpeg

Converted Image: sepia.jpeg
Reading and Writing an Image in Java
- To read and write an image, we need to import the File class using import java.io.File; statement.
- To deal with errors we utilize the IOException class using import java.io.IOException;
- We make an object of BufferedImage class to hold the image. To use this BufferedImage class we use the package java.awt.image. This object stores the image in the RAM.
Code to read and write an image in Java:
package com.techvidvan.imageprocessing;
import java.io.*;
import java.awt.image.BufferedImage;
import javax.imageio.ImageIO;
public class ReadWriteImage
{
  public static void main(String args[])throws IOException
  {
    int width = 963; //width of the image
    int height = 640; //height of the image

    // For storing image in RAM
    BufferedImage image = null;

    // READ IMAGE
    try
    {
      File file = new File("/home/techvidvan/Desktop/inputimage.jpeg");
      image = new BufferedImage(width, height, BufferedImage.TYPE_INT_ARGB);

      // Reading input file
      image = ImageIO.read(file);

      System.out.println("Reading complete.");
    }
    catch(IOException e)
    {
      System.out.println("Error: "+e);
    }

    // WRITE IMAGE
    try
    {
      // Output file path
      File output_file = new File("/home/techvidvan/Desktop/outputimage.jpeg");

      // Writing to file taking type and path as
      ImageIO.write(image, "jpg", output_file);

      System.out.println("Writing complete.");
    }
    catch(IOException e)
    {
      System.out.println("Error: "+e);
    }
  }
}
Output:
Writing complete.
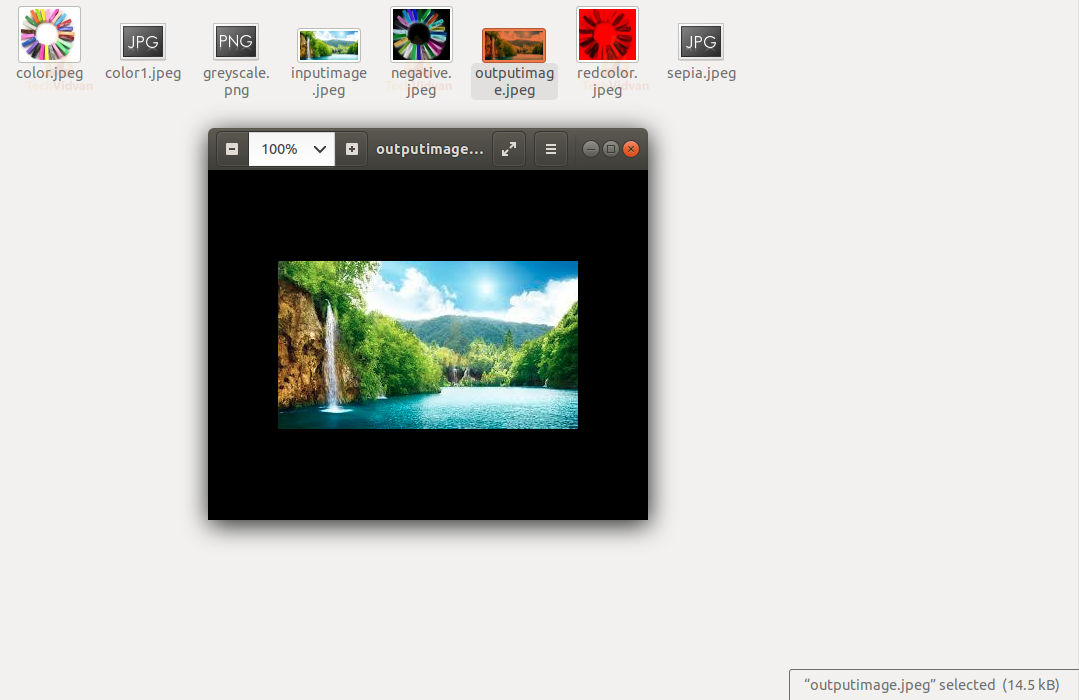
After the execution of the program we could see a newly created image:
Input Image: inputimage.jpeg Output Image: outputimage.jpeg
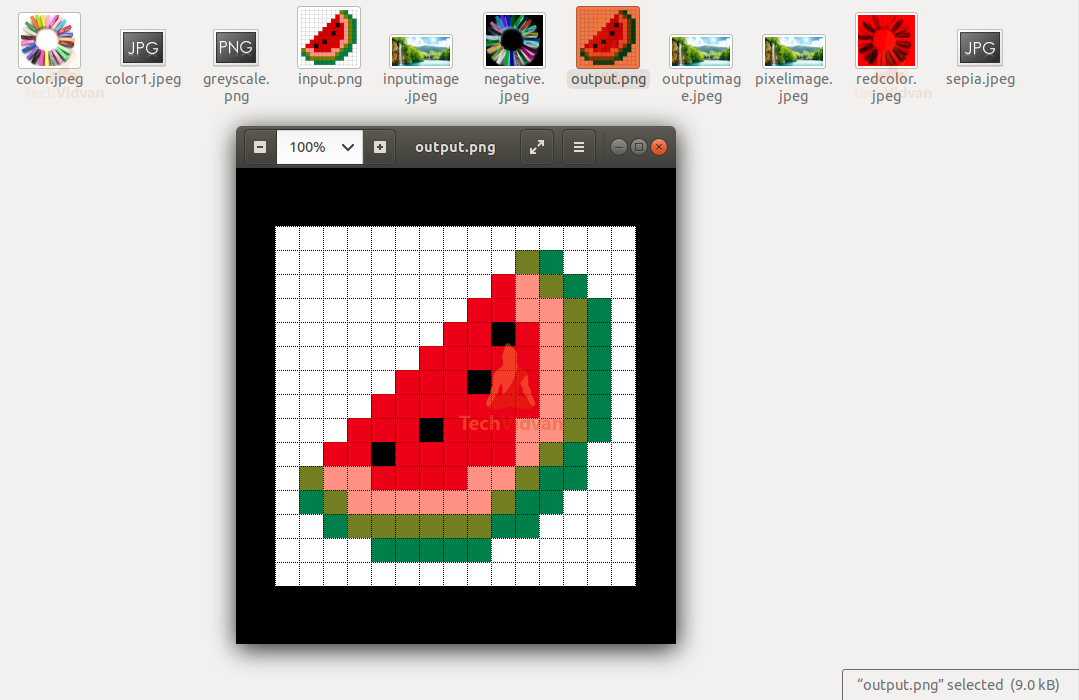
Getting and Setting a Pixel Value
Pixel is the smallest repeating unit of an image. A pixel consists of four parts: Alpha (straightforwardness measure), Red, Green, and Blue. These 4 parts are collectively called (ARGB) in short.
Code to get and set a pixel value of an image:
package com.techvidvan.imageprocessing;
import java.io.*;
import java.awt.image.BufferedImage;
import javax.imageio.ImageIO;
public class GetandSetPixels
{
  public static void main(String args[])throws IOException
  {
    BufferedImage image = null;
    File file = null;
    //read image
    try
    {
      file = new File("/home/techvidvan/Desktop/input.png");
      image = ImageIO.read(file);
      System.out.println("Reading complete.");
    }
    catch(IOException e)
    {
      System.out.println(e);
    }

    int p = img.getRGB(0,0);
    int a = (p>>24) & 0xff;
    int r = (p>>16) & 0xff;
    int g = (p>>8) & 0xff;
    a = p & 0xff;
    a = 255;
    r = 100;
    g = 150;
    int b = 200;

    //set the pixel value
    p = (a<<24) | (r<<16) | (g<<8) | b;
    image.setRGB(0, 0, p);

    //write image
    try
    {
      file = new File("/home/techvidvan/Desktop/output.png");
      ImageIO.write(image, "png", file);
      System.out.println("Writing complete.");
    }
    catch(IOException e)
    {
      System.out.println(e);
    }
  }
}
Output:
Writing complete.
After the execution of the program we could see a newly created image:Input Image: input.png
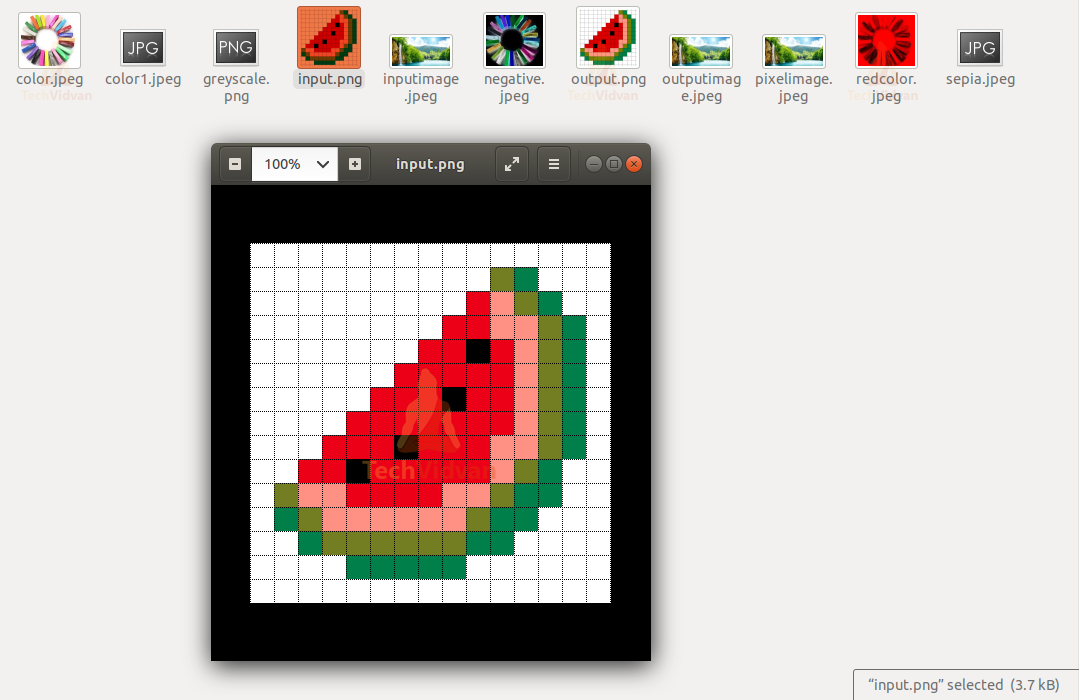
Output Image: output.png
Creating a Random Pixel Image in Java
We can also create a random image by providing pixel values. We will not provide any input image, we will just create a random image.
To create a random image, we use the following algorithm.
Algorithm
Step 1
The first step is to set the dimension of the desired image.
Step 2
We need to create a BufferedImage object which will hold the image.
Step 3
Generate random numbers of red, blue, green and Alpha components.
Step 4
Set the randomly generated ARGB.
Step 5
Repeat steps 3 and 4 for each pixel.
Code to create a random pixel image:
package com.techvidvan.imageprocessing;
import java.*;
import java.awt.image.BufferedImage;
import javax.imageio.ImageIO;
public class RandomImage
{
  public static void main(String args[])throws IOException
  {
    int width = 640, height = 320;
    BufferedImage image = null;
    img = new BufferedImage(width, height, BufferedImage.TYPE_INT_ARGB);
    File file = null;

    // create random values pixel by pixel
    for (int y = 0; y < height; y++)
    {
      for (int x = 0; x < width; x++)
      {
        //Generating values less than 250
        int a = (int)(Math.random()*60);
        int r = (int)(Math.random()*123);
        int g = (int)(Math.random()*45);
        int b = (int)(Math.random()*24);

        //Creating pixel
        int p = (a<<24) | (r<<16) | (g<<8) | b;
        image.setRGB(x, y, p);
      }
    }
    // write image
    try
    {
      file = new File("/home/techvidvan/Desktop/random.png");
      ImageIO.write(image, "png", file);
      System.out.println("Successfully created a random image at the given path");
    }
    catch(IOException e)
    {
      System.out.println("Error: " + e);
    }
  }
}
Output:
Successfully created a random image at the given path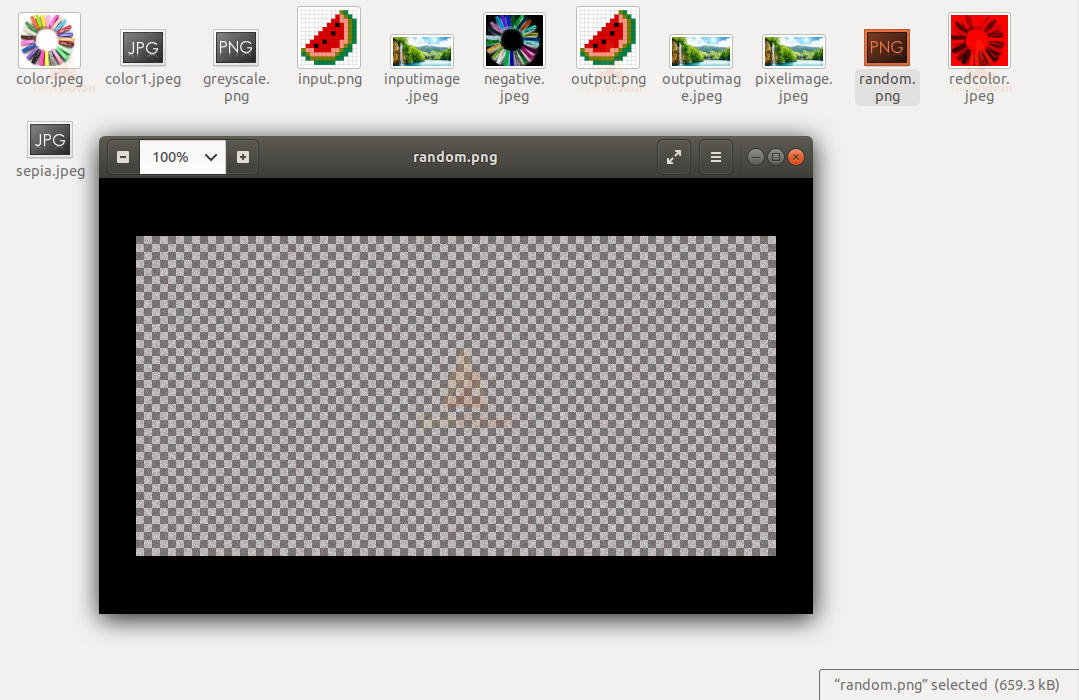
Creating Mirror Image in Java
We can also get the mirror image of the given image. We just need to get the source pixel from left to right and then set the same in the output image from right to left. Following is the algorithm to generate a mirror image.
Algorithm
Step 1
Read the input image in a BufferedImage to get the given image.
Step 2
Get the measurements of the input image.
Step 3
Make another object of the BufferedImage class for the same measurement to store the identical representation.
Step 4
Get the ARGB (Alpha, Red, Green, and Blue) values from the input image in the left to right direction.
Step 5
Set the ARGB (Alpha, Red, Green, and Blue) values to the recently created image in the right to left direction.
Step 6
Repeat steps 4 and 5 for every pixel of the image.
Code to create a mirror image in Java:
package com.techvidvan.imageprocessing;
import java.io.*;
import java.awt.image.BufferedImage;
import javax.imageio.ImageIO;
public class MirrorImage
{
  public static void main(String args[])throws IOException
  {
    BufferedImage img1 = null;
    File file = null;
    try
    {
      file = new File("/home/techvidvan/Desktop/original.jpeg");
      img1 = ImageIO.read(file);
    }
    catch(IOException e)
    {
      System.out.println("Error: " + e);
    }
    int width = img1.getWidth();
    int height = img1.getHeight();
    BufferedImage img2 = new BufferedImage(width, height,
        BufferedImage.TYPE_INT_ARGB);
    for (int y = 0; y < height; y++)
    {
      for (int lx = 0, rx = width - 1; lx < width; lx++, rx--)
      {
        int p = simg.getRGB(lx, y);
        mimg.setRGB(rx, y, p);
      }
    }
    // save mirror image
    try
    {
      file = new File("/home/techvidvan/Desktop/mirror.png");
      ImageIO.write(img2, "png", file);
      System.out.println("Successfully created a mirror image at the given path");
    }
    catch(IOException e)
    {
      System.out.println("Error: " + e);
    }
  }
}
Output:
Successfully created a mirror image at the given path
Input image: original.jpeg
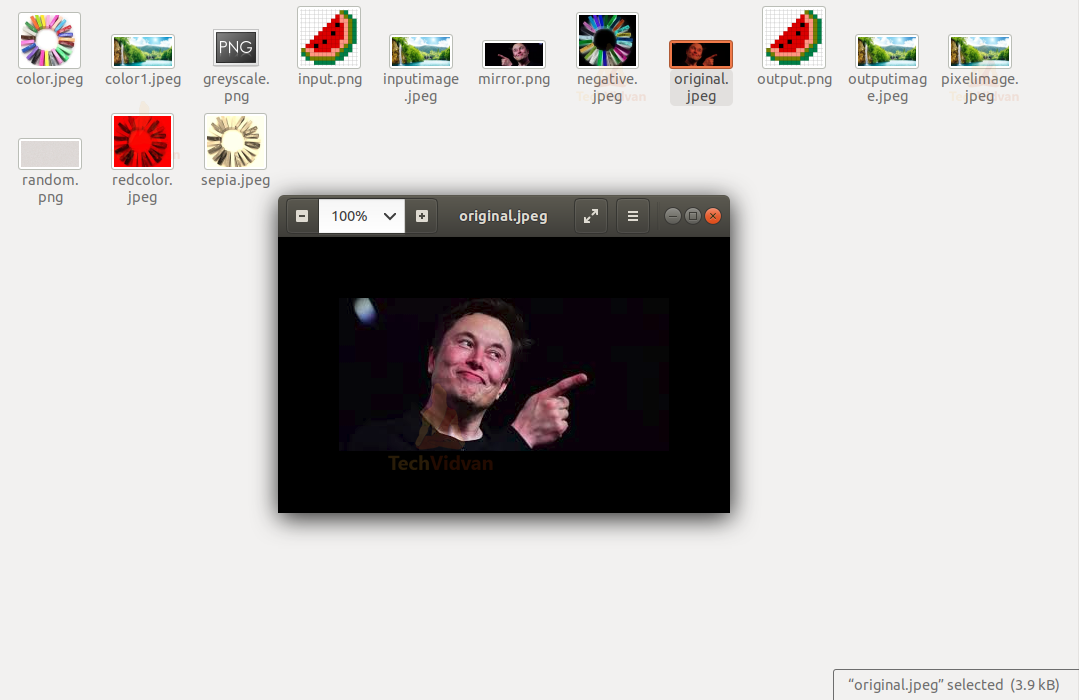
Output image: mirror.png

Face Detection in Java
Till now we have used the BufferedImage class to perform operations on an image. But, there are few restrictions in this class like we can adjust the R, G, B values of a given image and create the changed picture.
For complex image processing, for example, face/object recognition we need to use the OpenCV library.
Presently let’s see a portion of the strategies required for face detection.
- CascadeClassifier(): This class loads the trained cascaded set of faces which are useful to detect faces for any input image.
- imcodecs.imread() / imcodecs.imwrite(): These methods read and write images.
- rectangle(): This method generates the rectangle box outlining the detected faces. We can pass four arguments to this method: input_image, top_left_point, bottom_right_point, color_of_border.
Code to perform Face Detection in Java:
package com.techvidvan.imageprocessing;
import org.opencv.core.*;
import org.opencv.imgcodecs.Imgcodecs;
import org.opencv.imgproc.Imgproc;
import org.opencv.objdetect.CascadeClassifier;
public class FaceDetector
{
  public static void main(String[] args)
  {
    System.loadLibrary(Core.NATIVE_LIBRARY_NAME);
    CascadeClassifier faceDetector = new CascadeClassifier();
    faceDetector.load("haarcascade_frontalface_alt.xml");
    Mat image = 			      Imgcodecs.imread("/home/techvidvan/Desktop/inputimage.jpeg");
    MatOfRect faceDetections = new MatOfRect();
    faceDetector.detectMultiScale(image, faceDetections);
    for (Rect rect : faceDetections.toArray())
    {
      Imgproc.rectangle(image, new Point(rect.x, 		rect.y), new Point(rect.x + rect.width, rect.y + rect.height), new
Scalar(0, 255, 0));
    }
    String filename = "Output.jpg";
    Imgcodecs.imwrite("/home/techvidvan/Desktop/"+filename, image);
  }
}
Watermarking an Image in Java
Now, we will create a watermark in our image. We use java.awt.Graphics package. For connecting Textual style and shading of the content, we use java.awt.Color and java.awt.Font classes.
Code to generate a watermark in an image:
package com.techvidvan.imageprocessing;
import java.awt.*;
import java.awt.image.BufferedImage;
import java.io.*;
import javax.imageio.ImageIO;
public class WaterMarking
{
  public static void main(String[] args)
  {
    BufferedImage image = null;
    File file = null;
    try
    {
      file = new File("/home/techvidvan/Desktop/inputimage.jpeg");
      image = ImageIO.read(file);
    }
    catch(IOException e)
    {
      System.out.println(e);
    }
    BufferedImage temp = new BufferedImage(image.getWidth(),
    image.getHeight(), BufferedImage.TYPE_INT_RGB);

    Graphics graphics = temp.getGraphics();

    graphics.drawImage(image, 0, 0, null);
    graphics.setFont(new Font("Arial", Font.PLAIN, 80));
    graphics.setColor(new Color(220,0,0,40));
    String watermark = "TechVidvan";
    graphics.drawString(watermark, image.getWidth()/5, image.getHeight()/3);
    graphics.dispose();

    file = new File("/home/techvidvan/Desktop/watermark.png");
    try
    {
      ImageIO.write(temp, "png", file);
      System.out.println("Created a watermarked image");
    }
    catch (IOException e)
    {
      System.out.println(e);
    }
  }
}
Output:
Created a watermarked image
Input image: inputimage.jpeg
Output image: watermark.png

Summary
Java Image Processing is useful to perform several operations on images. Java provides a rich set of libraries and classes to process an image. This tutorial gave you the practical insights of each and every operation on an image.
We changed a colored image to various colors like gray image, sepia image, negative image, etc. We created a watermark using the Java Image Processing.
Also, we covered face detection in Java using the opencv library and at last, we were able to generate a random image by giving pixel values. This article will surely help you in understanding image processing in Java.
Thank you for reading our article. Do share it on Social Media.
Happy Learning 🙂