Singleton Class in Java – Implementation and Example
Till now, we have learned and implemented normal classes in Java. Now we will discuss the Singleton class in Java. A Singleton class in Java comes under one of the five creational singleton design patterns in Java.
These classes are different from the normal classes, and we use them to serve some particular requirements and to simplify the use and to remove the bottlenecks that we face during the java application development.
In this article, we will learn what a singleton class is and how we can implement a singleton class in Java. There are several different ways to implement this class in Java. We will discuss each of these ways with implementation and examples.
So let’s start with the introduction of the singleton class in Java.
Singleton class in Java
Singleton class in Java is one of the Gangs of Four Design Patterns. It falls under the category of the creational design pattern in Java.
A Singleton class in Java allows only one instance to be created and provides global access to all other classes through this single object or instance. Similar to the static fields, The instance fields(if any) of a class will occur only for a single time.
Purpose of Singleton class
The primary purpose of Single class is to restrict the limit of the number of object creation to only one. This often ensures that there is access control to resources, for example, socket or database connection.
The memory space wastage does not occur with the use of singleton class because it restricts the instance creation. As the object creation will take place only once instead of creating it each time a new request is made.
We can use this single object repeatedly as per the requirements. This is the reason why the multi-threaded and database applications mostly make use of the Singleton pattern in Java for caching, logging, thread pooling, configuration settings and much more.
For example, there is a license with us, and we have only one database connection or suppose if our JDBC driver does not allow us to do multithreading, then Singleton class comes into the picture and makes sure that at a time, only a single connection or a single thread can access the connection.
How to design a singleton class?
To design a singleton class, we need to do the following things:
- Firstly, declare the constructor of the Singleton class with the private keyword. We declare it as private so that no other classes can instantiate or make objects from it.
- A private static variable of the same class that is the only instance of the class.
- Declare a static factory method with the return type as an object of this singleton class.
Difference between Normal class and Singleton class
We can distinguish a Singleton class from the usual classes with respect to the process of instantiating the object of the class. To instantiate a normal class, we use a java constructor. On the other hand, to instantiate a singleton class, we use the getInstance() method.
The other difference is that a normal class vanishes at the end of the lifecycle of the application while the singleton class does not destroy with the completion of an application.
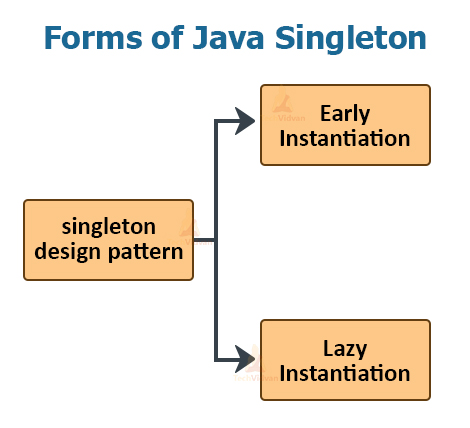
Forms of Singleton Design pattern
There are two forms of singleton design pattern, which are:
- Early Instantiation: The object creation takes place at the load time.
- Lazy Instantiation: The object creation is done according to the requirement.
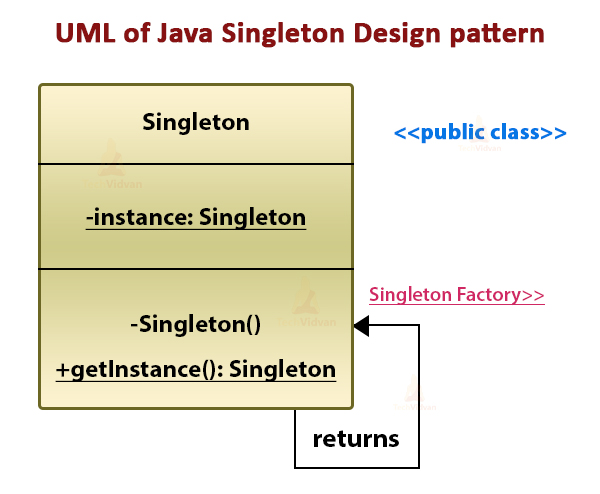
UML of Singleton Design Pattern
Implementation of Singleton Class
There are several ways to implement or design a Singleton class. The following are some popular methods by which we can design a Singleton class:
- Eager Initialization Method
- Lazy Initialization Method
- Thread Safe Singleton Method
- Lazy Initialization with Double Lock Method
- Lazy Load Method
- Static Block Initialization Method
- Bill Pugh Implementation Method
Let’s start discussing each of the above approaches with examples.
1. Eager Initialization Method
The most basic and simple technique to create a Singleton class is the Eager Initialization method. With this approach, the object or the instance of the class is created when JVM loads memory to the object. We accomplish this by directly assigning the reference to the object.
We can use this technique when we know that the program is always going to use the object/instance of this class. Also, we use this technique when the cost of creating the instance is not too high in terms of resources and time.
To create a singleton class using Eager Initialization method, we need to follow the below steps:
- Declare the constructor of the class as private.
- Now, create a private class member for this Singleton class.
- In the next step, you need to define a factory method that will return the object of the Singleton class.
Code to implement Eager Initialization Method:
package com.techvidvan.singletonclass;
public class EagerInitialization
{
  //Instance will be created at load time
  private static EagerInitialization obj = new EarlyInitialization();
  public String string;

  //Creating private constructor
  private EagerInitialization()
  {
    string = "Welcome to TechVidvan's Tutorial of Java";
  }

  //Declaring static method
  public static EagerInitialization getInstance()
  {
    return obj;
  }

  public static void main(String args[])
  {
    EagerInitialization text = EagerInitialization.getInstance();
    //original string
    System.out.println("Original String:");
    System.out.println(text.string);

    //text in upper case
    System.out.println("String in Upper Case:");
    text.string = (text.string).toUpperCase();
    System.out.println(text.string);
  }
}
Output:
Welcome to TechVidvan’s Tutorial of Java
String in Upper Case:
WELCOME TO TECHVIDVAN’S TUTORIAL OF JAVA
In the code above, you can observe that rather than invoking the class constructor, we need to use the getInstance() method each time we instantiate an object.
Advantages
- The technique of Eager Initialization is very simple to implement.
Disadvantages
- As the object of a class is always created whether you need it or not, this may lead to resource wastage.
- There is also the wastage of CPU time in the unnecessary creation of an instance.
- With this approach, we can not use Exception Handling.
2. Lazy Initialization Method
As we know that using the Eager Initialization method to create a singleton class may lead to unnecessary creation of an object, whether the application is using it or not. So, to overcome this problem, there is another technique to create a singleton class i.e., Lazy Initialization method.
The Lazy Initialization method delays the instantiation of the class until it is needed. In other words, the object is created only if it is required. This method helps in avoiding unnecessary creation of the class instance.
To create a singleton class using Lazy Initialization method, we need to follow the below steps:
- Declare the constructor of the class as private.
- Create a private static instance of this class but don’t initialize it.
- In the final step, create a factory method. This method will first check whether the instance member is null or not. If it is not null, then it will create an instance of the singleton class for you and return it; otherwise, it will not create any instance.
Code to implement Lazy Initialization Method:
package com.techvidvan.singletonclass;
public class LazyInitialization
{
  // private instance, so that it can be
  // accessed by only by getInstance() method
  private static LazyInitialization instance;
  public String string;
  private LazyInitialization ()
  {
    // private constructor
    string = "Welcome to TechVidvan's Tutorial of Java";
  }
  //method to return instance of class
  public static LazyInitialization getInstance()
  {
    if (instance == null)
    {
      // if instance is null, initialize
      instance = new LazyInitialization ();
    }
    return instance;
  }
  public static void main(String args[])
  {
    LazyInitialization text = LazyInitialization .getInstance();
    //original string
    System.out.println("The String is:");
    System.out.println(text.string);
  }
}
Output:
Welcome to TechVidvan’s Tutorial of Java
Advantages
- The creation of an object takes place only when it is required. This prevents the wastage of resources and CPU time.
- Exception handling is also possible with this technique.
Disadvantages
- There is a need to check the condition of null each time.
- We cannot access the object of the class directly.
3. Thread Safe Singleton Method
A thread-safe singleton method creates a Singleton class even in a multithreaded environment. We need to mark the getInstance() method ‘synchronized’. Marking this method as synchronized ensures that multiple threads can’t access it simultaneously.
Code to implement Thread Safe Singleton Method:
package com.techvidvan.singletonclass;
public class ThreadSafeSingleton
{
  //Thread Safe Singleton

  private static ThreadSafeSingleton instance;
  private ThreadSafeSingleton()
  {
    // private constructor
  }
  //Making the getInstance method as synchronized
  public static synchronized ThreadSafeSingleton getInstance()
  {
    if(instance == null)
    {
      instance = new ThreadSafeSingleton();
    }
    return instance;
  }
}
Advantages
- Lazy initialization is possible with the Thread-safe method.
- It is also thread-safe.
Disadvantages
- The getInstance() method is synchronized, which slows down the performance of the application as it restricts the m ultiple threads to be accessed simultaneously.
4. Lazy Initialization with Double Lock Method
In this approach, we overcome the overhead problem of synchronized methods. Here, we do not synchronize the getInstance() method. Instead of making it synchronized, we enclose the code of creating objects within a synchronized block.
By doing this, only a minimum number of threads have to wait and that too only for the first time. This approach usually boosts the performance of the application.
Code to implement Lazy Initialization Method with Double Locking:
package com.techvidvan.singletonclass;

public class LazyDoubleLock
{
        // Java code to explain double-check locking private instance so that it can be
        // accessed by only by getInstance() method
        private static LazyDoubleLock instance;
        public String string;

        private LazyDoubleLock()
        {
                // private constructor
                string = "Welcome to TechVidvan's Java Tutorial";
        }
        public static LazyDoubleLock getInstance()
        {
                if (instance == null)
                {
                        //synchronized block to remove overhead
                        synchronized (LazyDoubleLock.class)
                        {
                                if(instance==null)
                                {
                                        // if instance is null, initialize
                                        instance = new LazyDoubleLock();
                                }
                        }
                }
                return instance;
        }
        public static void main(String args[ ])
        {
                LazyDoubleLock text = LazyDoubleLock.getInstance();
                //original string
                System.out.println("Original String:");
                System.out.println(text.string);

                //text in upper case
                System.out.println("String in Upper Case:");
                text.string = (text.string).toUpperCase();
                System.out.println(text.string);

        }
}
Output:
Welcome to TechVidvan’s Java Tutorial
String in Upper Case:
WELCOME TO TECHVIDVAN’S JAVA TUTORIAL
Advantages
- Lazy initialization is possible.
- It is also a thread-safe method.
- Performance improves because of the synchronized block.
Disadvantages
- It can affect the performance of the first time.
5. Lazy Load Method
In the Lazy Load method, the JVM will load static data members only when required. Thus, when the JVM loads the singleton class into the JVM, no object is created.
Code to implement Lazy Load Method:
package com.techvidvan.singletonclass;
public class LazyLoadMethod
{
  //Lazy Load Method
  private LazyLoadMethod()
  {

  }
  private static class SingletonClassHolder
  {
    private static LazyLoadMethod instance= new LazyLoadMethod();
  }
  public static LazyLoadMethod getInstance()
  {
    return SingletonClassHolder.instance;
  }
}
6. Static Block Initialization Method
The Static Block Initialization method in Java is similar to the Eager Initialization method. Actually, this method is the sub-part of the Eager Initialization method. They differ with each other in the fact that the object creation for this class takes place within the static block.
This method also provides the functionality of Exception Handling. As the object is created within the static block, we can have access to its creation. We can use this technique when we know that exceptions may occur while creating an object of the class with the Eager Initialization method.
Code to implement Static Block Initialization Method:
package com.techvidvan.singletonclass;
public class StaticBlockInitialization
{
  //Static Block Initialization
  private static StaticBlockInitialization instance;
  private StaticBlockInitialization()
  {
  }
  //exception handling within static block
  static
  {
    try
    {
      instance = new StaticBlockInitialization();
    } catch (Exception e)
    {
      throw new RuntimeException("Exception occured while creating a Singleton Class");
    }
  }
  public static StaticBlockInitialization getInstance()
  {
    return instance;
  }
}
Advantages
- Very simple to implement.
- No need to implement getInstance() method. We can access the instance directly.
- Exceptions can be handled in static blocks.
Disadvantages
- This method may result in wastage of resources. The reason is that the instance of a class is always created, whether required or not.
- There is also the wastage of CPU time in the unnecessary creation of instances.
7. Bill Pugh Implementation Method
Before Java 5, there were a lot of issues in the memory model. Therefore, the above methods of creating a Singleton class failed in specific scenarios in a multithreaded environment.
So, the concept of Bill Pugh Method came into the picture that used the idea of inner static classes for a singleton. Bill Pugh discovered this method; therefore it is named as Bill Pugh Implementation Method.
Code to implement Bill Pugh Method:
package com.techvidvan.singletonclass;
public class BillPughMethod
{
  // Java code for Bill Pugh Singleton Implementation

  private BillPughMethod()
  {
    // private constructor
  }

  // Inner class to provide instance of class
  private static class BillPughSingleton
  {
    private static final BillPughMethod INSTANCE = new BillPughMethod();
  }

  public static BillPughMethod getInstance()
  {
    return BillPughSingleton.INSTANCE;
  }
}
When to Use Which method?
- We can use the Eager initialization only if the cost of initializing a class is not so high with respect to resources or when your program will always need the object of a class.
- If we want to provide the exception handling with the Eager Initialization method, then we can use the Static block in Eager initialization. Using this method, we can also have control over instances.
- We can use the Double-check Locking mechanism when we want to create a Singleton class for a multithreaded environment. To implement this method, make the method synchronized so that the application can work in a multithreading environment.
- Bill Pugh implementation is the most widely used approach for singleton classes. Most developers prefer it because of its simplicity and advantages.
Summary
Here we come to the end of the article on Singleton class in Java. We came to know that this class contains a single object. With the help of private constructors and getInstance() factory method, we can create a Singleton class.
There are different techniques to create a singleton class that we discussed in this article. All methods are different, and we can use them according to the requirement of the application.
There are some pros and cons for each method; you can choose any of these methods to create a singleton class as per your needs. All these methods serve the same purpose of creating a Singleton class.