
Node.js with MySQL
When it comes to working with databases, MySQL is one of the most widely used relational database management systems. In this article, we will explore how to create a Node.js application that connects to a MySQL database, perform CRUD operations, and handle errors effectively. We will cover all the necessary topics and provide code examples along the way.
Setting Up the Environment:
Before we begin, ensure that you have Node.js and MySQL installed on your machine. You can download Node.js from the official website (https://nodejs.org) and MySQL from the MySQL Downloads page (https://dev.mysql.com/downloads/). Once installed, you’re ready to proceed.
Initializing the Project
To create a Node.js project, open a terminal or command prompt, navigate to your desired directory, and run the following command:
mkdir node-mysql-app
cd node-mysql-app
npm init –y
This will create a new directory called ‘node-mysql-app’ and generate a ‘package.json’ file that tracks your project’s dependencies.
Installing Dependencies
Next, we need to install the required dependencies: ‘mysql’ and ‘dotenv’. The ‘mysql’ package allows us to interact with the MySQL database, while ‘dotenv’ helps manage environment variables. Run the following command to install them:
npm install mysql dotenv
Creating a MySQL Database
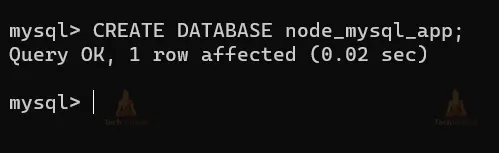
Open your MySQL client and create a new database for our application. You can use the following SQL query:
CREATE DATABASE node_mysql_app;
The output will be:
Establishing a Connection
Now, let’s create a file called ‘db.js’ to handle the database connection. Add the following code to the file:
const mysql = require('mysql');

const connection = mysql.createConnection({
  host: process.env.DB_HOST,
  user: process.env.DB_USER,
  password: process.env.DB_PASSWORD,
  database: process.env.DB_NAME,
});

connection.connect((error) => {
  if (error) {
    console.error('Error connecting to the database:', error);
  } else {
    console.log('Connected to the database!');
  }
});

module.exports = connection;
This code imports the ‘mysql’ package and establishes a connection to the MySQL database using the provided credentials. It also exports the connection for other modules to use.
The output will be:

In case of any error, It will give:

Handling Environment Variables
Create a ‘.env’ file in the root directory of your project and add the following lines:
DB_HOST=localhost
DB_USER=root
DB_PASSWORD=your_password
DB_NAME=node_mysql_app
Replace ‘your_password’ with your MySQL password. These environment variables will be used to configure the database connection.
Performing CRUD Operations
Now that we have established a database connection, let’s perform CRUD operations on a sample table called ‘users’.
const db = require('./db');

// Create a new user
const newUser = { name: 'John Doe', email: 'johndoe@example.com' };
db.query('INSERT INTO users SET ?', newUser, (error, results) => {
  if (error) {
    console.error('Error creating a new user:', error);
  } else {
    console.log('New user created:', results.insertId);
  }
});

// Read all users
db.query('SELECT * FROM users', (error, results) => {
  if (error) {
    console.error('Error retrieving users:', error);
  } else {
    console.log('Users:', results);
  }
});

// Update a user
const userId = 1;
const updatedEmail = 'newemail@example.com';
db.query('UPDATE users SET email = ? WHERE id = ?', [updatedEmail, userId], (error, results) => {
  if (error) {
    console.error('Error updating user:', error);
  } else {
    console.log('User updated:', results.affectedRows);
  }
});

// Delete a user
const userIdToDelete = 2;
db.query('DELETE FROM users WHERE id = ?', userIdToDelete, (error, results) => {
  if (error) {
    console.error('Error deleting user:', error);
  } else {
    console.log('User deleted:', results.affectedRows);
  }
});
In this example, we perform four operations: creating a new user, reading all users, updating a user’s email, and deleting a user. The db.query method executes SQL queries and provides the results or errors in the callback function.
The outputs will be:
When creating a new user-

When reading all users-

When updating a user-

When deleting a user-

Handling Errors
To handle errors in a more organized manner, create an errorHandler.js file and add the following code:
function handleDatabaseError(error) {
  console.error('Database error:', error);
  // Handle the error according to your application's needs
}

module.exports = {
  handleDatabaseError,
};
You can call the ‘handleDatabaseError’ function whenever an error occurs in the database-related code.
Why Connect Node.js With MySQL?
Numerous factors more than support integrating Node.js with MySQL for data storage, including:
Quick Guide: Using MySQL in Node
STEP-1: Make a fresh Node.js project.
Using the NPM, start a new directory and a Node project.
$ mkdir mysqlexperiment && cd mysqlexperiment
$ npm init --y
STEP-2: Install The MySql Node Module
Installing the mysql module from NPM
npm install --save mysql
STEP-3: Connect With MySQL
Copy and paste the following code into an app.js file. Adapt the MySQL login information to your system.
const mysql = require('mysql');
const connection = mysql.createConnection({
    host: 'localhost',
    user: 'user',
    password: 'password',
    database: 'databasename'
});

connection.connect((err) => {
    if (err) throw err;
    console.log('Connected to MySQL Server!');
});
Run the code using the following command.
node app.js
Keep an eye on the terminal’s ‘Connected to MySQL Server!’ message.
If you have the most recent version of MySQL installed, you can receive the following problem.
{
 code: 'ER_NOT_SUPPORTED_AUTH_MODE',
 errno: 1251,
 sqlMessage: 'Client does not support authentication protocol requested by server; consider upgrading MySQL client',
 sqlState: '08004',
 fatal: true
}
Create a new user with the’mysql_native_password’ authentication mechanism on your MySQL server to solve this problem.
Here is an easy method for doing it. Start by entering the MySQL server as root.
mysql -u root -p
Run each of these commands one at a time.
CREATE USER 'newuser'@'localhost' IDENTIFIED WITH 'mysql_native_password' BY 'newpassword';
GRANT ALL PRIVILEGES ON * . * TO 'newuser'@'localhost';
FLUSH PRIVILEGES;
Pass the updated credentials to connect to the MySQL server in the code. Let’s continue now.
Pooling MySQL Connections
The earlier-demonstrated code is not intended for use in production. It serves only as a starting point for Node and MySQL. To increase MySQL’s performance in a production environment and prevent the MySQL server from becoming overloaded with connections, connection pooling must be used.
Let’s use a clear example to demonstrate.
Take a look at the code below.
const express = require("express");
const app = express();
const mysql = require('mysql');

const connection = mysql.createConnection({
    host: 'localhost',
    user: 'username',
    password: 'password',
    database: 'databasename'
});

connection.connect((err) => {
    if (err) throw err;
    console.log('Connected to MySQL Server!');
});

app.get("/", (req, res) => {
    connection.query('SELECT * from users LIMIT 1', (err, rows) => {
        if (err) throw err;
        console.log('The data from users table are: \n', rows);
        connection.end();
    });
});

app.listen(3000, () => {
    console.log('Server is running at port 3000');
});
In order to develop a web server, we are integrating the express module. Use the next command to install the module.
npm install --save express
Every time a user request comes in, a MySQL connection is established. As soon as the MySQL server receives several concurrent requests, it becomes overloaded and fails.
We will use a programme called Siege to model the concurrent connection scenario.
To install it on an Ubuntu machine, use this command.
sudo apt-get install siege
Run our Node server.
node app.js
Let’s practise the simultaneous requests.
siege -c10 -t1M http://localhost:3000
Assuming running on Node server Port 3000.
OUTPUT:

The information above shows that our server crashed while dealing with several concurrent requests. We apply the Pooling method to deal with this issue.
In order to support connection pooling, let’s update our code.
const express = require("express");
const app = express();
const mysql = require('mysql');

const pool = mysql.createPool({
    host: 'localhost',
    user: 'username',
    password: 'password',
    database: 'databasename'
});

app.get("/", (req, res) => {
    pool.getConnection((err, connection) => {
        if (err) throw err;
        console.log('connected as id ' + connection.threadId);
        connection.query('SELECT * from users LIMIT 1', (err, rows) => {
            connection.release(); // return the connection to pool
            if (err) throw err;
            console.log('The data from users table are: \n', rows);
        });
    });
});

app.listen(3000, () => {
    console.log('Server is running at port 3000');
});
Run the code using the following command.
node app.js
Use this command to start ten simultaneous users of the siege for 1 minute.
siege -c10 -t1M http://localhost:3000
OUTPUT:
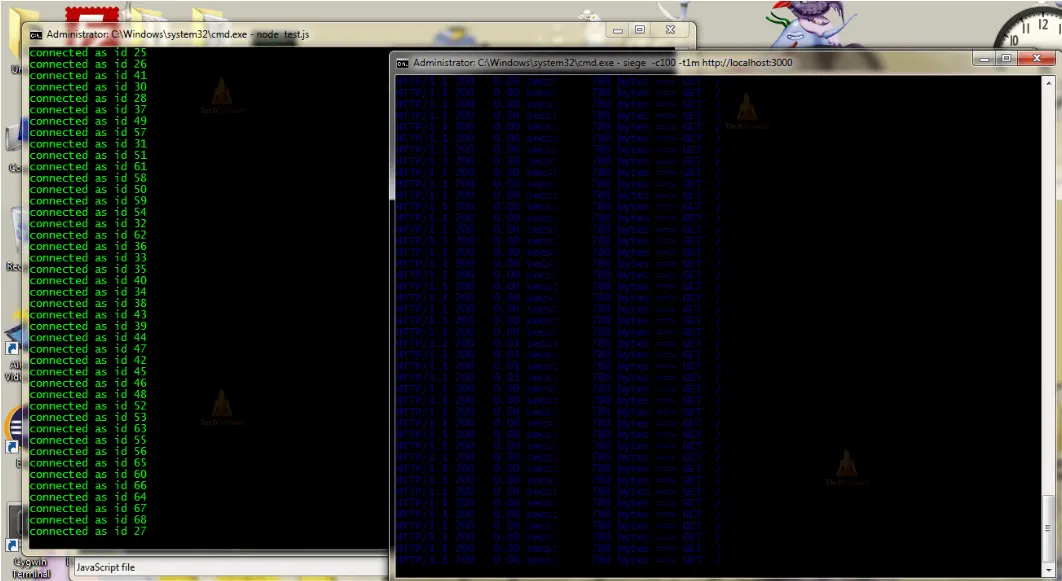
Multiple requests are being successfully handled by our server with ease. This strategy works like a charm in the production software solutions I’ve used, which have huge payloads.
Executing Queries
1. Inserting data into Table
The code to add new rows to the table is provided here.
THE CODE:
const mysql = require('mysql');

const pool = mysql.createPool({
    connectionLimit: 100, //important
    host: 'localhost',
    user: 'root',
    password: '',
    database: 'todolist',
    debug: false
});

// add rows in the table

function addRow(data) {
    let insertQuery = 'INSERT INTO ?? (??,??) VALUES (?,?)';
    let query = mysql.format(insertQuery, ["todo", "user", "notes", data.user, data.value]);
    pool.query(query, (err, response) => {
        if (err) {
            console.error(err);
            return;
        }
        // rows added
        console.log(response.insertId);
    });
}

// timeout just to avoid firing query before connection happens

setTimeout(() => {
    // call the function
    addRow({
        "user": "Shahid",
        "value": "Just adding a note"
    });
}, 5000);
The query escape will be carried out by the mysql.format function.
2. Selecting data in Table
THE CODE:
const mysql = require('mysql');

const pool = mysql.createPool({
    connectionLimit: 100, //important
    host: 'localhost',
    user: 'root',
    password: '',
    database: 'todolist',
    debug: false
});

// query rows in the table

function queryRow(userName) {
    let selectQuery = 'SELECT * FROM ?? WHERE ?? = ?';
    let query = mysql.format(selectQuery, ["todo", "user", userName]);
    // query = SELECT * FROM `todo` where `user` = 'shahid'
    pool.query(query, (err, data) => {
        if (err) {
            console.error(err);
            return;
        }
        // rows fetch
        console.log(data);
    });
}

// timeout just to avoid firing query before connection happens

setTimeout(() => {
    // call the function
    // select rows
    queryRow('shahid');
}, 5000);
You can supply an array as the values if you want to add numerous rows to a single query. as in this.
let insertQuery = 'INSERT INTO ?? (??,??) VALUES (?,?);
let values = [["shahid","hello"],["Rohit","Hi"]]; // each array is one row
let query = mysql.format(insertQuery,["todo","user","notes",values]);
3. Updating data in Table
THE CODE:
const mysql = require('mysql');

const pool = mysql.createPool({
    connectionLimit: 100, //important
    host: 'localhost',
    user: 'root',
    password: '',
    database: 'todolist',
    debug: false
});

// update rows

function updateRow(data) {
    let updateQuery = "UPDATE ?? SET ?? = ? WHERE ?? = ?";
    let query = mysql.format(updateQuery, ["todo", "notes", data.value, "user", data.user]);
    // query = UPDATE `todo` SET `notes`='Hello' WHERE `name`='shahid'
    pool.query(query, (err, response) => {
        if (err) {
            console.error(err);
            return;
        }
        // rows updated
        console.log(response.affectedRows);
    });
}

// timeout just to avoid firing query before connection happens

setTimeout(() => {
    // call the function
    // update row
    updateRow({
        "user": "Shahid",
        "value": "Just updating a note"
    });
}, 5000);
4. Deleting Rows in the table
THE CODE:
const mysql = require('mysql');

const pool = mysql.createPool({
    connectionLimit: 100, //important
    host: 'localhost',
    user: 'root',
    password: '',
    database: 'todolist',
    debug: false
});

function deleteRow(userName) {
    let deleteQuery = "DELETE from ?? where ?? = ?";
    let query = mysql.format(deleteQuery, ["todo", "user", userName]);
    // query = DELETE from `todo` where `user`='shahid';
    pool.query(query, (err, response) => {
        if (err) {
            console.error(err);
            return;
        }
        // rows deleted
        console.log(response.affectedRows);
    });
}

// timeout just to avoid firing query before connection happens

setTimeout(() => {
    // call the function
    // delete row
    deleteRow('shahid');
}, 5000);
Calling MySQL Stored Procedure Using Node
When a SQL query is run to retrieve data from the MySQL database, MySQL executes that query and returns the requested data. However, if our system needs to query the same data frequently, we would need to write multiple times to accomplish that. To address this issue, stored procedures were created. When a stored procedure is called, SQL statements that were previously stored in the MySQL server can be executed immediately.
Additionally, Node.js allows you to directly invoke a stored process. If you don’t already have stored procedures in MySQL, you may perform the identical action by using the code below.
CREATE PROCEDURE `getAllTodo`()
BEGIN
SELECT * FROM todo;
END$$
The Node.js code for calling this stored process looks like this:
const mysql = require('mysql');

const pool = mysql.createPool({
    connectionLimit: 100, //important
    host: 'localhost',
    user: 'root',
    password: '',
    database: 'todolist',
    debug: false
});

function callSP(spName) {
    let spQuery = 'CALL ??';
    let query = mysql.format(spQuery, [spName]);
    // CALL `getAllTodo`
    pool.query(query, (err, result) => {
        if (err) {
            console.error(err);
            return;
        }
        // rows from SP
        console.log(result);
    });
}

// timeout just to avoid firing query before connection happens

setTimeout(() => {
    // call the function
    // call sp
    callSP('getAllTodo')
}, 5000);
Conclusion
We covered the process of creating a Node.js application that connects to a MySQL database, performs CRUD operations, and handles errors effectively. We explored how to set up the environment, establish a database connection, handle environment variables, and execute queries. By following these steps, you can build powerful and scalable applications using Node.js and MySQL. Remember to handle errors gracefully and adapt the code to meet your specific project requirements.