Flutter Project – Quiz App
As students or professionals, we are asked questions in the form of quizzes related to the subject in many exams. The questions are generally presented in the form of MCQs. Ultimately, these tests in the form of quizzes generally show a report showcasing how many and which answers are filled in correctly by the user.
About Flutter Quiz App
In this Flutter Quiz App project, we will build a quiz app. It will provide a seamless and enjoyable quiz experience, whether to challenge yourself, have fun with friends, or enhance your knowledge. With a user-friendly interface and interactive features, it’s the ideal choice for casual learners and dedicated quiz enthusiasts. We will build several features in this Flutter Quiz app to create a user-friendly interface. You can also tailor it to suit your requirements.
Prerequisites For Flutter Quiz App Project
Before starting work on building the Flutter Quiz app, you should have the below-mentioned required software on your computer:
(i) Flutter – Refer to the link for installing Flutter, depending on your operating system
(ii) Android Studio – This is necessary as it will run the app in the Android emulator.
(iii) Visual Studio Code – Although unnecessary, you can also build apps in Android Studio. But in our case, we have used VS code as it is a good code editor.
Now that the setup is ready, let’s get started!
Download the Flutter Quiz App Project
Please download the source code of the Flutter Quiz App Project: Flutter Quiz App Project Code.
Creating New Flutter Quiz App Project
Let’s start with creating a new project through the Flutter terminal. Go to the directory where you want to save the project using:-
cd $Project-directory-path
Then create a new project using the below command:-
flutter create quiz_app

Changes in the pubsec.yaml file
In our app, we will use one image to show the logo for the quiz. Therefore, we need to change the ‘pubsec.yaml’ file to display the assets we are using. You can see the changes in the image below. Make sure that the path in the assets section points to the image’s path. In this case, I have created an image folder inside an assets folder and stored it in it.

Steps to Build Flutter Quiz App Project
1. Building the Main Layout of the App and Functions
Let’s start by building the main layout of the app, which we have created using a custom Stateful Widget called Quiz. Stateful widget because the data inside the widget can be modified, affecting the app’s UI.
In this app, we will create three screens:- Home Screen, Questions Screen and Results screen. In this widget, we will also be managing which screen to show.
In the ‘selectedAnswers’ variable, we will be storing the options chosen by the user, and using activeScreen, we will decide which screen to show.
Here we have defined some functions which we will use for user interaction:-
(i) switchScreen – It will be used to switch b/w Home Screen, Questions Screen and Results screen.
(ii) addAnswer – It adds the selected answer by the user to the ‘selectedAnswers’ list. It checks if the list length equals the number of questions; if so, it shows the results screen.
(iii) restartQuiz – It restarts the quiz, setting the activeScreen to home screen and clearing the selected answers list.
import 'package:flutter/material.dart';
import 'package:quiz_app/questions_screen.dart';

import './home_screen.dart';
import './data/questions.dart';
import './results_screen.dart';

class Quiz extends StatefulWidget {
  const Quiz({super.key});

  @override
  State<Quiz> createState() {
    return _QuizState();
  }
}

class _QuizState extends State<Quiz> {
  final List<String> selectedAnswers = [];
  var activeScreen = 'home-screen';

  void switchScreen() {
    setState(() {
      activeScreen = 'questions-screen';
    });
  }

  void addAnswer(String answer) {
    selectedAnswers.add(answer);

    if (selectedAnswers.length == questions.length) {
      setState(() {
        activeScreen = 'results-screen';
        //selectedAnswers.clear();
      });
    }
  }

  void restartQuiz() {
    setState(() {
      activeScreen = 'home-screen';
      selectedAnswers.clear();
    });
  }
In the build function, we return the MaterialApp widget to set the material design of the app. Through this, we set the app bar and applied some styling with a background color. In the body, we return the ‘Container’ widget. It is used to set the gradient using ‘BoxDecoration’, and in the child, we return the ‘HomePage’, which is a custom widget that we will create in the next section.
@override
  Widget build(BuildContext context) {
    // ignore: unused_local_variable
    Widget screenWidget = HomeScreen(switchScreen);

    if (activeScreen == 'home-screen') {
      screenWidget = HomeScreen(switchScreen);
    } else if (activeScreen == 'questions-screen') {
      screenWidget = QuestionsScreen(onSelectedAnswer: addAnswer);
    } else if (activeScreen == 'results-screen') {
      screenWidget = ResultsScreen(
        chosenAnswers: selectedAnswers,
        restart: restartQuiz,
      );
    }
    return MaterialApp(
      home: Scaffold(
        appBar: AppBar(
          backgroundColor: const Color.fromARGB(255, 47, 4, 121),
          title: const Text(
            'Quiz App (By TechVidvan)',
            style: TextStyle(color: Color.fromARGB(255, 169, 131, 235)),
          ),
        ),
        body: Container(
          decoration: const BoxDecoration(
            gradient: LinearGradient(colors: [
              Color.fromARGB(255, 78, 13, 151),
              Color.fromARGB(255, 107, 15, 168),
            ], begin: Alignment.topLeft, end: Alignment.bottomRight),
          ),
          child: screenWidget,
        ),
      ),
    );
  }
}
2. Creating a Home Screen for the App
The Home Screen is a Stateless widget that we have defined to show the initial screen the user will land on when they open the app.
Here, we have imported two packages, material.dart, to help create the widget using the existing widgets and google_fonts package to use the fonts created by Google.
In the constructor function, we accept the ‘startQuiz’ function as an argument, as seen in the above section. The Home Screen will contain the logo, some text and the button to start the Quiz. In the build function, we have returned a Column widget inside the Center widget. In the column widget, we return the logo using the Image.asset, for which we made the changes in pubsec file, the Text widget to show the text for which we have used lato font from the google_fonts library we imported and Outlined Button/ Text Button to display the ‘Start Quiz’ button to start the quiz.
import 'package:flutter/material.dart';
import 'package:google_fonts/google_fonts.dart';

class HomeScreen extends StatelessWidget {
  const HomeScreen(this.startQuiz, {super.key});

  final void Function() startQuiz;
  @override
  Widget build(BuildContext context) {
    return Center(
      child: Column(
        mainAxisSize: MainAxisSize.min,
        children: [
          Image.asset(
            'assets/images/quiz-logo.png',
            width: 300,
            color: const Color.fromARGB(150, 255, 255, 255),
          ),
          const SizedBox(
            height: 70,
          ),
          Text(
            "Learn Flutter the fun way!",
            style: GoogleFonts.lato(
                color: const Color.fromARGB(192, 255, 255, 255), fontSize: 24),
          ),
          const SizedBox(
            height: 50,
          ),
          OutlinedButton.icon(
            style: OutlinedButton.styleFrom(
                foregroundColor: const Color.fromARGB(200, 255, 255, 255),
                textStyle: const TextStyle(fontSize: 16)),
            onPressed: startQuiz,
            icon: const Icon(Icons.arrow_right_alt),
            label: const Text(
              "Start Quiz",
            ),
          )
        ],
      ),
    );
  }
}
3. Creating a Class for Quiz Questions
We have created a class with the name of QuizQuestion. It will be used to store the quiz questions and the possible answers. We will set questions such that the first option will always be the correct answer, but when we display it on the screen, the possible answers will be arranged randomly. For this, we have defined a function called ‘getShuffledAnswers’, which will shuffle the possible answers before displaying them.
class QuizQuestion {
  const QuizQuestion(this.text, this.answers);

  final String text;
  final List<String> answers;

  List<String> getShuffledAnswers() {
    final shuffledList = List.of(answers);
    shuffledList.shuffle();
    return shuffledList;
  }
}
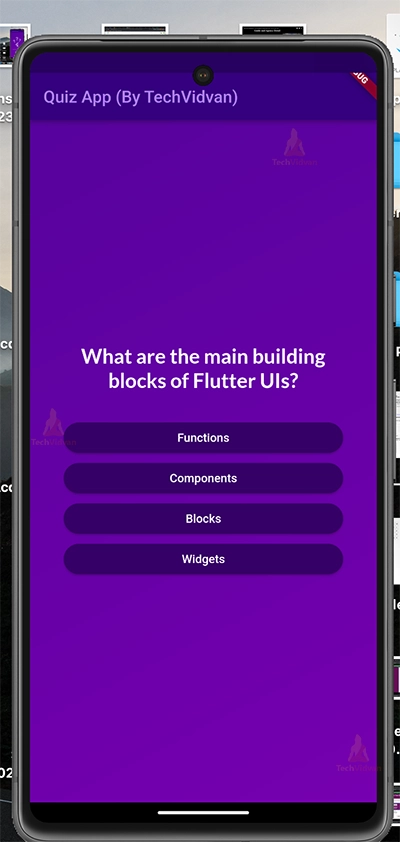
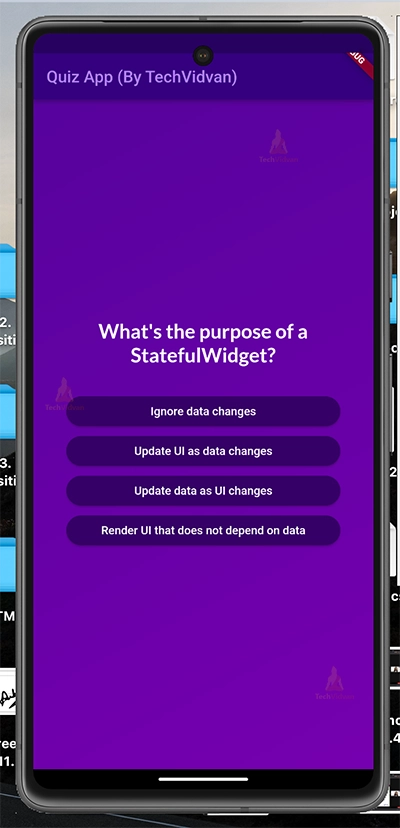
4. Building the Quiz Questions Screen
The below code shows the building of QuestionsScreen, which we will use to display questions. It is a Stateful Widget because the questions will get updated once the user selects an option for the current question.
We will be importing several files:- google_fonts.dart to use the fonts created by Google; answer_button.dart, which is a custom widget to display the possible answers that we will create in the Helper widgets section; questions.dart, which contains the question we will be displaying.
Through the constructor function, we are accepting the function onSelectedAnswer. We will be using this function in our function, which we will create here called nextQuestion, which will update the question and store the answer the user opts for the current question.
In the build function, we are returning a ‘SizedBox’ widget to give the content on the screen some width. We are returning the page’s content using the Column widget, as various items need to be displayed vertically. We also set the ‘mainAxisAlignment’ to centre and ‘crossAxisAlignment’ to stretch. We display the question using Text widget, for which we do some styling using GoogleFonts lato font. To display the possible answers, we use the ‘map’ function on the list of answers, where each item will be mapped to the ‘AnswerButton’ widget, which we will create in the Helper Widgets section.
import 'package:flutter/material.dart';
import 'package:google_fonts/google_fonts.dart';

import './models/answer_button.dart';
import './data/questions.dart';

class QuestionsScreen extends StatefulWidget {
  const QuestionsScreen({required this.onSelectedAnswer, super.key});
  final void Function(String answer) onSelectedAnswer;
  @override
  State<QuestionsScreen> createState() {
    return _QuestionsScreenState();
  }
}

class _QuestionsScreenState extends State<QuestionsScreen> {
  var currentQuestionIndex = 0;

  void nextQuestion(selectedAnswer) {
    widget.onSelectedAnswer(selectedAnswer);
    setState(() {
      currentQuestionIndex += 1;
    });
  }

  @override
  Widget build(BuildContext context) {
    final currentQuestion = questions[currentQuestionIndex];

    return SizedBox(
      width: double.infinity,
      child: Container(
        margin: const EdgeInsets.all(40),
        child: Column(
          mainAxisAlignment: MainAxisAlignment.center,
          crossAxisAlignment: CrossAxisAlignment.stretch,
          children: [
            Text(
              currentQuestion.text,
              style: GoogleFonts.lato(
                  color: Colors.white,
                  fontSize: 24,
                  fontWeight: FontWeight.bold),
              textAlign: TextAlign.center,
            ),
            const SizedBox(
              height: 30,
            ),
            ...currentQuestion.getShuffledAnswers().map((answer) {
              return AnswerButton(
                answerText: answer,
                onTap: () {
                  nextQuestion(answer);
                },
              );
            }),
          ],
        ),
      ),
    );
  }
}
5. Creating the Results Screen
Result Screen is used to show the final summary of the quiz and whether the user wants to restart the quiz. We are importing questions.dart and questions_summary.dart file. We will create the questions_summary.dart inside the helper widgets section.
In the constructor function, we accept the chosenAnswers by the user and restartQuiz function to restart the quiz. In the getSummaryData function, we store the question index, question, correct answer and user answer inside a Map object.
In the build function, we are returning a Text which shows how many questions are correct out of a total number of questions, a QuestionsSummary object, which we will create in the next section and a TextButton with an icon which is used to restart the quiz. With each of these widgets, styling is done using various widget arguments.
import 'package:flutter/material.dart';

import './data/questions.dart';
import './questions_summary.dart';

class ResultsScreen extends StatelessWidget {
  const ResultsScreen(
      {super.key, required this.chosenAnswers, required this.restart});

  final List<String> chosenAnswers;
  final void Function() restart;

  List<Map<String, Object>> getSummaryData() {
    final List<Map<String, Object>> summary = [];

    for (var i = 0; i < chosenAnswers.length; i++) {
      summary.add({
        'question_index': i,
        'question': questions[i].text,
        'correct_answer': questions[i].answers[0],
        'user_answer': chosenAnswers[i]
      });
    }
    return summary;
  }

  @override
  Widget build(BuildContext context) {
    var summaryData = getSummaryData();
    var countTotalQuestions = questions.length;
    var countCorrectQuestions = summaryData.where((data) {
      return data['user_answer'] == data['correct_answer'];
    }).length;

    return SizedBox(
      width: double.infinity,
      child: Container(
        margin: const EdgeInsets.all(40),
        child: Column(
          mainAxisAlignment: MainAxisAlignment.center,
          children: [
            Text(
    // Displaying the number of questions answered correctly out of total
              "Out of $countTotalQuestions, you have answered $countCorrectQuestions , questions correctly!",
              style: const TextStyle(
                  color: Color.fromARGB(174, 255, 255, 255),
                  fontSize: 20,
                  fontWeight: FontWeight.bold),
              textAlign: TextAlign.center,
            ),
            const SizedBox(
              height: 40,
            ),
            QuestionsSummary(summaryData),
            const SizedBox(
              height: 30,
            ),
            TextButton(
                onPressed: restart,
                style: TextButton.styleFrom(
                    iconColor: Colors.white, foregroundColor: Colors.white),
                child: const Row(
                  mainAxisAlignment: MainAxisAlignment.center,
                  children: [
                    Icon(Icons.refresh),
                    SizedBox(
                      width: 10,
                    ),
                    Text("Restart Quiz!")
                  ],
                ))
          ],
        ),
      ),
    );
  }
}
6. Building Helper Widgets
The below code is used to display the QuestionsSummary. It will be used in the Results screen, which we saw above. Here, in the constructor function, we are accepting ‘summaryData’, which contains details about which question the user has chosen which answer option and what the correct answer is.
In the ‘build’ function, we are returning a ‘SizedBox’ widget to heighten the questions’ summary. Inside it, we are returning a ‘SingleChildScrollView’ widget. This is important because if the number of questions increases, the content should not overflow the page. SingleChildScrollView will make the content scrollable. In the ‘child’ argument, we are returning a ‘Column’ widget whose children are generated using the ‘map’ function on ‘summaryData’, where each element of the ‘summaryData’ is mapped to a ‘Row’ widget. Inside the ‘Row’ widget, we set ‘crossAxisAlignment’ to center.
In the children, we are returning the question number, with its styling based on whether the user selected the correct answer. We also return a ‘Column’ widget inside it, where we display the question, the answer opted by the user, and the correct answer using the ‘Text’ widget. Between each of these texts, we add some space using a ‘SizedBox’ widget.
import 'package:flutter/material.dart';

class QuestionsSummary extends StatelessWidget {
  const QuestionsSummary(this.summaryData, {super.key});

  final List<Map<String, Object>> summaryData;

  @override
  Widget build(BuildContext context) {
    return SizedBox(
      height: 400,
      child: SingleChildScrollView(
        child: Column(
          children: summaryData.map(
            (data) {
              return Row(
                crossAxisAlignment: CrossAxisAlignment.start,
                children: [
                  Container(
                    width: 30,
                    height: 30,
                    alignment: Alignment.center,
                    decoration: BoxDecoration(
                        shape: BoxShape.circle,
                        color: data['user_answer'] == data['correct_answer']
                            ? const Color.fromARGB(255, 126, 163, 227)
                            : const Color.fromARGB(255, 195, 119, 235)),
                    child: Text(
                      ((data['question_index'] as int) + 1).toString(),
                      textAlign: TextAlign.center,
                    ),
                  ),
                  const SizedBox(
                    width: 20,
                  ),
                  Expanded(
                    child: Column(
                      crossAxisAlignment: CrossAxisAlignment.start,
                      children: [
                        Text(
                          data['question'] as String,
                          style: const TextStyle(
                              color: Color.fromARGB(210, 238, 228, 247),
                              fontSize: 16,
                              fontWeight: FontWeight.bold),
                        ),
                        const SizedBox(
                          height: 5,
                        ),
                        Text(
                          data['user_answer'] as String,
                          style: const TextStyle(
                              color: Color.fromARGB(255, 195, 119, 235),
                              fontSize: 14),
                        ),
                        Text(
                          data['correct_answer'] as String,
                          style: const TextStyle(
                              color: Color.fromARGB(255, 126, 163, 227),
                              fontSize: 14),
                        ),
                        const SizedBox(
                          height: 15,
                        )
                      ],
                    ),
                  )
                ],
              );
            },
          ).toList(),
        ),
      ),
    );
  }
}
Below is a Stateless Widget created to show the answers on the Questions Screen in a custom-styled manner. Here we are returning an Elevated Button and doing some styling like padding, backgroundColor, foregroundColor and shape. In the child, we are returning text, which will be one of the possible answers.
import 'package:flutter/material.dart';

class AnswerButton extends StatelessWidget {
  const AnswerButton(
      {required this.answerText, required this.onTap, super.key});

  final String answerText;
  final void Function() onTap;
  @override
  Widget build(BuildContext context) {
    return ElevatedButton(
      style: ElevatedButton.styleFrom(
        padding: const EdgeInsets.symmetric(vertical: 10, horizontal: 30),
        backgroundColor: const Color.fromARGB(255, 48, 4, 97),
        foregroundColor: Colors.white,
        shape: RoundedRectangleBorder(borderRadius: BorderRadius.circular(30)),
      ),
      onPressed: onTap,
      child: Text(
        answerText,
        textAlign: TextAlign.center,
      ),
    );
  }
}
Flutter Quiz App Output


Conclusion
In this Flutter Quiz App project, we learned about various widgets like ‘SizedBox’ to give fixed dimensions to the widgets, ‘TextButton.icon’ to show icons along with text, nested ‘Row’ and ‘Column’ widgets to display the content appropriately. We also learned about the ‘shape’ argument, where we used ‘RoundedRectangleBorder’ for the answer buttons. We also learned how to use the map function to return a list of items. We also learned about what changes to make in pubsec.yaml file while using images in your project using the .assets property of the Image widget.
I hope you enjoyed working on this project!
Thank you for reading! Keep Learning Flutter!