Android Kotlin Project – Income Tax Calculator
Hello there, Android enthusiasts! Today, we will look at and learn how to develop an Android project that is an Income Tax Calculator application in Android Studio. In this article, we’ll learn about the entire project’s development.
An income tax calculator app developed in Kotlin is a mobile application that takes the user’s income as input and displays the tax amount as well as the income after deducting taxes. Kotlin is a modern programming language that enables efficient and reliable app development for Android devices.
About Android Kotlin Income Tax Calculator Project
This is a simple project for those just learning the fundamentals of developing Android applications. This Android app’s user interface contains an area for the user to enter their income as well as two text fields that display the tax amount and income after deducting tax, respectively.
Details about the user interface are as follows:
1. The user interface consists of an editText where the user can enter their income.
2. The user interface consists of a button when clicked by the user, calculates the tax applicable to the income entered by the user.
3. At the bottom of both the text views, display the tax amount and income after taxes, respectively.
Prerequisites For Income Tax Calculator Using Android Kotlin
To develop this Income Tax Calculator application, the requirements and prerequisites are as follows:
1. Kotlin: You must first familiarize yourself with Kotlin programming. It is essential because Kotlin will be used to create the app’s code.
2. XML: Another crucial component of our Android application is XML. The application’s user interface will be made using it.
3. Android Studio: The foundation of our application is Android Studio because that is how we will make it. Android Studio also offers a virtual Android device that can be used to test an application’s functionality.
Download Android Kotlin Income Tax Calculator Project.
Please download the source code of the Android Kotlin Income Tax Calculator Project: Android Kotlin Income Tax Calculator Project Code.
Develop an Android Kotlin Income Tax Calculator in Android Studio
We’ll now start working on developing an Android Income Tax Calculator application. Before actually implementing and executing the code, we will learn about its workings. So, let’s look at the files and functions needed to run the code:
In order to make this Android Income Tax Calculator application, you must follow a set of instructions. We are here to guide you through each step of creating an app.
1. To the location of your choice, extract all the files from the downloaded zip file.
2. Launch Android Studio.
3. Open by selecting File.
4. Locate and choose the extracted folder, then select OK.
The Android Kotlin Income Tax Calculator application’s source code has been successfully opened in Android Studio.
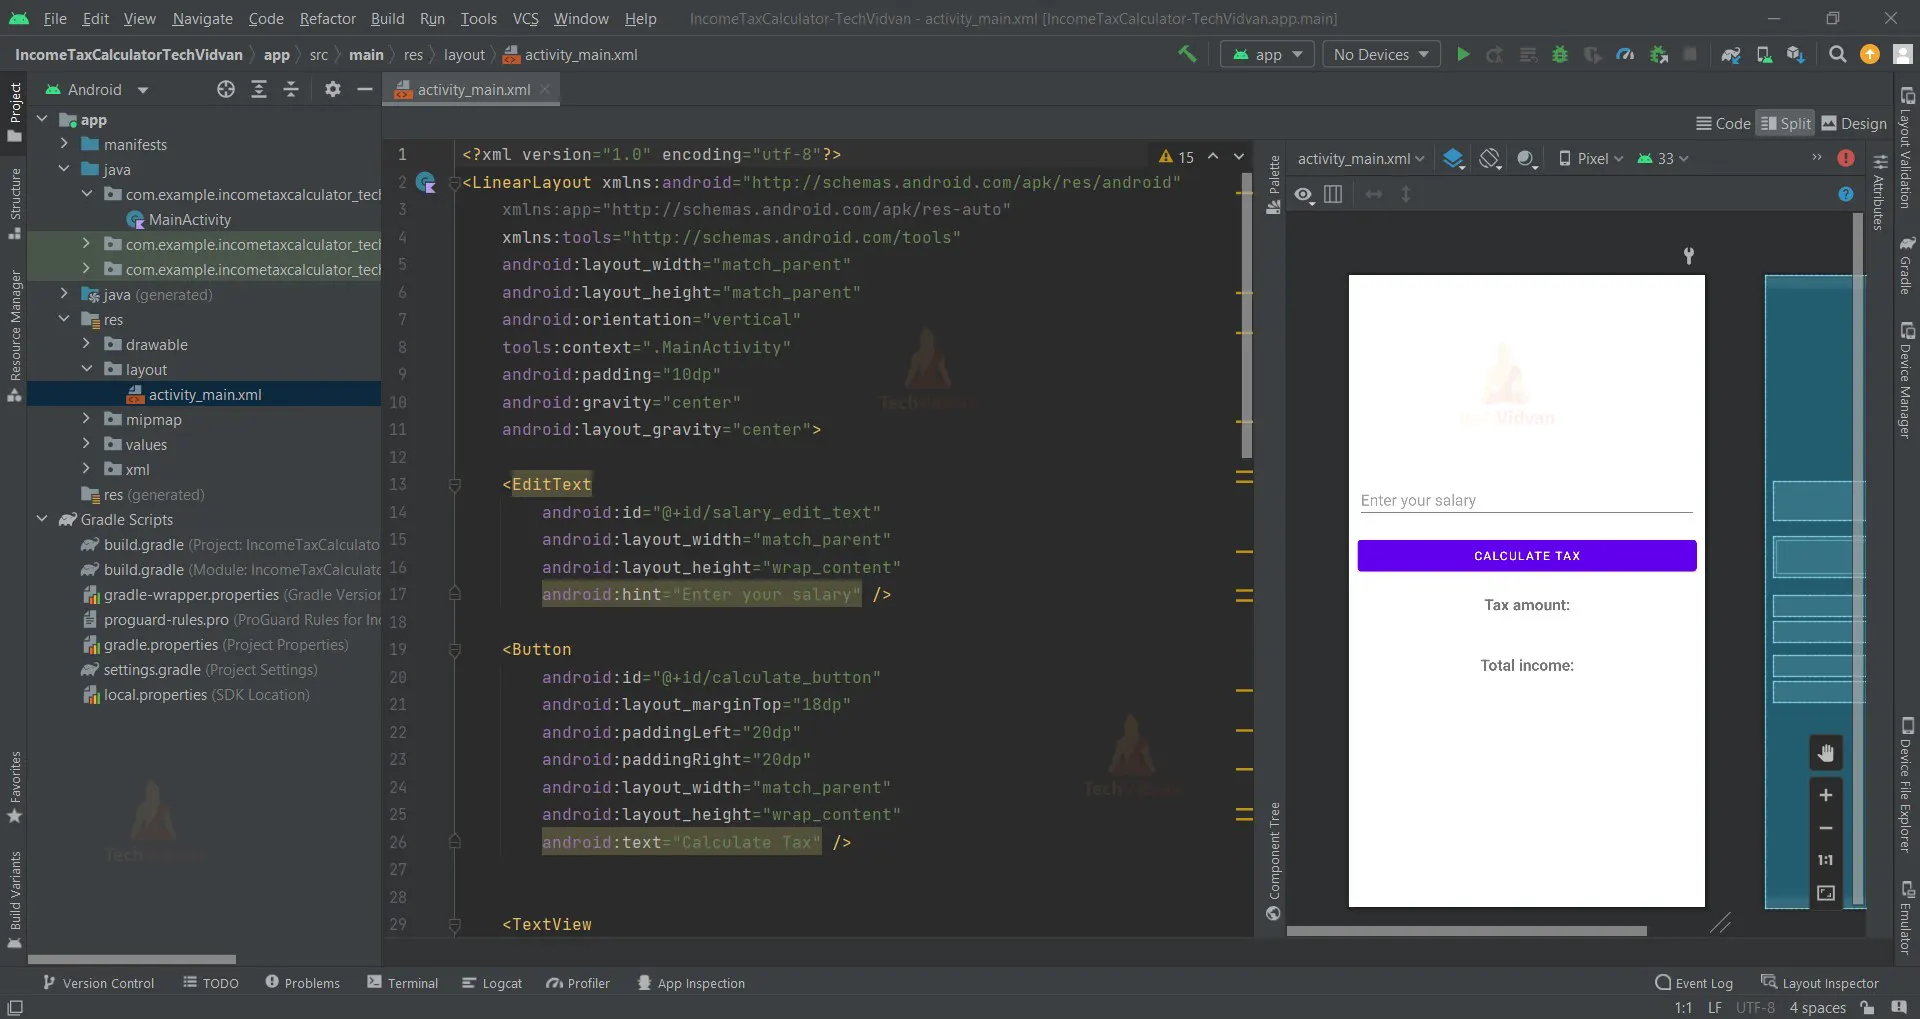
1. ‘activity_main.xml’ is an XML file that is responsible for creating the user interface of the home screen of our Android application.
The layout uses the following attributes to control the appearance and behaviour of the elements:
- android:layout_width=”match_parent”: This attribute specifies that the layout should fill the entire width of the screen.
- android:layout_height=”match_parent”: This attribute specifies that the layout should fill the entire height of the screen.
- android:orientation=”vertical”: This attribute specifies that the elements in the layout should be displayed vertically.
- android:padding=”10dp”: This attribute specifies that a 10dp margin should be added around all sides of the layout.
- android:gravity=”centre”: This attribute specifies that the elements in the layout should be centered vertically and horizontally.
<LinearLayout xmlns:android="http://schemas.android.com/apk/res/android"
   xmlns:app="http://schemas.android.com/apk/res-auto"
   xmlns:tools="http://schemas.android.com/tools"
   android:layout_width="match_parent"
   android:layout_height="match_parent"
   android:orientation="vertical"
   tools:context=".MainActivity"
   android:padding="10dp"
   android:gravity="center"
   android:layout_gravity="center">


   <EditText
       android:id="@+id/salary_edit_text"
       android:layout_width="match_parent"
       android:layout_height="wrap_content"
       android:hint="Enter your salary" />


   <Button
       android:id="@+id/calculate_button"
       android:layout_marginTop="18dp"
       android:paddingLeft="20dp"
       android:paddingRight="20dp"
       android:layout_width="match_parent"
       android:layout_height="wrap_content"
       android:text="Calculate Tax" />


   <TextView
       android:id="@+id/tax_amount_text"
       android:textSize="18dp"
       android:textAlignment="center"
       android:layout_marginTop="20dp"
       android:textStyle="bold"
       android:paddingLeft="20dp"
       android:paddingRight="20dp"
       android:layout_width="match_parent"
       android:layout_height="wrap_content"
       android:text="Tax amount:" />


   <TextView
       android:id="@+id/tax_amount_text_view"
       android:textSize="18dp"
       android:textAlignment="center"
       android:layout_marginTop="7dp"
       android:paddingLeft="20dp"
       android:paddingRight="20dp"
       android:layout_width="match_parent"
       android:layout_height="wrap_content" />


   <TextView
       android:id="@+id/income_after_tax_text"
       android:textSize="18dp"
       android:textStyle="bold"
       android:layout_marginTop="15dp"
       android:paddingLeft="20dp"
       android:textAlignment="center"
       android:paddingRight="20dp"
       android:layout_width="match_parent"
       android:layout_height="wrap_content"
       android:text="Total income:" />


   <TextView
       android:id="@+id/income_after_tax"
       android:textSize="18dp"
       android:textAlignment="center"
       android:layout_marginTop="7dp"
       android:paddingLeft="20dp"
       android:paddingRight="20dp"
       android:layout_width="match_parent"
       android:layout_height="wrap_content" />
</LinearLayout>
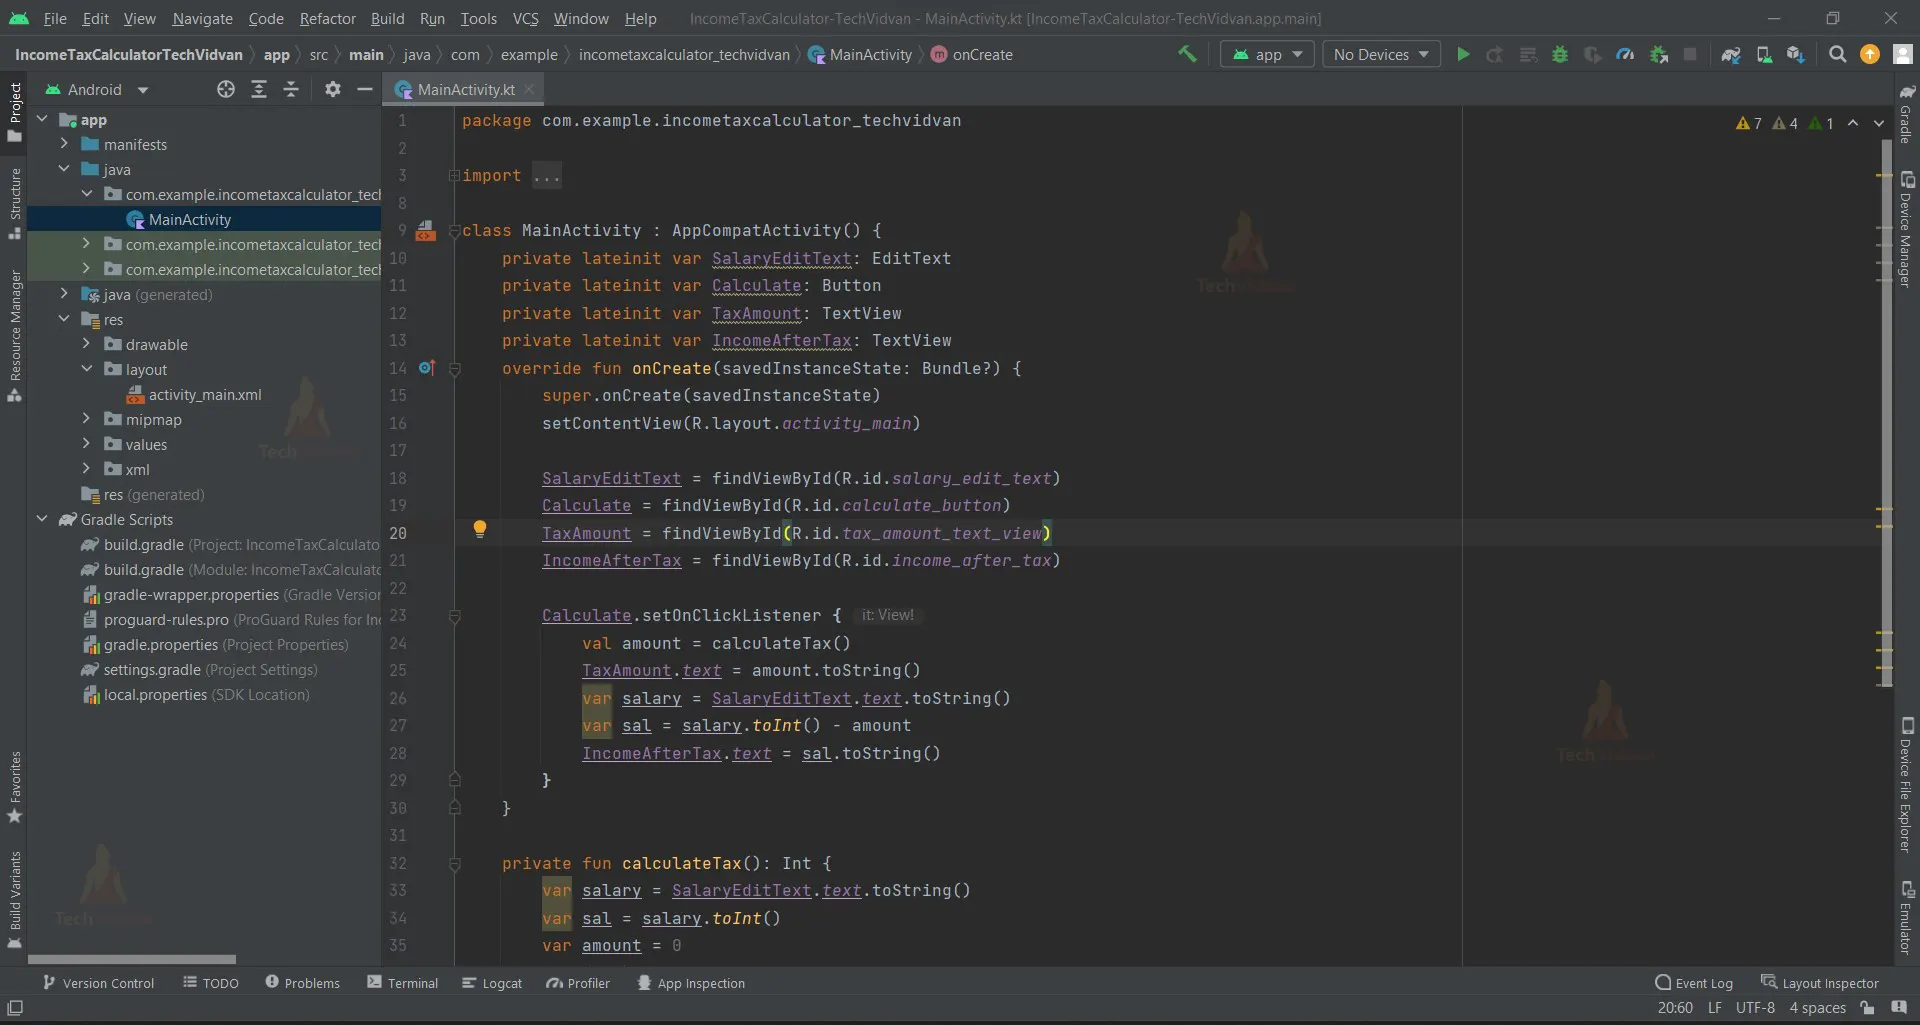
2. ‘MainActivity.kt’ is a kotlin file that is responsible for the functioning of our Android income tax counter application.
class MainActivity : AppCompatActivity() {
   private lateinit var SalaryEditText: EditText
   private lateinit var Calculate: Button
   private lateinit var TaxAmount: TextView
   private lateinit var IncomeAfterTax: TextView
   override fun onCreate(savedInstanceState: Bundle?) {
       super.onCreate(savedInstanceState)
       setContentView(R.layout.activity_main)


       SalaryEditText = findViewById(R.id.salary_edit_text)
       Calculate = findViewById(R.id.calculate_button)
       TaxAmount = findViewById(R.id.tax_amount_text_view)
       IncomeAfterTax = findViewById(R.id.income_after_tax)


       Calculate.setOnClickListener {
           val amount = calculateTax()
           TaxAmount.text = amount.toString()
           var salary = SalaryEditText.text.toString()
           var sal = salary.toInt() - amount
           IncomeAfterTax.text = sal.toString()
       }
   }


   private fun calculateTax(): Int {
       var salary = SalaryEditText.text.toString()
       var sal = salary.toInt()
       var amount = 0
       when(sal){
           in 0..250000 -> amount = 0
           in 250001..500000 -> amount = (sal*5)/100
           in 500001..750000 -> amount = (sal*20)/100
           in 750001..1000000 -> amount = (sal*25)/100
           in 1000001..1250000 -> amount = (sal*30)/100
           else-> amount = (sal*35)/100
       }
       return amount
   }
}
The above code is an Android app that calculates tax. The app uses the following steps to calculate tax:
- The user enters their salary into an EditText element.
- The app calls the calculateTax() function to calculate the amount of tax owed.
- The app displays the amount of tax owed in a TextView element.
- The app subtracts the amount of tax owed from the user’s salary and displays the total income after tax in a TextView element.
The calculateTax() function uses the following steps to calculate the amount of tax owed:
- The function gets the user’s salary from the EditText element.
- The function uses a when statement to determine the tax bracket for the user’s salary.
- The function multiplies the user’s salary by the tax rate for their tax bracket.
- The function returns the amount of tax owed.
Android Kotlin Income Tax Calculator Output:
1. Home Screen:

2. Income entered as input:
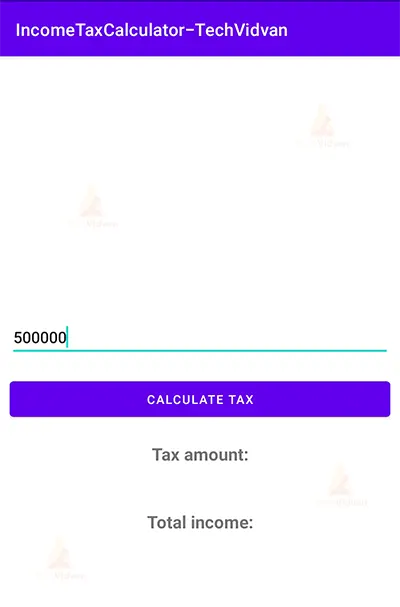
3. The Calculate Tax Button is clicked:

Summary
So, in this Android Kotlin Income Tax Calculator, we learned how to use Android Studio to develop an application that calculates the tax applicable to a certain income. This Android project is suitable for beginners as it will improve your ability to design user interfaces as per the application’s needs and add basic functionality using programming logic. We hope you enjoyed it, and we are confident that you will like putting it into practice.