Java Digital Watermarking – Make Your Mark on the Digital World
In this project, we will be creating a project that allows you to add a watermark to an image using the Java Digital Watermarking . This project will have a user interface that allows you to select the image file and the watermark file, and then choose the position of the watermark on the image.
About Java Digital Watermarking
The objective of this project is to create a Java Digital Watermarking Project that can add a watermark to an image. The user will be able to select the image and watermark files, and choose the position of the watermark on the image.
Prerequisites Digital Watermarking using Java
You should have a basic understanding of the Java programming language and the Java Swing library for creating graphical user interfaces.
Download Java Digital Watermarking Project
Please download the source code of Java Digital Watermarking project from the following link: Java Digital Watermarking Code
Steps to Create Digital Watermarking using Java
Following are the steps for developing the Java Digital Watermarking project:
Step 1: Importing libraries
The first step in creating our project is to import the necessary libraries. The libraries that we will be using in this project are:
package com.TechVidvan.watermarker;
import java.awt.AlphaComposite;
import java.awt.Graphics2D;
import java.awt.event.ActionEvent;
import java.awt.event.ActionListener;
import java.awt.image.BufferedImage;
import java.io.File;
import java.io.IOException;
import javax.imageio.ImageIO;
import javax.swing.ButtonGroup;
import javax.swing.JButton;
import javax.swing.JFileChooser;
import javax.swing.JFrame;
import javax.swing.JLabel;
import javax.swing.JOptionPane;
import javax.swing.JPanel;
import javax.swing.JRadioButton;
import javax.swing.filechooser.FileNameExtensionFilter;
Step 2: Creating the Watermarker class
The next step is to create the Watermarker class, which will be the main class of our project. This class will extend the JFrame class and will contain the user interface and the logic for adding the watermark to the image.
public class Watermarker extends JFrame {
Step 3: Initializing the user interface
In this step, we will initialize the user interface of our project. This includes the buttons for opening the image and watermark files, the button for applying the watermark, and the radio buttons for selecting the position of the watermark on the image. We also initialize the JFileChooser to allow the user to select the image and watermark files. We also add labels to indicate the currently selected image and watermark files.
- In the constructor of the Watermarker class, the user interface is initialized. This includes the buttons for opening the image and watermark files, the button for applying the watermark, and the radio buttons for selecting the position of the watermark on the image.
- The JFileChooser is also initialized to allow the user to select the image and watermark files.
- Labels are also added to indicate the currently selected image and watermark files.
   private JButton openImageButton;
    private JButton openWatermarkButton;
    private JButton watermarkButton;

//    Radio buttons to select the position of the watermark on the image
    private JRadioButton topLeftRadioButton;
    private JRadioButton topRightRadioButton;
    private JRadioButton bottomLeftRadioButton;
    private JRadioButton bottomRightRadioButton;
    private JRadioButton centerRadioButton;

    private JFileChooser fileChooser;
    private File sourceFile;
    private File watermarkFile;

//	Labels to indicate the selected  filename
    private JLabel imageLabel =new JLabel("No Image Selected");
    private JLabel watermarkLabel = new JLabel("No WaterMark selected");

    public Watermarker() {
//    	Ui Inititalization
        setTitle("Image Watermarker");
        setSize(400, 300);
        setDefaultCloseOperation(JFrame.EXIT_ON_CLOSE);

        JPanel panel = new JPanel();
        getContentPane().add(panel);

//        initializing the action buttons
        openImageButton = new JButton("Open Image File");
        panel.add(openImageButton);
        panel.add(imageLabel);
        imageLabel.setVisible(true);

        openWatermarkButton = new JButton("Open Watermark File");
        panel.add(openWatermarkButton);
        panel.add(watermarkLabel);
        watermarkLabel.setVisible(true);

        watermarkButton = new JButton("Watermark");
        panel.add(watermarkButton);

//        initializzing the radio buttons
        ButtonGroup positionsButtonGroup = new ButtonGroup();
        topLeftRadioButton = new JRadioButton("Top Left");
        topRightRadioButton = new JRadioButton("Top Rigth");
        bottomLeftRadioButton = new JRadioButton("Bottom Left");
        bottomRightRadioButton = new JRadioButton("Bottm Right");
        centerRadioButton = new JRadioButton("Center");
        positionsButtonGroup.add(topLeftRadioButton);
        positionsButtonGroup.add(topRightRadioButton);
        positionsButtonGroup.add(bottomLeftRadioButton);
        positionsButtonGroup.add(bottomRightRadioButton);
        positionsButtonGroup.add(centerRadioButton);
        centerRadioButton.setSelected(true);


        panel.add(topLeftRadioButton);
        panel.add(topRightRadioButton);
        panel.add(bottomLeftRadioButton);
        panel.add(bottomRightRadioButton);
        panel.add(centerRadioButton);

//        Initializing and setting up the current directory for file chooser
        fileChooser = new JFileChooser();
        fileChooser.setCurrentDirectory(new File(System.getProperty("user.home")));
We can also add a filter to the file chooser to only allow image files with specific extensions, such as .jpg, .png, .jpeg, etc.
//Setting up a filter to allow only image files
       fileChooser.setAcceptAllFileFilterUsed(false);
       String[] imageExtensionStrings = {"png","jpeg","jpg"};
       fileChooser.addChoosableFileFilter(new FileNameExtensionFilter("Only Image files are valid",imageExtensionStrings ));
Step 4: Setting up the action listeners
In this step, we will set up the action listeners for the buttons and radio buttons in our user interface. This includes the open image and watermark buttons, the watermark button, and the radio buttons for selecting the position of the watermark on the image.
- In the constructor of the Watermarker class, action listeners are set up for the buttons and radio buttons.
- The openImageButton and openWatermarkButton have an action listener that opens the file chooser and sets the sourceFile and watermarkFile variables accordingly.
- The watermarkButton has an action listener that gathers the necessary information (i.e the position of the watermark and the source and watermark files)
//setting up the open Image button action
        openImageButton.addActionListener(new ActionListener() {
            public void actionPerformed(ActionEvent e) {
                int result = fileChooser.showOpenDialog(Watermarker.this);
                if (result == JFileChooser.APPROVE_OPTION) {
                    sourceFile = fileChooser.getSelectedFile();
                    imageLabel.setText(sourceFile.getName());
                }
            }
        });
//        setting up the open Watermark button action
        openWatermarkButton.addActionListener(new ActionListener() {
            public void actionPerformed(ActionEvent e) {
                int result = fileChooser.showOpenDialog(Watermarker.this);
                if (result == JFileChooser.APPROVE_OPTION) {
                    watermarkFile = fileChooser.getSelectedFile();
                    watermarkLabel.setText(watermarkFile.getName());
                }
            }
        });
Step 5: Setting up the watermarking button action and watermarking logic
In this step, we will write the logic for adding the watermark to the image. This includes reading the image and watermark files, creating a new image with the watermark, and saving the new image to a file.
- In this step, we will write the logic for adding the watermark to the image.
- The first step is to read the image and watermark files using the ImageIO.read() method. This method reads an image file and returns a BufferedImage object.
- Next, we create a new BufferedImage object with the same size as the original image and set the graphics context to it.
- Then, we draw the original image on the new BufferedImage object.
- Next, we set the composite of the graphics context to the AlphaComposite.SrcOver. This is used for transparency and overlay operations.
- Then, we draw the watermark image on the new BufferedImage object using the chosen position and the graphics context.
- Next, we create a new File object to save the new image with watermark.
- Finally, we use the ImageIO.write() method to write the new BufferedImage object to the file and save it.
// setting up the watermarking button action watermarking logic
        watermarkButton.addActionListener(new ActionListener() {
            public void actionPerformed(ActionEvent e) {
                if (sourceFile != null && watermarkFile != null) {
                    try {
                    	//Reading the source images
                        BufferedImage sourceImage = ImageIO.read(sourceFile);
                        BufferedImage watermarkImage = ImageIO.read(watermarkFile);

                        // Create a new buffered image with a transparent alpha channel.
                        BufferedImage watermarkedImage = new BufferedImage(sourceImage.getWidth(), sourceImage.getHeight(), BufferedImage.TYPE_INT_ARGB);

                        // Draw the source image on the new image.
                        Graphics2D g2d = watermarkedImage.createGraphics();
                        g2d.drawImage(sourceImage, 0, 0, null);

                        // Set the opacity to use for drawing the watermark image.
                        AlphaComposite alphaComposite = AlphaComposite.getInstance(AlphaComposite.SRC_OVER, 0.3f);
                        g2d.setComposite(alphaComposite);

                        int watermarkX = (watermarkedImage.getWidth() - watermarkImage.getWidth()) / 2;
                        int watermarkY = (watermarkedImage.getHeight() - watermarkImage.getHeight()) / 2;

                        // Calculate the position of the watermark image.
                        if(topLeftRadioButton.isSelected()) {
                        	 watermarkX = 0;
                             watermarkY = 0;
                        }

                        if(topRightRadioButton.isSelected()) {
                       	 	watermarkX = watermarkedImage.getWidth()-watermarkImage.getWidth();
                            watermarkY = 0;
                        }
                        if(bottomLeftRadioButton.isSelected()) {
                        	watermarkX = 0;
                        	watermarkY = watermarkedImage.getHeight() - watermarkImage.getHeight();
                        }

                        if(bottomRightRadioButton.isSelected()) {
                        	 watermarkX = watermarkedImage.getWidth() - watermarkImage.getWidth();
                             watermarkY = watermarkedImage.getHeight() - watermarkImage.getHeight();
                        }

                        if(centerRadioButton.isSelected()) {
                        	watermarkX = (watermarkedImage.getWidth() - watermarkImage.getWidth()) / 2;
                            watermarkY = (watermarkedImage.getHeight() - watermarkImage.getHeight()) / 2;
                       }


                        // Drawing the watermark image on the new image.
                        g2d.drawImage(watermarkImage, watermarkX, watermarkY, null);
                        g2d.dispose();
                       //showing the save dialog
                        int returnVal = fileChooser.showSaveDialog(Watermarker.this);
                        if (returnVal == JFileChooser.APPROVE_OPTION) {
                            File file = fileChooser.getSelectedFile();


                            try {
//                            	writing the image to the disk
                            	ImageIO.write(watermarkedImage, "png", file);

                            	 JOptionPane.showMessageDialog(Watermarker.this, "File Saved", "Success",
                                         JOptionPane.INFORMATION_MESSAGE);

                            } catch (IOException ex) {
                                JOptionPane.showMessageDialog(Watermarker.this, "Error saving file", "Error",
                                        JOptionPane.ERROR_MESSAGE);
                            }
                        }
                        } catch (IOException ex) {
                        ex.printStackTrace();
                    }
                }
            }
        });
    }
Step 6: Creating the main method
The final step would be to add the main method and call the constructor of the Watermarker class to initialize the UI and make the app
public static void main(String[] args) {
        Watermarker watermarker = new Watermarker();
        watermarker.setVisible(true);
    }
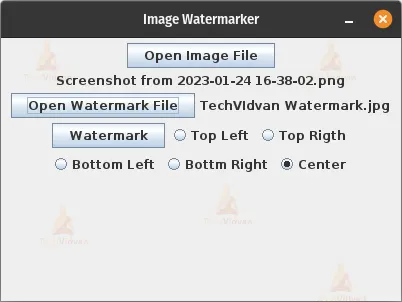
Java Digital Watermarking Output
Summary
In conclusion, We have created a Java program that allows adding a watermark to an image. The Java Digital Watermarking program features a graphical user interface (GUI) that is created using Java’s built-in libraries such as javax.swing.
The interface has buttons that we can use to open both the source image and the watermark image, and there are also radio buttons to choose the position of the watermark on the image. Once we have selected the images and the position of the watermark, we can press the “Watermark” button to apply the watermark and save the result.
We use java.awt.AlphaComposite to apply the watermark as an overlay with adjustable transparency.