JDBC Tutorial – JDBC Architecture, Components and Working
In this JDBC tutorial, we will learn about the Performing Database Operations in Java using the JDBC API (SQL CREATE, INSERT, UPDATE, DELETE, and SELECT).
We will look at the process of connecting Java with the database using JDBC. We will implement each example of performing operations on the database.
In this JDBC tutorial, we will also discuss the composition and architecture of JDBC in Java. We will also see all the classes and interfaces used in the JDBC API. So, let us start the JDBC tutorial.
What is JDBC?
The term JDBC stands for Java Database Connectivity. JDBC is a specification from Sun microsystems. JDBC is an API(Application programming interface) in Java that helps users to interact or communicate with various databases.
The classes and interfaces of JDBC API allow the application to send the request to the specified database.
Using JDBC, we can write programs required to access databases. JDBC and the database driver are capable of accessing databases and spreadsheets. JDBC API is also helpful in accessing the enterprise data stored in a relational database(RDB).
Purpose of JDBC
There are some enterprise applications created using the JAVA EE(Enterprise Edition) technology. These applications need to interact with databases to store application-specific information.
Interacting with the database requires efficient database connectivity, which we can achieve using ODBC(Open database connectivity) driver. We can use this ODBC Driver with the JDBC to interact or communicate with various kinds of databases, like Oracle, MS Access, Mysql, and SQL, etc.
Applications of JDBC
JDBC is fundamentally a specification that provides a complete set of interfaces. These interfaces allow for portable access to an underlying database.
We can use Java to write different types of executables, such as:
- Java Applications
- Java Applets
- Enterprise JavaBeans (EJBs)
- Java Servlets
- Java ServerPages (JSPs)
All these different executables can use a JDBC driver to access a database, and take advantage of the stored data. JDBC provides similar capabilities as ODBC by allowing Java programs to contain database-independent code.
The JDBC 4.0 Packages
There are two primary packages for JDBC 4.0: java.sql and javax.sql. JDBC 4.0 is the latest JDBC version at the time of writing this article. These packages offer the main classes for interacting with data sources.
The new features in these packages include changes in the following areas:
- Automatic database driver loading.
- Exception handling improvements.
- National character set support.
- SQL ROWID access.
- Enhanced BLOB/CLOB functionality.
- Connection and statement interface enhancements.
- SQL 2003 XML data type support.
- Annotations.
Components of JDBC
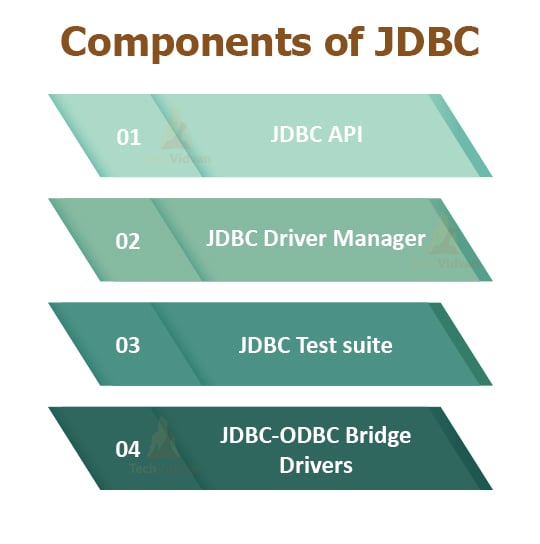
Let us move further in the JDBC Tutorial and learn the JDBC components. There are mainly four main components of JDBC. These components help us to interact with a database. The components of JDBC are as follows:
1. JDBC API: The JDBC API provides various classes, methods, and interfaces that are helpful in easy communication with the database. It also provides two packages that contain the Java SE(Standard Edition) and Java EE(Enterprise Edition) platforms to exhibit the WORA(write once run everywhere) capabilities.
There is also a standard in JDBC API to connect a database to a client application.
2. JDBC Driver Manager: The Driver Manager of JDBC loads database-specific drivers in an application. This driver manager establishes a connection with a database. It also makes a database-specific call to the database so that it can process the user request.
3. JDBC Test suite: The Test Suite of JDBC helps to test the operation such as insertion, deletion, updation that the JDBC Drivers perform.
4. JDBC-ODBC Bridge Drivers: The JDBC-ODBC Bridge Driver connects the database drivers to the database. This bridge driver translates the JDBC method call to the ODBC method call. It uses a package in which there is a native library to access ODBC characteristics.
Architecture of JDBC
The following figure shows the JDBC architecture:
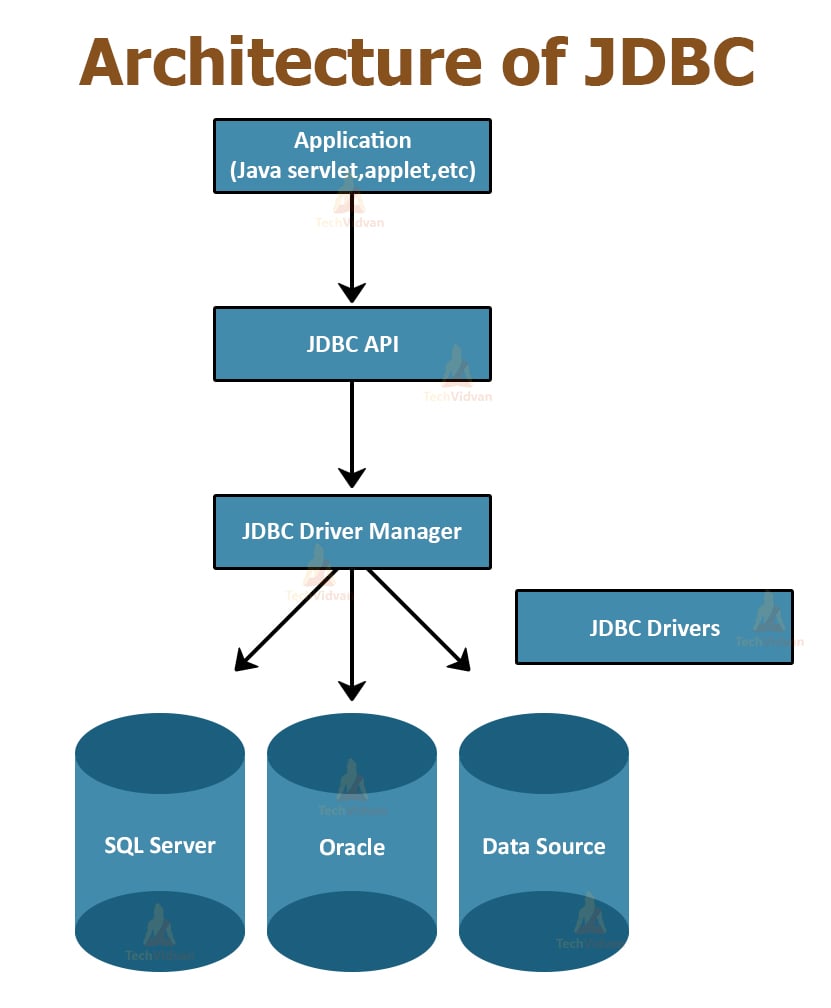
Description of the Architecture:
1. Application: Application in JDBC is a Java applet or a Servlet that communicates with a data source.
2. JDBC API: JDBC API provides classes, methods, and interfaces that allow Java programs to execute SQL statements and retrieve results from the database. Some important classes and interfaces defined in JDBC API are as follows:
- DriverManager
- Driver
- Connection
- Statement
- PreparedStatement
- CallableStatement
- ResultSet
- SQL data
3. Driver Manager: The Driver Manager plays an important role in the JDBC architecture. The Driver manager uses some database-specific drivers that effectively connect enterprise applications to databases.
4. JDBC drivers: JDBC drivers help us to communicate with a data source through JDBC. We need a JDBC driver that can intelligently interact with the respective data source.
Types of JDBC Architecture
There are two types of processing models in JDBC architecture: two-tier and three-tier. These models help us to access a database. They are:
1. Two-tier model
In this model, a Java application directly communicates with the data source. JDBC driver provides communication between the application and the data source. When a user sends a query to the data source, the answers to those queries are given to the user in the form of results.
We can locate the data source on a different machine on a network to which a user is connected. This is called a client/server configuration, in which the user machine acts as a client, and the machine with the data source acts as a server.
2. Three-tier model
In the three-tier model, the query of the user queries goes to the middle-tier services. From the middle-tier service, the commands again reach the data source. The results of the query go back to the middle tier.
From there, it finally goes to the user. This type of model is beneficial for management information system directors.
Prerequisites of JDBC
- JDK(Java Development Kit)
- Oracle Database: Download it from http://www.oracle.com/technetwork/database/database-technologies/express-edition/downloads/index.html
- JDBC driver for Oracle Database: Download it from http://www.oracle.com/technetwork/apps-tech/jdbc-112010-090769.html. Add ojdbc6.jar to the project library.
Steps to connect Java program and database:

1. Loading the Driver
We first need to load the driver or register it before using it in the program. There should be registration once in your program. We can register a driver in any of the two ways:
a. Class.forName(): In this, we load the driver’s class file into memory during runtime. There is no need to use a new operator for the creation of an object. The following shows the use of Class.forName() to load the Oracle driver:
Class.forName(“oracle.jdbc.driver.OracleDriver”);
b. DriverManager.registerDriver(): DriverManager is an inbuilt class of Java that comes with a static member register. We call the drivers class’ constructor at compile-time. The following example shows the use of DriverManager.registerDriver() to register the Oracle driver:
DriverManager.registerDriver(new oracle.jdbc.driver.OracleDriver())
2. Create the connections
After loading the driver, we need to establish connections using the following code:
Connection con = DriverManager.getConnection(url, user, password)
- user: username from which sql command prompt can be accessed.
- password: password from which sql command prompt can be accessed.
- con: reference to Connection interface.
- url : Uniform Resource Locator. We can create it as follows:
- String url = “ jdbc:oracle:thin:@localhost:1521:xe”
Where oracle is the database, thin is the driver, @localhost is the IP Address where the database is stored, 1521 is the port number, and xe is the service provider. All three parameters are of String type and the programmer should declare them before calling the function.
3. Create a statement
Once you establish a connection, you can interact with the database. The JDBCStatement, CallableStatement, and PreparedStatement interfaces define the methods that allow us to send the SQL commands and receive data from the database.
Use of JDBC Statement is as follows:
Statement statement = con.createStatement()
Here, con is a reference to the Connection interface that we used in the previous step.
4. Execute the query
The most crucial part is executing the query. Here, Query is an SQL Query. Now, as we know that we can have multiple types of queries. Some of them are as follows:
- The query for updating or inserting tables in a database.
- The query for retrieving data from the database.
The executeQuery() method of the Statement interface executes queries of retrieving values from the database. The executeQuery() method returns the object of ResultSet that we can use to get all the records of a table.
5. Close the connections
Till now, we have sent the data to the specified location. Now, we are about to complete our task. We need to close the connection. By closing the connection, objects of Statement and ResultSet interface are automatically closed. The close() method of Connection interface closes the connection.
Example :
con.close();
Implementation
package com.techvidvan.jdbctutorial;
import java.sql. * ;
import java.util. * ;
class JDBCTutorial {
  public static void main(String a[]) {
    //Creating the connection
    String url = "jdbc:oracle:thin:@localhost:1521:xe";
    String user = "system";
    String pass = "12345";

    //Entering the data
    Scanner sc = new Scanner(System. in );
    System.out.println("Enter name:");
    String name = sc.next();
    System.out.println("Enter Roll number:");
    int rollNumber = sc.nextInt();
    System.out.println("Enter class:");
    String cls = sc.next();

    //Inserting data using SQL query
    String sql = "insert into student values('" + name + "'," + rollNumber + ",'" + cls + "')";
    Connection con = null;
    try {
      DriverManager.registerDriver(new oracle.jdbc.OracleDriver());

      //Reference to connection interface
      con = DriverManager.getConnection(url, user, pass);

      Statement st = con.createStatement();
      int result = st.executeUpdate(sql);
      if (result == 1) System.out.println("Inserted successfully: " + sql);
      else System.out.println("Insertion failed");
      con.close();
    }
    catch(Exception e) {
      System.err.println(e);
    }
  }
}
Output:
Shreya
Enter Roll number:
123
Enter class:
8C
Inserted successfully: insert into student values(‘Shreya’, ‘123’, ‘8C’)
Working of JDBC
Now, moving ahead in this JDBC Tutorial, let us learn working of JDBC. A Java application that communicates with the database requires programming using JDBC API.
We need to add Supporting data sources of JDBC Driver such as Oracle and SQL server in Java application for JDBC support. We can do this dynamically at run time. This JDBC driver intelligently interacts with the respective data source.
Creating a simple JDBC application
package com.techvidvan.jdbctutorial;
import java.sql. * ;
public class JDBCTutorial {
  public static void main(String args[]) throws ClassNotFoundException,
  SQLException,
  {
    String driverName = "sun.jdbc.odbc.JdbcOdbcDriver";
    String url = "jdbc:odbc:XE";
    String username = "John";
    String password = "john12";
    String query1 = "insert into students values(101, 'Pooja')";

    //Load the driver class
    Class.forName(driverName);

    //Obtaining a connection
    Connection con = DriverManager.getConnection(url, username, password);

    //Obtaining a statement
    Statement stmt = con.createStatement();

    //Executing the query
    int count = stmt.executeUpdate(query1);
    System.out.println("The number of rows affected by this query= " + count);

    //Closing the connection
    con.close();
  }
}
The above example shows the basic steps to access a database using JDBC. We used the JDBC-ODBC bridge driver to connect to the database. We have to import the java.sql package that provides basic SQL functionality.
Principal JDBC Interfaces and Classes
Let us take an overview look at the principal interfaces and classes of JDBC. They are all present in the java.sql package.
1. Class.forName()
This method loads the driver’s class file into memory at runtime. There is no need to use new or creation of objects.
Class.forName("oracle.jdbc.driver.OracleDriver");
2. DriverManager
The DriverManager class registers drivers for a specific database type. For example, Oracle Database in this tutorial. This class also establishes a database connection with the server using its getConnection() method.
3. Connection
The Connection interface represents an established database connection. Using this connection, we can create statements to execute queries and retrieve results. We can also get metadata about the database, close the connection, etc.
Connection con = DriverManager.getConnection
("jdbc:oracle:thin:@localhost:1521:orcl", "login1", "pwd1");
4. Statement and PreparedStatement
The Statement and PreparedStatement interfaces execute a static SQL query and parameterized SQL queries. The statement interface is the super interface of the PreparedStatement interface. The commonly used methods of these interfaces are:
a. boolean execute(String sql): This method executes a general SQL statement. It returns true if the query returns a ResultSet and false if the query returns nothing. We can use this method with a Statement only.
b. int executeUpdate(String sql): This method executes an INSERT, UPDATE, or DELETE statement. It then returns an updated account showing the number of rows affected. For example, 1 row inserted, or 2 rows updated, or 0 rows affected, etc.
c. ResultSet executeQuery(String sql): This method executes a SELECT statement and returns an object of ResultSet. This returned object contains results returned by the query.
5. ResultSet
The ResultSet is an interface that contains table data returned by a SELECT query. We use the object of ResultSet to iterate over rows using the next() method.
6. SQLException
The SQLException class is a checked exception. We declare it to so all the above methods can throw this exception. We have to provide a mechanism to explicitly catch this exception when we call the methods of the above classes.
Implementing Insert Statement in JDBC
package com.techvidvan.jdbctutorial;
import java.sql. * ;
public class InsertStatementDemo {
  public static void main(String args[]) {
    String id = "id1";
    String password = "pswd1";
    String fullname = "TechVidvan";
    String email = "techvidvan.com";

    try {
      Class.forName("oracle.jdbc.driver.OracleDriver");
      Connection con = DriverManager.getConnection("
      jdbc:oracle:thin:@localhost:1521:orcl", "login1", "pswd1");
      Statement stmt = con.createStatement();

      // Inserting data in database
      String s1 = "insert into userid values('" + id + "', '" + password + "', '" + fullname + "', '" + email + "')";
      int result = stmt.executeUpdate(s1);
      if (result > 0) System.out.println("Successfully Registered");
      else System.out.println("Insertion Failed");
      con.close();
    }
    catch(Exception e) {
      System.out.println(e);
    }
  }
}
Output:
Implementing Update Statement in JDBC
package com.techvidvan.jdbctutorial;
import java.sql. * ;
public class UpdateStatementDemo {
  public static void main(String args[]) {
    String id = "id1";
    String password = "pswd1";
    String newPassword = "newpswd";
    try {
      Class.forName("oracle.jdbc.driver.OracleDriver");
      Connection con = DriverManager.getConnection("
      jdbc:oracle:thin:@localhost:1521:orcl", "login1", "pswd1");
      Statement stmt = con.createStatement();

      // Updating database
      String s1 = "UPDATE userid set password = '" + newPassword + "' WHERE id = '" + id + "' AND password = '" + password + "'";
      int result = stmt.executeUpdate(s1);

      if (result > 0) System.out.println("Password Updated Successfully ");
      else System.out.println("Error Occured!!Could not update");
      con.close();
    }
    catch(Exception e) {
      System.out.println(e);
    }
  }
}
Output:
Implementing Delete Statement in JDBC
package com.techvidvan.jdbctutorial;
import java.sql. * ;
public class DeleteStatementDemo {
  public static void main(String args[]) {
    String id = "id2";
    String password = "pswd";
    try {
      Class.forName("oracle.jdbc.driver.OracleDriver");
      Connection con = DriverManager.getConnection("
      jdbc:oracle:thin:@localhost:1521:orcl", "login1", "pswd1");
      Statement stmt = con.createStatement();

      //Deleting from database
      String s1 = "DELETE from userid WHERE id = '" + id + "' AND password = '" + pswd + "'";

      int result = stmt.executeUpdate(s1);

      if (result > 0) System.out.println("One User Successfully Deleted");
      else System.out.println("Error Occured!!Could not delete");

      con.close();
    }
    catch(Exception e) {
      System.out.println(e);
    }
  }
}
Output:
Implementing Select Statement in JDBC
package com.techvidvan.jdbctutorial;
import java.sql. * ;
public class SelectStatementDemo {
  public static void main(String args[]) {
    String id = "id1";
    String password = "pwd1";
    try {
      Class.forName("oracle.jdbc.driver.OracleDriver");
      Connection con = DriverManager.getConnection("
      jdbc:oracle:thin:@localhost:1521:orcl", "login1", "pwd1");
      Statement stmt = con.createStatement();

      //SELECT query
      String s1 = "select * from userid WHERE id = '" + id + "' AND pwd = '" + pwd + "'";
      ResultSet rs = stmt.executeQuery(s1);
      if (rs.next()) {
        System.out.println("User-id: " + rs.getString(1));
        System.out.println("Full Name: " + rs.getString(3));
        System.out.println("E-mail: " + rs.getString(4));
      }
      else {
        System.out.println("This id is already registered");
      }
      con.close();
    }
    catch(Exception e) {
      System.out.println(e);
    }
  }
}
Output:
Full Name: TechVidvan
E-mail: techvidvan.com
Conclusion
In this JDBC tutorial, we learned how to perform the various database operations in Java. We also discussed various programs and steps of Connecting to a database.
Then we learned to execute the INSERT statement, the SELECT Statement, the UPDATE statement, AND the DELETE statement with an example program. We covered the architecture and components of JDBC.
We hope this article will surely help you in performing database operations in Java.