Scaling Application in Node.js
Although Node.js operates in a single-thread mode, it handles concurrency using an event-driven architecture. Additionally, it makes it easier to create child processes so that multi-core CPU-based systems can benefit from parallel processing.
Child processes always have three stdin, stdout, and stderr streams, which can be shared with the parent process’s stdio streams.
The Node.js child process module provides three major ways to create a child process:
1. ‘spawn’(): Launches a new process and provides streams for communication.
2. ‘exec’(): Executes a command in a shell, buffers the output, and provides it in a callback.
3. ‘fork’(): Creates a child process that communicates with the parent process through IPC (inter-process communication) using message events and send function.
The exec() method:
The ‘exec()’ method in the ‘child_process’ module of Node.js has several parameters that allow you to customize the behavior of the executed command. Here are the parameters used in the ‘exec()’ method:
1. ‘command’ (string): The command to be executed in a shell.
2. ‘options’ (object, optional): An object that allows you to specify additional options for executing the command.
- ‘cwd’ (string, optional): The current working directory for the command.
- ‘Env’ (object, optional): Key-value pairs representing the environment variables.
- ‘encoding’ (string, optional): The character encoding to use for the command’s output. Defaults to ‘utf8’.
- ‘shell’ (string, optional): The shell to be used for executing the command. Defaults to ‘/bin/sh’.
- ‘timeout’ (number, optional): The maximum amount of time in milliseconds the process is allowed to run.
- ‘maxBuffer’ (number, optional): The largest amount of data in bytes allowed on stdout or stderr. If exceeded, an error is thrown.
- ‘killSignal’ (string or integer, optional): The signal used to kill the process when the ‘timeout’ option is specified.
- ‘uid’ (number, optional): Sets the user identity of the process.
- ‘gid’ (number, optional): Sets the group identity of the process.
- ‘windowsHide’ (boolean, optional): Hides the subprocess console window on Windows.
3. ‘callback’ (function): A callback function that is invoked when the command execution is complete. It receives three arguments: ‘error’, ‘stdout’, and ‘stderr’.
const { exec } = require('child_process');

exec('ls -l', (error, stdout, stderr) => {
  if (error) {
    console.error(`Error: ${error.message}`);
    return;
  }

  if (stderr) {
    console.error(`Error: ${stderr}`);
    return;
  }

  console.log(`Output: ${stdout}`);
});
The ‘exec()’ method executes the ‘ls -l’ command, and the callback function handles the results, including any errors, stdout, and stderr.
Output:
total 20
drwxr-xr-x 2 user staff 64 May 20 10:15 directory1
-rw-r–r– 1 user staff 116 May 20 10:15 file1.txt
-rw-r–r– 1 user staff 120 May 20 10:15 file2.txt
Another Example:-
Support.js
console.log("Child Process " + process.argv[2] + " executed." );
Master.js
const fs = require('fs');
const child_process = require('child_process');

for(var i=0; i<3; i++) {
   var workerProcess = child_process.exec('node support.js '+i,function
      (error, stdout, stderr) {

      if (error) {
         console.log(error.stack);
         console.log('Error code: '+error.code);
         console.log('Signal received: '+error.signal);
      }
      console.log('stdout: ' + stdout);
      console.log('stderr: ' + stderr);
   });

   workerProcess.on('exit', function (code) {
      console.log('Child process exited with exit code '+code);
   });
}
execute the master code and the output will be [node master.js]:-
Child process exited with exit code 0
stdout: Child Process 1 executed.

stderr:
Child process exited with exit code 0
stdout: Child Process 0 executed.

stderr:
Child process exited with exit code 0
stdout: Child Process 2 executed.
The spawn() Method:
The ‘spawn()’ method in the ‘child_process’ module of Node.js provides several parameters to customize the behavior of the spawned child process. Here are the parameters used in the ‘spawn()’ method:
1. ‘command’ (string): The command to be executed. It should be the name or path of the executable.
2. ‘args’ (array, optional): An array of command-line arguments to be passed to the command.
3. ‘options’ (object, optional): An object that allows you to specify additional options for spawning the child process.
- ‘cwd’ (string, optional): The current working directory for the child process.
- ‘env’ (object, optional): Key-value pairs representing the environment variables for the child process.
- ‘stdio’ (string, array, or object, optional): The standard input/output/error configuration for the child process.
- ‘detached’ (boolean, optional): Specifies if the child process should be detached from the parent.
- ‘uid’ (number, optional): Sets the user identity of the child process.
- ‘gid’ (number, optional): Sets the group identity of the child process.
- ‘shell’ (boolean or string, optional): Specifies whether to execute the command through the system shell.
- ‘windowsVerbatimArguments’ (boolean, optional): Specifies whether to quote the arguments on Windows systems.
- ‘windowsHide’ (boolean, optional): Hides the subprocess console window on Windows.
- ‘timeout’ (number, optional): The maximum amount of time in milliseconds the process is allowed to run.
- ‘killSignal’ (string or integer, optional): The signal used to kill the process when the ‘timeout’ option is specified.
const { spawn } = require('child_process');

const child = spawn('ls', ['-l']);

child.stdout.on('data', (data) => {
  console.log(`Output: ${data}`);
});

child.stderr.on('data', (data) => {
  console.error(`Error: ${data}`);
});

child.on('close', (code) => {
  console.log(`Child process exited with code ${code}`);
});
The ‘spawn()’ method spawns a child process with the command ‘ls’ and the argument [‘-l’]. The child process’s output is captured through ‘stdout’ and ‘stderr’ events, and the ‘close’ event is triggered when the child process exits.
Another Example:-
Support.js
console.log("Child Process " + process.argv[2] + " executed." );
Master.js
const fs = require('fs');
const child_process = require('child_process');

for(var i = 0; i<3; i++) {
   var workerProcess = child_process.spawn('node', ['support.js', i]);

   workerProcess.stdout.on('data', function (data) {
      console.log('stdout: ' + data);
   });

   workerProcess.stderr.on('data', function (data) {
      console.log('stderr: ' + data);
   });

   workerProcess.on('close', function (code) {
      console.log('child process exited with code ' + code);
   });
}
execute the master code and the output will be [node master.js]:-
stdout: Child Process 0 executed.

child process exited with code 0
stdout: Child Process 1 executed.

stdout: Child Process 2 executed.

child process exited with code 0
child process exited with code 0
The fork() Method:
The ‘fork()’ method in the ‘child_process’ module of Node.js has several parameters that allow you to configure the behavior of the forked child process. Here are the parameters used in the ‘fork()’ method:
1. ‘modulePath’ (string): The path to the module file that will be executed as the child process.
2. ‘args’ (array, optional): An array of command-line arguments to be passed to the module.
3. ‘options’ (object, optional): An object that allows you to specify additional options for forking the child process.
- ‘cwd’ (string, optional): The current working directory for the child process.
- ‘env’ (object, optional): Key-value pairs representing the environment variables for the child process.
- ‘execPath’ (string, optional): The path to the Node.js executable to be used for the child process.
- ‘execArgv’ (array, optional): An array of Node.js command-line arguments to be passed to the child process.
- ‘stdio’ (string, array, or object, optional): The standard input/output/error configuration for the child process.
- ‘uid’ (number, optional): Sets the user identity of the child process.
- ‘gid’ (number, optional): Sets the group identity of the child process.
- ‘silent’ (boolean, optional): If ‘true’, disables the IPC channel between the parent and child process.
- ‘serialization’ (string, optional): Specifies the type of serialization used for sending messages between the parent and child processes.
- ‘stdioStream’ (boolean, optional): If true, creates a separate stream for each stdio channel.
- ‘windowsVerbatimArguments’ (boolean, optional): Specifies whether to quote the arguments on Windows systems.
- ‘windowsHide’ (boolean, optional): Hides the subprocess console window on Windows.
const { fork } = require('child_process');

const child = fork('child.js');

child.on('message', (message) => {
  console.log(`Received message from child process: ${message}`);
});

child.send('Hello, child process!');
In this example, the ‘fork()’ method creates a child process that executes the ‘child.js’ module. The parent process communicates with the child process using the ‘message’ event and the ‘send()’ function.
Another Example:-
Support.js
console.log("Child Process " + process.argv[2] + " executed." );
Master.js
const fs = require('fs');
const child_process = require('child_process');

for(var i=0; i<3; i++) {
   var worker_process = child_process.fork("support.js", [i]);

   worker_process.on('close', function (code) {
      console.log('child process exited with code ' + code);
   });
}
execute the master code, and the output will be [node master.js]:-
Child Process 0 executed.
Child Process 1 executed.
Child Process 2 executed.
child process exited with code 0
child process exited with code 0
child process exited with code 0
Setting Up The Project Directory [Setup]
We will create the directory for the project and download the dependencies for the application which we will be creating here:
Make a directory first to start. You can give the directory any name you like, such as the cluster_demo:
mkdir cluster_demo
Enter the directory after that:
cd cluster_demo
The project must then be initialised in order to produce a package.the json file
npm init -y
NPM is instructed to accept all default options by the -y option.
The command will produce output that complies with the following when it runs:
Output
Wrote to /home/sammy/cluster_demo/package.json:

{
  "name": "cluster_demo",
  "version": "1.0.0",
  "description": "",
  "main": "index.js",
  "scripts": {
    "test": "echo \"Error: no test specified\" && exit 1"
  },
  "keywords": [],
  "author": "",
  "license": "ISC"
}
Take note of the following characteristics that relate to your particular project:
name: The npm package’s name.
version: The version of your package.
main: the point at which your project begins.
Next, launch your preferred editor (nano will be used in this tutorial) and open the package.json file:
nano package.json,
Add the italicised text to your package.json file to enable support for ES modules when importing packages:
{
  ...
  "author": "",
  "license": "ISC",
  "type": "module"
}
Save and close the file
You will then download the following files:
express is a Node.js framework for creating web applications.js.
An app’s performance can be evaluated by creating traffic with the help of the loadtest tool.
PM2 is a programme that scales apps to use multiple CPUs automatically.
For the Express package to download, enter the following command:
npm install express
Run the following command to download PM2 and loadtest globally next:
npm install -g loadtest pm2
After setting up the required dependencies, you will now create an application without using clustering.
Strategies of Scalability
There are several strategies that can be employed to effectively handle increasing workloads and user demands. Here, I’ll explain three strategies: cloning, decomposing, and splitting.
1. Cloning:- Cloning is the process of making exact replicas of a service or application in order to handle the increased load. Because the load is shared equally among the clones, capacity is increased, and performance is improved. Cloning can be done by creating duplicate instances of an application using containerization technologies like Docker or by replicating entire servers or virtual machines. Incoming requests can then be split among these clones by load balancers, ensuring optimum resource use.
2. Decomposing:- Another technique for scalability is to decompose, or break down, an application into smaller, independent components or services. Using this strategy, which is frequently used in conjunction with a microservices architecture, a monolithic application is divided into modular services that can be created, deployed, and scaled independently. Each service specialises in a particular functionality or industry, allowing teams to work on them independently. Microservices enable more effective scaling because they can each be scaled independently based on their unique demand, optimising resource allocation and enhancing overall performance.
3. Splitting:- Splitting is the process of distributing the workload among various systems or resources. It entails segmenting various components of an application or its data in order to spread the load and improve scalability. For instance, splitting can take the form of sharding in the context of a database, where data is horizontally divided across several database instances or servers based on particular criteria (such as user ID or geographic region). The ability of each shard to handle a portion of the total data enables parallel processing and enhances performance. In a similar vein, splitting can also entail dividing up functionality or tasks across several servers or services to prevent bottlenecks and allow for independent scaling of different components.
Based on the unique needs and architectural design of an application, these cloning, decomposing, and splitting strategies offer various ways to achieve scalability. They enable flexible system scaling both horizontally and vertically, maximise resource efficiency, and guarantee effective management of growing workloads. The best strategy to use, or a combination of strategies, will depend on a number of variables, including the application’s nature, expected growth, performance requirements, and available resources.
Cluster Module
A cluster of child processes also referred to as worker processes, can be created and managed using the cluster module, a built-in module in Node.js. It offers a simple method to take advantage of multiple CPU cores, enhancing the performance and scalability of Node.js applications.
The cluster module’s primary function is to make it possible to distribute incoming network connections and requests among several workers, enabling the application to support more concurrent connections. This is accomplished by setting up a group of child processes that share a server port. Each child process functions as a separate instance of the application, able to respond to requests and execute parallel programs.
Here are the key features and components of the cluster module:
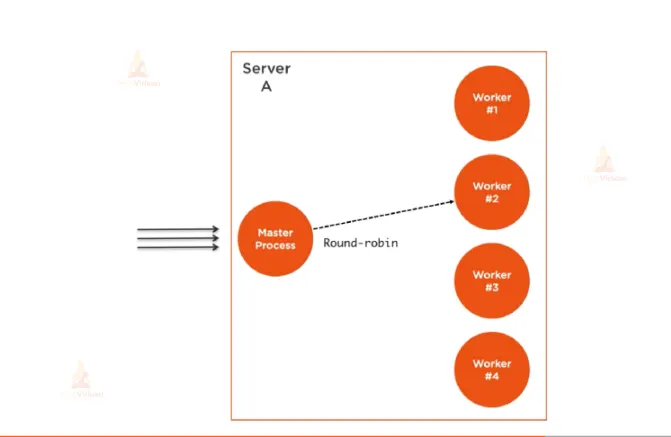
1. Master Process: Initiating and overseeing worker processes is the responsibility of the master process. It keeps an ear out for network connections and divides them up between the workers using different algorithms, like round-robin or the least-connection technique.
2. Worker Processes: The master process generates worker processes. With its own event loop and memory space, each worker runs as a distinct instance of the application. They can each manage incoming requests independently while sharing the same server port.
3. Load Balancing: To fairly distribute network connections across the available worker processes, the cluster module employs an internal load balancing mechanism. This aids in making the most of multi-core systems’ capabilities and handling heavier concurrent loads.
4.Inter-Process Communication (IPC): IPC channels are used by the master and worker processes to communicate. By enabling message transfer between the master and workers, the IPC facilitates data sharing, action coordination, and operation synchronisation.
You may extend your application horizontally and utilise all of the CPU cores available by using the cluster module to handle additional traffic and boost performance. The module offers a simple and effective approach to constructing a clustered Node.js application by abstracting away the complexities of maintaining many processes, load balancing, and inter-process communication.
Here’s a simple example demonstrating the usage of the cluster module:
const cluster = require('cluster');
const http = require('http');
const numCPUs = require('os').cpus().length;

if (cluster.isMaster) {
  console.log(`Master ${process.pid} is running`);

  // Fork workers
  for (let i = 0; i < numCPUs; i++) {
    cluster.fork();
  }

  // Handle worker events
  cluster.on('exit', (worker, code, signal) => {
    console.log(`Worker ${worker.process.pid} died`);
    // Replace the dead worker
    cluster.fork();
  });
} else {
  // Worker process - create an HTTP server
  http.createServer((req, res) => {
    res.writeHead(200);
    res.end('Hello, World!');
  }).listen(8000);

  console.log(`Worker ${process.pid} started`);
}
In this case, the master process uses a cluster. fork() to establish numerous worker processes, each of which manages incoming HTTP requests individually. When a worker process terminates, the master process forks a new worker to take its place. The cluster module automatically manages the load balancing, enabling the application to effectively handle more concurrent requests.