Create Chatbot with Python & Artificial Intelligence
Do you want your friend to solve your problems instantly? and most importantly Do you want your friend to be with you for the rest of your life? Then you don’t have to be worried. All of these qualities may be found in the most widely used AI application, the CHATBOT!
What is Chatbot?
Chat bot is a software application that uses artificial intelligence and natural language processing to allow you to have a text-based or text-to-speech conversation.
Types of Chatbots:
1. Rule-based Chatbots: Rule-based chatbots are often known as decision tree bots since they understand queries using a tree-like flow. For each query, it has a set of predefined responses. They aren’t aware of the context of the user’s query.
2. AI based Chatbots: AI chatbots uses natural language processing (NLP) and machine learning to understand the context and intent of a user’s query pattern and to create connections between different queries which are asked in different ways in order to provide a better response.
About the Python Chatbot Project:
So in this Chatbot project, we are going to make an AI-based contextual chatbot that will maintain the context or in which sense or proportion the user is asking a query. Further using deep learning techniques in Python, we will construct a Sequential model for our training sets of data. The intents, patterns, and responses will all be used to train the chatbot. The user’s query will be mapped to the intents class using neural networks, which will maintain context and then return a random response.
Prerequisites for Python Deep Learning Chatbot project:
Modules required: nltk, pickle, tensorflow, numpy, sklearn
The versions which are used in this project for python and its corresponding modules are as follows:
- Python: 3.8.5
- Tensorflow: 2.3.1 Note: TensorFlow version should be 2.2 or higher in order to use keras or else install keras directly
- sklearn: 0.24.2
- pickle: 4.0
- numpy: 1.19.5
- nltk: 3.2.5
Download Chatbot Project Code & Dataset
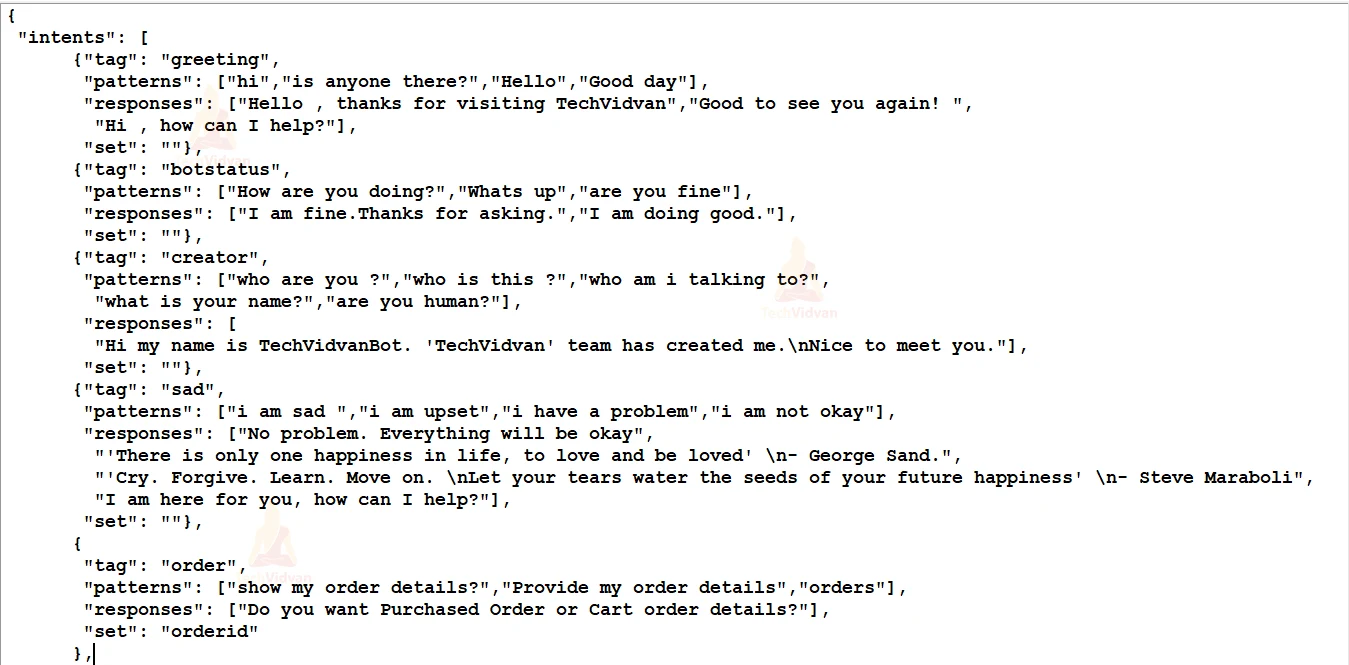
The dataset for python chatbot project will be ‘intents.json’. This file contains the required patterns we need to find and corresponding responses we want to return to the end users.
Please download chatbot project code & dataset from the following link: Python Chatbot Project
How to Create a Chatbot in Python?
Before creating the chatbot let’s have a glance through the project file structure.
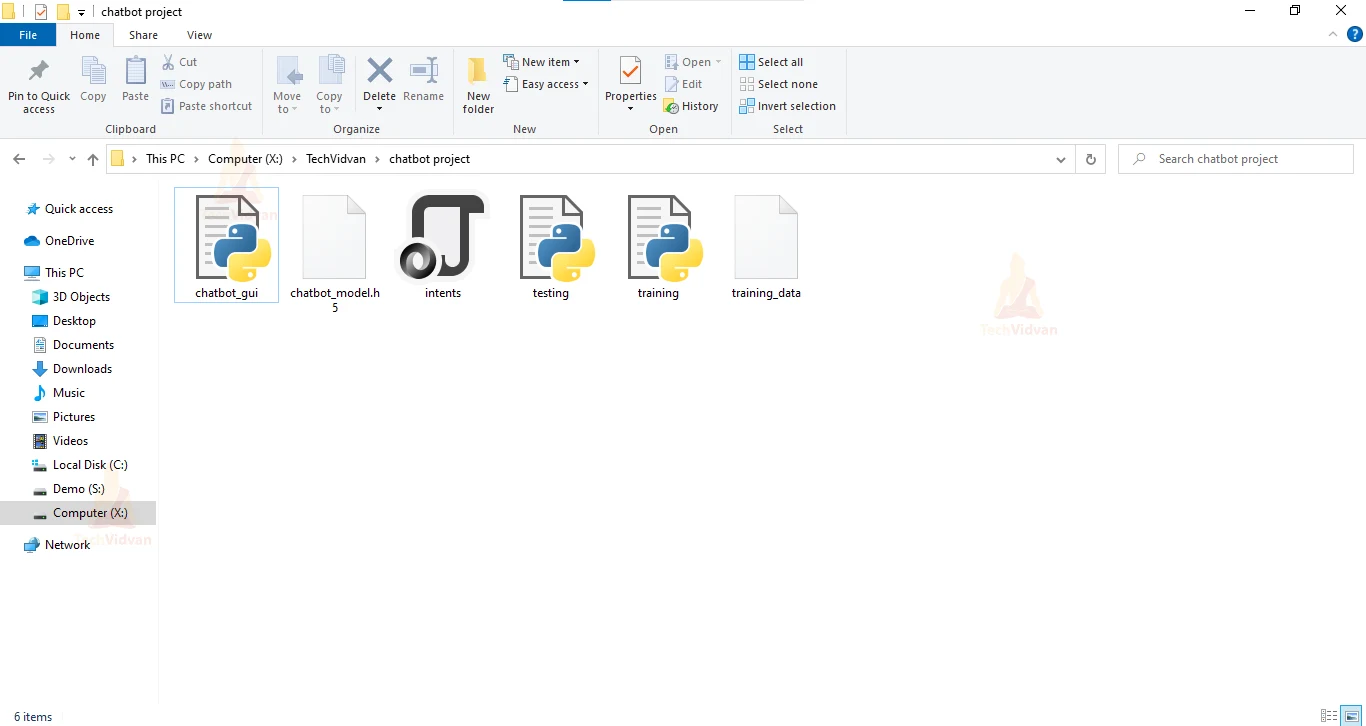
- intents.json – This file contains sets of tags, patterns, and responses. The intent of every class has a set and filter to check in which contexts the user query belong to.
- training.py: This file is used to create the model and train our python chatbot.
- training_data.file: This file contains lists of words, patterns, and training sets in a binary format which we get when we train our chat bot model.
- chatbot_model.h5: This file stores the trained model neurons weights and also the configuration of the model.
- testing.py: This file is used to predict in which tag(classes) the user’s query belongs to and return a random response from that tag.
- chatbot_gui.py: This file is the GUI for the Chatbot where users can interact with the bot and also they can train their bot.
1. Import modules and load intents file
Make a file with the name ‘training.py’ and import all required modules
Code:
#TechVidvan ChatBot project
import nltk, random, json , pickle
nltk.download('punkt');nltk.download('wordnet')
from nltk.stem import WordNetLemmatizer
from nltk.tokenize import word_tokenize
from nltk import flatten
import numpy as np
from sklearn.feature_extraction.text import CountVectorizer
from tensorflow.keras.models import Sequential
from tensorflow.keras.layers import Dense,Activation,Dropout
from tensorflow.keras.optimizers import SGD
Create a class with the name “Training”. In the constructor of this class we will initialize all variables which will be accessible through all class methods. So firstly we will read the ‘intents.json’ file and will parse the intents file which is in JSON format by json module into the ‘intents’ variable using json. The ‘ignore words’ variable will contain all the symbols which we are going to remove from patterns.
Code:
lemmatizer=WordNetLemmatizer()
class Training:
def __init__(self):
    #read and load the intent file
    data_file=open('intents.json').read()
    self.intents=json.loads(data_file)['intents']
    self.ignore_words=list("!@#$%^&*?")
    self.process_data()
Intents.json file :
2. Preprocessing the Data
Preprocess is required to transform textual data into a clean data set that will eventually be fed in our python chatbot models. We’ll create a class method process_data() which will perform various operations on our text data.
a. Tokenizing: Tokenizing is the process of splitting a stream of texts like sentences into smaller chunks(tokens) like words.
We will be using a natural language processing module named ‘nltk’ which contains the ‘word_tokenize()’ function for the tokenizing process. In this method we will iterate through patterns and tokenize each sentence. For iteration, we are going to use the in-built python map function.
Map function is used to link “Functions” with every element of the “Iterables” and return the generator. This generator can be later converted to lists or any other data type. Let’s see what are arguments of map functions are:
1. Function: you can create your function using the “def” keyword and put the function name in Map as the first parameter or you can use lambda function expression. For more details on lambda function you can visit Python Lambda Expression.
2. Iterables: Iterables are nothing but a python object which can return its member one at a time. Examples can be strings, lists, sets, tuples etc. If you want, you can apply more iterables separated by commas in the map function.
Now you know how the map function works. Let’s use it in our code.
As I said earlier, we are iterating over patterns and tokenizing each sentence. So for this we are going to use map function. First argument will be the “word_tokenize” function and the second argument will be the patterns.
Code:
def process_data(self):
   #fetch patterns and tokenize them into words
   self.pattern=list(map(lambda x:x["patterns"],self.intents))
   self.words=list(map(word_tokenize,flatten(self.pattern)))
After every iteration, we will get words or chunks from these sentences which we will store into the ‘words’ variable. After that we will make a “document” variable which will have a tuple object containing two data’s. First will be the tokenized words and second will be its respective tag or class name.
Code:
#fetch classes i.e. tags and store in documents along with tokenized patterns
self.classes= flatten( [[x["tag"]]*len(y) for x,y in zip(self.intents,self.pattern)])
self.documents=list(map(lambda x,y:(x,y),self.words,self.classes))
After splitting words from patterns, the next step is to know the meaning of words. For this we we can use:
a. Stemming
Stemming is the process of reducing words into their word stem i.e. root of the words. If a user’s query contains an error word like “crazie”, stemming will reduce it to “crazy,” which is the root word. The main issue with stemming is that it might result in wrong meaning. For example, if the error word is ‘orde’ it will stem to the root word ‘ord.’ We can’t conclude that the user is looking for the word “order” or “ordeal” based on this.
b. Lemmatization
Lemmatization is the process of reducing words into their root words and ensures that the word is meaningful or in dictionary form. In Lemmatization the root word is called Lemma. Lemmatization is able to maintain the context of the user’s query pattern which helps to get meaningful words.
In this project we are going to use the Lemmatization method, you can also try the stemming method. After lemmatizing words, store them in the “words” variable and also remove all symbols if they are present in the tokenized words and lower case all the words.
Code:
#lower case and filter all the symbols from words
self.words=list(map(str.lower,flatten(self.words)))
self.words=list(filter(lambda x:x not in self.ignore_words,self.words))

#lemmatize the words and sort the class and word lists
self.words=list(map(lemmatizer.lemmatize,self.words))
self.words=sorted(list(set(self.words)))
self.classes=sorted(list(set(self.classes)))
3. Bag of words and Training sets
Bag of words is the process that one-hot encodes textual data and converts into a fixed-size vector length. Since we require numerical data for our model, we need to transform textual data ( “words” ) into numerical data. So we will vectorize chunks of words from sentences(pattern).
We’ll use sklearn’s CountVectorizer() method which will fit the words and return a list containing 0s if the word isn’t included in the intent’s pattern list and 1s if it is.
Also, we will create training sets which will contain input sets and output sets for our model. Our input will patterns and output will be the class respective to those patterns. Also shuffle the training sets to avoid the model getting trained on the same data again and again.
Code:
def train_data(self):
#initialize and set analyzer=word as we want to vectorize words not characters
cv=CountVectorizer(tokenizer=lambda txt:
txt.split(),analyzer="word",stop_words=None)
#create the training sets for model
training=[]
for doc in self.documents:
#lower case and lemmatize the pattern words
pattern_words=list(map(str.lower,doc[0]))
pattern_words=' '.join(list(map(lemmatizer.lemmatize,pattern_words)))

#train or fit the vectorizer with all words
#and transform into one-hot encoded vector
vectorize=cv.fit([' '.join(self.words)])
word_vector=vectorize.transform([pattern_words]).toarray().tolist()[0]

#create output for the respective input
#output size will be equal to total numbers of classes
output_row=[0]*len(self.classes)

#if the pattern is from current class put 1 in list else 0
output_row[self.classes.index(doc[1])]=1
cvop=cv.fit([' '.join(self.classes)])
out_p=cvop.transform([doc[1]]).toarray().tolist()[0]

#store vectorized word list long with its class
training.append([word_vector,output_row])

#shuffle training sets to avoid model to train on same data again
random.shuffle(training)
training=np.array(training,dtype=object)
train_x=list(training[:,0]) #patterns
train_y=list(training[:,1]) #classes
return train_x,train_y
4. Build the machine learning model
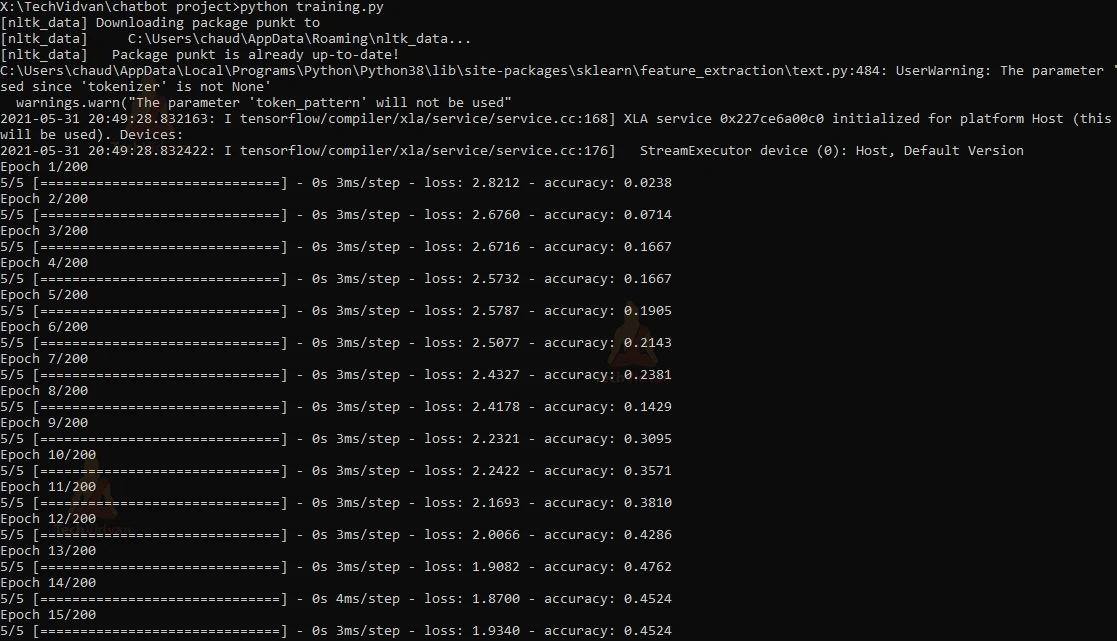
Now we can use our training sets to build the sequential model. This model will have 3 layers i.e Input Layer, hidden layer, and output layer. We will use TensorFlow’s Keras function to create a model. We will use Dropout to prevent overfitting between layers. Also, our input and the hidden layer will have ‘relu’ activation function and output Dense layer will have ‘softmax’ activation function. We are going to use SGD optimizer with a learning rate of 0.01 and train our model for 200 epochs in a batch size of 10.
Code:
def build(self):
 #load the data from train_data function
 train_x,train_y = self.train_data()

##Create a Sequential model with 3 layers.
model=Sequential()
#input layer with latent dimension of 128 neurons and ReLU activation function
model.add(Dense(128,input_shape=(len(train_x[0]),),activation='relu'))
model.add(Dropout(0.5)) #Dropout to avoid overfitting
#second layer with the latent dimension of 64 neurons
model.add(Dense(64,activation='relu'))
model.add(Dropout(0.5))
#fully connected output layer with softmax activation function
model.add(Dense(len(train_y[0]),activation='softmax'))
'''Compile model with Stochastic Gradient Descent with learning rate and
nesterov accelerated gradient descent'''
sgd=SGD(lr=1e-2,decay=1e-6,momentum=0.9,nesterov=True)
model.compile(loss='categorical_crossentropy',
optimizer=sgd,metrics=['accuracy'])
#fit the model with training input and output sets
hist=model.fit(np.array(train_x),np.array(train_y),
epochs=200,batch_size=10,verbose=1)
After training the model we will get 100% accuracy.
Let’s save this trained model in chatbot_model.h5’ file and also store “words”, “classes” and “training” (input and output) sets to ‘training_data.file’ using pickle which will help while predicting the response.
Code:
#save model and words,classes which can be used for prediction.
model.save('chatbot_model.h5',hist)
pickle.dump({'words':self.words,'classes':self.classes,
'train_x':train_x,'train_y':train_y},open("training_data","wb"))
5. Predicting the response for user’s query
For predicting we will firstly create a ‘testing.py’ file and load all the required modules.
Code:
#TechVidvan ChatBot project
import nltk, random, json , pickle
#nltk.download('punkt');nltk.download('wordnet')
from nltk.stem import WordNetLemmatizer
from nltk.tokenize import word_tokenize
import numpy as np
from tensorflow.keras.models import load_model
from sklearn.feature_extraction.text import CountVectorizer
Create a ‘Testing’ class where we will initialize all variables and load ‘intent.json’, ‘training_data.file’ and ‘chatbot_model.h5’ file. which will be accessible to all class methods. As you know our ‘training_data.file’ contains “words”, “classes” and “training” (input and output) sets from the training.py file.
Code:
lemmatizer=WordNetLemmatizer()
context={};
class Testing:
 def __init__(self):
  #load the intent file
  self.intents = json.loads(open('intents.json').read())
  #load the training_data file which contains training.py file data
  data=pickle.load(open("training_data","rb"))
  self.words=data['words']
  self.classes=data['classes']
  self.model=load_model('chatbot_model.h5')
  #set the error threshold value
  self.ERROR_THRESHOLD=0.5
  self.ignore_words=list("!@#$%^&*?")
Our prediction will depend on the user’s query so our input sentence for prediction will be a user query. So do the same process of lemmatization and vectorization(Bag of words) that we have done for patterns in our training.py file.
Code:
def clean_up_sentence(self,sentence):
 #tokenize each sentence (user's query)
 sentence_words=word_tokenize(sentence.lower())
 #lemmatize the word to root word and filter symbols words
 sentence_words=list(map(lemmatizer.lemmatize,sentence_words))
 sentence_words=list(filter(lambda x:x not in
self.ignore_words,sentence_words))
 return set(sentence_words)

def wordvector(self,sentence):
 #initialize CountVectorizer
 #txt.split helps to tokenize single character
 cv=CountVectorizer(tokenizer=lambda txt: txt.split())
 sentence_words=' '.join(self.clean_up_sentence(sentence))
 words=' '.join(self.words)

 #fit the words into cv and transform into one-hot encoded vector
 vectorize=cv.fit([words])
 word_vector=vectorize.transform([sentence_words]).toarray().tolist()[0]
 return(np.array(word_vector))
Now we will create a function “classify”. This function will predict the tag(classes) for the user’s query. Our python chatbot model will give us the probability value of every class(tag) for the user’s query. We will consider tag(classes) probability which are higher than the Threshold value that is 0.5 in our case. After that, sort them in descending order and consider the highest probability value class(tag).
Code:
def classify(self,sentence):
 #predict to which class(tag) user's query belongs to
 results=self.model.predict(np.array([self.wordvector(sentence)]))[0]
 #store the class name and probability of that class
 results = list(map(lambda x: [x[0],x[1]], enumerate(results)))
 #accept those class probability which are greater then threshold value,0.5
 results = list(filter(lambda x: x[1]>self.ERROR_THRESHOLD ,results))

 #sort class probability value in descending order
 results.sort(key=lambda x: x[1], reverse=True)
 return_list = []

 for i in results:
  return_list.append((self.classes[i[0]],str(i[1])))
 return return_list
So we are now ready for the response of the user query. As I said earlier, we are making a contextual chatbot. So we have to also check if the user’s query is a response to the previous query. For that we create a context dictionary and check if the user query falls into any context and then filter the query according to the context set.
Code:
def results(self,sentence,userID):
 #if context is maintained then filter class(tag) accordingly
 if sentence.isdecimal():
 if context[userID]=="historydetails":
   return self.classify('ordernumber')
return self.classify(sentence)
For example in the “intents.json” file, you will see a tag named ‘offers’ which has a set key with the value “productoffers” as context which means that the user is looking for those products which have offers on it. So store the value “productoffers” in the context dictionary with the key as “userID”. Now the context is ready for the user’s next query. Finally we will return response of those intent’s tag which have a filter key with the value as “productoffers”
Code:
def response(self,sentence,userID='TechVidvan'):
 #get class of users query
 results=self.results(sentence,userID)
 print(sentence,results)
 #store random response to the query
 ans=""
 if results:
  while results:
   for i in self.intents['intents']:
    #check if tag == query's class
     if i['tag'] == results[0][0]:

       #if class contains key as "set"
       #then store key as userid along with its value in
       #context dictionary
       if 'set' in i and not 'filter' in i:
          context[userID] = i['set']
       #if the tag doesn't have any filter return response
       if not 'filter' in i:
         ans=random.choice(i['responses'])

       #if a class has key as filter then check if context dictionary key's value is same as filter value
       #return the random response
       if userID in context and 'filter' in i and i['filter']==context[userID]:
        if 'set' in i:
         context[userID] = i['set']
        ans=random.choice(i['responses'])

results.pop(0)
#if ans contains some value then return response to user's query else return some message
return ans if ans!="" else "Sorry ! I am still Learning.\nYou can train me by providing more datas."
Now we’ll utilise Python’s Tkinter module to create a graphical user interface. The Tkinter library provides the quickest and easiest way to construct GUI applications as it’s equipped with several helpful libraries. We will accept the user’s input query and then on click of send button return the response of that query.
Import modules and files. Initialize the window
Code:
from tkinter import *
from tkinter import ttk
import json
#import the training.py
#and testing.py file
import testing as testpy
import training as trainpy
BG_GRAY="#ABB2B9"
BG_COLOR="#000"
TEXT_COLOR="#FFF"
FONT="Helvetica 14"
FONT_BOLD="Helvetica 13 bold"

class ChatBot:
def __init__(self):
 #initialize tkinter window
 self.window=Tk()
 self.main_window()
 self.test=testpy.Testing()

#run window
 def run(self):
  self.window.mainloop()
Create the main window for the conversation between user and chatbot.
Code:
def main_window(self):
 #add title to window and configure it
 self.window.title("ChatBot")
 self.window.resizable(width=False,height=False)
 self.window.configure(width=520,height=520,bg=BG_COLOR)
 #add tab for Chatbot and Train Bot in Notebook frame
 self.tab = ttk.Notebook(self.window)
 self.tab.pack(expand=1,fill='both')
 self.bot_frame=ttk.Frame(self.tab,width=520,height=520)
 self.train_frame=ttk.Frame(self.tab,width=520,height=520)
 self.tab.add(self.bot_frame,text='TechVidvanBot'.center(100))
 self.tab.add(self.train_frame,text='Train Bot'.center(100))
 self.add_bot()
 self.add_train()
Create heading for the window, text-area where the text will be displayed and input entry where the user will type the query along with the Send button.
Code:
def add_bot(self):
 #Add heading to the Chabot window
head_label=Label(self.bot_frame,bg=BG_COLOR,fg=TEXT_COLOR,text="Welcome to TechVidvan",font=FONT_BOLD,pady=10)
 head_label.place(relwidth=1)
 line = Label(self.bot_frame,width=450,bg=BG_COLOR)
 line.place(relwidth=1,rely=0.07,relheight=0.012)

 #create text widget where conversation will be displayed

self.text_widget=Text(self.bot_frame,width=20,height=2,bg="#fff",fg="#000",font=FONT,padx=5,pady=5)
 self.text_widget.place(relheight=0.745,relwidth=1,rely=0.08)
 self.text_widget.configure(cursor="arrow",state=DISABLED)

 #create scrollbar
 scrollbar=Scrollbar(self.text_widget)
 scrollbar.place(relheight=1,relx=0.974)
 scrollbar.configure(command=self.text_widget.yview)

 #create bottom label where message widget will placed
 bottom_label=Label(self.bot_frame,bg=BG_GRAY,height=80)
 bottom_label.place(relwidth=1,rely=0.825)
 #this is for user to put query

self.msg_entry=Entry(bottom_label,bg="#2C3E50",fg=TEXT_COLOR,font=FONT)
 self.msg_entry.place(relwidth=0.788,relheight=0.06,rely=0.008,relx=0.008)
 self.msg_entry.focus()
 self.msg_entry.bind("<Return>",self.on_enter)
 #send button which will call on_enter function to send the query
send_button=Button(bottom_label,text="Send",font=FONT_BOLD,width=8,bg="Green",command=lambda: self.on_enter(None))
 send_button.place(relx=0.80,rely=0.008,relheight=0.06,relwidth=0.20)
If the user pressed the send button, the button should perform some event(action) , that is the query should be displayed on the text-area along with the bot prediction.
Code:
def on_enter(self,event):
 #get user query and bot response
 msg=self.msg_entry.get()
 self.my_msg(msg,"You")
 self.bot_response(msg,"Bot")

def bot_response(self,msg,sender):
 self.text_widget.configure(state=NORMAL)
 #get the response for the user's query from testing.py file
 self.text_widget.insert(END,str(sender)+" : "+self.test.response(msg)+"\n\n")
 self.text_widget.configure(state=DISABLED)
 self.text_widget.see(END)

def my_msg(self,msg,sender):
 #it will display user query and bot response in text_widget
 if not msg:
 return
 self.msg_entry.delete(0,END)
 self.text_widget.configure(state=NORMAL)
 self.text_widget.insert(END,str(sender)+" : "+str(msg)+"\n")
 self.text_widget.configure(state=DISABLED)
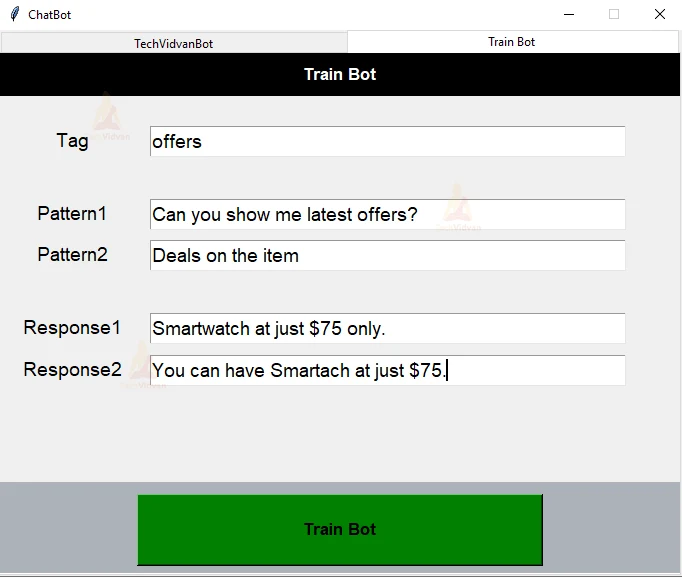
We can also train the model by creating our own intent’s. We can achieve this by creating a ‘Train Bot’ section which will accept tags, patterns and responses from the user and utilise them to train our model for giving the best response which will eventually make your work easier.
Code:
def add_train(self):
 #Add heading to the Train Bot window

head_label=Label(self.train_frame,bg=BG_COLOR,fg=TEXT_COLOR,text="Train Bot",font=FONT_BOLD,pady=10)
 head_label.place(relwidth=1)

 #Tag Label and Entry for intents tag.
 taglabel=Label(self.train_frame,fg="#000",text="Tag",font=FONT)
 taglabel.place(relwidth=0.2,rely=0.14,relx=0.008)
 self.tag=Entry(self.train_frame,bg="#fff",fg="#000",font=FONT)
 self.tag.place(relwidth=0.7,relheight=0.06,rely=0.14,relx=0.22)
 #Pattern Label and Entry for pattern to our tag.
 self.pattern=[]
 for i in range(2):

patternlabel=Label(self.train_frame,fg="#000",text="Pattern%d"%(i+1),font=FONT)
 patternlabel.place(relwidth=0.2,rely=0.28+0.08*i,relx=0.008)
 self.pattern.append(Entry(self.train_frame,bg="#fff",fg="#000",font=FONT))
 self.pattern[i].place(relwidth=0.7,relheight=0.06,rely=0.28+0.08*i,relx=0.22)

#Response Label and Entry for response to our pattern.
 self.response=[]
 for i in range(2):
 responselabel=Label(self.train_frame,fg="#000",text="Response%d"%(i+1),font=FONT)
 responselabel.place(relwidth=0.2,rely=0.50+0.08*i,relx=0.008)
 self.response.append(Entry(self.train_frame,bg="#fff",fg="#000",font=FONT))
 self.response[i].place(relwidth=0.7,relheight=0.06,rely=0.50+0.08*i,relx=0.22)

#to train our bot create Train Bot button which will call on_train function
bottom_label=Label(self.train_frame,bg=BG_GRAY,height=80)
bottom_label.place(relwidth=1,rely=0.825)

train_button=Button(bottom_label,text="Train Bot",font=FONT_BOLD,width=12,bg="Green",command=lambda: self.on_train(None))
train_button.place(relx=0.20,rely=0.008,relheight=0.06,relwidth=0.60)
After the “Train Bot” button is pressed the data should be inserted into the intents.json file and the model should train on new data.
Code:
def on_train(self,event):
 #read intent file and append created tag,pattern and responses from add_train function
 with open('intents.json','r+') as json_file:
  file_data=json.load(json_file)
  file_data['intents'].append({
  "tag": self.tag.get(),
  "patterns": [i.get() for i in self.pattern],
  "responses": [i.get() for i in self.response],
  "context": ""
  })
  json_file.seek(0)
  json.dump(file_data, json_file, indent = 1)
 #run and compile model from our training.py file.
 train=trainpy.Training()
 train.build(); print("Trained Successfully")
 self.test=testpy.Testing()
6. Run the Python Chatbot Project
In order to run the chatbot, we need to run chatbot_gui.py.
Run the following command on the terminal
python chatbotgui.py
Python Chatbot Output
Training the Model :
User query and Bot response:
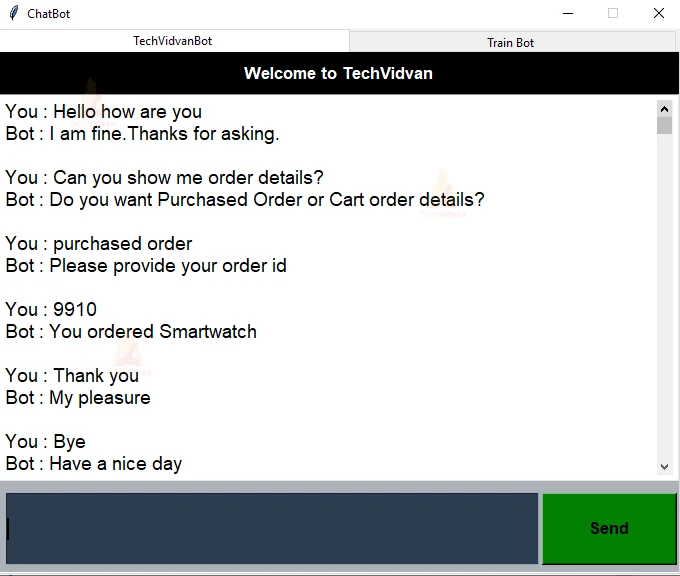
As you can see in the above screenshot, when the user asked for order details, the context dictionary was set with the value as “orderid”. So after the user provided the orderid as 9910 the bot predicted the class in the intents.json having the filter key with the value as “orderid”. This is how the contextual chatbot works.
Train the Bot with new classes, patterns, and responses :
Congratulations! Now you will be able to chat easily with your ChatBot friend which will have all the qualities.
Summary
In this Python Chatbot Project, we understood the implementation of Chatbot using Deep Learning algorithms. The chatbot can be customised and trained to meet specific needs with its accurate response. AI Chatbots are now being used in nearly all industries for the convenience of users and company stakeholders. Well trained Chatbot makes one to one conversation easier and faster.