Deep Learning Pneumonia Detection Project using Chest X-ray Images
Pneumonia is an infection of the lungs caused by fungi, bacteria, and viruses.
This infection can be in one or both lungs. The infection causes inflammation in the air sacs in your lungs, which are called alveoli. The alveoli fill with fluid or pus, making it difficult to breathe. So basically the main causes of Pneumonia are Bacteria and viruses.
General Symptoms of Pneumonia are chest pain, fever, cough, and trouble breathing.
How can Pneumonia be detected?
There are various methods to detect pneumonia, some of them are Chest X-ray, Blood or sputum culture, Complete Blood Count (CBC), and various tests.
But as we are going to detect Pneumonia using Deep Learning we will be using the Chest X-ray method to detect.
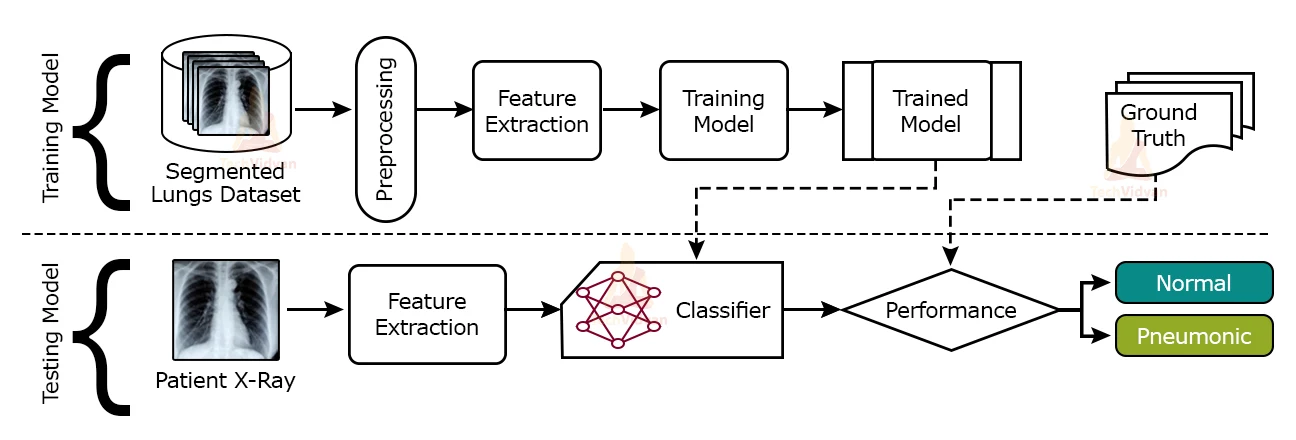
About Pneumonia Detection Project:
In this Project, we will detect Pneumonia using Deep Learning. We will create a model that will classify whether the patient is normal or suffering from pneumonia by looking at Chest X-ray images. The algorithm or the model which we will create should be extremely accurate because the lives of people are at stake.
Pneumonia Detection Chest X-ray Dataset:
We will be using is Chest X-ray images (Pneumonia) for this deep learning project, please download the dataset from the following link: Chest X-ray for Pneumonia Detection
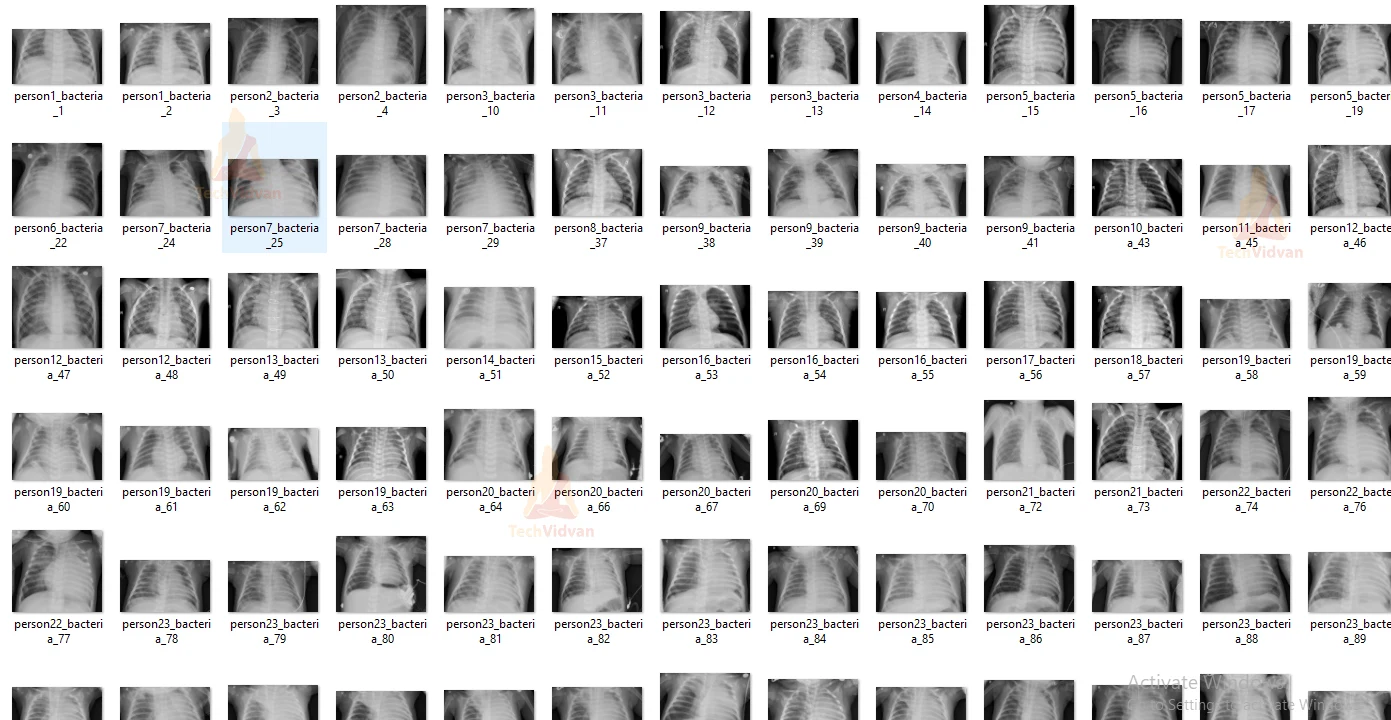
The dataset we are using is already splitted into train, test, and val. Train folder contains training data / images which we will use to train our model, similarly the test and val folder also contains Normal and Pneumonia images which will be used to test our model. There are a total 5856 images consisting of normal and pneumonia images both.
Pneumonia Detection Deep Learning Project Code
Please download the pneumonia detection project code from the following link: Pneumonia Detection Project Code
Required Libraries:
These are the following libraries you need to install for pneumonia detection project:
- Numpy
- Matplotlib
- OpenCV
- Tensorflow
- keras
You can install it using pip. So open your command prompt and type pip install numpy, pip install matplotlib, pip install tensorflow etc. You can install all the required libraries like this.
Now let’s start implementing pneumonia detection project:
Follow the steps to implement and understand Pneumonia detection using deep learning.
1.) Importing all the libraries:
First we will import all the libraries that we will require to implement this project.
import tensorflow
from tensorflow.keras.models import Sequential
from tensorflow.keras.layers import Conv2D
from tensorflow.keras.layers import MaxPooling2D
from tensorflow.keras.layers import Flatten
from tensorflow.keras.layers import Dense
from tensorflow.keras.preprocessing.image import ImageDataGenerator
import numpy as np
from tensorflow.keras.preprocessing import image
import os
import matplotlib.pyplot as plt
import cv2
2.) Declaring Variables:
In this step, we will declare our image size and batch size:
image_dims = 128
batch_size = 64
3.) Creating Model:
I will be creating a Convolutional Neural Network model (CNN).
Convolutional Neural Network has an excellent ability to perform image classification and it is preferred for classification problems. CNN model consists of Input layer, Number of hidden and dense layers and at last an output layer. You can understand it better as I have explained below.
In our case we have to classify chest X-ray images as Normal or Pneumonia detected, that’s why we will be creating a convolutional model.
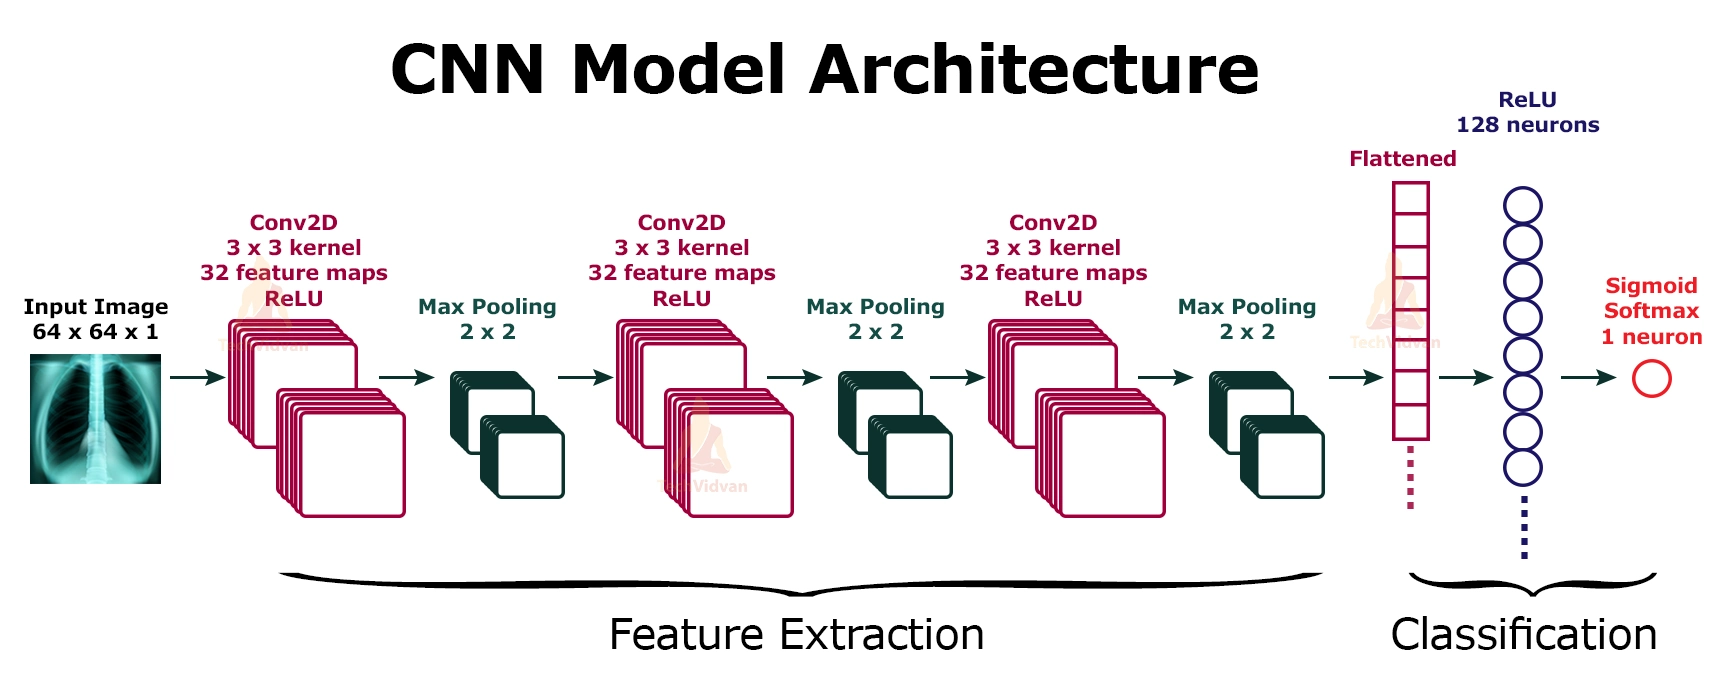
In CNN model there is one input layer, hidden layer, Dense layer, and output Layer.
- So the first layer we will create is an input layer with 64 nodes and relu as
an activation function. - And then we will add two more Conv2D layers with 64 nodes each and relu as an activation function.
- And then we will create one Dense layer with 128 nodes, and relu as an activation function.
- At last we will create an output layer with 1 node and sigmoid as an activation function.
model = Sequential()

model.add(Conv2D(64 , (3,3) , activation = 'relu' , input_shape= (image_dims, image_dims, 3)))
model.add(MaxPooling2D((2,2)))

model.add(Conv2D(64 , (3,3) , activation = 'relu'))
model.add(MaxPooling2D((2,2)))

model.add(Conv2D(64 , (3,3) , activation = 'relu'))
model.add(MaxPooling2D((2,2)))

model.add(Flatten())

model.add(Dense(128, activation = 'relu'))

model.add(Dense(1, activation = 'sigmoid'))
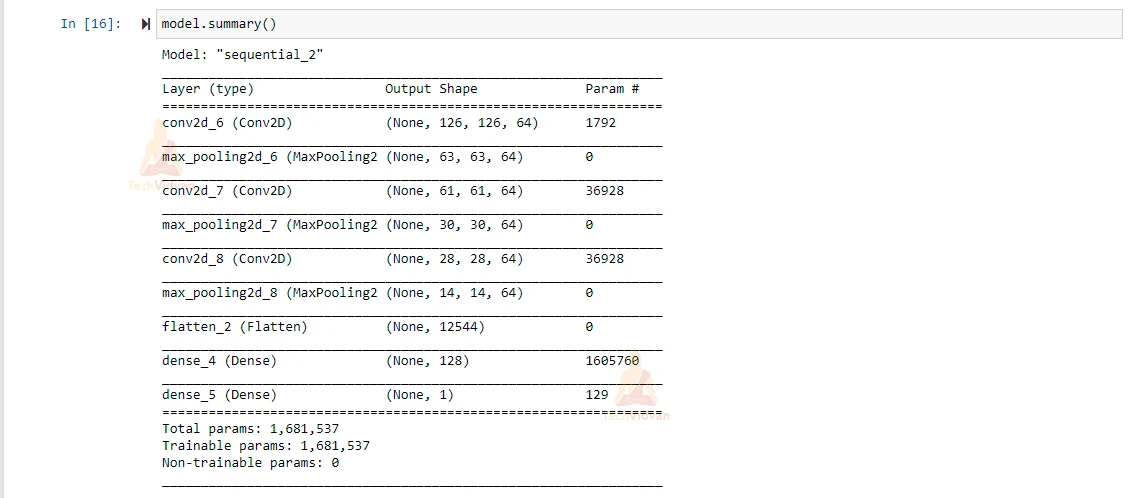
Let’s see the model that we have created using the model.summary() method.
model.summary()
4.) Compile the model:
Now we will compile our model and set optimizer and loss function.
model.compile(optimizer = 'adam', loss = 'binary_crossentropy', metrics = ['accuracy'])
5.) Creating Training data:
Now we will generate training data using ImageDataGenerator and set a path to the directory that consists of Normal and Pneumonia X-ray images, from there our training data will be generated.
input_path = './chest_xray/'

# Generate Training data:
training_data_generator = ImageDataGenerator(rescale = 1./255,
                          shear_range = 0.2,
                          zoom_range = 0.2,
                          horizontal_flip= True)

training_gen = training_data_generator.flow_from_directory(directory=input_path+'train',
target_size=(image_dims,image_dims),
                             batch_size=batch_size,
                             class_mode='binary')
6.) Creating Validation data:
Validation data will be created in the same manner as we have created training data using ImagDataGenerator() and flow_from_directory() method that is given by keras to generate data directly.
validation_data_generator = ImageDataGenerator(rescale= 1./255)

validation_gen = validation_data_generator.flow_from_directory(directory= input_path+ 'val',
                             target_size=(image_dims,image_dims),
                             batch_size= batch_size,
                             class_mode= 'binary')
7.) Fit the data into the model:
After creating training and testing data we will fit training data to the model that we have created above to check our model accuracy.
epochs = 10
history = model.fit_generator(training_gen,
             steps_per_epoch= 10,
             epochs = epochs,
             validation_data=validation_gen,
             validation_steps= validation_gen.samples)
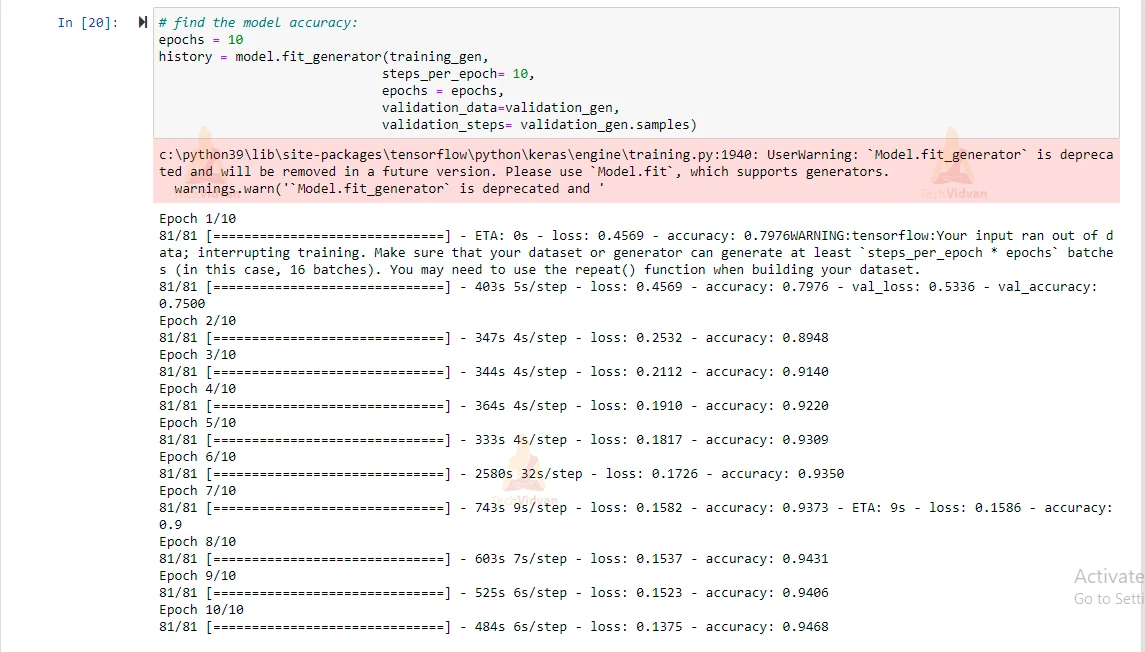
As you can see our model accuracy on training data is 94% which is good.
Let’s visualize our model accuracy and validation accuracy:
plt.figure(figsize=(8,6))
plt.title('TechVidvan Accuracy scores')
plt.plot(history.history['accuracy'])
plt.plot(history.history['val_accuracy'])
plt.legend(['accuracy', 'val_accuracy'])
plt.show()

plt.figure(figsize=(8,6))
plt.title('TechVidvan Loss value')
plt.plot(history.history['loss'])
plt.plot(history.history['val_loss'])
plt.legend(['loss', 'val_loss'])
plt.show()
8.) Creating Test data:
Now we will create test data to evaluate our model accuracy.
As our model has not seen test data before, it will help us to check that the model we have created is accurate and can accurately classify the Chest X-ray image as Normal or Pneumonia one.
test_data_generator = ImageDataGenerator(rescale = 1/255)

test_gen = test_data_generator.flow_from_directory(directory = input_path + 'test',
  target_size = (image_dims, image_dims),
  batch_size = 128,
  class_mode = 'binary'
)

eval_result = model.evaluate_generator(test_gen, 624)
print('loss rate at evaluation data :', eval_result[0])
print('accuracy rate at evaluation data :', eval_result[1])
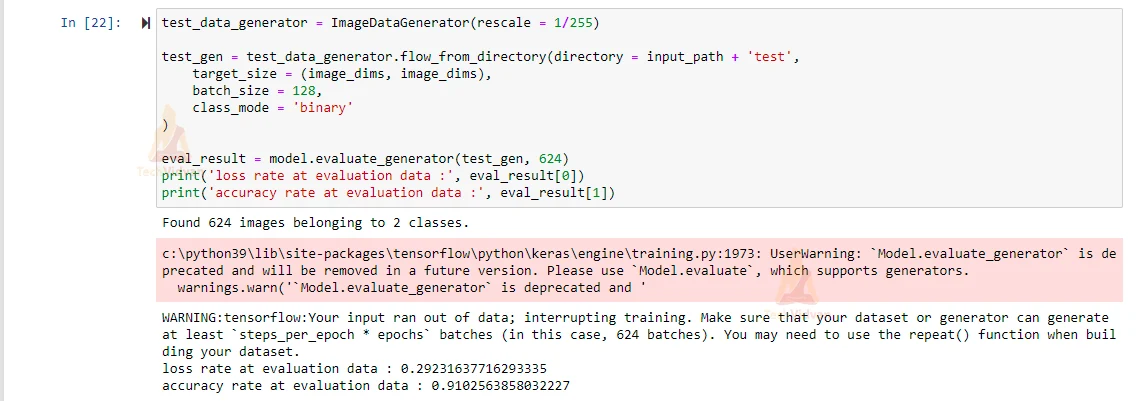
Our deep learning model is able to classify the image with 91% accuracy. So the model we have created works fine on classifying the data it has never seen before. So we can use this model to predict whether the person is Normal or suffering from Pneumonia with the help of that person’s Chest X-ray image.
Summary
We have created a Convolutional Neural Network Model which is able to correctly predict that the patient is suffering from Pneumonia or not by using that person’s chest X-ray. So, in this project we have learned how to create CNN models and also learn how to generate data using ImageDataGenerator that is given by keras.