Gender and Age Detection using Keras and OpenCV
In this article, we are going to explore an interesting project – gender and age prediction using python and deep learning. We will be training a convolutional neural network that will predict the age group and gender from an image containing the face of a person.
About Gender and Age Detection Project
Facial analysis from images has gained a lot of interest because it helps in several different problems like better ad targeting for customers, better content recommendation system, security surveillance, and other fields as well.
Age and gender are a very important part of facial attributes and identifying them are the very basic of facial analysis and a required step for such tasks. Many companies are using these kinds of tools for different purposes making it easier for them to work with customers, cater to their needs better and create a great experience for them. It is easier to identify and predict needs of people based on their gender and age.
The task of gender and age detection just from an image is not an easy task even for us humans because it is totally based on looks and sometimes it is not easy to guess it. People of the same age can look very different from what we can guess.
Not everyone ages the same and it all depends on genetics and how well they care for their skin and body, we also often associate balding and white hairs with aging but it is very different for different people. Similarly, we associate long hairs and jewelry with women but it is different in many cases. So we can say that it is not such an easy task. This task especially age detection is a subjective matter and solely based on looks and appearances and can vary widely.
Tools & Frameworks
There are many methods we can use to solve this problem. There are traditional algorithms like “Fisherfaces” and “Eigenface” which are created for face recognition and feature relation methods, but these do not work as well as needed. We can create solutions better than this using CNN (convolutional neural networks) which have emerged as the most preferred model for computer vision tasks. They have proven to be most effective when dealing with image datasets and are the heart of most machine learning computer vision models.
We will be using Keras for designing the architecture of our model, which also provides some helper functions to load, train, test, and evaluate the model.
We are using TensorFlow backend for Keras, Tensorflow v2, or above recommended. Numpy v1.75.0 or above and pandas v1.2 will be used for loading annotations CSV file, cleaning, and handeling the data.
Matplotlib v3.3 and seaborn will be used for displaying and plotting information about the data, opencv v4 and pillow v8 or above for working with images, and finally sklearn 0.20 for creating the training and test split of the data.
Download Dataset for Gender & Age Detection
The dataset we are going to use to train our model is the audience benchmark age and gender dataset. This dataset contains various images in various real-world conditions with different lighting and noise levels.
It contains 26580 images of 2284 subjects of different age groups and gender. It can be downloaded in zip format. The directory contains the following files:
- faces.tar.gz (936M) – Face images, cropped
- aligned.tar.gz (1.9G) – Face images, cropped and aligned using our 2D, in plain alignment tool
- fold_0_data.txt – fold_4_data.txt – text files with indices to the five-fold cross validation tests using all faces
- fold_frontal_0_data.txt – fold_frontal_4_data.txt – same as above, but using only faces in approximately frontal pose.
These files contain also the label information for each of the photos.
Age & Gender Detection Project Dataset
You can use google colab for training this network, it is a great option as it provides free high-performance hardware for training.
Download Age Gender Project Code
Please download the source code for age – gender detection project: Age & Gender Detection Code
Steps to Develop Age & Gender Detection Project
1. Uploading the data (Optional)
You need to unzip the archive and upload it to your google drive if you want to work in google colab environment and use their free gpu for training.
The process will be the same if you are doing so in a jupyter notebook on a local machine. If working on a local machine, skip the step of mounting the drive. The code file should be in the same directory as the dataset unzipped folder.
Mount the drive and navigate to the folder that has the dataset in it. If you are not using collab you may skip this step.
import os
from google.colab import drive
drive.mount('/content/drive')

os.chdir('/content/drive/MyDrive/TechVidvan’)
2. Import the necessary libraries for loading and viewing data:
Numpy: for working with the data, cleaning it, formatting it in the required way and deleting irrelevant data.
Pandas: for reading the dataset csv files.
Matplotlib: for plotting the graphs and showing images inside of the colab console along with seaborn.
Opencv and PIL: for working with images resizing it, formating it for the model and stuff.
import numpy as np
import pandas as pd
import matplotlib.pyplot as plt
import seaborn as sns
import cv2
from PIL import Image
3. Read the Data
There are 5 files with names fold_0_data.txt, fold_1_data.txt, fold_2_data.txt, fold_3_data.txt, fold_4_data.txt that contain the data. We will read it using pandas.read csv function.
#load data
fold0 = pd.read_csv("AdienceBenchmarkGenderAndAgeClassification/fold_0_data.txt",sep = "\t" )
fold1 = pd.read_csv("AdienceBenchmarkGenderAndAgeClassification/fold_1_data.txt",sep = "\t")
fold2 = pd.read_csv("AdienceBenchmarkGenderAndAgeClassification/fold_2_data.txt",sep = "\t")
fold3 = pd.read_csv("AdienceBenchmarkGenderAndAgeClassification/fold_3_data.txt",sep = "\t")
fold4 = pd.read_csv("AdienceBenchmarkGenderAndAgeClassification/fold_4_data.txt",sep = "\t")
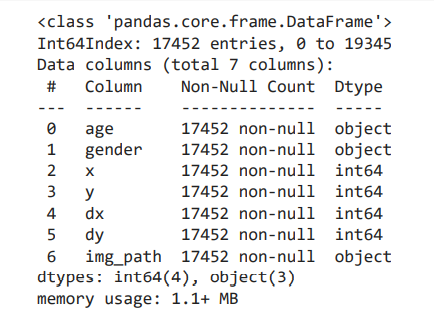
We have data from 5 different files, we need to add the data from all those files into single pandas dataframe and print the shape and info about it.
total_data = pd.concat([fold0, fold1, fold2, fold3, fold4], ignore_index=True)
print(total_data.shape)
total_data.info()
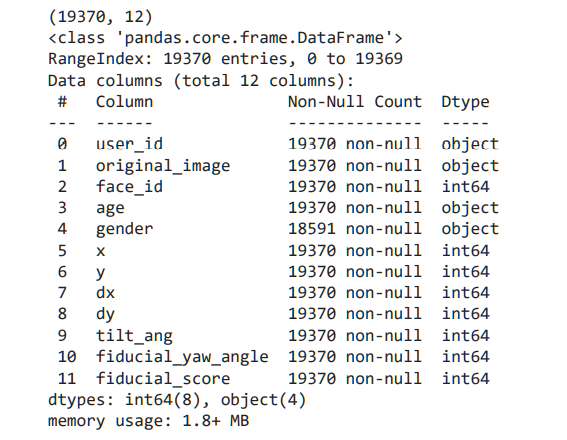
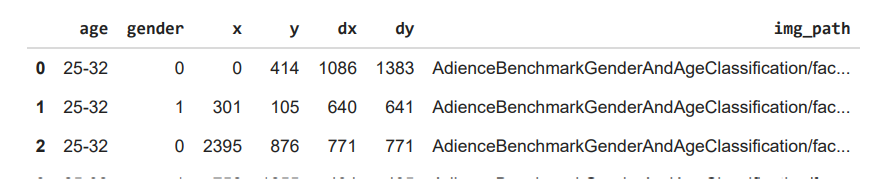
Print the top 5 records from the dataframe using.head() function, verifying the data structure.
total_data.head()

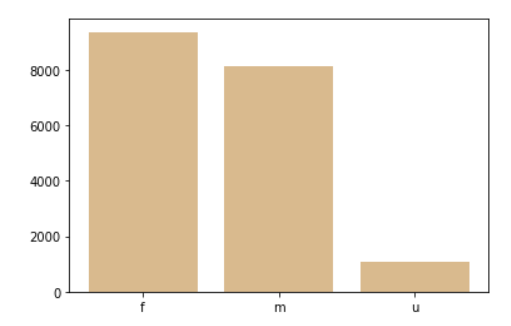
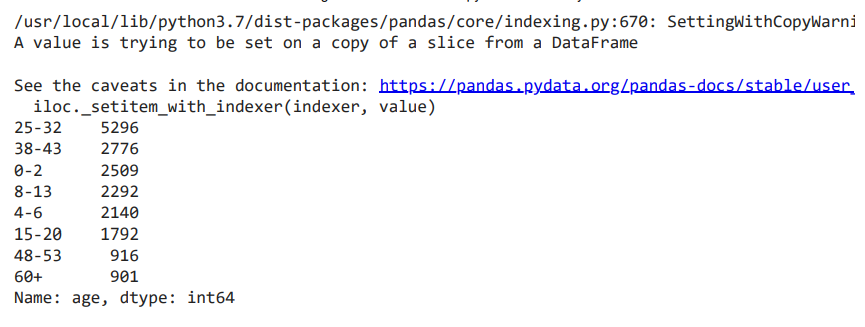
Plot a bar graph for gender values. This will visualize the variance in data as well as overview of what the gender data holds.
#bar chart
gender = ['f','m','u']
plt.bar(gender, total_data.gender.value_counts(), align='center', alpha=0.5)
plt.show()
4. Import the necessary modules for model building
We will be using Keras with TensorFlow for creating this model. The model will be a sequential model ie: data will pass sequentially from one layer to another, there will be no jump nodes or breakpoints in the flow of data.
All the required layers are imported from Keras and the function for loading them.
import tensorflow as tf
from keras.models import Sequential
from keras.layers import Conv2D, MaxPooling2D, Activation, Dropout, Flatten, Dense, Dropout, LayerNormalization
from keras.preprocessing.image import ImageDataGenerator, img_to_array, load_img
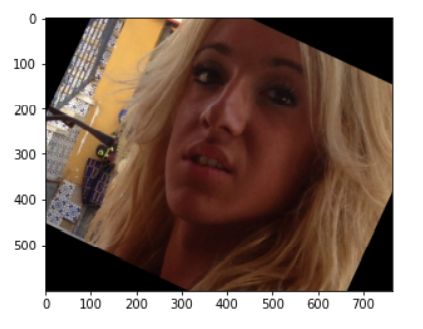
Load the first sample data and check it. This will verify that the data structure and our project structure are correct.
path = "AdienceBenchmarkGenderAndAgeClassification/faces/"+total_data.user_id.loc[0]+"/coarse_tilt_aligned_face."+str(total_data.face_id.loc[0])+"."+total_data.original_image.loc[0]
img = load_img(path)
plt.imshow(img)
plt.show()
5. Use the relevant data and map them
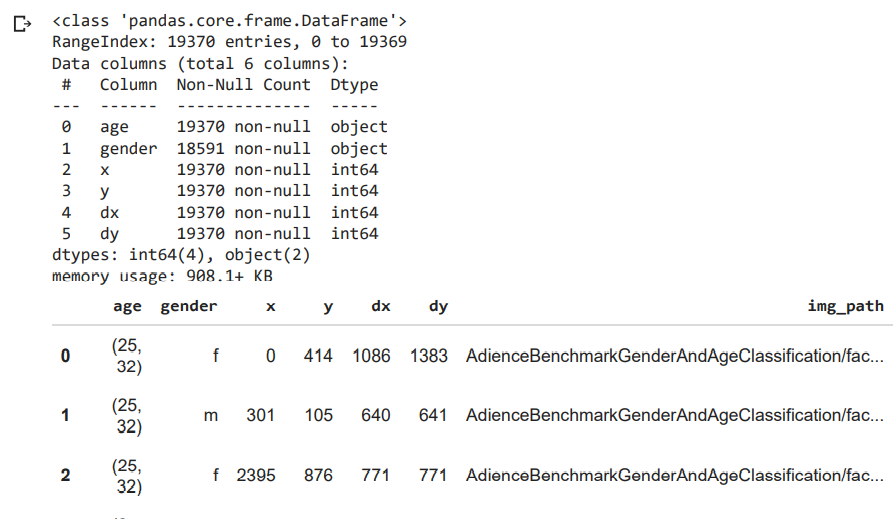
now copy just the data that we need from total data.
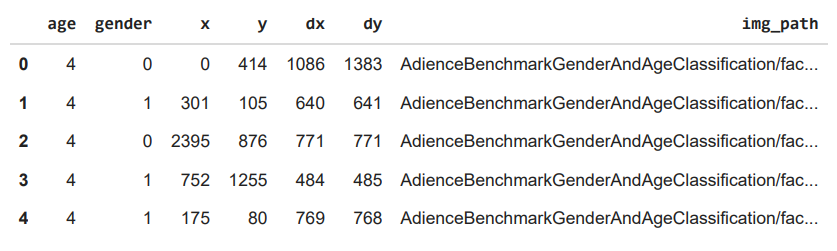
We need age, gender, position, and bounding box for all images, we copy that in another df. Also from the data, create a relative link to images stored in the drive and add that link as well to the df.
imp_data = total_data[['age', 'gender', 'x', 'y', 'dx', 'dy']].copy()
imp_data.info()

img_path = []
for row in total_data.iterrows():
    path = "AdienceBenchmarkGenderAndAgeClassification/faces/"+row[1].user_id+"/coarse_tilt_aligned_face."+str(row[1].face_id)+"."+row[1].original_image
    img_path.append(path)

imp_data['img_path'] = img_path
imp_data.head()
Create an age mapping dictionary and map each age data from dataset to an age group.
Drop the records that do not have a correct age value
age_mapping = [('(0, 2)', '0-2'), ('2', '0-2'), ('3', '0-2'), ('(4, 6)', '4-6'), ('(8, 12)', '8-13'), ('13', '8-13'), ('22', '15-20'), ('(8, 23)','15-20'), ('23', '25-32'), ('(15, 20)', '15-20'), ('(25, 32)', '25-32'), ('(27, 32)', '25-32'), ('32', '25-32'), ('34', '25-32'), ('29', '25-32'), ('(38, 42)', '38-43'), ('35', '38-43'), ('36', '38-43'), ('42', '48-53'), ('45', '38-43'), ('(38, 43)', '38-43'), ('(38, 42)', '38-43'), ('(38, 48)', '48-53'), ('46', '48-53'), ('(48, 53)', '48-53'), ('55', '48-53'), ('56', '48-53'), ('(60, 100)', '60+'), ('57', '60+'), ('58', '60+')]

age_mapping_dict = {each[0]: each[1] for each in age_mapping}
drop_labels = []
for idx, each in enumerate(imp_data.age):
    if each == 'None':
        drop_labels.append(idx)
    else:
        imp_data.age.loc[idx] = age_mapping_dict[each]

imp_data = imp_data.drop(labels=drop_labels, axis=0) #droped None values
imp_data.age.value_counts(dropna=False)
Drop the records that do not have a known gender associated with them and print the stats for the remaining data. The records that have unknown gender will be dropped because we cannot use them to train our model.
imp_data = imp_data.dropna()
clean_data = imp_data[imp_data.gender != 'u'].copy()
clean_data.info()
Map the gender to class labels 0 and 1 and print the first five records to check the integrity of the data
gender_to_label_map = {
    'f' : 0,
    'm' : 1
}

clean_data['gender'] = clean_data['gender'].apply(lambda g: gender_to_label_map[g])
clean_data.head()
Map the ages to class labels 0 to 7 for each age group and print the first 5 records to check
age_to_label_map = {
    '0-2'  :0,
    '4-6'  :1,
    '8-13' :2,
    '15-20':3,
    '25-32':4,
    '38-43':5,
    '48-53':6,
    '60+'  :7
}

clean_data['age'] = clean_data['age'].apply(lambda age: age_to_label_map[age])
clean_data.head()
Create training and test datasets with sklearn train test split method
For gender model resize the images to 227,227 convert them to numpy array and add them to the test and train dataset. This process may take up a little time because the dataset is not very small.
X = clean_data[['img_path']]
y = clean_data[['gender']]
from sklearn.model_selection import train_test_split
X_train, X_test, y_train, y_test = train_test_split(X, y, test_size=0.3, random_state=42)

print('Train data shape {}'.format(X_train.shape))
print('Test data shape {}'.format(X_test.shape))

train_images = []
test_images = []

for row in X_train.iterrows():
    image = Image.open(row[1].img_path)
    image = image.resize((227, 227))   # Resize the image
    data = np.asarray(image)
    train_images.append(data)

for row in X_test.iterrows():
    image = Image.open(row[1].img_path)
    image = image.resize((227, 227))  # Resize the image
    data = np.asarray(image)
    test_images.append(data)

train_images = np.asarray(train_images)
test_images = np.asarray(test_images)

print('Train images shape {}'.format(train_images.shape))
print('Test images shape {}'.format(test_images.shape))
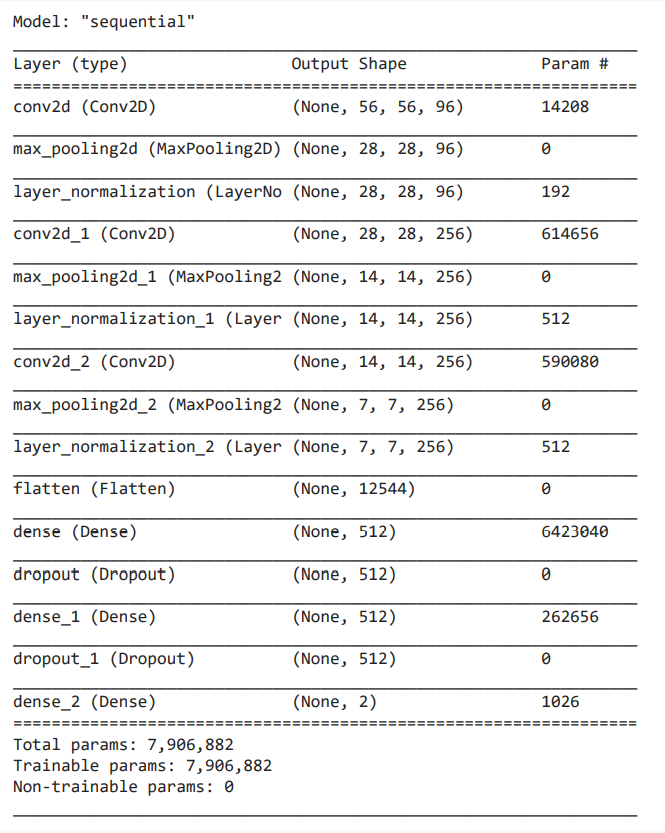
6. Gender Model
We define the CNN model here, we are using a sequential model i.e. data will travel sequentially from one layer to another without any jumps and splitting.
model = Sequential()
model.add(Conv2D(input_shape=(227, 227, 3), filters=96, kernel_size=(7, 7), strides=4, padding='valid', activation='relu'))
model.add(MaxPooling2D(pool_size=(2,2),strides=(2,2)))
model.add(LayerNormalization())
model.add(Conv2D(filters=256, kernel_size=(5, 5), strides=1, padding='same', activation='relu'))
model.add(MaxPooling2D(pool_size=(2,2),strides=(2,2)))
model.add(LayerNormalization())
model.add(Conv2D(filters=256, kernel_size=(3, 3), strides=1, padding='same', activation='relu'))
model.add(MaxPooling2D(pool_size=(2,2),strides=(2,2)))
model.add(LayerNormalization())

model.add(Flatten())
model.add(Dense(units=512, activation='relu'))
model.add(Dropout(rate=0.25))
model.add(Dense(units=512, activation='relu'))
model.add(Dropout(rate=0.25))
model.add(Dense(units=2, activation='softmax'))

model.summary()
7. Train the model
There can be many reasons the model will not be as accurate as you expect it to. In that case, check if the data is correct, maybe change some hyperparameters, increase epochs and try different kinds of stuff.
callback = tf.keras.callbacks.EarlyStopping(monitor='loss', patience=3) # Callback for earlystopping
model.compile(optimizer='adam', loss=tf.keras.losses.SparseCategoricalCrossentropy(from_logits=True), metrics=['accuracy'])
history = model.fit(train_images, y_train, batch_size=32, epochs=25, validation_data=(test_images, y_test), callbacks=[callback])

print("++++++++++++++++++++++++++++++++++++++++++++++++++++++++++++++++++++++++++++++++++++++++++++++++++++++++++++++++++++++++++")

model.save('gender_model25.h5')
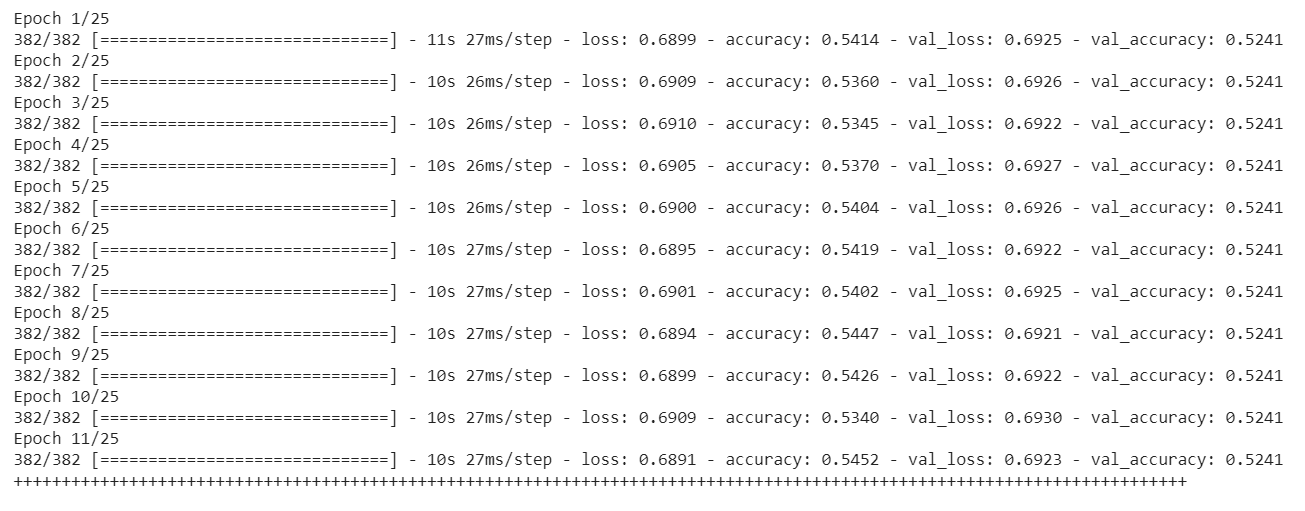
test_loss, test_acc = model.evaluate(test_images, y_test, verbose=2)
print(test_acc)
8. Create training and testing split for age data
X = clean_data[['img_path']]
y = clean_data[['age']]
from sklearn.model_selection import train_test_split
X_train, X_test, y_train, y_test = train_test_split(X, y, test_size=0.3, random_state=42)

print('Train data shape {}'.format(X_train.shape))
print('Test data shape {}'.format(X_test.shape))

train_images = []
test_images = []

for row in X_train.iterrows():
    image = Image.open(row[1].img_path)
    image = image.resize((227, 227))   # Resize the image
    data = np.asarray(image)
    train_images.append(data)

for row in X_test.iterrows():
    image = Image.open(row[1].img_path)
    image = image.resize((227, 227))  # Resize the image
    data = np.asarray(image)
    test_images.append(data)

train_images = np.asarray(train_images)
test_images = np.asarray(test_images)

print('Train images shape {}'.format(train_images.shape))
print('Test images shape {}'.format(test_images.shape))
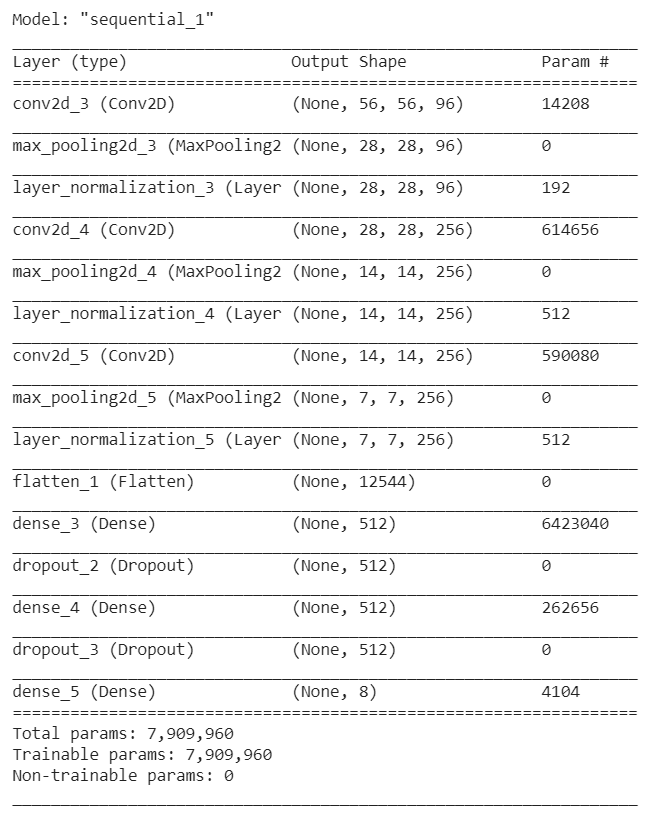
9. Age Model
model = Sequential()
model.add(Conv2D(input_shape=(227, 227, 3), filters=96, kernel_size=(7, 7), strides=4, padding='valid', activation='relu'))
model.add(MaxPooling2D(pool_size=(2,2),strides=(2,2)))
model.add(LayerNormalization())
model.add(Conv2D(filters=256, kernel_size=(5, 5), strides=1, padding='same', activation='relu'))
model.add(MaxPooling2D(pool_size=(2,2),strides=(2,2)))
model.add(LayerNormalization())
model.add(Conv2D(filters=256, kernel_size=(3, 3), strides=1, padding='same', activation='relu'))
model.add(MaxPooling2D(pool_size=(2,2),strides=(2,2)))
model.add(LayerNormalization())

model.add(Flatten())
model.add(Dense(units=512, activation='relu'))
model.add(Dropout(rate=0.25))
model.add(Dense(units=512, activation='relu'))
model.add(Dropout(rate=0.25))
model.add(Dense(units=8, activation='softmax'))

model.summary()
callback = tf.keras.callbacks.EarlyStopping(monitor='loss', patience=3) # Callback for earlystopping
model.compile(optimizer='adam', loss=tf.keras.losses.SparseCategoricalCrossentropy(from_logits=True), metrics=['accuracy'])
history = model.fit(train_images, y_train, batch_size=32, epochs=50, validation_data=(test_images, y_test), callbacks=[callback])

model.save('age_model50.h5')

test_loss, test_acc = model.evaluate(test_images, y_test, verbose=2)
print(test_acc)
Inference on the trained model
Now that we have trained our model we need to inference using the model.
While we can infer images on google colab, it does not allow using a webcam so we cannot use webcam for real-time inference. Download the model trained on your local machine and set up the environment with all necessary modules. Make sure you have the following modules installed on your system and setup correctly:
- Tensorflow
- Keras
- Numpy
- Opencv
- Dlib
- Face_recognition
TensorFlow and Keras for loading and working with the model. Numpy for working with image arrays. Opencv for reading from webcam resizing images and creating blobs.
Dlib and face_recognition modules are used for face detection from the images before passing only the face area to the model. You can use any face detector for this purpose, even the haar cascade detector built into opencv would work. Dlib is used for its speed, accuracy, and ease of use.
We begin by importing the necessary modules from the packages installed.
import keras
import json
import sys
import tensorflow as tf
from keras.layers import Input
import numpy as np
import argparse
from wide_resnet import WideResNet
from keras.utils.data_utils import get_file
import face_recognition
Then the model is loaded as the most important step, and its summary is printed to verify the correct loading of the model.
gender_model = tf.keras.models.load_model('weights.hdf5')
gender_model.summary()
Age mapping is created to correctly extract the age from the model.
age_map=[['0-2'],['4-6'],['8-13'],['15-20'],['25-32'],['38-43'],['48-63'],['60+']]
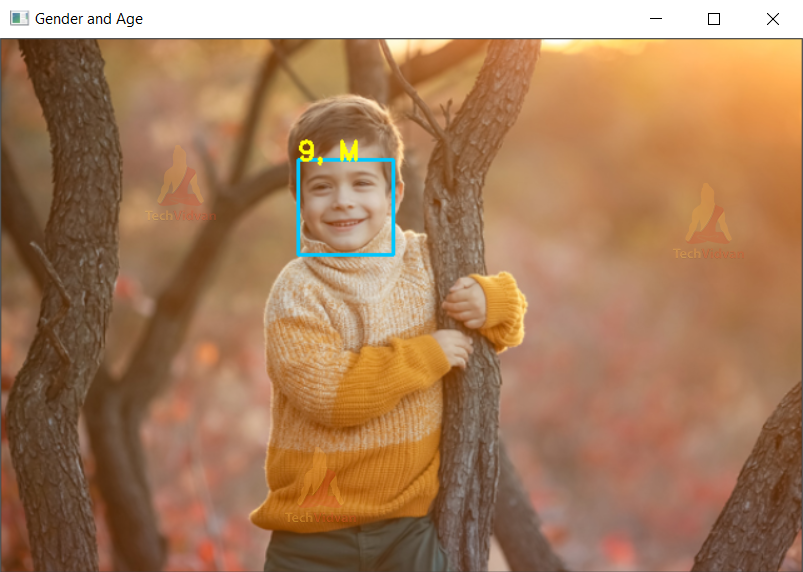
This is the function where we load the images from the webcam, extract the face from the webcam image, pass it to the model for prediction, get the predictions, format and extract meaningful data from it and display it on the screen.
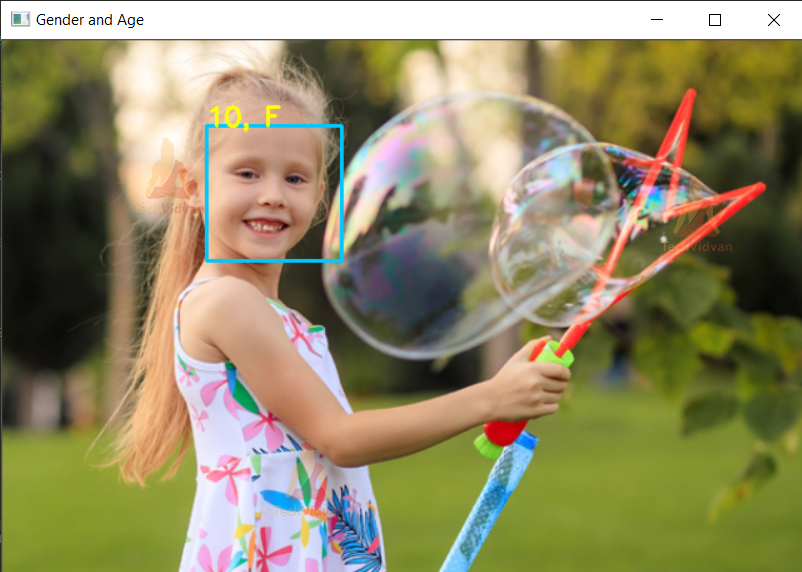
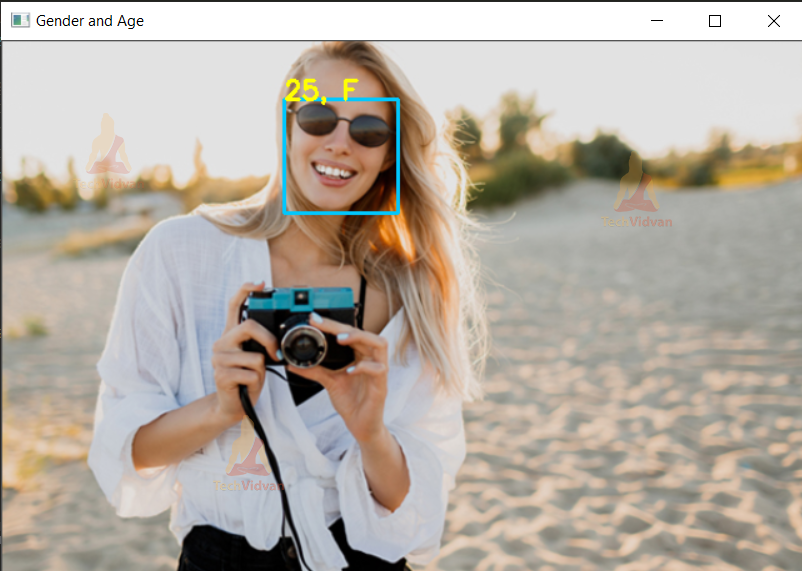
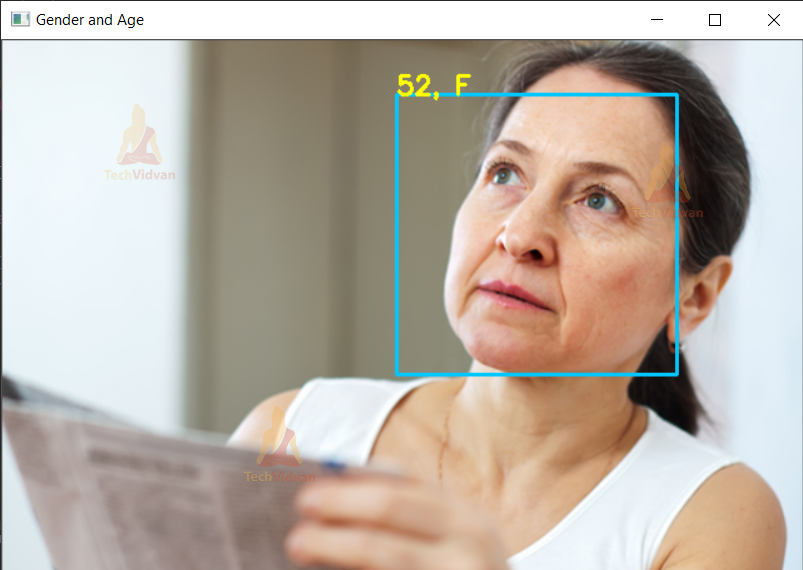
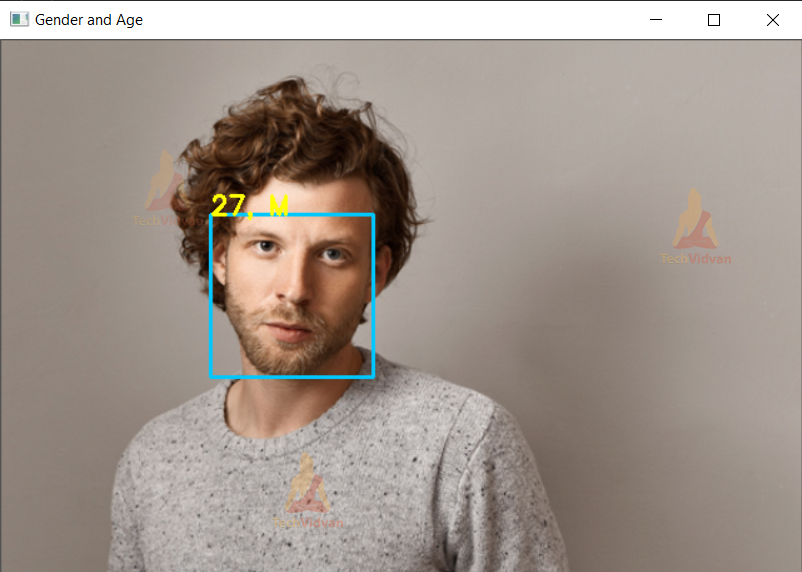
The following screenshot shows how to use images for inference. The main part is not creating an infinite loop and passing the image to imread function, Except that nothing much changes.
In these lines, we declare the video capture and start an infinite loop that will run till we get frames from the webcam, or we break the loop.
We store the frame from the webcam in the frame variable, convert it to grayscale.
If you want to use it with a video file just pass the relative path of that file in the videocapture function.
def detect_face(self):
    cap=cv2.VideoCapture(0)
    while True:
        grb,frame=cap.read()
        gray = cv2.cvtColor(frame, cv2.COLOR_BGR2GRAY)
        if not grb:
            break
Now we pass that frame to face location function for getting the face location that we will pass to the model for prediction. It will return a list of lists containing the location coordinates of the face in the image.
If there are no faces found in the image we show the frame as it is. Waiting for esc key press to break the loop.
face_locations = face_recognition.face_locations(frame)
print(face_locations)
if(face_locations==[]):
    cv2.imshow('Gender and age', frame)
    if cv2.waitKey(1) == 27:
        break
Else, if a face is found in the image we create a rectangle around that area on the frame. We also crop the area that contains the face, which we will pass to the model after formatting it in the next steps
else:
    cv2.rectangle(frame, (face_locations[0][3], face_locations[0][0]), (face_locations[0][1], face_locations[0][2]), (255, 200, 0), 2)
    img=frame[face_locations[0][0]-25: face_locations[0][2]+25, face_locations[0][3]-25: face_locations[0][1]+25]
Now we resize the image to the model input size and reshape it adding another axis to the image making it 1 x h x w x 3, and pass that to the model.predict function from the keras library.
# predict ages and genders of the detected faces
img2= cv2.resize(img, (64, 64))
img2=np.array([img2]).reshape((1, 64,64,3))
results = self.model.predict(img2)
Here we parse the result from the model. The first is the gender data and we estimate the gender based on its values it returns in floating-point ranging from 0-1, next we get the age and reshape it.
predicted_genders = results[0]
gen="F" if predicted_genders[0][0] > 0.5 else "M"
ages = np.arange(0, 101).reshape(101, 1)
predicted_ages = results[1].dot(ages).flatten()
Join the data from the result that is the age and gender data into one, print it on the console, and then also write it on the frame that we will display just above the rectangle that we created. We are using the coordinates from the face location.
pred=""
pred=str(int(predicted_ages[0]))+" "+str(gen)
print(pred)
cv2.putText(frame, pred,(face_locations[0][3],face_locations[0][0]) , cv2.FONT_HERSHEY_SIMPLEX,0.7, (2, 255, 255), 2)
Finally, we show the frame to the user. If the esc key is pressed that we check by using waitkey 27(27 is keycode for esc), we break out of the loop, release the capture, close all windows and we are done.
        cv2.imshow('Gender and age', frame)
        if cv2.waitKey(1) == 27:
            break
cap.release()
cv2.destroyAllWindows()
# When everything is done, release the capture
Age & Gender Detection Project Output
Summary
We have successfully created models for gender and age prediction and used them for inferencing on photos, videos, and webcam. Now we can use them in different projects and add them to our facial analysis tools list.