Real-time Hand Gesture Recognition using TensorFlow & OpenCV
Gesture recognition is an active research field in Human-Computer Interaction technology. It has many applications in virtual environment control and sign language translation, robot control, or music creation. In this machine learning project on Hand Gesture Recognition, we are going to make a real-time Hand Gesture Recognizer using the MediaPipe framework and Tensorflow in OpenCV and Python.
OpenCV is a real-time Computer vision and image-processing framework built on C/C++. But we’ll use it on python via the OpenCV-python package.
What is MediaPipe?
MediaPipe is a customizable machine learning solutions framework developed by Google. It is an open-source and cross-platform framework, and it is very lightweight. MediaPipe comes with some pre-trained ML solutions such as face detection, pose estimation, hand recognition, object detection, etc.
What is Tensorflow?
TensorFlow is an open-source library for machine learning and deep learning developed by the Google brains team. It can be used across a range of tasks but has a particular focus on deep neural networks.
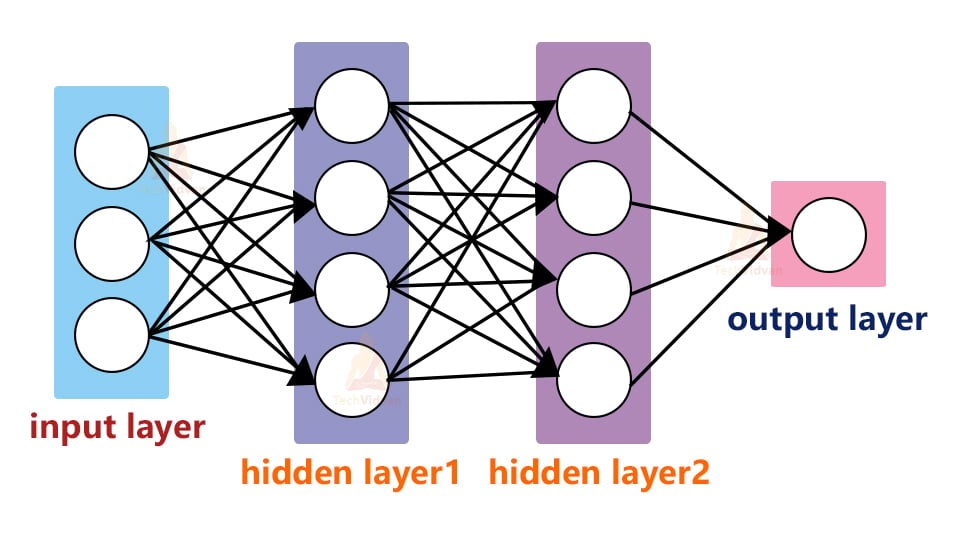
Neural Networks are also known as artificial neural networks. It is a subset of machine learning and the heart of deep learning algorithms. The concept of Neural networks is inspired by the human brain. It mimics the way that biological neurons send signals to one another. Neural networks are composed of node layers, containing an input layer, one or more hidden layers, and an output layer.
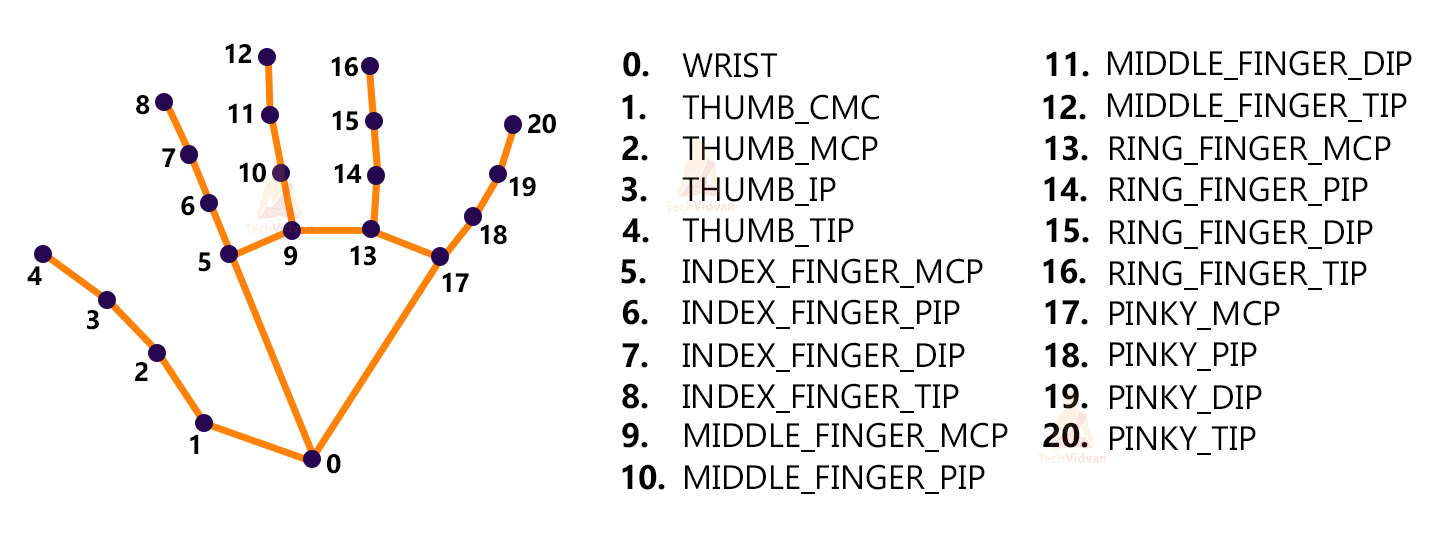
We’ll first use MediaPipe to recognize the hand and the hand key points. MediaPipe returns a total of 21 key points for each detected hand.
These key points will be fed into a pre-trained gesture recognizer network to recognize the hand pose.
Prerequisites for this project:
1. Python – 3.x (we used Python 3.8.8 in this project)
2. OpenCV – 4.5
- Run “pip install opencv-python” to install OpenCV.
3. MediaPipe – 0.8.5
- Run “pip install mediapipe” to install MediaPipe.
4. Tensorflow – 2.5.0
- Run “pip install tensorflow” to install the tensorflow module.
5. Numpy – 1.19.3
Download Hand Gesture Recognition Project Code
Please download the source code of hand gesture recognition project: Hand Gesture Recognition ML Project Code
Steps to solve the project:
- Import necessary packages.
- Initialize models.
- Read frames from a webcam.
- Detect hand keypoints.
- Recognize hand gestures.
Step 1 – Import necessary packages:
To build this Hand Gesture Recognition project, we’ll need four packages. So first import these.
# import necessary packages for hand gesture recognition project using Python OpenCV

import cv2
import numpy as np
import mediapipe as mp
import tensorflow as tf
from tensorflow.keras.models import load_model
Step 2 – Initialize models:
Initialize MediaPipe:
# initialize mediapipe
mpHands = mp.solutions.hands
hands = mpHands.Hands(max_num_hands=1, min_detection_confidence=0.7)
mpDraw = mp.solutions.drawing_utils
- Mp.solution.hands module performs the hand recognition algorithm. So we create the object and store it in mpHands.
- Using mpHands.Hands method we configured the model. The first argument is max_num_hands, that means the maximum number of hand will be detected by the model in a single frame. MediaPipe can detect multiple hands in a single frame, but we’ll detect only one hand at a time in this project.
- Mp.solutions.drawing_utils will draw the detected key points for us so that we don’t have to draw them manually.
Initialize Tensorflow:
# Load the gesture recognizer model
model = load_model('mp_hand_gesture')

# Load class names
f = open('gesture.names', 'r')
classNames = f.read().split('\n')
f.close()
print(classNames)
- Using the load_model function we load the TensorFlow pre-trained model.
- Gesture.names file contains the name of the gesture classes. So first we open the file using python’s inbuilt open function and then read the file.
- After that, we read the file using the read() function.
Output :
[‘okay’, ‘peace’, ‘thumbs up’, ‘thumbs down’, ‘call me’, ‘stop’, ‘rock’, ‘live long’, ‘fist’, ‘smile’]
The model can recognize 10 different gestures.
Step 3 – Read frames from a webcam:
# Initialize the webcam for Hand Gesture Recognition Python project
cap = cv2.VideoCapture(0)

while True:
  # Read each frame from the webcam
  _, frame = cap.read()
x , y, c = frame.shape

  # Flip the frame vertically
  frame = cv2.flip(frame, 1)
  # Show the final output
  cv2.imshow("Output", frame)
  if cv2.waitKey(1) == ord('q'):
    		break

# release the webcam and destroy all active windows
cap.release()
cv2.destroyAllWindows()
- We create a VideoCapture object and pass an argument ‘0’. It is the camera ID of the system. In this case, we have 1 webcam connected with the system. If you have multiple webcams then change the argument according to your camera ID. Otherwise, leave it default.
- The cap.read() function reads each frame from the webcam.
- cv2.flip() function flips the frame.
- cv2.imshow() shows frame on a new openCV window.
- The cv2.waitKey() function keeps the window open until the key ‘q’ is pressed.
Step 4 – Detect hand keypoints:
framergb = cv2.cvtColor(frame, cv2.COLOR_BGR2RGB)
  # Get hand landmark prediction
  result = hands.process(framergb)

  className = ''

  # post process the result
  if result.multi_hand_landmarks:
    	landmarks = []
    	for handslms in result.multi_hand_landmarks:
        	for lm in handslms.landmark:
            	# print(id, lm)
            	lmx = int(lm.x * x)
            	lmy = int(lm.y * y)

            	landmarks.append([lmx, lmy])

        	# Drawing landmarks on frames
        	mpDraw.draw_landmarks(frame, handslms,
mpHands.HAND_CONNECTIONS)
- MediaPipe works with RGB images but OpenCV reads images in BGR format. So, using cv2.cvtCOLOR() function we convert the frame to RGB format.
- The process function takes an RGB frame and returns a result class.
- Then we check if any hand is detected or not, using result.multi_hand_landmarks method.
- After that, we loop through each detection and store the coordinate on a list called landmarks.
- Here image height (y) and image width(x) are multiplied with the result because the model returns a normalized result. This means each value in the result is between 0 and 1.
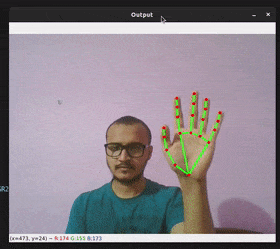
- And finally using mpDraw.draw_landmarks() function we draw all the landmarks in the frame.
Result:
And now, the last and the final step-
Step 5 – Recognize hand gestures:
# Predict gesture in Hand Gesture Recognition project
        	prediction = model.predict([landmarks])
print(prediction)
        	classID = np.argmax(prediction)
        	className = classNames[classID]

  # show the prediction on the frame
  cv2.putText(frame, className, (10, 50), cv2.FONT_HERSHEY_SIMPLEX,
               	1, (0,0,255), 2, cv2.LINE_AA)
- The model.predict() function takes a list of landmarks and returns an array contains 10 prediction classes for each landmark.
The output looks like this-
[[2.0691623e-18 1.9585415e-27 9.9990010e-01 9.7559416e-05
1.6617223e-06 1.0814080e-18 1.1070732e-27 4.4744065e-16 6.6466129e-07 4.9615162e-21]] - Np.argmax() returns the index of the maximum value in the list.
- After getting the index we can simply take the class name from the classNames list.
- Then using the cv2.putText function we show the detected gesture into the frame.
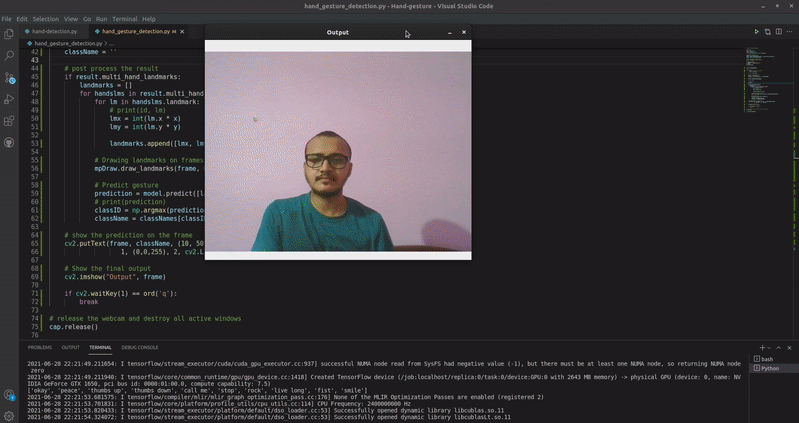
Hand Gesture Recognition Output
Summary
In this Hand Gesture Recognition project, we’ve built a hand gesture recognizer using OpenCV and python. We’ve used MediaPipe and Tensorflow framework for the detection and gesture recognition respectively. Here we’ve learned about the basics of the Neural Network, File handling, some common image processing techniques, etc.