Human Pose Estimation using OpenCV & Python
In object detection technology, we can detect Humans, but we can’t say the activity of that human. But in Human pose estimation technology, we can detect humans and analyze the posture of that particular human.
What is Human Pose Estimation?
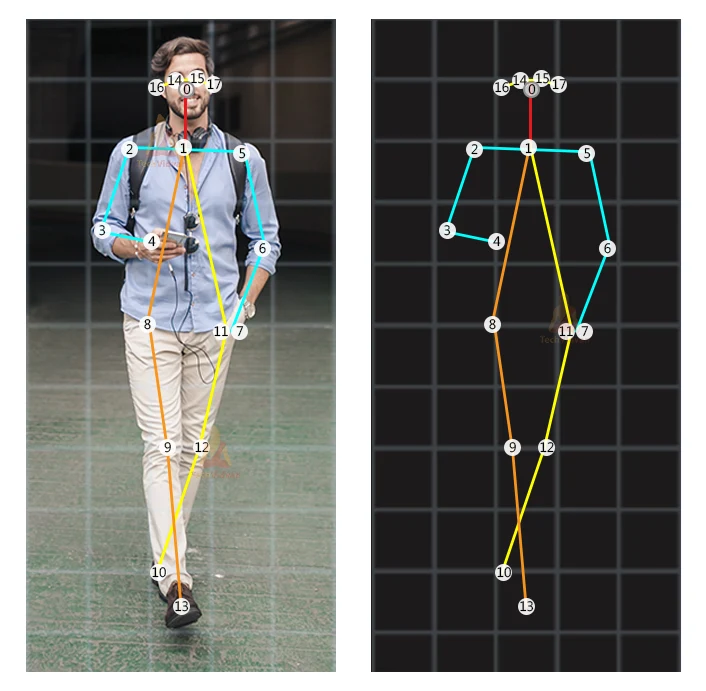
Human pose estimation represents a graphical skeleton of a human. It helps to analyze the activity of a human. The skeletons are basically a set of coordinates that describe the pose of a person.
Each joint is an individual coordinate that is known as a key point or pose-landmark. And the connection between key points is known as pair.
Why does pose estimation matter?
With pose estimation, we’re able to track humans’ motion and activity in real-world space. This opens up a wide range of application possibilities. It is a powerful technology that helps to build complex applications very effectively.
Here are some real-world applications of human pose estimation.
Applications:
Pose estimation has many applications in various fields such as :
1. Human activity estimation:
Pose estimation is useful to track Human activities such as Walking, Running, Sleeping, Drinking. It provides some information about a person. Activity estimation can enhance security and surveillance systems.

2. Motion Transfer:
One of the most interesting applications of human pose estimation is Motion Transfer. We’ve seen in movies or games, 3d graphics character’s physical movement is like real humans or animals. By tracking the human pose, the 3d rendered graphics can be animated by the human’s movement.
3. Robotics:
To train the movement of a robot, human pose estimation is useful. Instead of manually programming a robot to follow a certain path, a human pose skeleton is useful to train the robot’s joint movement.
4. Gaming:
Nowadays VR or Virtual reality gaming is very popular. In virtual reality gaming, a 3d pose is estimated by one or more cameras, and the game character moves according to the human’s action.
An example of a graphical skeleton is shown below:
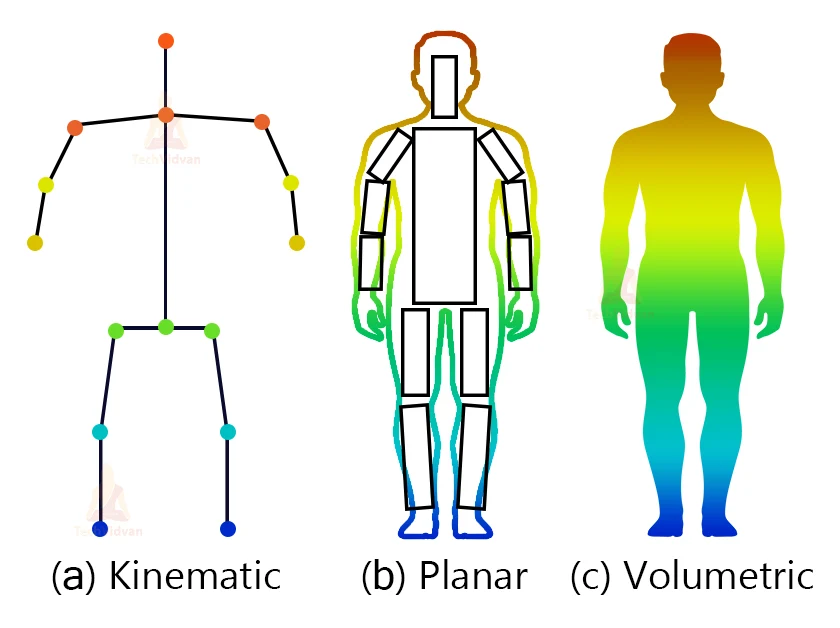
There are mainly three types of pose estimation models:
1. Kinematic Model: It is a skeleton-based model that represents the human body.
2. Planar Model: Planer model is a contour-based model that represents the human body shape using a contour around the human body.
3. Volumetric model: Volumetric model creates a 3d mesh of a human and represents the shape and appearance of the human body.
Categories of Pose estimation:
1. 2D pose estimation: In 2d pose estimation only the x and y coordinates are predicted for each landmark in an image. It doesn’t give any information about the skeleton’s angles or the rotation or orientation of an object or human instance.
2. 3D pose estimation: 3d pose estimation allows us to predict the spiral position of a human. It gives x, y, and z coordinates for each landmark. With 3d pose estimation, we can determine the angle of each joint of a human skeleton.
3. Rigid pose estimation: Rigid pose estimation is also known as 6D pose estimation. It provides all information about the human pose as well as the rotation and orientation of a human instance.
4. Single pose estimation: In a single pose estimation model only one human’s pose can be predicted in an image.
5. Multi pose estimation: In multi-pose estimation, Multiple human poses can be predicted in an image at the same time.
How does pose estimation work?
Pose estimation mainly uses deep-learning solutions to predict the human pose landmarks. It takes an image as input and gives pose landmarks for every instance as output.
There are two types of approaches for pose estimation,
1. Bottom-up: In this approach, every instance of a particular key point is predicted in an image and then it assembles a group of key points to the final skeleton.
2. Top-down: In the top-down approach, first objects/humans are detected in a given image, and then landmarks are predicted within each cropped object instance from that image.
Some Human pose Estimation Models:
1. OpenPose: OpenPose is one of the most popular methods for multi-person human pose estimation. It is an open-source real-time multi-person detection with high accuracy keypoints.
2. DeepPose: DeepPose uses a deep neural network to estimate human pose. The architecture captures all hinges and joints in a convolution layer and then a fully connected layer to form part of these layers.
3. PoseNet: PoseNet is built on Tensorflow.js. This is a lightweight architecture that runs on mobile devices and browsers.
In this project, we’ll use the MediaPipe framework with OpenCV to build a Human Pose Estimator.
What is MediaPipe?
MediaPipe is an Open-source framework by Google. It is a very lightweight multi-platform machine learning solution framework that can run in real-time on a CPU.
What is OpenCV?
OpenCV is an image processing Library for python. OpenCV is very fast and real-time because it runs on C/C++ in the backend. It is one of the most popular libraries for image processing and computer vision. OpenCV contains more than 2500 algorithms.
Prerequisites:
1. OpenCV – 4.4.0
2. MediaPipe – 0.8.5
Install all the packages using pip (pip install “package-name”)
Download Human Pose Estimation Project Code
Please download the source code of human pose estimation with opencv: Human Pose Estimation Project Code
Steps to solve the project:
1. Import dependencies.
2. Create the detector object.
3. Make detection from a video file.
4. Draw the detection on video frames.
So let’s begin with the code.
Step 1 – Import dependencies:
# TechVidvan Human pose estimator
# import necessary packages

import cv2
import mediapipe as mp
- We need only two dependencies for the project. The first one is OpenCV, named cv2 and the second one is mediapipe.
Step 2 – Create the detector object:
# initialize Pose estimator
mp_drawing = mp.solutions.drawing_utils
mp_pose = mp.solutions.pose

pose = mp_pose.Pose(
    min_detection_confidence=0.5,
    min_tracking_confidence=0.5)
- In these three lines of code, we’ve defined the mediapipe’s pose estimator object.
- Mp.solutions.drawing_utils will help us to draw the detected skeleton joints and pairs on the frame.
So how does it work?
MediaPipe uses TensorFlow lite in the backend. Using a detector first locates the person (ROI) within the frame. Then it uses the ROI cropped frame as INPUT and predicts the landmarks/key-points within the ROI. The mediaPipe pose estimator detects a total of 33 key points.
MediaPipe pose estimation is a single 3D pose estimator. It detects x, y, and z coordinates for each landmark. Z-axis is basically information about the depth of a landmark. That means how far or close the landmarks are from the camera relative to the other landmarks.![]()
Step 3 – Make detection from a video file:
# create capture object
cap = cv2.VideoCapture('video.mp4')

while cap.isOpened():
    # read frame from capture object
    _, frame = cap.read()

    try:
    	# convert the frame to RGB format
    	RGB = cv2.cvtColor(frame, cv2.COLOR_BGR2RGB)

    # process the RGB frame to get the result
    results = pose.process(RGB)
    print(results.pose_landmarks)
- First, we’ve created a capture object using cv2.VideoCapture(‘video.mp4’). This will allow us to read the video file.
- cap.isOpened() check if the capture object is opened successfully.
- Then using cap.read() we read video frames from the video file until the capture object is opened.
- MediaPipe works with RGB images. But OpenCV reads images in BGR format. So using cv2.cvtColor() function we convert the frame to RGB format.
- And then, with the pose.process() function we make the detection from the frame. It gives a result class that contains all the information about the frame.
- We can extract all the key points coordinates using results.pose_landmarks.
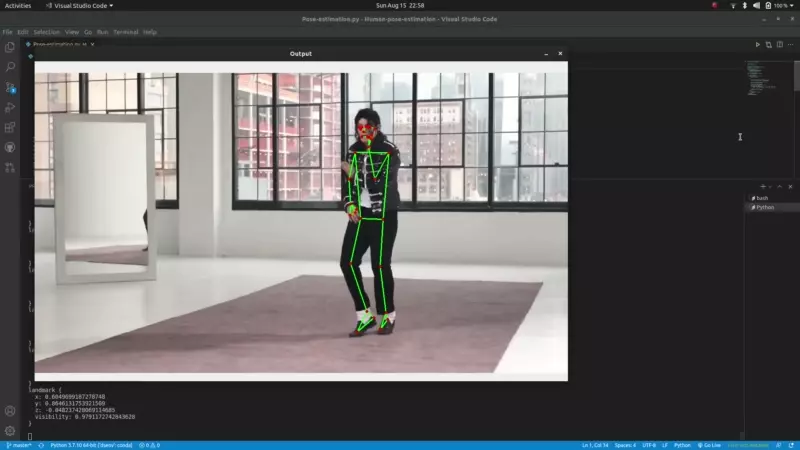
Step 4 – Draw the detection on video frames:
# draw detected skeleton on the frame
    mp_drawing.draw_landmarks(
    	frame, results.pose_landmarks, mp_pose.POSE_CONNECTIONS)

    # show the final output
    cv2.imshow('Output', frame)
except:
    	break
if cv2.waitKey(1) == ord('q'):
    	break
cap.release()
cv2.destroyAllWindows()
- mp_drawing.draw_landmarks() will draw all the detected keypairs from the result directly.
- Finally, show the final output using cv2.imshow() function.
- We keep the loop content in a try-except block. Because, if the capture object has read all the frames from the video file and then tries to read the next frame, then it will not find any frame to read and it will throw an error. So if any error happens during the runtime, the loop will break and the program will close without throwing any error.
- cap.release() releases the capture object.
- cv2.destroyAllWindows() closes all the active opencv windows.
Human Pose Estimation with OpenCV Output:
Summary:
In this project, we’ve built a Human Pose estimator using MediaPipe and OpenCV. Through this project, we’ve learned to work with the MediaPipe framework and some basic image processing techniques. Using the pose estimator extracted data we can build various types of cool and experimental applications.