Image Segmentation using Machine Learning
You may have heard about object recognition and object detection which places a bounding box around specific detected objects in an image. But there’s another technique that can provide an exact outline of a detected object within an image. The technique is known as image segmentation.
What is image segmentation?
Image segmentation is the process of individually identifying and labeling every pixel in an image, where each pixel having the same label shares certain characteristics. It can detect an object at a granular level and it can identify the shape of that object also. It is an advanced and more accurate way of detecting an object’s edge and shape detection.
How does image segmentation work?
Image segmentation divides an image into different partitions known as segments. This collection of segments are represented by a mask or a labeled image. In this way, we can process only the important segments instead of the entire image.
Why do we need image segmentation?
Image segmentation is being used in many different fields. One of the great examples is the medical field. Image segmentation can be used to determine damaged cells in a medical image. Sometimes we not only need the object’s position but we need the shape of that particular object to further process. Cancer can be cured if we can identify cancer cells at an early stage. So by using image segmentation we can identify cancer cells as quickly as possible and save many lives.
Application of image segmentation:
- Medical imaging.
- Machine vision.
- Circuit board defect detection.
- Traffic control system.
- Self-driving car.
- Video surveillance.
Types of image segmentation:
Mainly three types of image segmentation are there.
1. Semantic segmentation: Semantic segmentation associates every pixel of an image with its corresponding classes with the same color.
2. Instance segmentation: Instant segmentation segments each individual object instance in an image and puts a mask with different colors.
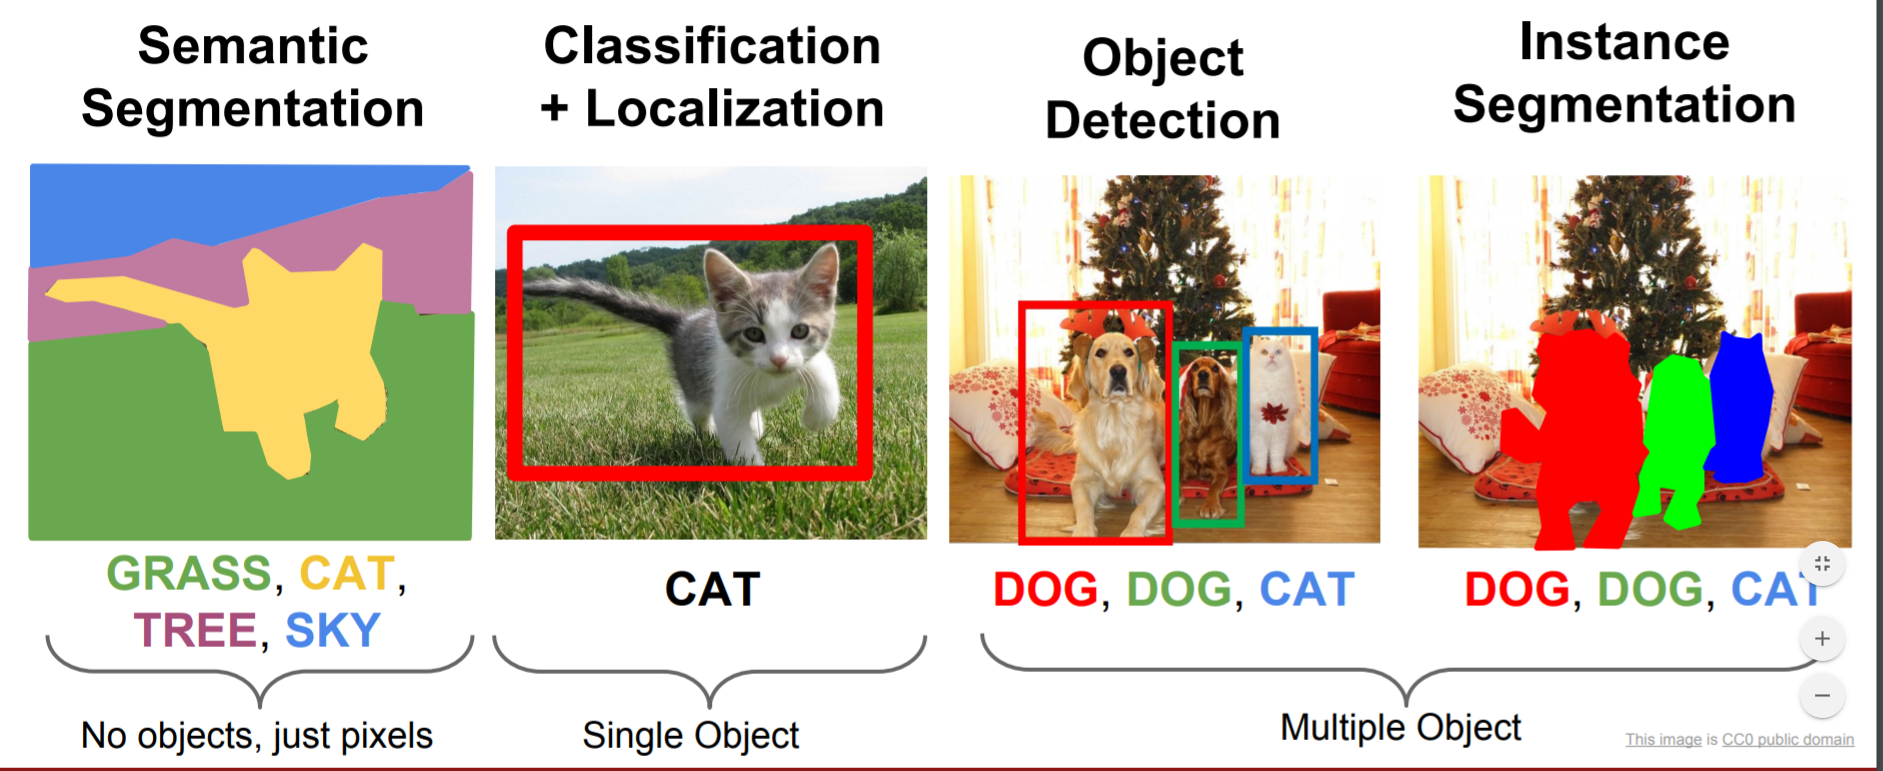
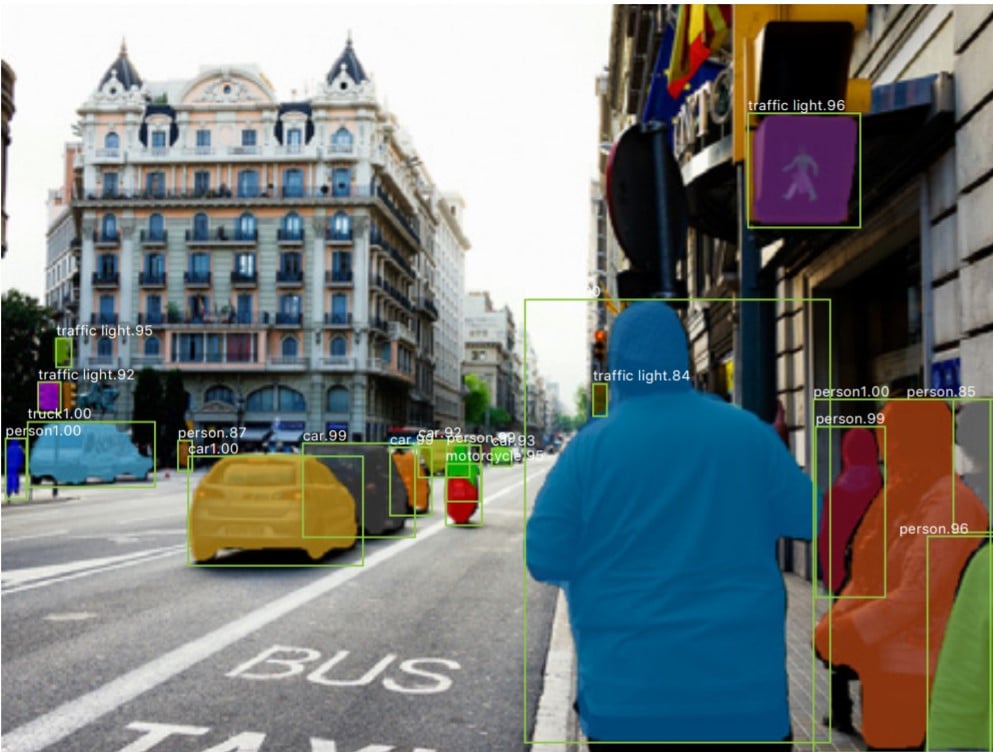
3. Panoptic segmentation: But there is another type of image segmentation that is a combination of semantic and instance segmentation called Panoptic segmentation. Panoptic segmentation classifies all the pixels of an image. It segments individual object instances as well as background regions in an image.
Techniques of image segmentation:
So many different types of segmentation techniques are there. Some of the common techniques are:
1. Thresholding method: Thresholding finds peak values based on the histogram of the image to segment similar pixels.
2. Edge Based Segmentation: Edge-based segmentation detects the boundary discontinuity of an object in an image to determine the shape of the object. And it helps to segment multiple objects in that image.
3. Region-based segmentation: Region-based segmentation partitions an image into regions that are similar according to a certain set of criteria. This technique involves an algorithm that makes segments by dividing an image into components that have similar pixel characteristics.
4. Cluster-based image segmentation: Cluster-based algorithms are used to group closer the data points that are similar to each other. It segments the image by a set of grouped data points.
5. Deep learning-based image segmentation: In this approach convolutional neural networks are used to segment each object instance in an image. MASK-RCNN is a popular algorithm for DNN based image segmentation.
In this project, we are going to build an image segmentation model using the Mask RCNN pre-trained model using OpenCV.
OpenCV is a free open-source computer vision library. OpenCV has an inbuilt solution to run DNN models. That’s why we don’t need any other deep learning framework to build this project.
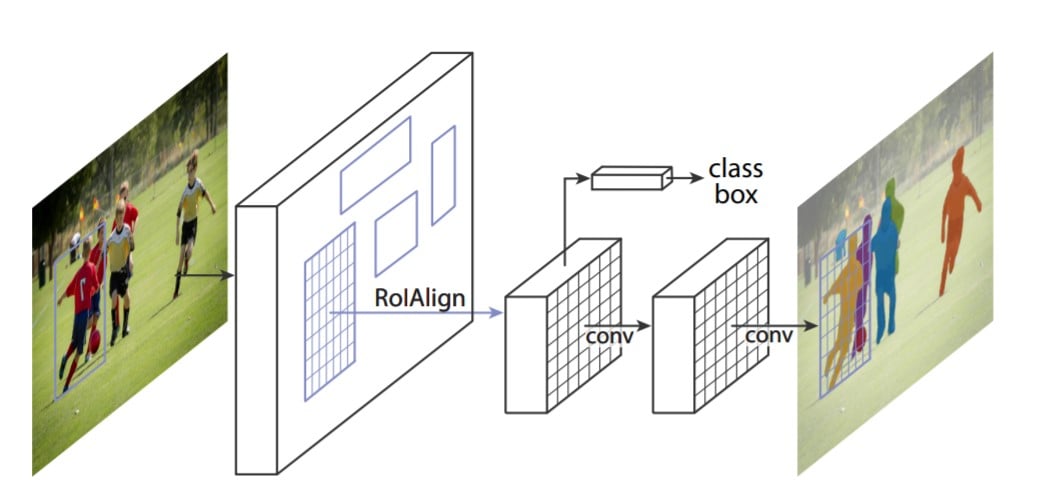
What is Mask RCNN and how does it work?
Mask RCNN is a deep learning model for image segmentation problems. It can separate different images in an image or video by giving their bounding box, classes, and corresponding binary image mask.
Mask RCNN built with Faster RCNN. F-RCNN has two outputs for each candidate, a class label and a bounding box. In addition, a 3rd branch is added to the model that outputs the object mask. The third branch works parallel with the existing branch for bounding box recognition.
So let’s begin –
Prerequisites for Image Segmentation Project: –
1. Python 3.x ( We used 3.8.8 for this project)
2. OpenCV 4.4 ( Run “pip install opencv-python opencv_contrib-python” to install opencv package)
3. Numpy – 1.20.3
4. Mask RCNN pre-trained weights.
Download Image Segmentation Project Code
Please download the source code of image segmentation using machine learning: Image Segmentation with Machine Learning
Steps to solve the project:
1. Import necessary packages and load the model.
2. Preprocess the input image.
3. Make predictions from the input.
4. Post-process the output data.
5. Combine post-processed data and get the final result.
Step 1 – Import necessary packages and load the model :
# TechVidvan image segmentation
import cv2
import numpy as np
- We need only two packages for the project. OpenCV and Numpy. So first, we’ve imported those.
# Load the model
net = cv2.dnn.readNetFromTensorflow("dnn/frozen_inference_graph_coco.pb",
"dnn/mask_rcnn_inception_v2_coco_2018_01_28.pbtxt")
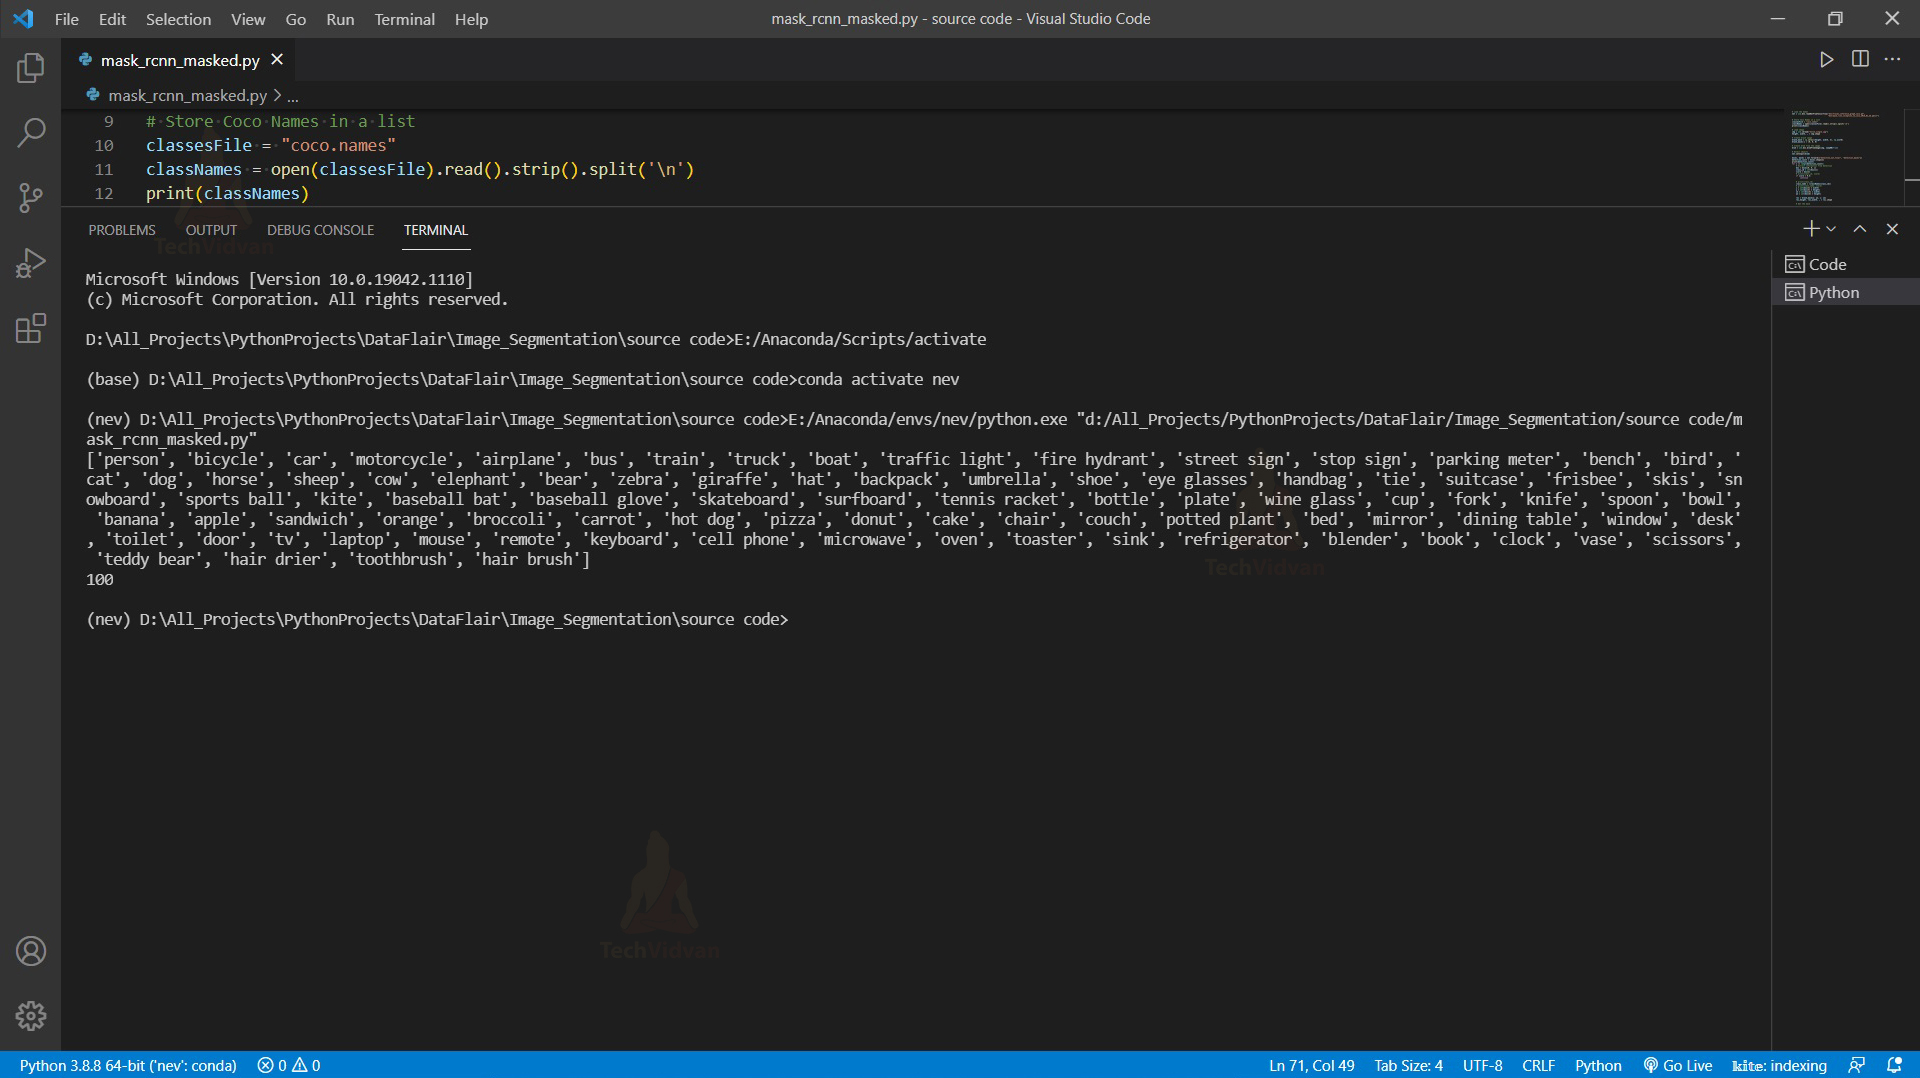
# Store Coco Names in a list
classesFile = "coco.names"
classNames = open(classesFile).read().strip().split('\n')
print(classNames)
- cv2.dnn.readNetFromTensorflow() loads DNN models that are trained with Tensorflow API.
- After that, we store all the class labels in a list called classNames.
Step 2 – Preprocess the input image:
# Load image
img = cv2.imread("road.jpg")
height, width, _ = img.shape

# Create black image
blank_mask = np.zeros((height, width, 3), np.uint8)
blank_mask[:] = (0, 0, 0)

# Create blob from the image
blob = cv2.dnn.blobFromImage(img, swapRB=True)
- First, we read the image using cv2.imread() function.
- Then we create a blank mask to create a segmented mask from the network’s output. Using np.zeros() we can create the blank mask.
- cv2.dnn.blobFromImage() creates a 4-dimensional blob of an image. Optionally it resizes the image, subtracts mean values, and swaps Red, Green, and Blue channels.
Step 3 – Make predictions from the input:
# Detect objects
net.setInput(blob)

boxes, masks = net.forward(["detection_out_final", "detection_masks"])
detection_count = boxes.shape[2]

print(len(detection_count))
- First, we set the blob as the input of the network using net.setInput(blob)
- net.forward() forwards the input to the model and as output it returns bounding boxes and corresponding masks of detected objects.
Output: – 100
So here we can see that we get a total of 100 detections from the output.
Step 4 – Post process the output data:
count=0
for i in range(detection_count):
# Extract information from detection
box = boxes[0, 0, i]
class_id = int(box[1])
score = box[2]
# print(class_id, score)
if score < 0.6:
continue
# print(class_id)
class_name = (classNames[class_id])
# print(class_name, score)
x = int(box[3] * width)
y = int(box[4] * height)
x2 = int(box[5] * width)
y2 = int(box[6] * height)
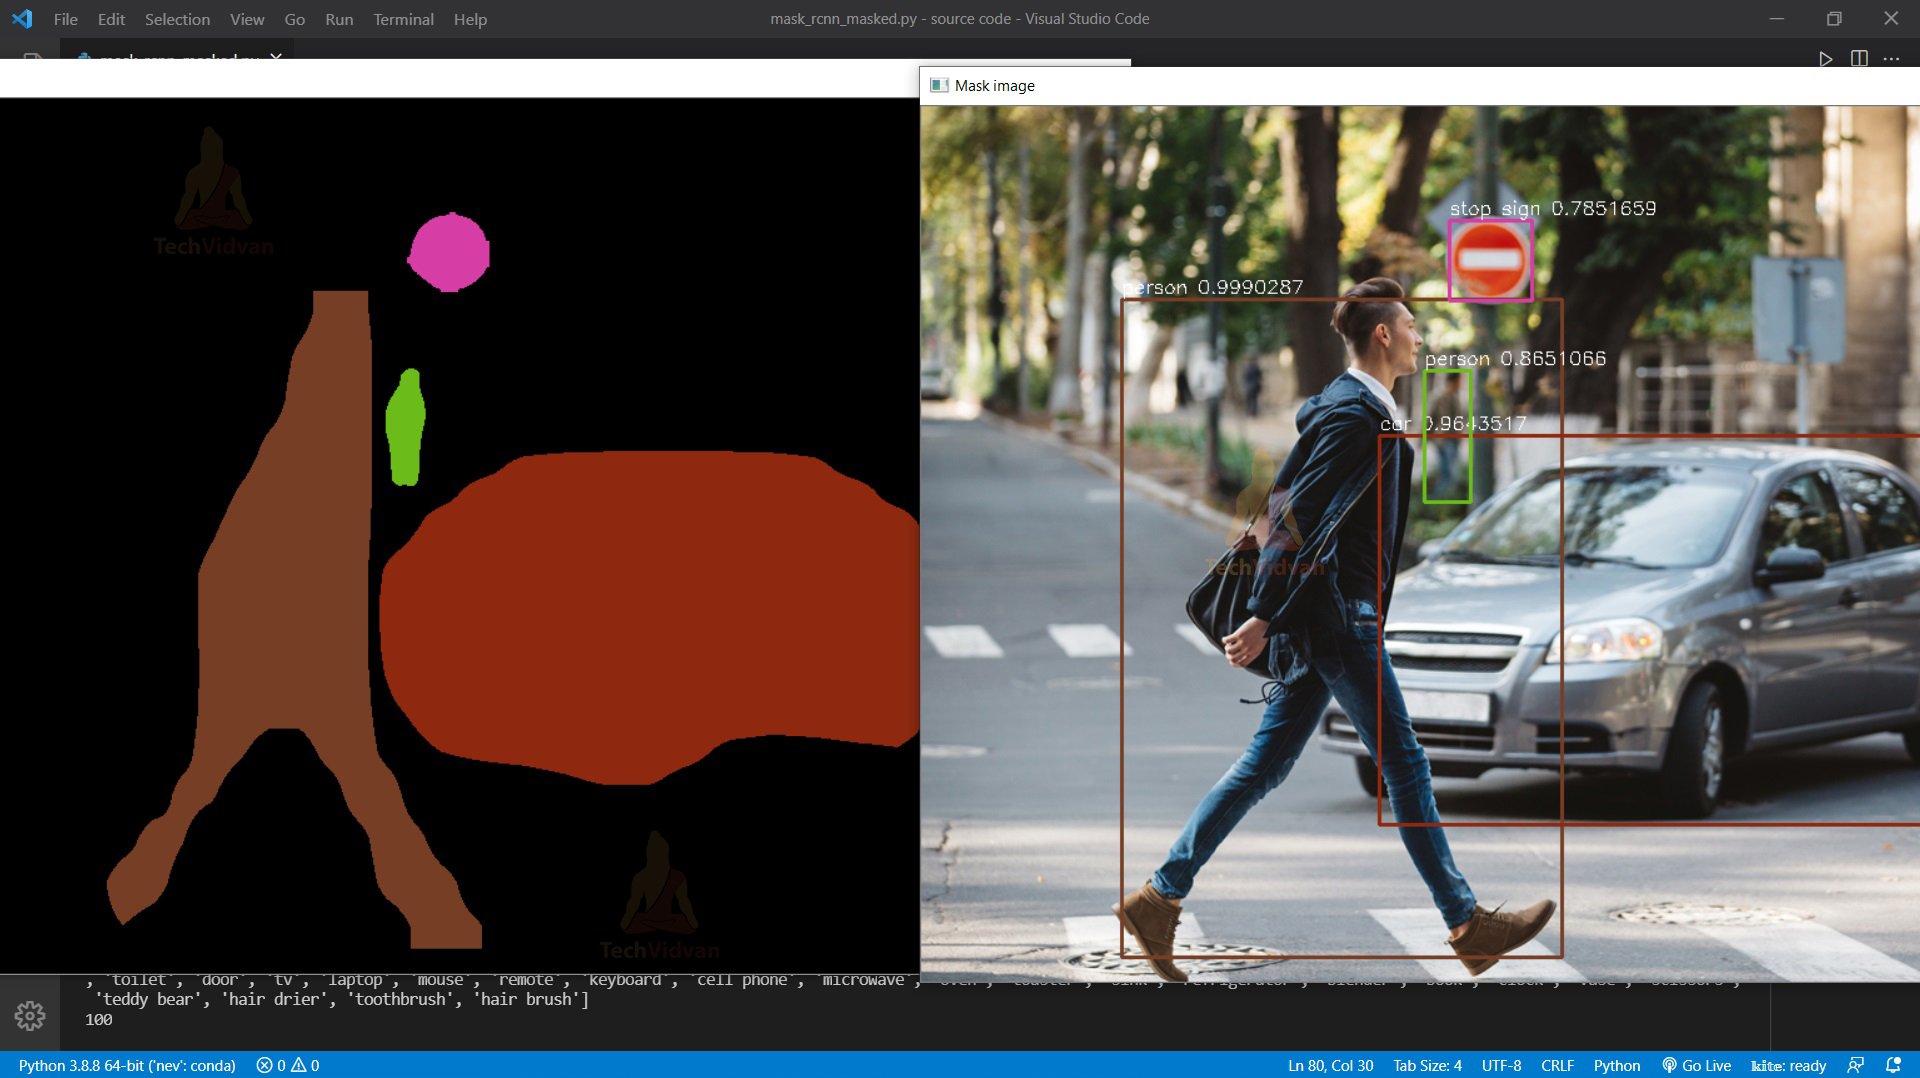
roi = blank_mask[y: y2, x: x2]
roi_height, roi_width, _ = roi.shape
# Get the mask
mask = masks[i, int(class_id)]
mask = cv2.resize(mask, (roi_width, roi_height))
_, mask = cv2.threshold(mask, 0.5, 255, cv2.THRESH_BINARY)
cv2.imshow("mask"+str(count), mask)
count+=1
- We extract the bounding box, class_id, and scores for each class and then we check if the score is less than a threshold then it continues to loop, otherwise we proceed to the next process.
- The network’s output value is a normalized value between 0 and 1. So we multiplied the original image’s height and width with the output to get the actual value.
- After that, we crop the blank_mask as the size of the bounding box.
- Next, we get the corresponding mask of the object and resize it to the same size as the cropped image. And then threshold the mask to create a binary mask of the object.
Step 5 – Combine post processed data and get the final result:
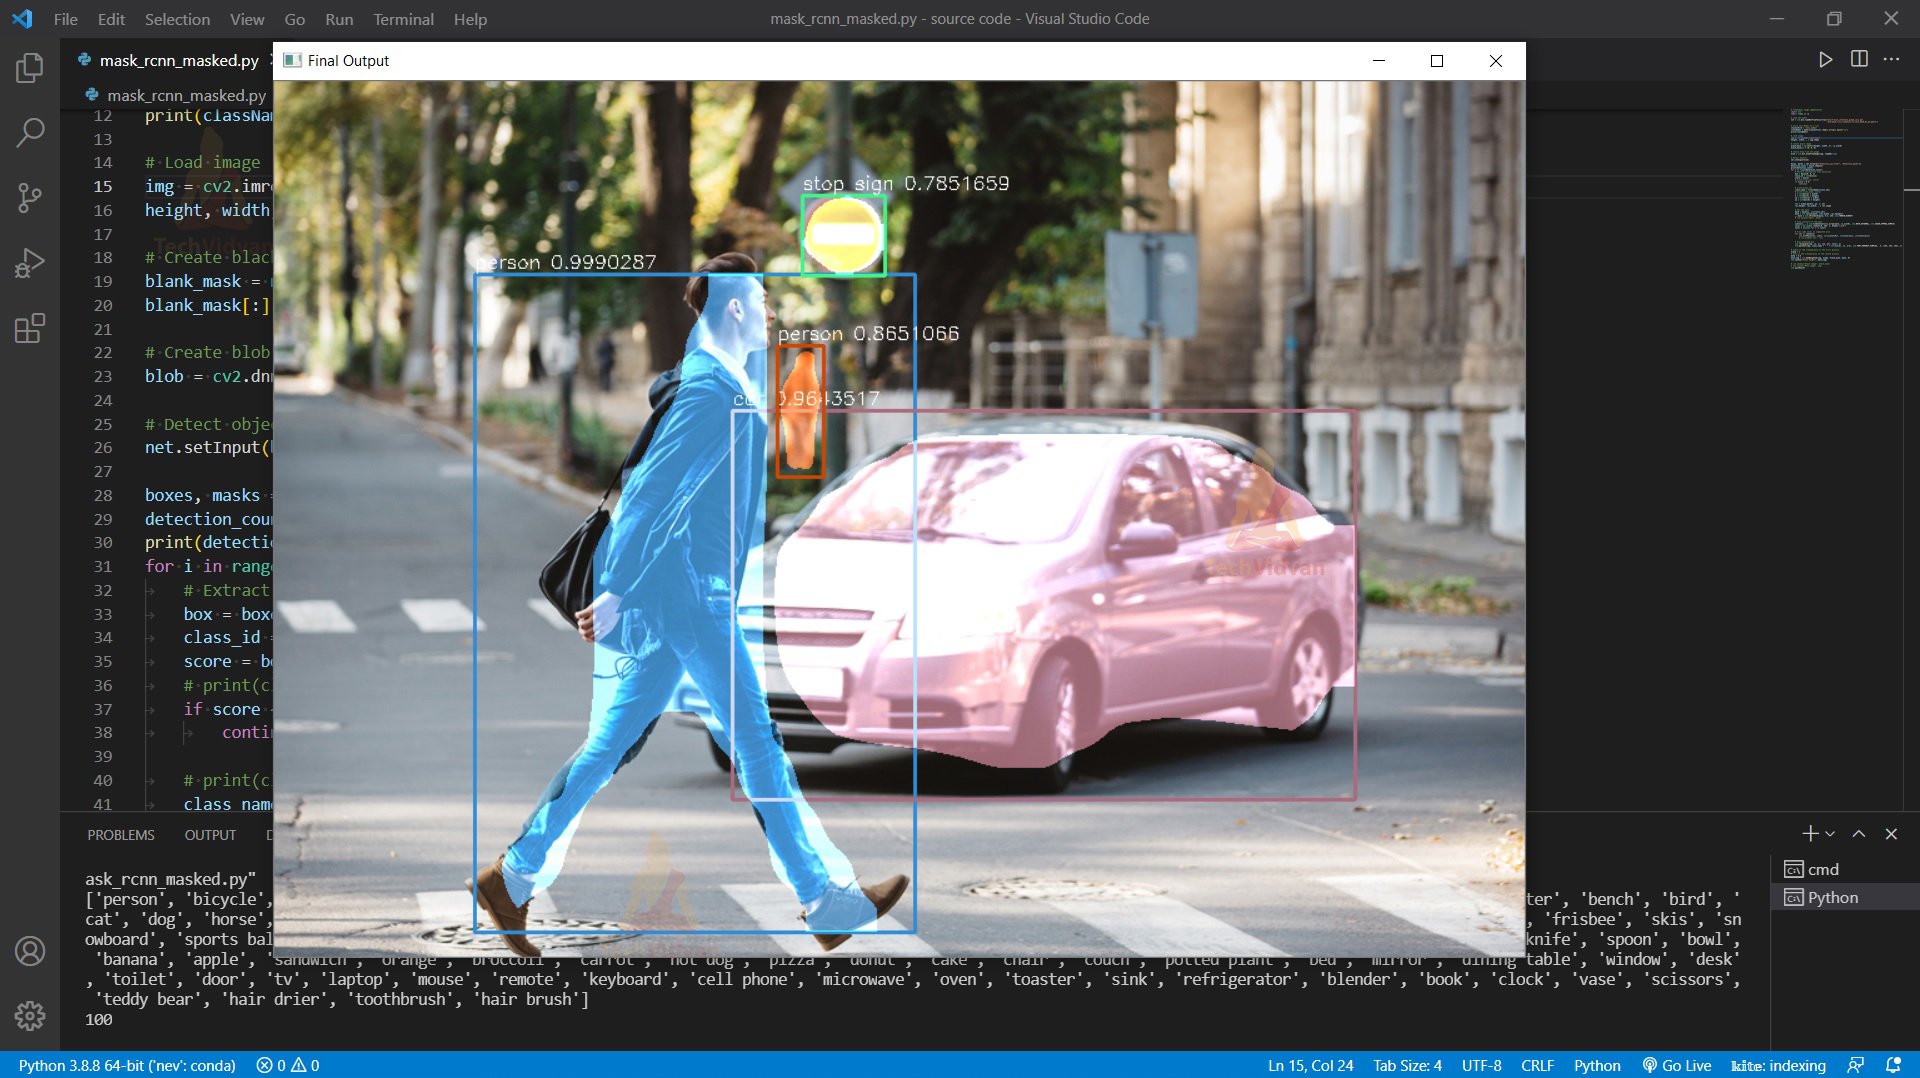
# Find contours of the mask
  contours, _ = cv2.findContours(np.array(mask, np.uint8), cv2.RETR_EXTERNAL,
cv2.CHAIN_APPROX_SIMPLE)
  color = np.random.randint(0, 255, 3, dtype='uint8')
  color = [int(c) for c in color]

  # fill some color in segmented area
  for cnt in contours:
    cv2.fillPoly(roi, [cnt], (int(color[0]), int(color[1]), int(color[2])))

  # Draw bounding box
  cv2.rectangle(img, (x, y), (x2, y2), color, 2)
  cv2.putText(img, class_name + " " + str(score), (x, y-5),
cv2.FONT_HERSHEY_SIMPLEX, .5, (255, 255, 255), 1)

cv2.imshow("Black image", blank_mask)
cv2.imshow("Mask image", img)
cv2.waitKey(0)
- cv2.findContours() finds the contours of the mask. Contours are basically all the continuous points along the boundary of the mask having the same color or intensity.
- Then we fill the binary mask with a random color using cv2.fillPoly() function.
- After that, we draw the class name text and the bounding box around each detected object.
Output:
And then finally we combine the mask and the original image to get a final output.
# alpha is the transparency of the first picture
alpha = 1
# beta is the transparency of the second picture
beta = 0.8
mask_img = cv2.addWeighted(img, alpha, blank_mask, beta, 0)
cv2.imshow("Final Output", mask_img)
- cv2.addWeighted() blends two images, where alpha is the intensity of the first image and beta is for the second image.
Image Segmentation Output
Summary
In this project, we have built an advanced image segmentation technique using OpenCV’s Deep neural Network module. We used the Pretrained Mask-RCNN model to perform the task. Through this project, we’ve learned about Deep learning, data pre-processing, post-processing, and other image processing techniques.