Twitter Hashtag Prediction Project using Machine learning
In this project, we will create a Machine Learning model that will analyze tweets about the weather forecast and then predict all of the hashtags associated with those tweets. The model will take tweets as input and separate each word of those tweets into three groups, namely “Sentiments”, “When,” and “Kind.”
The “Sentiment” category describes how people feel about the weather, whether they are happy, sad, or neutral. Weather timing is described in the “When” category, which includes the past, present, and future. The weather conditions like ‘stormy’, ‘thunder’, ‘lightning’ are described in the “Kind” category.
For example, if someone tweets “Yesterday’s stormy weather was extremely frightening.” So for “Sentiments”, we will say “how does the person feel about the weather?” So the answer is “extremely frightening”, for “When” we will say “when did it happen?” the answer is “Yesterday” now for “Kind” we will say “what kind of weather was there?” so the answer is “stormy”. We can choose only one value from the “Sentiment” and “When” categories but are allowed multiple choices for the “kind”.
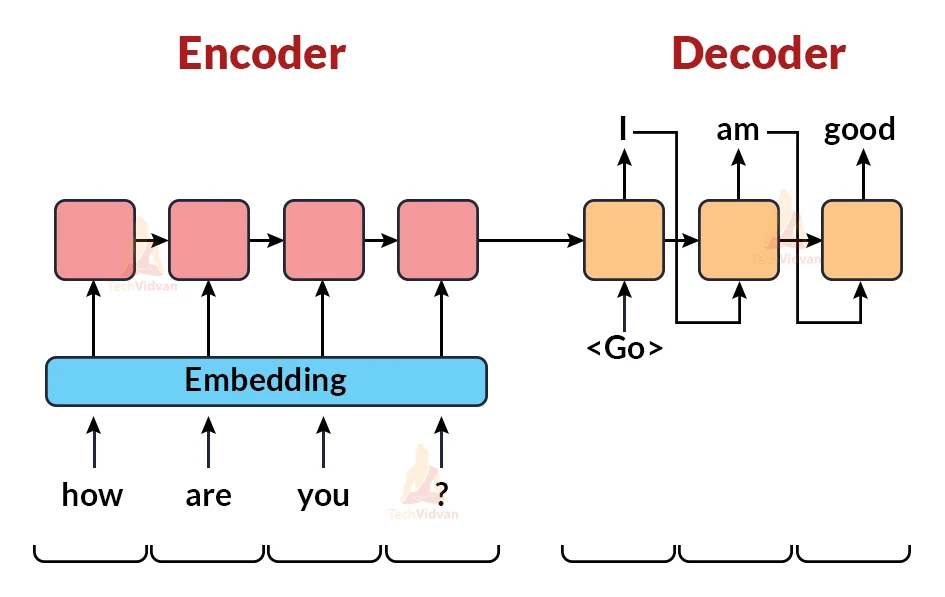
For this, we are going to use the Many to Many Encoder-Decoder Sequence Model.
This Sequence model accepts a stream of sentences as input and outputs another stream of sentences. The two main techniques used in sequence modeling are encoder and decoder along with the neural network Layer. We will be using the LSTM neural network along with Encoder and Decoder.
The encoder model takes the input sequence of tweets and passes it to 3 stacked Layers of the LSTM network which after processing returns the hidden state(output of the previous layer) or cell states (stored value) and passes to the next layers. The final output from the encoder model is the input for the Decoder model which will then predict the output sequence using one LSTM layer and Attention mechanism. The attention mechanism helps the model to focus only on specific words for the prediction.
There are two classes of Attention Mechanism.
a) Global Attention :
b) Local Attention
Global Attention: In Global attention, all the hidden states of LSTM layers at different time steps are used to generate the context vector.
Local Attention: In Local attention, some of the hidden states of the LSTM layers are used to generate the context vector.
Encoder-Decoder model:
Prerequisites :
You must be familiar with Python, Deep Learning, and Natural Language Processing(NLP). Using the following command, you can install all of the project’s modules:
pip install numpy, pandas, pickle, nltk, tensorflow, sklearn
The versions of Python and its relevant modules used in this project are as follows:
- python : 3.8.5
- tensorflow : 2.3.1 Note: TensorFlow version should be 2.2 or higher in order to use keras or else install keras directly
- sklearn : 0.24.2
- pickle : 4.0
- numpy : 1.19.5
- pandas : 1.1.5
- nltk : 3.2.5
Datasets for Twitter Hashtag Prediction Project:
You can download the datasets for Twitter Hashtag prediction project from the following link: Twitter Hashtag prediction Dataset
Download Twitter Hashtag Prediction Project Code
Please download the source code of twitter hashtag prediction project with machine learning: Twitter Hashtag Prediction Project Code
Project Structure :
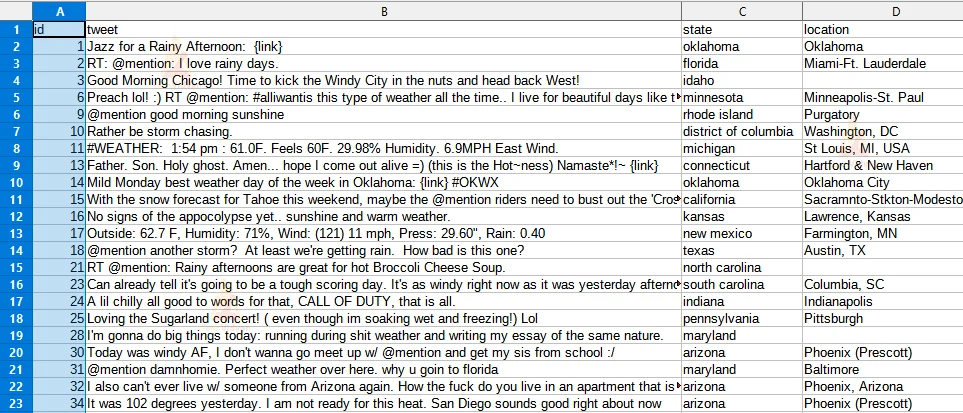
train.csv: This file contains training data for our model. It has tweets, locations, and a confidence score for each of 24 possible labels. These 24 labels are from three categories: sentiment, when and kind.
test.csv: This file contains testing data for our model. It has tweets and locations.
twitter_hashtag.py: In this file, we will create and train our model with input and target to predict the hashtag for the tweet.
s2s/: Our trained model’s optimizer, metrics, and weights are all stored in this directory.
contractions.pkl: This file provides a dictionary with keys representing abbreviated words and values representing their extended or original meanings.
Steps for Twitter Hashtag Prediction ML Project:
1) Import the Libraries
Firstly we will create a file called ‘twitter_hashtag.py’ and import all the libraries which have been shared in the prerequisites section.
Code:
#TechVidvan Twitter Hashtag Prediction Project
#import all the required libraries
import numpy as np
import pandas as pd
import pickle
from statistics import mode
import nltk
from nltk import word_tokenize
from tensorflow.keras.models import Model
from tensorflow.keras import models
from tensorflow.keras.preprocessing.sequence import pad_sequences
from tensorflow.keras.preprocessing.text import Tokenizer
from tensorflow.keras.utils import plot_model
from tensorflow.keras.layers import Input,LSTM,Embedding,Dense,Concatenate,Attention
from sklearn.model_selection import train_test_split
nltk.download('wordnet')
nltk.download('punkt')
2) Parse the Dataset file.
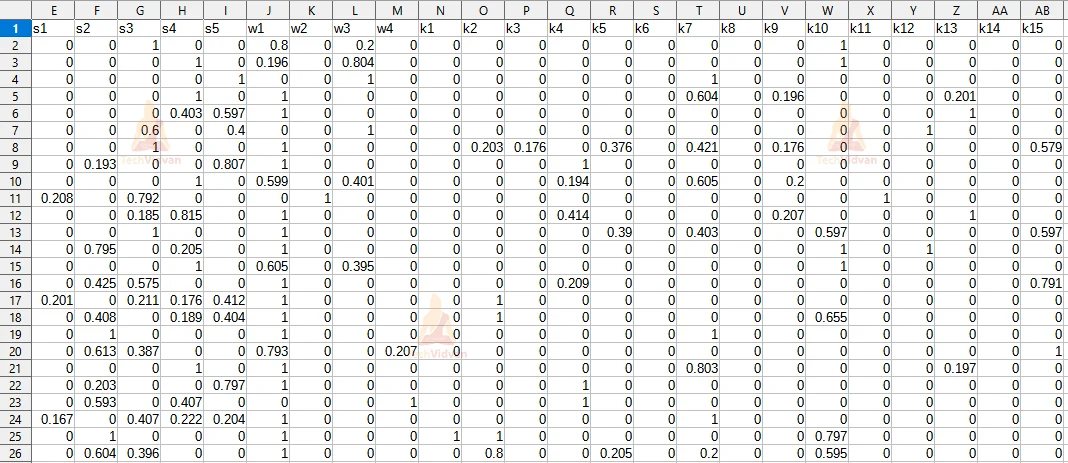
We will traverse the dataset folder which contains the ‘train.csv’ file and extract all the input texts. Our input will be the ‘tweet’ column which contains users’ tweets and the target label will be s1,s2,s3,s4,s5 i.e “sentiment”, w1,w2,w3,w4 i.e “when” and k1,k2,k3….k15 i.e “kind” column. The target label value will be the hashtag value of respective labels from s1 to k15.
Code:
#read the dataset file
train=pd.read_csv("train.csv")
#tweet column is input
inp_data=train["tweet"]
#target data is sentiment(s1,s2,s3,s4,s5) ,
#when (w1,w2,w3,w4) and kind(k1,k2,k3...k15)
tar_data=train.iloc[:,4:].values
#get the column name of target
tar_lab=train.iloc[:,4:].columns.tolist()
#value of the target label like
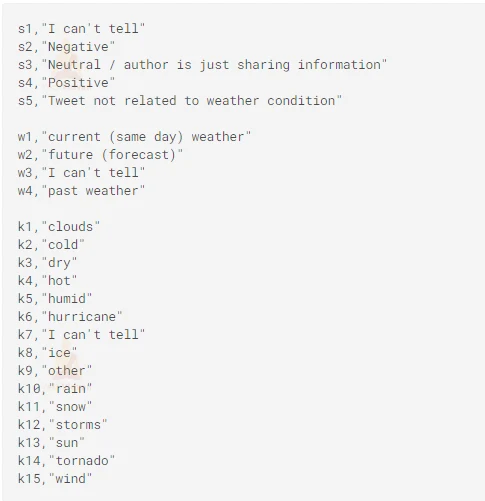
#s1="I can't tell" , s2="Negative" and so on till s5
#w1="current weather", w2=future forecast and so on till w4
#k1="clouds", k2="cold", k3="dry" and so on till k15
tar_lab_val=[
"I can't tell","Negative","Neutral","Positive","Tweet not related to weather condition",
"current (same day) weather","future (forecast)","I can't tell","past weather",
"clouds","cold","dry","hot","humid","hurricane","I can't tell","ice","other","rain",
"snow","storms","sun","tornado","wind"]
Input Data from ‘train.csv’
Target Data from ‘train.csv’:
Label Value:
3) Preprocessing
We need to clean our tweet texts as this data might be incomplete and it cannot be sent directly to the model. So we will create a function ‘clean()’ which does the following process in order to clean the data and returns the cleaned words:
a) Remove numbers, Alphanumeric words i.e. words which contain both alphabets and integers e.g. hello123 .
b) Expand the contraction words which are combinations of two words, shortened using apostrophe for example ‘aren’t’ shortened for ‘are not’.
Code:
#clean the tweets
def clean(tweet):
 #replace and lower case the tweets
 tweet=tweet.replace(":","").lower()
 #get only words that contains alphabets
 words= list(filter(lambda w:(w.isalpha()),tweet.split(" ")))
 #expand the shortened words
 words= [contractions[w] if w in contractions else w for w in words ]
 #return all the words
 return words
Now we will pass our input data that is training tweets to the ‘clean()’ function to get clean words and tweets.
Code:
#iterate over input data
for tweet in inp_data:
 #clean the tweets
 inpt_words= clean(tweet)
 #store the input texts and words
 inp_texts+= [' '.join(inpt_words)]
 inp_words+= inpt_words
As we are using many to many encoder-decoder sequence models, we need to make our target data also ready for the model. We will convert our confidence scores of “sentiments”, “when” and “kind” data back in the form of labels. As we can take only one value from “sentiments” and “when” labels, so for that we will take the maximum confidence score. And for the “kind” type we can have as many but we will take values that have a confidence score greater than 0.5.
We also need to have a starting and ending point for the target data as this will tell the model that from the starting word the sentence begins and after reaching the ending word the sentence ends. For example, we will take the following sentence “TechVidvan provides many projects” and now we will add “sos” (start of a sentence) at the starting of this sentence and “eos” (end of the sentence) at the end of that sentence. So our new sentence will be “sos TechVidvan provides many projects eos”. Let’s see how it works:
Input(x) Output(y)
sos, TechVidvan
sos TechVidvan, provides
sos TechVidvan provides, many
sos TechVidvan provides many, projects
sos TechVidvan provides many projects, eos
As you can see after feeding the input(x) word we get output(y) which is the next word. After reaching “eos” we will stop as it indicates the end of the sentence.
Code:
#iterate over target data
for lab in tar_data:
 #get index of maximum value from sentiment data(s1 to s5)
 #with the help of this index get label value
 senti=tar_lab[np.argmax(lab[:5])]

 #get index of maximum value from when data(w1 to w4)
 #with the help of this index get label value
 when=tar_lab[np.argmax(lab[5:9])+5]

 #get index of values greater than 0.5 and get label value from it
 kind=[tar_lab[ind] for ind,ele in enumerate(lab[9:len(lab)],9) if ele>=0.5]

 #store the target text which is combination of sentiment,when and kind data
 #add sos at start and eos at end of text
 tar_texts+=["sos "+" ".join([senti]+[when]+kind)+" eos"]
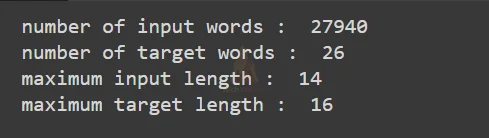
Now let’s see how many unique words are in input and target data along with the maximum input and target length.
Code:
#only store unique words from the input and target word lists
inp_words = sorted(list(set(inp_words)))
num_inp_words = len(inp_words)
num_tar_words = len(tar_lab)+2

#get the length of the input and the target texts which appears most frequently
max_inp_len = mode([len(i) for i in inp_texts])
max_tar_len = mode([len(i) for i in tar_texts])

print("number of input words : ",num_inp_words)
print("number of target words : ",num_tar_words)
print("maximum input length : ",max_inp_len)
print("maximum target length : ",max_tar_len)
Output:
4) Training and Testing sets
We will split the input and target texts into a 90:10 ratio. 90% for the training set and 10% for the testing set.
Code:
#split the input and target text into 90:10 ratio or testing size of 10%=0.1.
x_train,x_test,y_train,y_test=train_test_split(input_texts,target_texts,test_size=0.1,random_state=42)
5) Text Vectorization
As our model requires numeric data, we will use text vectorization. Text Vectorization is a technique that converts textual data into numeric data. Numeric data can be the index of respective textual data.
For example,
L = [ ‘on monday’, ‘free product’, ‘you are best’]
Tokenize all the elements of list ‘L’ and make a dictionary having keys as tokens and value as their index+1. So after the data is fit we get a dictionary as
D={ ‘on’:1, ‘monday’:2, ‘free’:3, ‘product’:4, ‘you’:5, ‘are’:6, ‘best’:7 }
So we have fit our data, now let’s transform the below sentence into an integer sequence using our tokenizer.
S = “are you free on monday”
Transformed (Vectorized) S : [ 6 , 5 , 3 , 1 , 2 ]
So we will convert our input and target text into a sequence of integers using a vectorization technique.
Code:
#Use all of the words from training input and output to train the tokenizer.
inp_tokenizer = Tokenizer()
inp_tokenizer.fit_on_texts(x_train)
tar_tokenizer = Tokenizer()
tar_tokenizer.fit_on_texts(y_train)

#convert text to an integer sequence where the integer represents the word index
x_train= inp_tokenizer.texts_to_sequences(x_train)
y_train= tar_tokenizer.texts_to_sequences(y_train)
We’ll make all of the input and target texts the same length after converting them to integer sequences for our model. We will pad an array of 0’s to the integer sequence if it is smaller than the provided maximum input length using the ‘max in len’ and ‘max tr len’ variables.
We’ll pad our encoder input data (‘x train’) and our decoder input data (‘y train’) but we won’t include the last word, ‘eos.’ The decoder target data will be the same as the decoder input data, but it will be one timestep ahead since it will not include our target sentence’s first word,’sos.’
Code:
#If the length is less than the maximum length, pad the array with 0s.
enc_inp_data= pad_sequences(x_train, maxlen=max_inp_len, padding='post',dtype="float32")
dec_data= pad_sequences(y_train, maxlen=max_tar_len, padding='post',dtype="float32")

#The last word, ie 'eos,' will not be included in the decoder input data.
dec_inp_data = dec_data[:,:-1]

#decoder target data will be one time step ahead as it will not include the first initial word i.e 'sos'
dec_tar_data = dec_data.reshape(len(dec_data),max_tar_len,1)[:,1:]
6) Build the model.
The LSTM network will have three stacked layers. This will greatly improve our prediction. As per your requirement, you can have more also. Let’s have a look at our encoder and decoder models.
Encoder: The ‘Input’ object will be used to initialize the encoder input tensor. The batch is expected to have 14 (maximum input length) dimensions. Then we’ll make a ‘Embedding Layer,’ with the total number of input words as the first argument and a shape of 500 for the latent (hidden) dimension.
LSTM: The input of the encoder will be used in the first LSTM layer, and so on, creating a continuous succession of LSTM layers. All of the contextual information in the input sequence will be captured by the LSTM layer. Following the execution of each LSTM layer, we will deliver hidden state output as well as states (hidden state and cell state).
Code:
from keras import backend as K
K.clear_session()
latent_dim = 500

#create input object with the shape equal to the maximum number of input words
enc_inputs = Input(shape=(max_inp_len,))
enc_embedding = Embedding(num_inp_words+1, latent_dim)(enc_inputs)


#create 3 stacked LSTM layer
#1st LSTM layer keep only output
enc_lstm1= LSTM(latent_dim, return_state=True, return_sequences=True)
enc_outputs1, *_ = enc_lstm1(enc_embedding)

#2nd LSTM layer keep only output
enc_lstm2= LSTM(latent_dim, return_state=True, return_sequences=True)
enc_outputs2, *_ = enc_lstm2(enc_outputs1)

#3rd LSTM layer keep output as well as its states
enc_lstm3= LSTM(latent_dim,return_sequences=True,return_state=True)
enc_outputs3 , state_h3 , state_c3= enc_lstm3(enc_outputs2)

#encoder states
enc_states= [state_h3, state_c3]
Decoder: We’ll build the decoder input tensor similarly to Encoder and then give it to the single LSTM. The initial state of the decoder is where we will pass the hidden state and cell state values that we obtained from the encoder’s LSTM layer.
Attention Layer: The encoder and decoder outputs will be passed to the attention layer, which will then concatenate the attention layer outputs with the decoder outputs.
Code:
# Decoder.
dec_inputs = Input(shape=(None,))
dec_emb_layer = Embedding(num_tar_words+1, latent_dim)
dec_embedding = dec_emb_layer(dec_inputs)

#initialize the LSTM layer of the decoder with the encoder's output states
dec_lstm = LSTM(latent_dim, return_sequences=True, return_state=True)
dec_outputs, *_ = dec_lstm(dec_embedding,initial_state=enc_states)

#Attention layer
attention =Attention()
attn_out = attention([dec_outputs,enc_outputs3])

#Merge the attention output with the decoder outputs
merge=Concatenate(axis=-1, name='concat_layer1')([dec_outputs,attn_out])
We’ll now build our Dense Layer, which will be the model’s output layer. It will have the output dimension the same as a number of target word units of output dimension along with the softmax activation function.
Code:
#fully connected Dense layer for the output
dec_dense = Dense(num_tar_words+1, activation='softmax')
dec_outputs = dec_dense(merge)
7) Train the model.
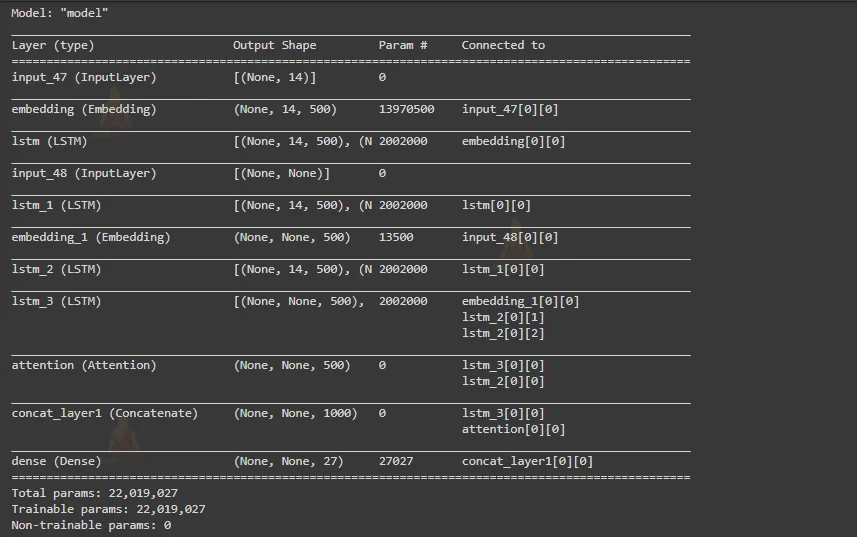
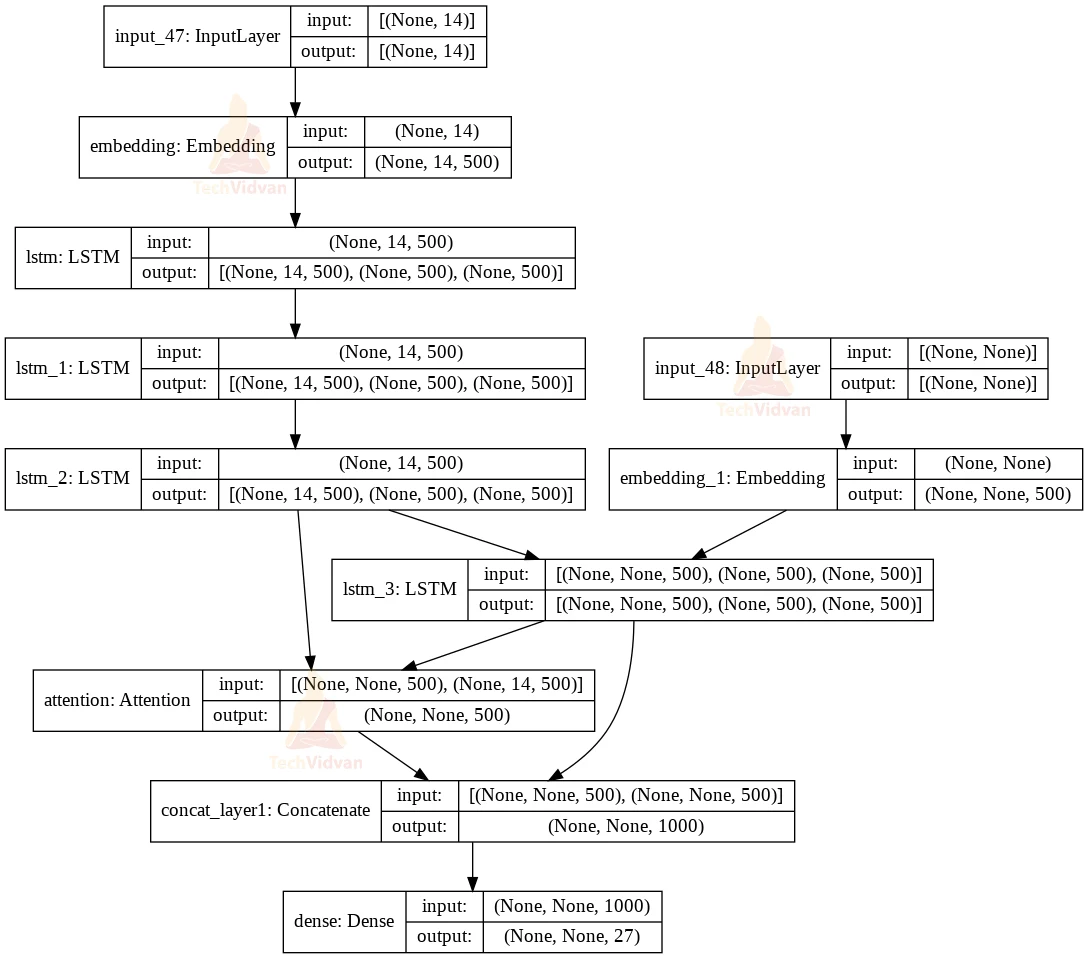
Finally, we’ll set up encoder and decoder inputs, as well as decoder output, in our Model class. We’ll plot the model layers and get a summary of our model.
Code:
#Model class and model summary
model = Model([enc_inputs, dec_inputs], dec_outputs)
model.summary()
plot_model(model, to_file='model_plot.png', show_shapes=True, show_layer_names=True)
Output:
Now we will train our model by passing the encoder input data, decoder input data as input for the model and decoder target data as output with ‘500’ batch size, for ‘10’ epochs and the optimizer will be ‘RMSprop’. You can increase or decrease the epoch but take care of the validation accuracy and loss.
Code:
#compile the model using RMSProp optimizer
model.compile(
 optimizer="rmsprop", loss="sparse_categorical_crossentropy", metrics=["accuracy"])

#train the model with input and target data from encoder and decoder
model.fit(
 [enc_inp_data, dec_inp_data],dec_tar_data,
batch_size=500,epochs=10)

#Save model with the name as “s2s”
model.save("s2s")
Output:
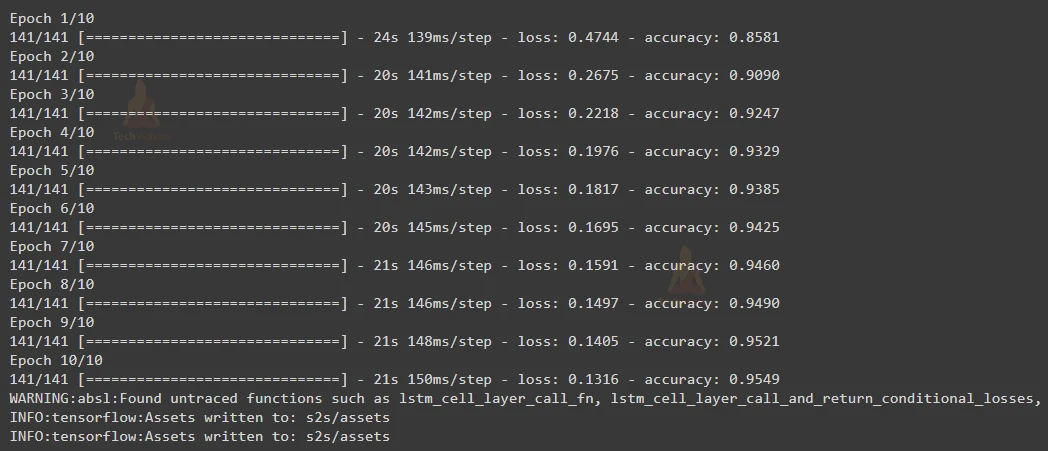
After training the model, we got an accuracy of 95.49%.
8) Inference Model
We will be using the trained model to create an inference architecture for the encoder and decoder model. Load the model. By using the Inference model we will test our model on new sentences for which the target sequence is unknown.
Code:
# encoder inference model
latent_dim=500

#load the saved model
model = models.load_model("s2s")
Encoder Inference: The 0th layer, i.e. the input object that we constructed (as seen in the above summary and model plot), will be the input for the inference encoder model, and the output will be the output of the last LSTM, which is the 6th layer.
Code:
#construct an encoder model from the output of the 6th layer of LSTM
enc_outputs,state_h_enc,state_c_enc = model.layers[6].output
enc_states=[state_h_enc,state_c_enc]

#add input data and state data from the layer
enc_model = Model(model.input[0],[enc_outputs]+enc_states)
Decoder Inference: We’ll get the input, embedding, and LSTM layers from the stored model, just as the Encoder inference model. The shape of latent (hidden) dimensions should be used to initialize the decoder hidden input and the other two states.
Attention Inference: The attention layer is the eighth layer in our case. We’ll get it and combine the output of the inference decoder with the hidden state input we set up earlier. The attention layer output will then be concatenated with the decoder output.
Code:
# decoder inference model
#create Input object of hidden state and cell state for decoder
dec_state_input_h = Input(shape=(latent_dim,))
dec_state_input_c = Input(shape=(latent_dim,))
dec_hidden_state_input = Input(shape=(max_inp_len,latent_dim))

#Get all the layers from the model
dec_inputs = model.input[1]
dec_emb_layer = model.layers[5]
dec_lstm = model.layers[7]
dec_embedding= dec_emb_layer(dec_inputs)

#add input and initialize the LSTM layer with decoder’s hidden and cell state
dec_outputs2, state_h2, state_c2 = dec_lstm(dec_embedding, initial_state=[dec_state_input_h,dec_state_input_c])

#Attention layer
attention = model.layers[8]
attn_out1 = attention([dec_outputs2,dec_hidden_state_input])
merge2 = Concatenate(axis=-1)([dec_outputs2, attn_out1])
And same for the Dense layer (output layer) which is the 10th layer of our saved model. With the help of the above data, initialize the Inference Model class.
Code:
#Dense layer for decoder output
dec_dense = model.layers[10]
dec_outputs2 = dec_dense(merge2)

# Finally define the Decoder model Class
dec_model = Model(
[dec_inputs] + [dec_hidden_state_input,dec_state_input_h,dec_state_input_c],
[dec_outputs2] + [state_h2, state_c2])
Assign state vectors to the input sequence. For each pair, create an empty array containing the intended sequence and generate the start word, which in our case is ‘sos’. Predict the output index using this state value and the input sequence. To obtain the word from the output index, use the reverse target word index and append it to the decoded sequence.
Code:
#create a dictionary with all indexes as key and respective target label as values
reverse_tar_word_index = tar_tokenizer.index_word
reverse_inp_word_index = inp_tokenizer.index_word
tar_word_index = tar_tokenizer.word_index
reverse_tar_word_index[0]=' '

def decode_sequence(inp_seq):
 #get the encoder outputs and states(hidden and cell) by passing the input
 sequence
 enc_out, enc_h, enc_c= enc_model.predict(inp_seq)

 #target sequence with starting initial word as 'sos'
 tar_seq = np.zeros((1, 1))
 tar_seq[0, 0] = tar_word_index['sos']

 #Stop the iteration if the iteration reaches end of the text
 stop_condition = False
 #merge every predicted word in decoded sentence
 decoded_sentence = ""
 while not stop_condition:
  #get predicted output words, hidden and cell state for the model
 output_words, dec_h, dec_c= dec_model.predict([tar_seq] + [enc_out,enc_h, enc_c])

 #Using index get the word from the dictionary
 word_index = np.argmax(output_words[0, -1, :])
 text_word = reverse_tar_word_index[word_index]
 decoded_sentence += text_word +" "
Assign the index of our word to the target sequence, so that our target sequence has a vector of the previous word for the next iteration. Iterate until our word equals the last word (in our example, ‘eos’) or the target text’s maximum length.
Code:
# Stop when we either hit max length or reach the terminal word i.e. eos.
if text_word == "eos" or len(decoded_sentence) > max_tar_len:
 stop_condition = True


#update target sequence with the current word index.
tar_seq = np.zeros((1, 1))
tar_seq[0, 0] = word_index
enc_h, enc_c = dec_h, dec_c


#return the decoded sentence string
return decoded_sentence
Finally, we are done with all the processes and now we can predict the Hashtag for the input tweet. For this, we will clean and vectorize our ‘x_test’ and then pass to the ‘decode_sequence()’ function to get the predicted hashtag.
Code:
#dict with key as label and value as target label value
lab_val=dict((i,v) for i,v in zip(tar_lab,tar_lab_val))

for i in range(0,20,3):
 #tokenize the x_test and convert into integer sequence
 inp_x= inp_tokenizer.texts_to_sequences([x_test[i]])
 #pad array of 0's
 inp_x= pad_sequences(inp_x, maxlen=max_inp_len, padding='post')
 #reshape the input x_test
 tag=decode_sequence(inp_x.reshape(1,max_inp_len)).replace('eos','')
 print("Tweet:",x_test[i])
 print("Predicted Hashtag:"," ".join(["#"+lab_val[i] for i in word_tokenize(tag)]))
 print("Actual Hashtag:"," ".join(["#"+lab_val[i] for i in y_test[i][4:-4].split(" ")]))
 print("\n")
Twitter Hashtag Prediction Output


Summary
In this project, we have developed a Twitter Hashtag prediction model which generates Hashtag from the provided tweet using the LSTM model and Attention Mechanism. We got an accuracy of 95.49%. To improve model accuracy you can change some parameters like training and testing sets or you can go for Bidirectional LSTM also.