AudioManager in Android with Examples
Most often, whenever we get calls or messages, then our device plays a ringtone. Did you ever think about how these work? These all are handled through the Android AudioManager. The Audio Manager helps us to handle system ringtones, their modes, and their volumes.
This article will cover every use case and aspect of Audio Manager and Audio Capture. By the end of this article, you will be very comfortable dealing with these things.
Android AudioManager
Audio Manager helps to control your phone ringtone, its modes, and its volume. Whenever you require adjusting your phone ringtone volume or changing the mode, you particularly need the Audio Manager. There are several modes present in Audio Manager that are as follows:
- Ringing
- Vibration
- Loud
- Silent, etc
Android Audio Manager is a class in Android that helps you to implement the above-stated functionalities. So first, you need to create an Android Audio Manager class object and then use the setRingerMode() method.
So, now let’s see an example of the same.
For creating the Audio Manager object, we need to use the getSystemService() method.
Code:
lateinit var my_audio_manager:AudioManager
//creating an instance of the Audio Manager class
my_audio_manager = getSystemService(Context.AUDIO_SERVICE) as AudioManager
Now set the setRingerMode() as follows:
Code:
//setting the ringer mode of the device to vibrate
my_audio_manager.ringerMode = AudioManager.RINGER_MODE_VIBRATE
Android AudioManager Modes
So, as discussed earlier, you can have several ringing modes for your device. Now for this, you need to use the modes present in Audio Manager.
RINGER_MODE_NORMAL – It sets the device in its normal state of ringing. When activated, the device will play ringtones and notifications at the volume level set by the user. This is the default mode for most devices and is used when the user wants to hear audible alerts.
RINGER_MODE_VIBRATE – This mode sets the device to vibrate without playing any sound. The device will vibrate for incoming calls and notifications, making it suitable for environments where loud ringtones might be disruptive. This mode is often used in meetings or quiet places.
RINGER_MODE_SILENT – This mode silences all ringtones and notifications. No sound or vibration is produced, ensuring complete discretion.
Methods involved in Audio Manager
Till now, you just got to know about setRingerMode(), but there are more methods present. Let’s see each of them below.

getRingerMode() –
It displays the device’s current ringing mode. It returns one of the three modes: RINGER_MODE_NORMAL, RINGER_MODE_VIBRATE, or RINGER_MODE_SILENT. This helps you understand whether the device will ring, vibrate, or remain silent when there is an incoming call or notification.
getMode() –
It tells us the current audio mode of the device, such as MODE_NORMAL, MODE_RINGTONE, MODE_IN_CALL, or MODE_IN_COMMUNICATION. Knowing the audio mode is useful for managing audio settings and behaviours during different scenarios, like phone calls or media playback.
getStreamVolume(int streamType) –
This method returns the current volume index for a particular audio stream in your device. For instance, it can give you the current volume level of the media, ringtone, or notification stream. It helps in understanding and adjusting the current audio levels for different types of audio outputs.
getStreamMaxVolume(int streamtype) –
This method provides the maximum volume index a particular audio stream can have. This is useful for setting volume levels programmatically, ensuring you don’t exceed the maximum allowable volume for any stream type.
adjustVolume(int direction, int flags) –
You can adjust your device’s volume using this method. The direction parameter can be ADJUST_RAISE, ADJUST_LOWER, or ADJUST_SAME, and the flags parameter can specify additional behaviour, such as showing a volume UI. This allows for dynamic volume control based on user interactions or specific app requirements.
isMusicActive() –
It is used to check if your device is playing a piece of music or not. It returns true if music is playing and false otherwise. This is particularly useful for applications that need to manage audio playback or interruptions, ensuring a smooth user experience.
Android Audio Capture
As you know about Audio Manager, it’s time for us to explore Android Auto Capture. Android Auto capture is beneficial in terms of communication.
Any android comes with an inbuilt microphone to support calls, conversations, and recording. These all features are possible only due to the Audio capture.
Now to implement the Audio capture, we use the MediaRecorder class. The MediaRecorder class helps us to record both audio as well as video.
To use the MediaRecorder class, you need to use the object of the class. After the object is created successfully, you can specify the source, file format, and output file.
Below is an example that will guide you through the process of implementing Audio Capture.
Code:
//creating an object of the Media Recorder class
private var my_recording_obj: MediaRecorder = MediaRecorder()

//setting up the path for our output file
private var output: String= Environment.getExternalStorageDirectory().absolutePath + "/your_recording.mp3"

//setting the various methods of Media Recorder class
my_recording_obj.setAudioSource(MediaRecorder.AudioSource.MIC)
my_recording_obj.setOutputFormat(MediaRecorder.OutputFormat.MPEG_4)
my_recording_obj.setAudioEncoder(MediaRecorder.AudioEncoder.AAC)
my_recording_obj.setOutputFile(output)
//starting the recording using the start() method
my_recording_obj.start()
Methods involved in Audio Capture
Similar to Audio Manager, Audio capture also has many methods involved in it. You already saw that the start() method is used to start the recording, but now let’s see some more practical methods.
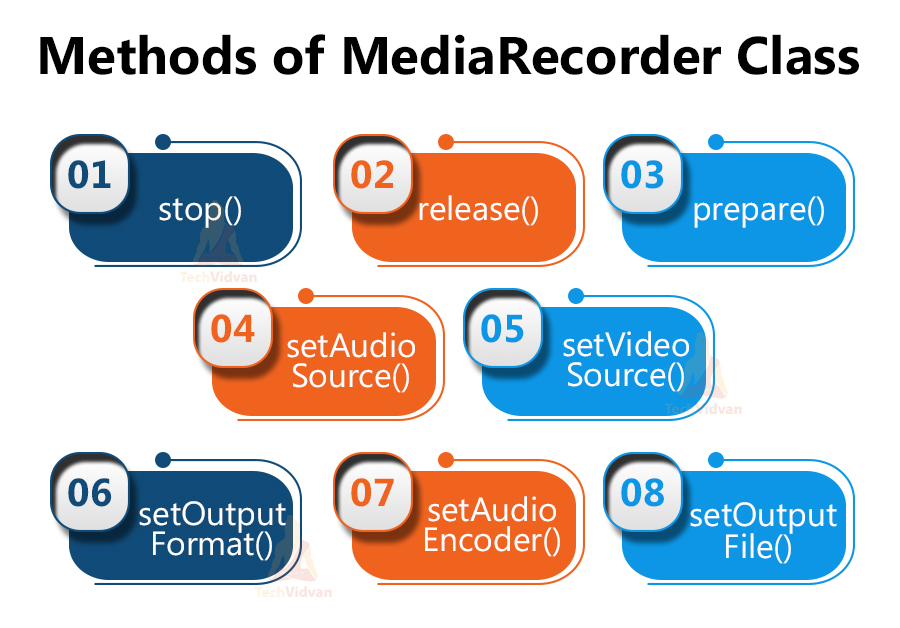
stop() –
It is used to stop the ongoing recording.
release() –
Whenever we need a recorder instance, we use the release() method.
prepare() –
It prepares the recorder before the actual recording begins.
setAudioSource() –
It sets the source microphone from where the recording will occur.
setVideoSource() –
It specifies the source from where the video will be recorded.
setOutputFormat() –
It specifies the format we want our audio file to be.
setAudioEncoder() –
It sets the encoding format for the audio.
setOutputFile() –
It specifies the path where we want our output file to be.
Implementation of Audio Manager through an App
So, now let’s see how you can implement AudioManager in your android application. We will develop an app to change your ringing modes and view the current mode. Now, let’s see steps of how you need to build such a kind of application.
1: Open your Android Studio and create a new Project.
2: Select an empty activity and proceed.
3: Provide a name to your application and then select API level 22 and proceed.
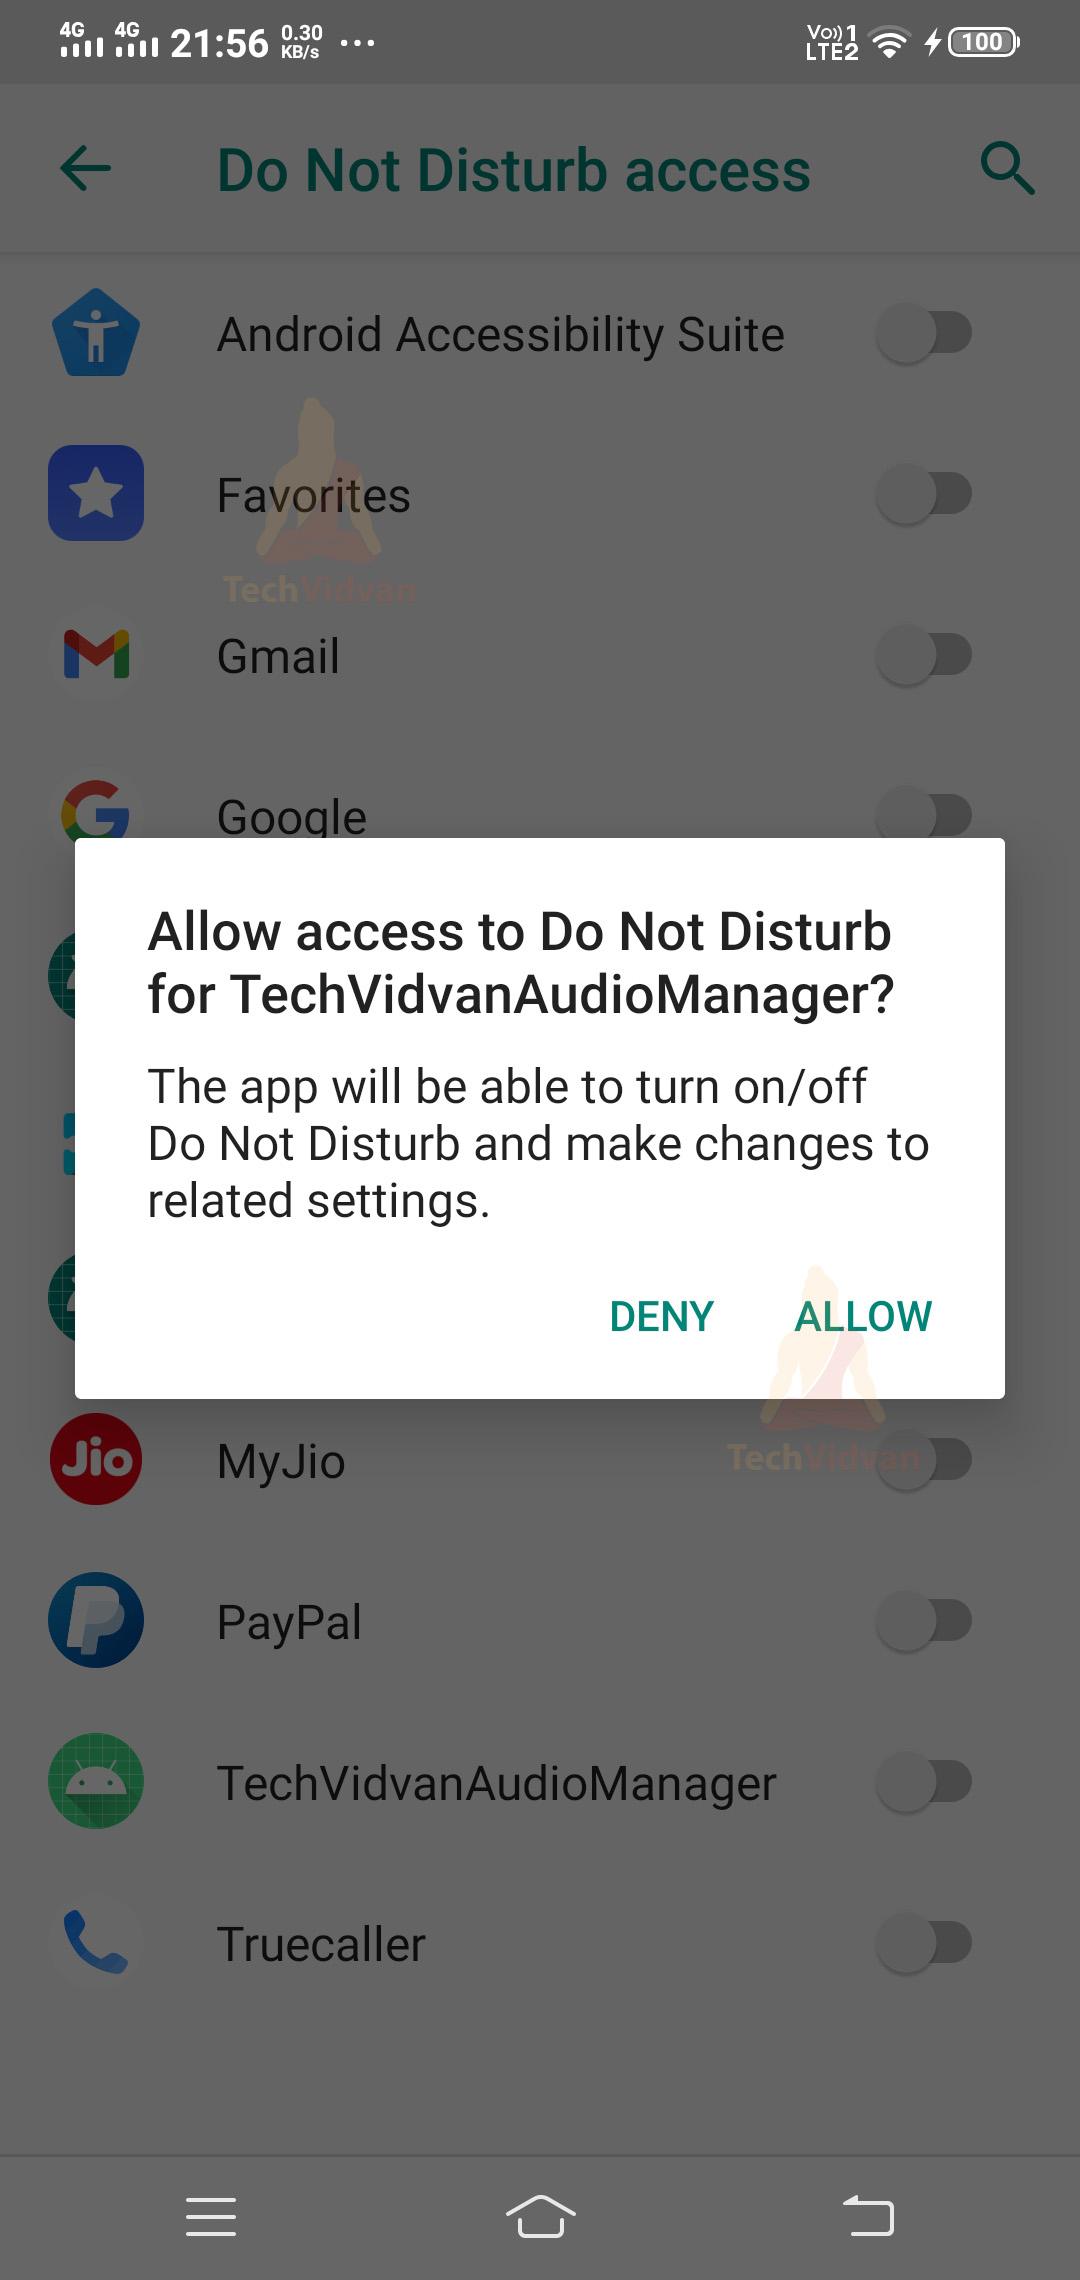
4: From Android Marshmallow, you need to give access to do not disturb mode. To this, you need to add the below permission in your manifest file. After you successfully add this permission then only you can change the ringing modes.
Code: AndoridManifest.xml
<?xml version="1.0" encoding="utf-8"?>
<manifest xmlns:android="http://schemas.android.com/apk/res/android"
    package="com.techvidvan.techvidvanaudiomanager">

    <!--    Add the below permission to access the ringing modes-->
    <uses-permission android:name="android.permission.ACCESS_NOTIFICATION_POLICY"/>

    <application
        android:allowBackup="true"
        android:icon="@mipmap/ic_launcher"
        android:label="@string/app_name"
        android:roundIcon="@mipmap/ic_launcher_round"
        android:supportsRtl="true"
        android:theme="@style/Theme.TechVidvanAudioManager">
        <activity android:name=".MainActivity">
            <intent-filter>
                <action android:name="android.intent.action.MAIN" />

                <category android:name="android.intent.category.LAUNCHER" />
            </intent-filter>
        </activity>
    </application>

</manifest>
Step 5: Now, you need to create four buttons. Three to access the various ringing modes and one to display the current mode. Paste the below code in your activity_main.xml file and then proceed.
Code: activity_main.xml
<?xml version="1.0" encoding="utf-8"?>
<LinearLayout xmlns:android="http://schemas.android.com/apk/res/android"
    xmlns:tools="http://schemas.android.com/tools"
    android:layout_width="match_parent"
    android:layout_height="match_parent"
    android:orientation="vertical"
    tools:context=".MainActivity">

    <TextView
        android:layout_marginTop="50dp"
        android:id="@+id/title"
        android:layout_width="match_parent"
        android:layout_height="wrap_content"
        android:text="TechVidvan Audio Manager"
        android:textColor="@color/black"
        android:textSize="30sp"
        android:gravity="center"/>

    <Button
        android:id="@+id/normal_mode"
        android:onClick="setNormalMode"
        android:layout_marginTop="100dp"
        android:layout_width="wrap_content"
        android:layout_height="wrap_content"
        android:text="Normal Mode"
        android:textSize="18sp"
        android:layout_gravity="center"
        android:backgroundTint="#4CAF50"
        />

    <Button
        android:onClick="setVibrateMode"
        android:id="@+id/vibrate_mode"
        android:layout_marginTop="10dp"
        android:layout_width="wrap_content"
        android:layout_height="wrap_content"
        android:text="Vibrate Mode"
        android:textSize="18sp"
        android:layout_gravity="center"
        android:backgroundTint="#E91E63"
        />

    <Button
        android:onClick="setSilentMode"
        android:id="@+id/silent_mode"
        android:layout_marginTop="10dp"
        android:layout_width="wrap_content"
        android:layout_height="wrap_content"
        android:layout_gravity="center"
        android:text="Silent Mode"
        android:textSize="18sp"
        android:backgroundTint="#FF5722"
        />


    <Button
        android:onClick="viewCurrentMode"
        android:id="@+id/view_current_mode"
        android:layout_marginTop="80dp"
        android:layout_width="wrap_content"
        android:layout_height="wrap_content"
        android:layout_gravity="center"
        android:text="Check Current Mode"
        android:textSize="18sp"
        android:backgroundTint="#3F51B5"
        />

</LinearLayout>
Step 6: Now, go to your MainActivity.kt file and paste the below code there.
Code: MainActivity.kt
package com.techvidvan.techvidvanaudiomanager

import android.app.NotificationManager
import android.content.Context
import android.content.Intent
import android.media.AudioManager
import android.os.Build
import androidx.appcompat.app.AppCompatActivity
import android.os.Bundle
import android.provider.Settings
import android.view.View
import android.widget.Toast

class MainActivity : AppCompatActivity()
{
    //declaring the variables
    lateinit var my_notification_manager:NotificationManager
    lateinit var my_audio_manager:AudioManager
    override fun onCreate(savedInstanceState: Bundle?)
    {
        super.onCreate(savedInstanceState)
        setContentView(R.layout.activity_main)

       //creating an object of the notification manager class
       my_notification_manager  = getSystemService(Context.NOTIFICATION_SERVICE) as NotificationManager

        //checking if your android version is Marshmallow or above
        if(Build.VERSION.SDK_INT >= Build.VERSION_CODES.M && !my_notification_manager.isNotificationPolicyAccessGranted)
        {
            //if its marshmallow and above then you need to give the
            //the access of Do not disturb to your application
            startActivity(Intent(Settings.ACTION_NOTIFICATION_POLICY_ACCESS_SETTINGS))
        }

       //creating an instance of the Audio Manager class
       my_audio_manager = getSystemService(Context.AUDIO_SERVICE) as AudioManager
    }

    //normal mode button listener
    fun setNormalMode(view: View)
    {
        //setting the ringer mode of the device to normal
        my_audio_manager.ringerMode = AudioManager.RINGER_MODE_NORMAL
        Toast.makeText(this@MainActivity, "Switched to Normal Mode", Toast.LENGTH_LONG).show()
    }

    //vibrate mode button listener
    fun setVibrateMode(view: View)
    {
        //setting the ringer mode of the device to vibrate
        my_audio_manager.ringerMode = AudioManager.RINGER_MODE_VIBRATE
        Toast.makeText(this@MainActivity, "Switched to Vibrate Mode", Toast.LENGTH_LONG).show()
    }

    //silent mode button listener
    fun setSilentMode(view: View)
    {
        //setting the ringer mode of the device to silent
        my_audio_manager.ringerMode = AudioManager.RINGER_MODE_SILENT
        Toast.makeText(this@MainActivity, "Switched to Silent Mode", Toast.LENGTH_LONG).show()
    }

    //view current mode button listener
    fun viewCurrentMode(view: View)
    {

        //checking the current ringing mode and then toasting it
        when(my_audio_manager.ringerMode) {
            AudioManager.RINGER_MODE_NORMAL -> {
                Toast.makeText(this@MainActivity, "Current Mode is Normal Mode", Toast.LENGTH_LONG)
                    .show()
            }

            AudioManager.RINGER_MODE_VIBRATE -> {
                Toast.makeText(this@MainActivity, "Current Mode is Vibrate Mode", Toast.LENGTH_LONG)
                    .show()
            }

            AudioManager.RINGER_MODE_SILENT -> {
                Toast.makeText(this@MainActivity, "Current Mode is Silent Mode", Toast.LENGTH_LONG)
                    .show()
            }
        }

    }
}
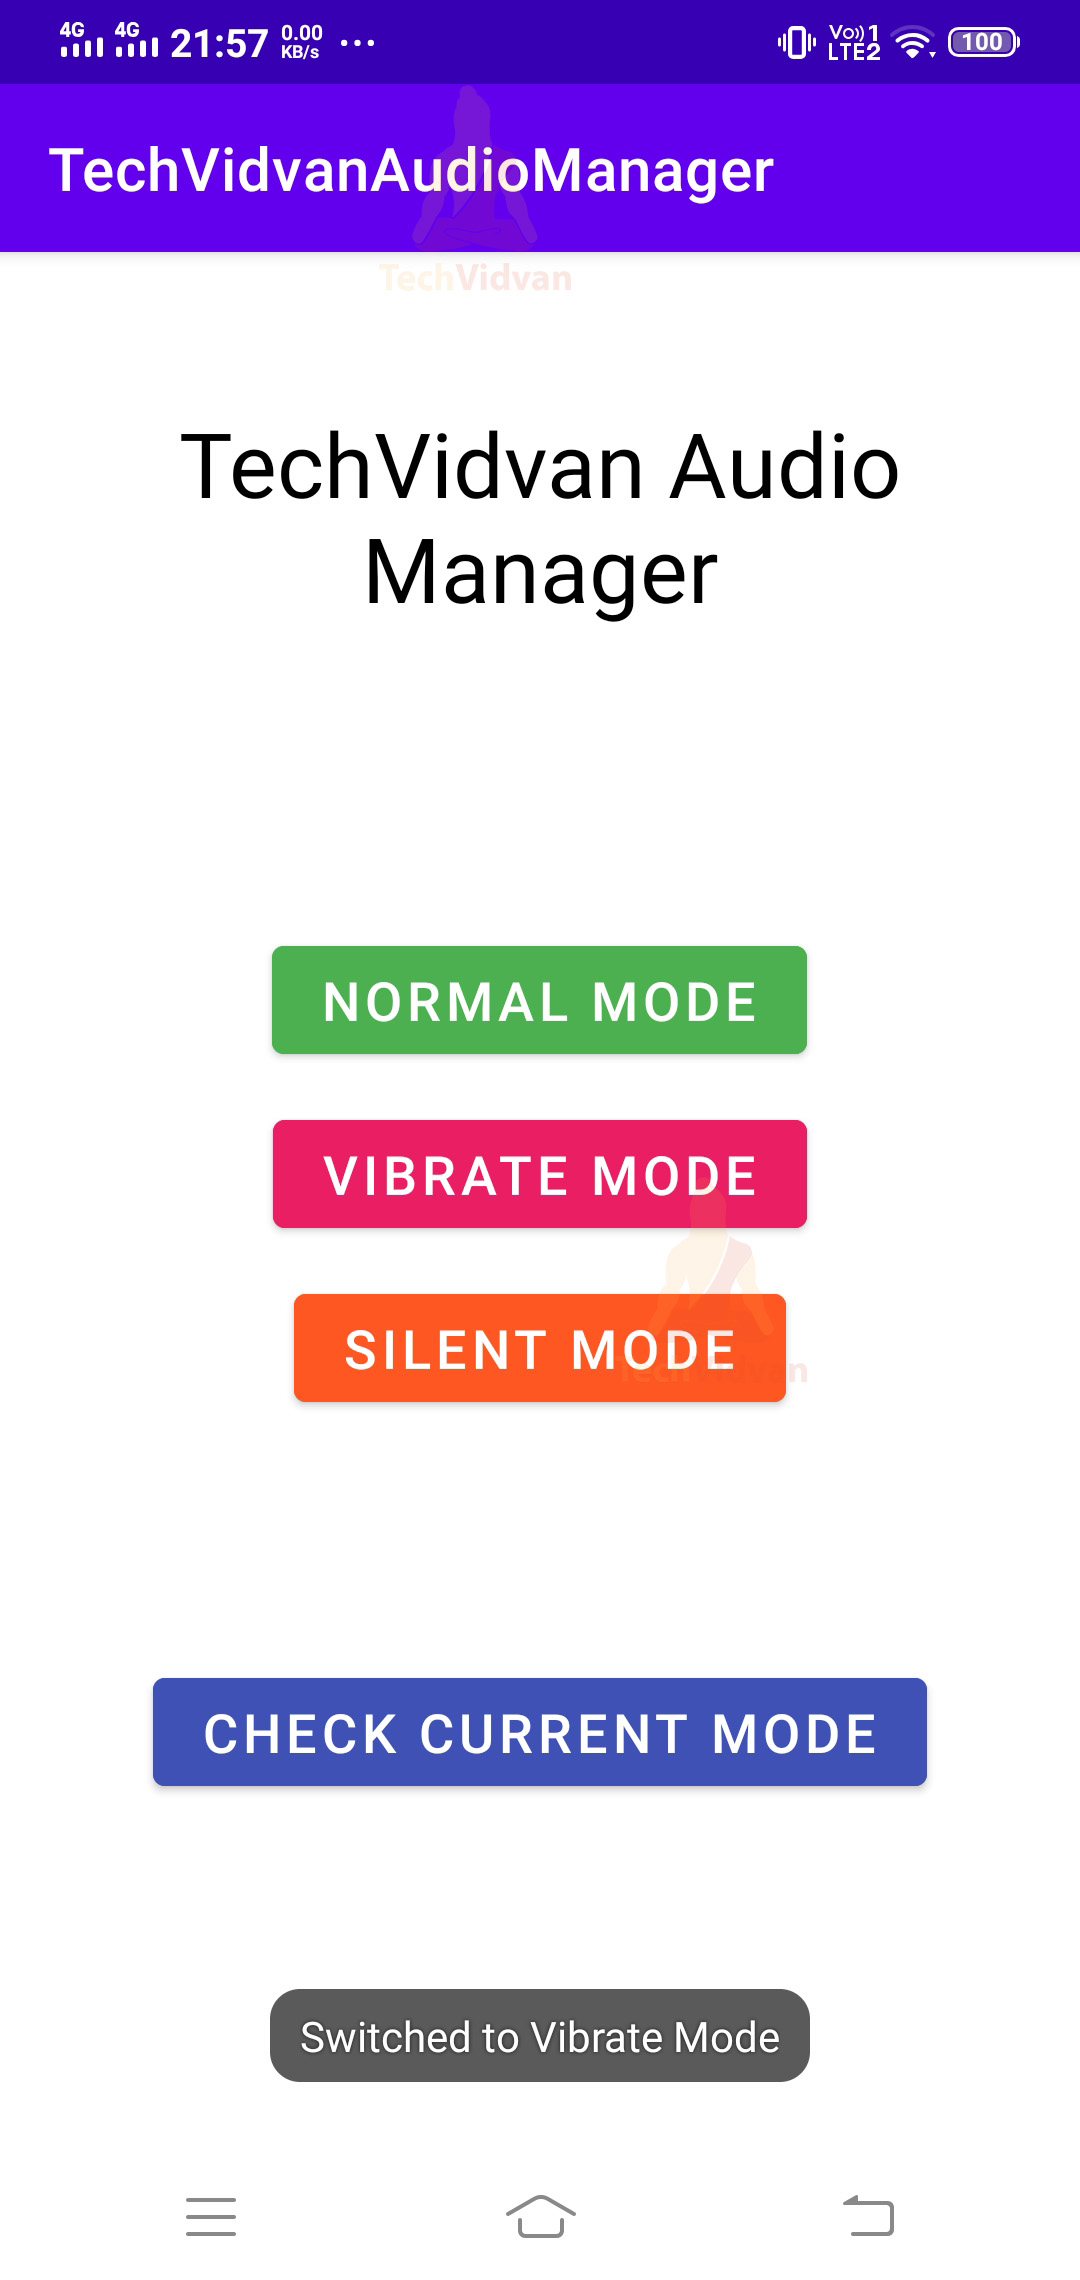
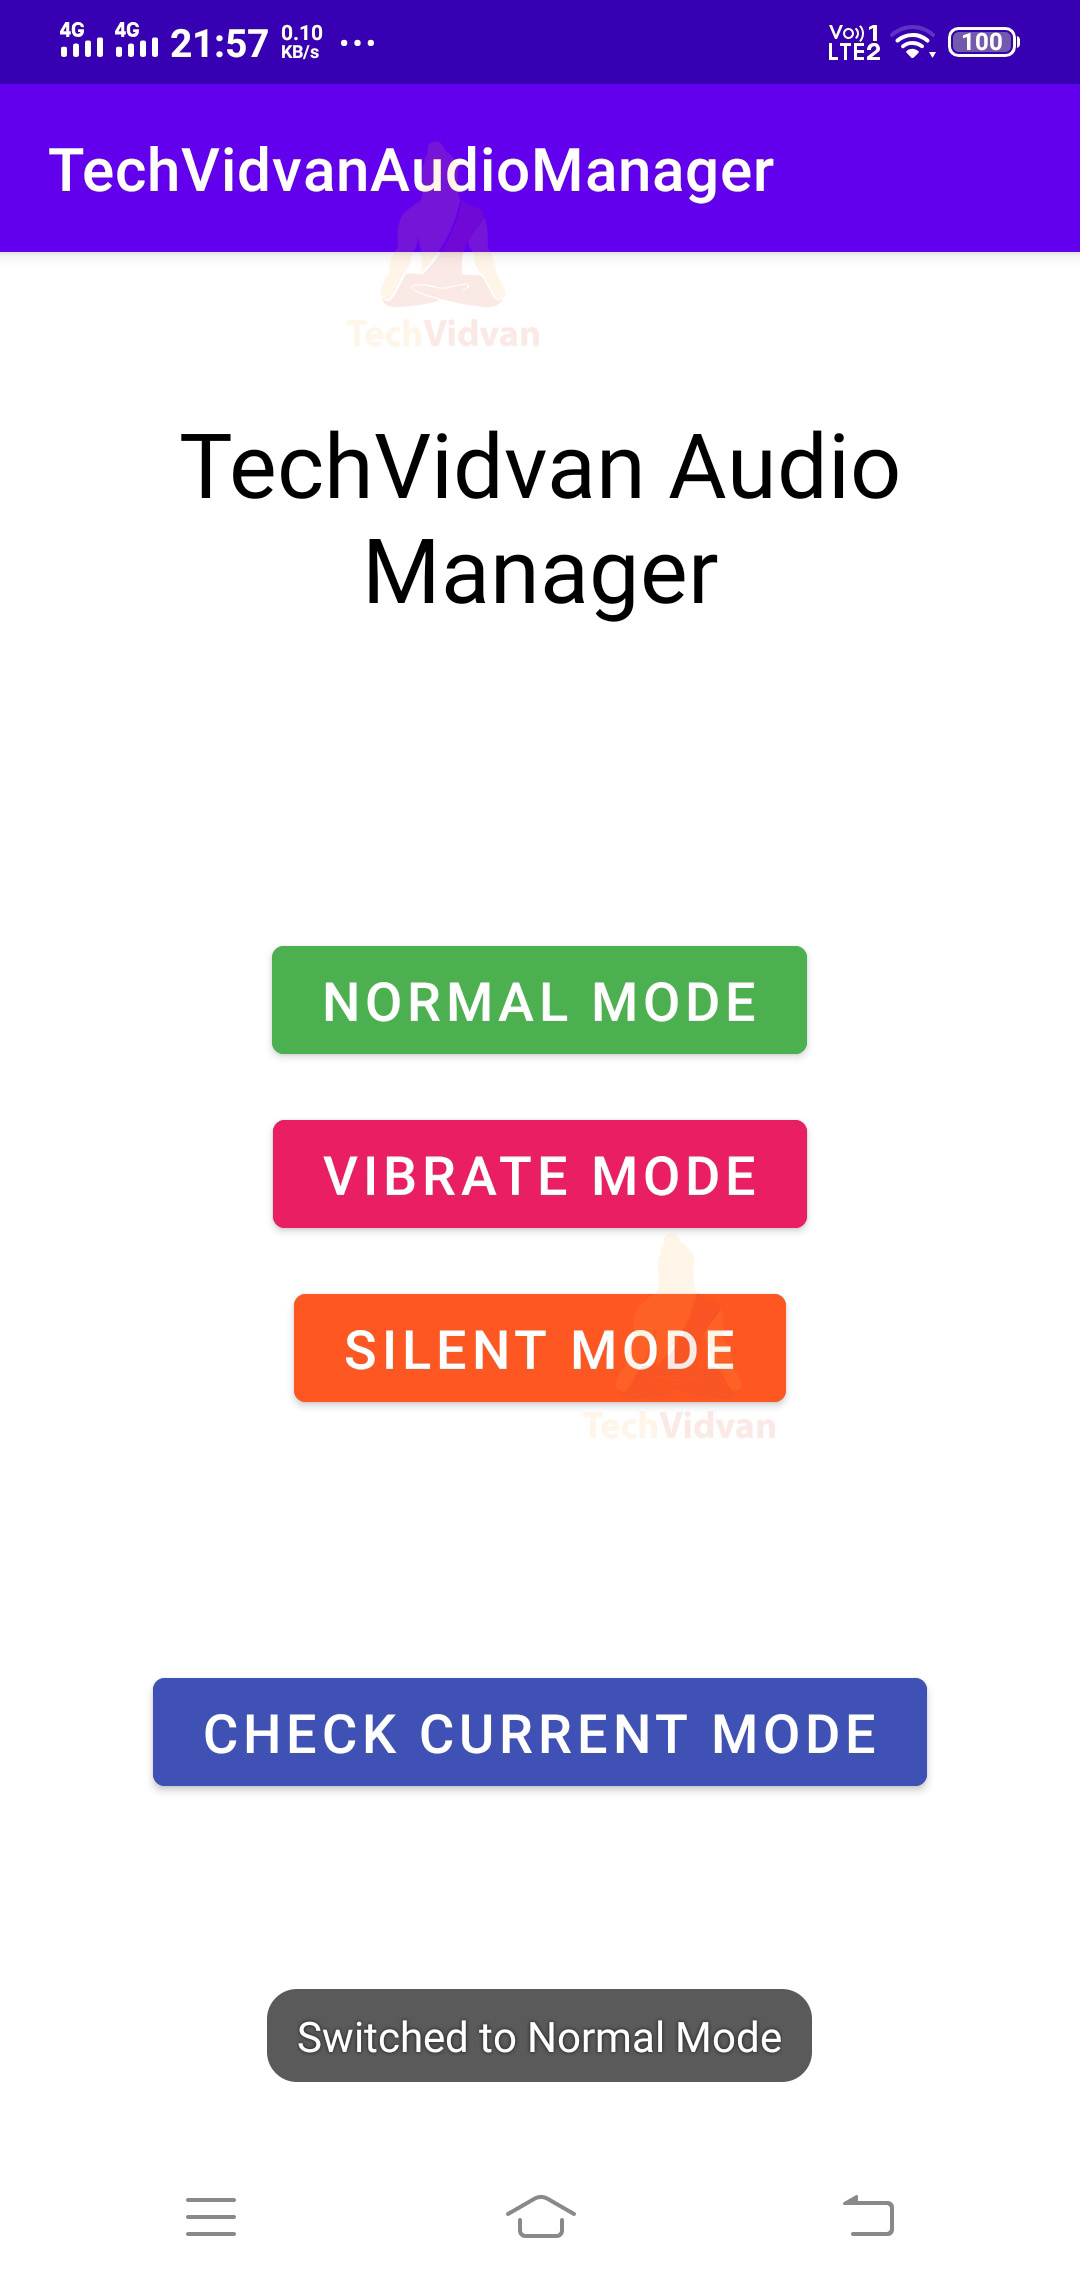
So, after you are done with the above steps, simply run your application and notice the following as output.
First, since my android version is above Marshmallow, I need to allow the Do Not Disturb mode in my application.
Now open your application again.
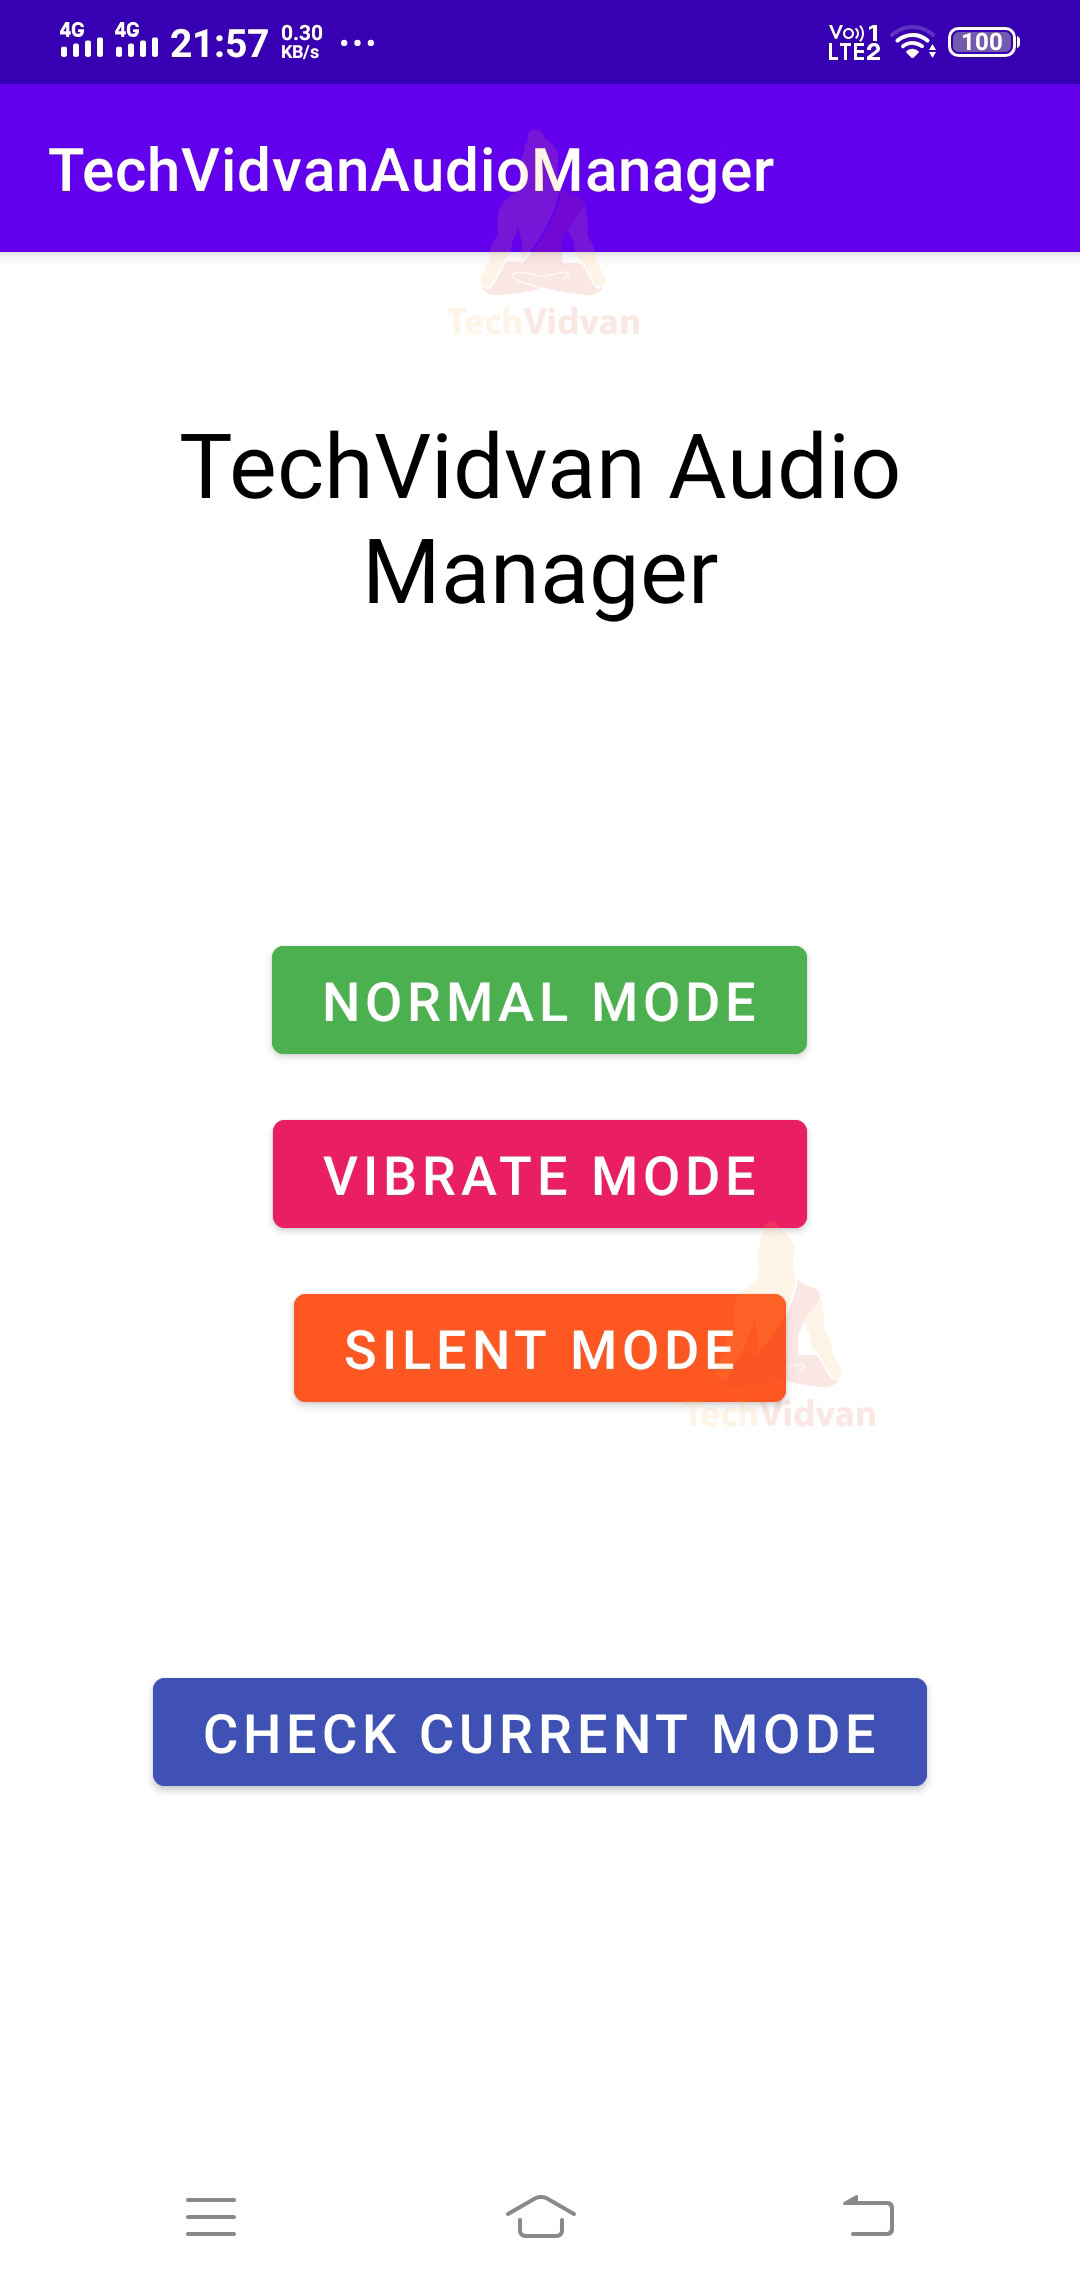
Next, check your current mode.
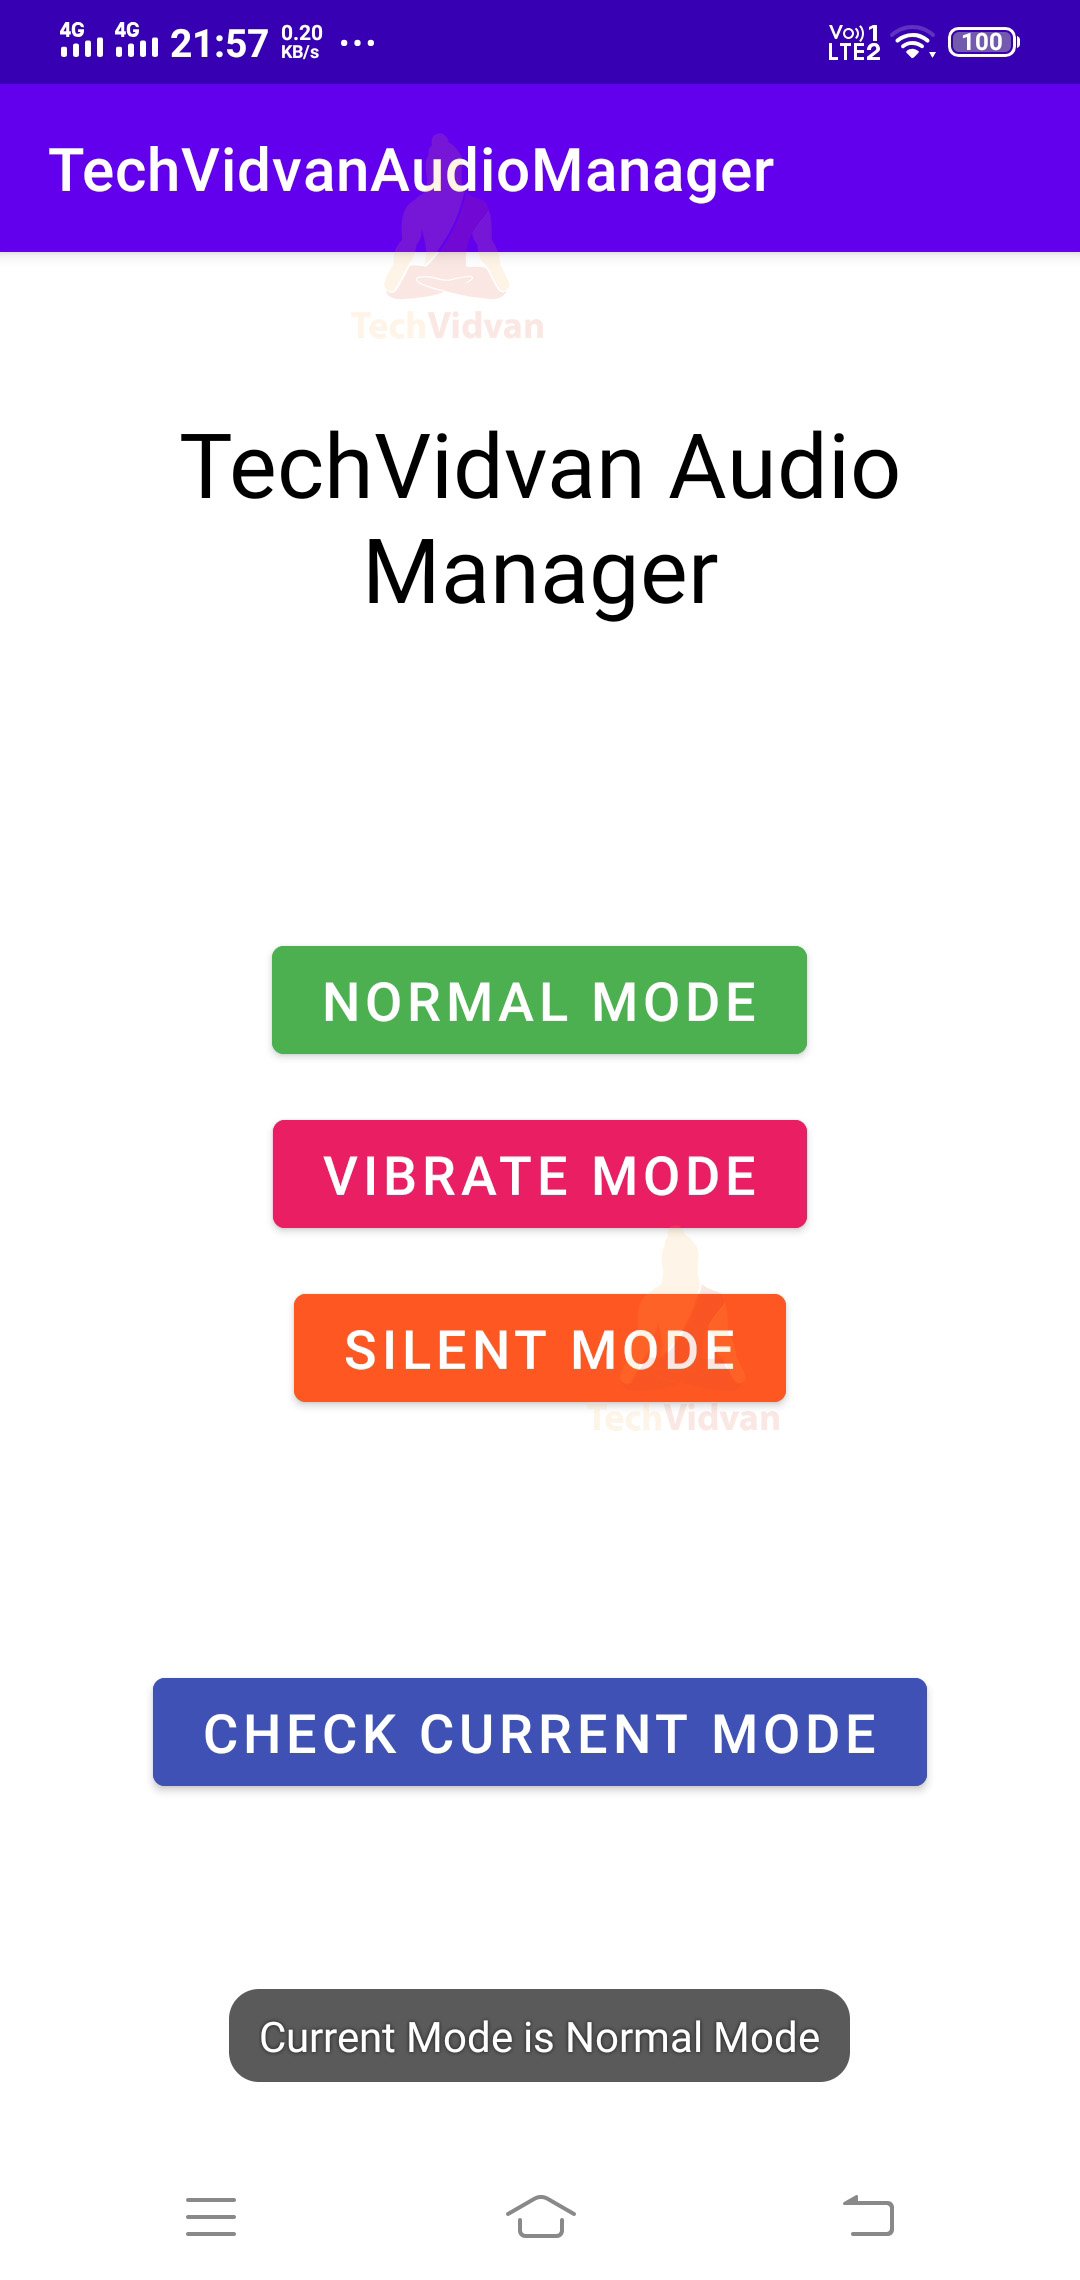
Now test switching between the three different modes and check if they are working.

Summary
So through this article, I hope you got to know what an AudioManager is and its purpose in Android. You saw the several ringing modes and also the various methods involved.
Later on, you came across the Audio capture in Android, which I used to record your voice and communicate with others. Finally, you saw an implementation of the Audio Manager through an android application.