EditText for Android Developers
Taking input is an essential part of any application. Without inputs, the app is kind of less interactive. Whether you wish to log in as a user or sign him up or take his preferences, then inputs play a significant role. Now the question is, how can you take inputs in android? Android EditText is used to do this. This article will try to cover every aspect of EditText along with its attributes and implementation.
What is an EditText in Android?
EditText is an android UI element that allows the app developers to take input from the users. EditText is quite helpful in creating forms, sign up, log in, or other kinds of user interaction pages. The EditText has several attributes to style it and add some functionality to it. Later on, in this article, we will see most of the attributes in detail.
Now let’s see a sample code to create an EditText in your application.
XML Code for normal EditText:
<EditText
            android:id="@+id/normal_edit_text"
            android:layout_width="match_parent"
            android:layout_height="wrap_content"
            android:inputType="textCapWords"
            />
XML Code for Material design based EditText:
<com.google.android.material.textfield.TextInputEditText
            android:id="@+id/full_name"
            android:layout_width="match_parent"
            android:layout_height="wrap_content"
            android:inputType="textCapWords"
            />
Kotlin Code:
full_name = findViewById(R.id.full_name)

val name = full_name.text.toString()
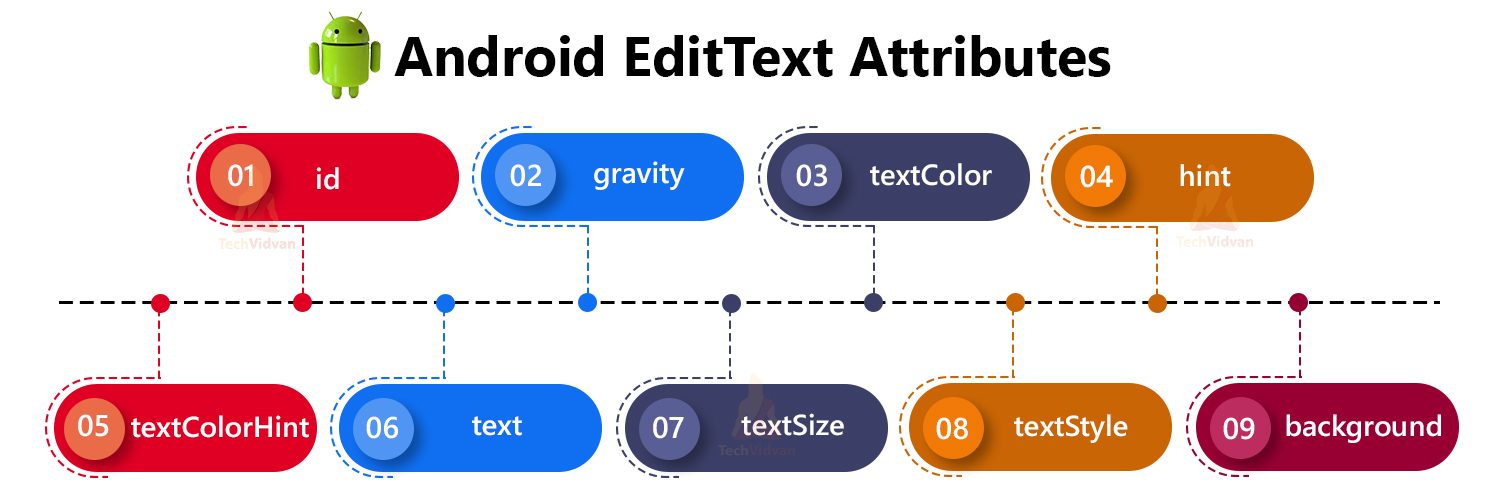
Android EditText Attributes
EditText, like every other UI element, has its own set of characteristics. Attributes are nothing but properties that can be applied to the UI element to style it and add more functionalities.
| Attribute Name | Description | Example |
| id | The “id” attribute is used to identify the EditText uniquely. | android:id= “@+id/your_unique_id” |
| gravity | The “gravity” attribute is used to choose the alignment of the content present inside the EditText. | android: gravity= “center” |
| textColor | The “textColor” attribute is used to set the color to text present inside the edit text. | android:textColor= “#dddddd” |
| hint | The “hint” attribute is like a placeholder for the edit text. | android: hint= “Enter the phone number here” |
| textColorHint | The “textColorHint” is used to provide a color to the hint text. | android:textColorHint= “#454545” |
| text | The “text” attribute is used to set the content in the EditText element. | android:text= “My Name is Falcon” |
| textSize | The “textSize” attribute is used to set the size of text content. | android:textSize= “27sp” |
| textStyle | The “textStyle” attribute is used to style the text present in the EditText. | android:textStyle= “bold” |
| background | The backdrop of the EditText is controlled by the “background” attribute. | android:background= “#d5d5d5” |
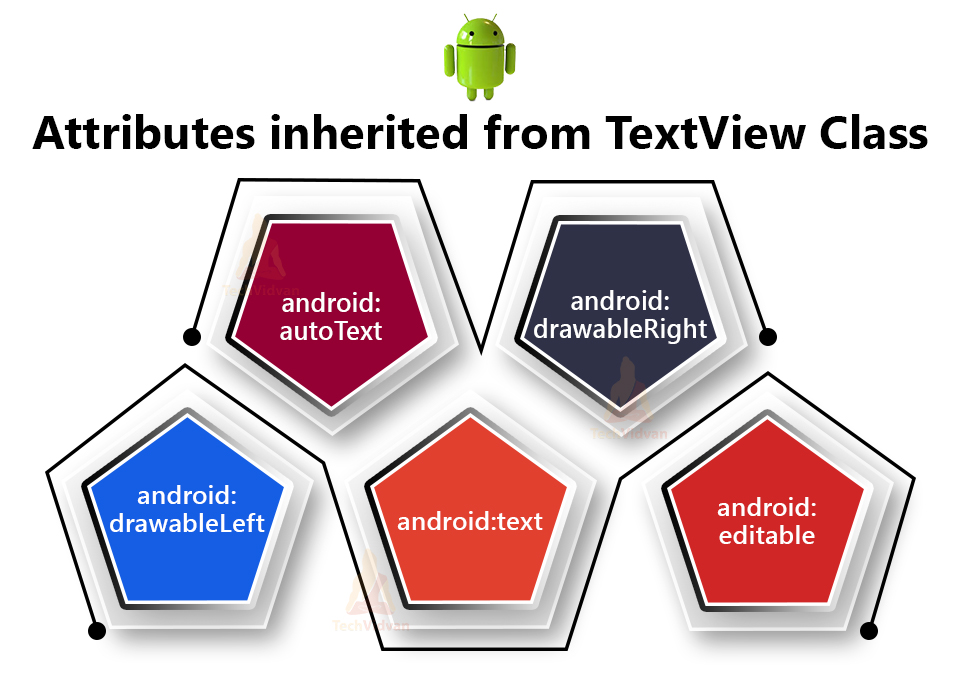
Attributes inherited from TextView Class
| Attribute Name | Description |
| android:autoText | The “autoText” attribute is used to automatically correct and suggest the complete sentence to the user. |
| android:drawableRight | The “drawableRight” is used to add an icon or a drawable asset at the extreme right of your EditText. |
| android:drawableLeft | The “drawableLeft” is used to add an icon or a drawable asset at the extreme left of your EditText. |
| android:text | The “text” attribute is used to set the content in the EditText element. |
| android:editable | The “editable” attribute is used to make a view editable. |
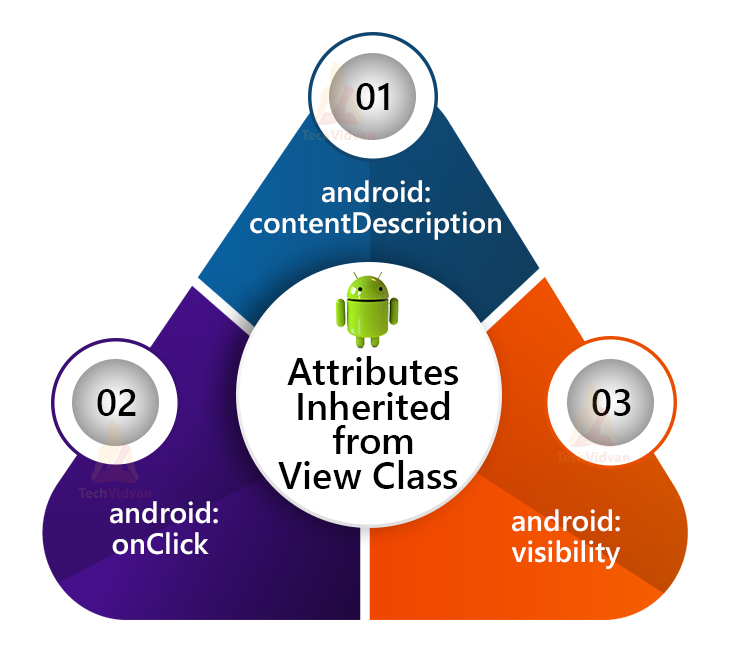
Attributes inherited from View Class
| Attribute Name | Description |
| android:contentDescription | The “contentDescription” is used to describe the view briefly. |
| android: onClick | The “onClick” attribute is used to add a click event on the view. |
| android: visibility | The “visibility” attribute is used to hide or show the element in the user interface. |
Implementation of Android EditText
I hope you now understand what EditText is and develop a small application using the above concepts. So, for the implementation, we will try to establish a straightforward sign-up application that will allow the users to enter their personal information and then register in your application.
To build the sign-up application, you need to follow the below steps nicely.
1: Open your Android Studio in your system and then click on create a new project.
2: Select Empty Activity to functionalities, and then provide a name for your application. In my case, it is “techVidvanSignUp.” Now select the Android Lollipop(API level 22) and then click on finish.
3: Let the files load, open your activity_main.xml file, and add the below code in the XML file.
Code: activity_main.xml
<?xml version="1.0" encoding="utf-8"?>
<LinearLayout
    xmlns:android="http://schemas.android.com/apk/res/android"
    xmlns:app="http://schemas.android.com/apk/res-auto"
    xmlns:tools="http://schemas.android.com/tools"
    android:layout_width="match_parent"
    android:layout_height="match_parent"
    android:orientation="vertical"
    tools:context=".MainActivity">

    <TextView
        android:layout_width="match_parent"
        android:layout_height="wrap_content"
        android:text="Tech Vidvan Sign Up"
        android:gravity="center"
        android:layout_marginTop="20dp"
        android:textSize="30sp"
        android:textColor="#3F51B5"
        android:layout_marginBottom="40dp"
        android:textStyle="bold"
        />

    <com.google.android.material.textfield.TextInputLayout
        android:layout_marginTop="10dp"
        android:layout_width="match_parent"
        android:layout_height="wrap_content"
        android:hint="Enter your full name"
        app:endIconMode="clear_text"
        style="@style/Widget.MaterialComponents.TextInputLayout.OutlinedBox"
        android:padding="10dp">

        <com.google.android.material.textfield.TextInputEditText
            android:id="@+id/full_name"
            android:layout_width="match_parent"
            android:layout_height="wrap_content"
            android:inputType="textCapWords"
            />

    </com.google.android.material.textfield.TextInputLayout>

    <com.google.android.material.textfield.TextInputLayout
        android:layout_marginTop="5dp"
        android:layout_width="match_parent"
        android:layout_height="wrap_content"
        app:endIconMode="custom"
        app:endIconDrawable="@drawable/check_circle_outline_24"
        android:hint="Enter your phone number"
        style="@style/Widget.MaterialComponents.TextInputLayout.OutlinedBox"
        android:padding="10dp">

        <com.google.android.material.textfield.TextInputEditText
            android:id="@+id/phone_number"
            android:layout_width="match_parent"
            android:layout_height="wrap_content"
            android:inputType="phone"
            />

    </com.google.android.material.textfield.TextInputLayout>

    <com.google.android.material.textfield.TextInputLayout
        android:layout_marginTop="5dp"
        android:layout_width="match_parent"
        android:layout_height="wrap_content"
        android:hint="Enter your email"
        app:endIconMode="custom"
        app:endIconDrawable="@drawable/check_circle_outline_24"
        style="@style/Widget.MaterialComponents.TextInputLayout.OutlinedBox"
        android:padding="10dp">

        <com.google.android.material.textfield.TextInputEditText
            android:id="@+id/email"
            android:layout_width="match_parent"
            android:layout_height="wrap_content"
            android:inputType="textEmailAddress"
            />

    </com.google.android.material.textfield.TextInputLayout>

    <com.google.android.material.textfield.TextInputLayout
        android:layout_marginTop="5dp"
        android:layout_width="match_parent"
        android:layout_height="wrap_content"
        android:hint="Enter your password"
        app:endIconMode="password_toggle"
        style="@style/Widget.MaterialComponents.TextInputLayout.OutlinedBox"
        android:padding="10dp">

        <com.google.android.material.textfield.TextInputEditText
            android:id="@+id/password"
            android:layout_width="match_parent"
            android:layout_height="wrap_content"
            android:inputType="textPassword"
            />

    </com.google.android.material.textfield.TextInputLayout>


    <Button
        android:onClick="registerMyself"
        android:layout_width="wrap_content"
        android:layout_height="wrap_content"
        android:layout_gravity="center"
        android:layout_marginTop="40dp"
        android:text="Sign Up"
        android:backgroundTint="#4CAF50"
        android:textStyle="bold"
        android:padding="18dp"/>

</LinearLayout>
4: Now, you need to handle the inputs from your MainActivity.kt file simply. For that, you can use the below code and take the information given by the user.
Code: MainActivity.kt
package com.techvidvan.techvidvansignup

import androidx.appcompat.app.AppCompatActivity
import android.os.Bundle
import android.view.View
import android.widget.EditText
import android.widget.Toast

class MainActivity : AppCompatActivity()
{
    //declaring variables
    lateinit var full_name:EditText
    lateinit var phone:EditText
    lateinit var email:EditText
    lateinit var password:EditText

    override fun onCreate(savedInstanceState: Bundle?)
    {
        super.onCreate(savedInstanceState)
        setContentView(R.layout.activity_main)

        //binding the edit text views with our created variables
        full_name = findViewById(R.id.full_name)
        phone = findViewById(R.id.phone_number)
        email = findViewById(R.id.email)
        password = findViewById(R.id.password)

    }

    fun registerMyself(view: View)
    {
        //it is triggered when the user presses the sign up button

        //fetching the values entered by the user
        //and storing it in some strings

        val name = full_name.text.toString()
        val phone_number = phone.text.toString()
        val email_address = email.text.toString()
        val user_pass = password.text.toString()

        //now you apply some checks over this value
        //like phone number should be exactly 10 digits and all
        //for now we will simply display the details of the user in Toast

        val msg = "Name : $name, Phone : $phone_number, Email : $email_address, Password : $user_pass"

        //displaying the toast message
        Toast.makeText(this@MainActivity, "Registration Successful \n$msg", Toast.LENGTH_LONG).show()

    }
}
After following the above, you need to run your application on your device or your emulator simply.
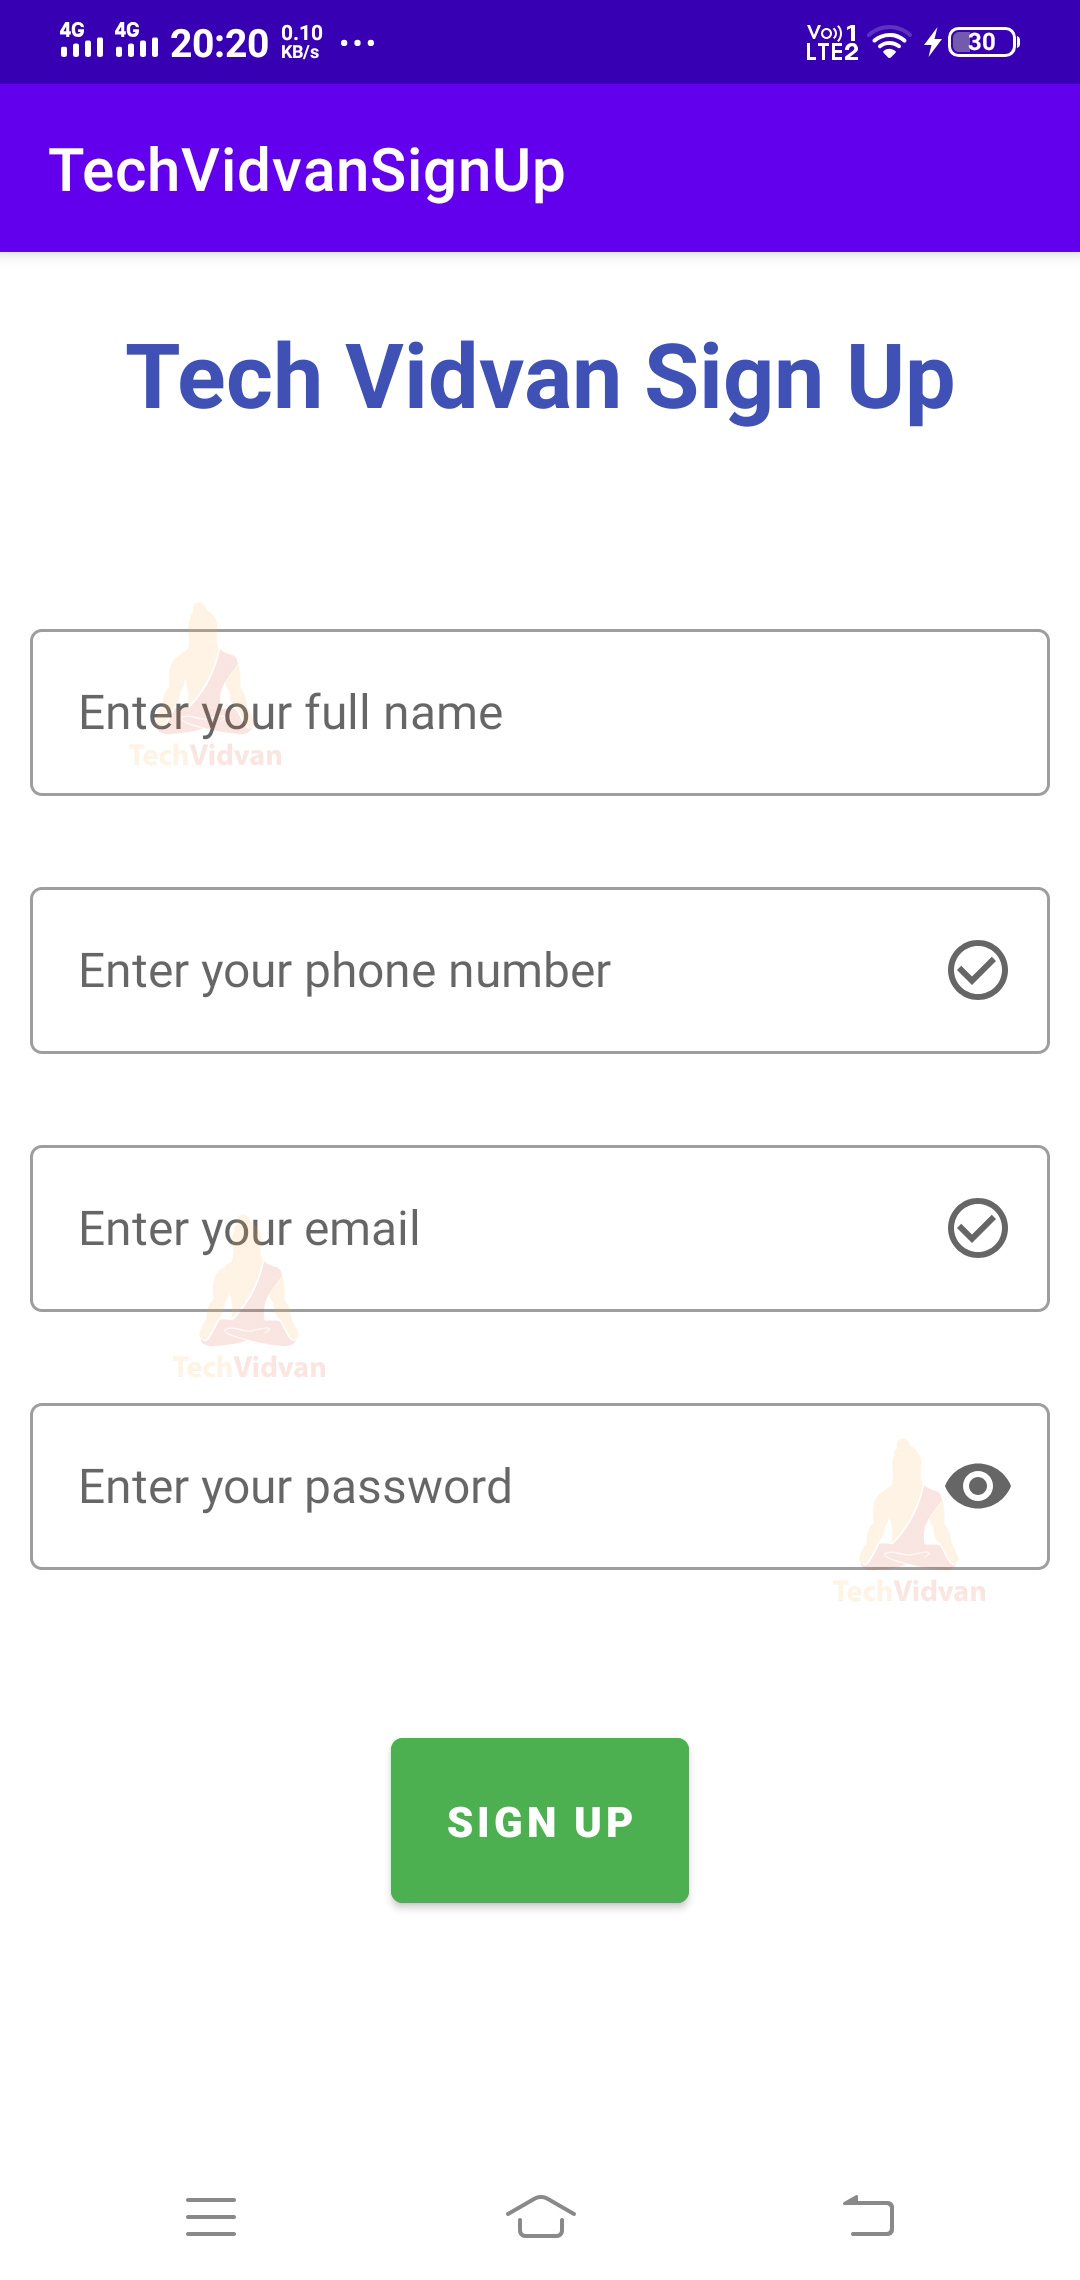
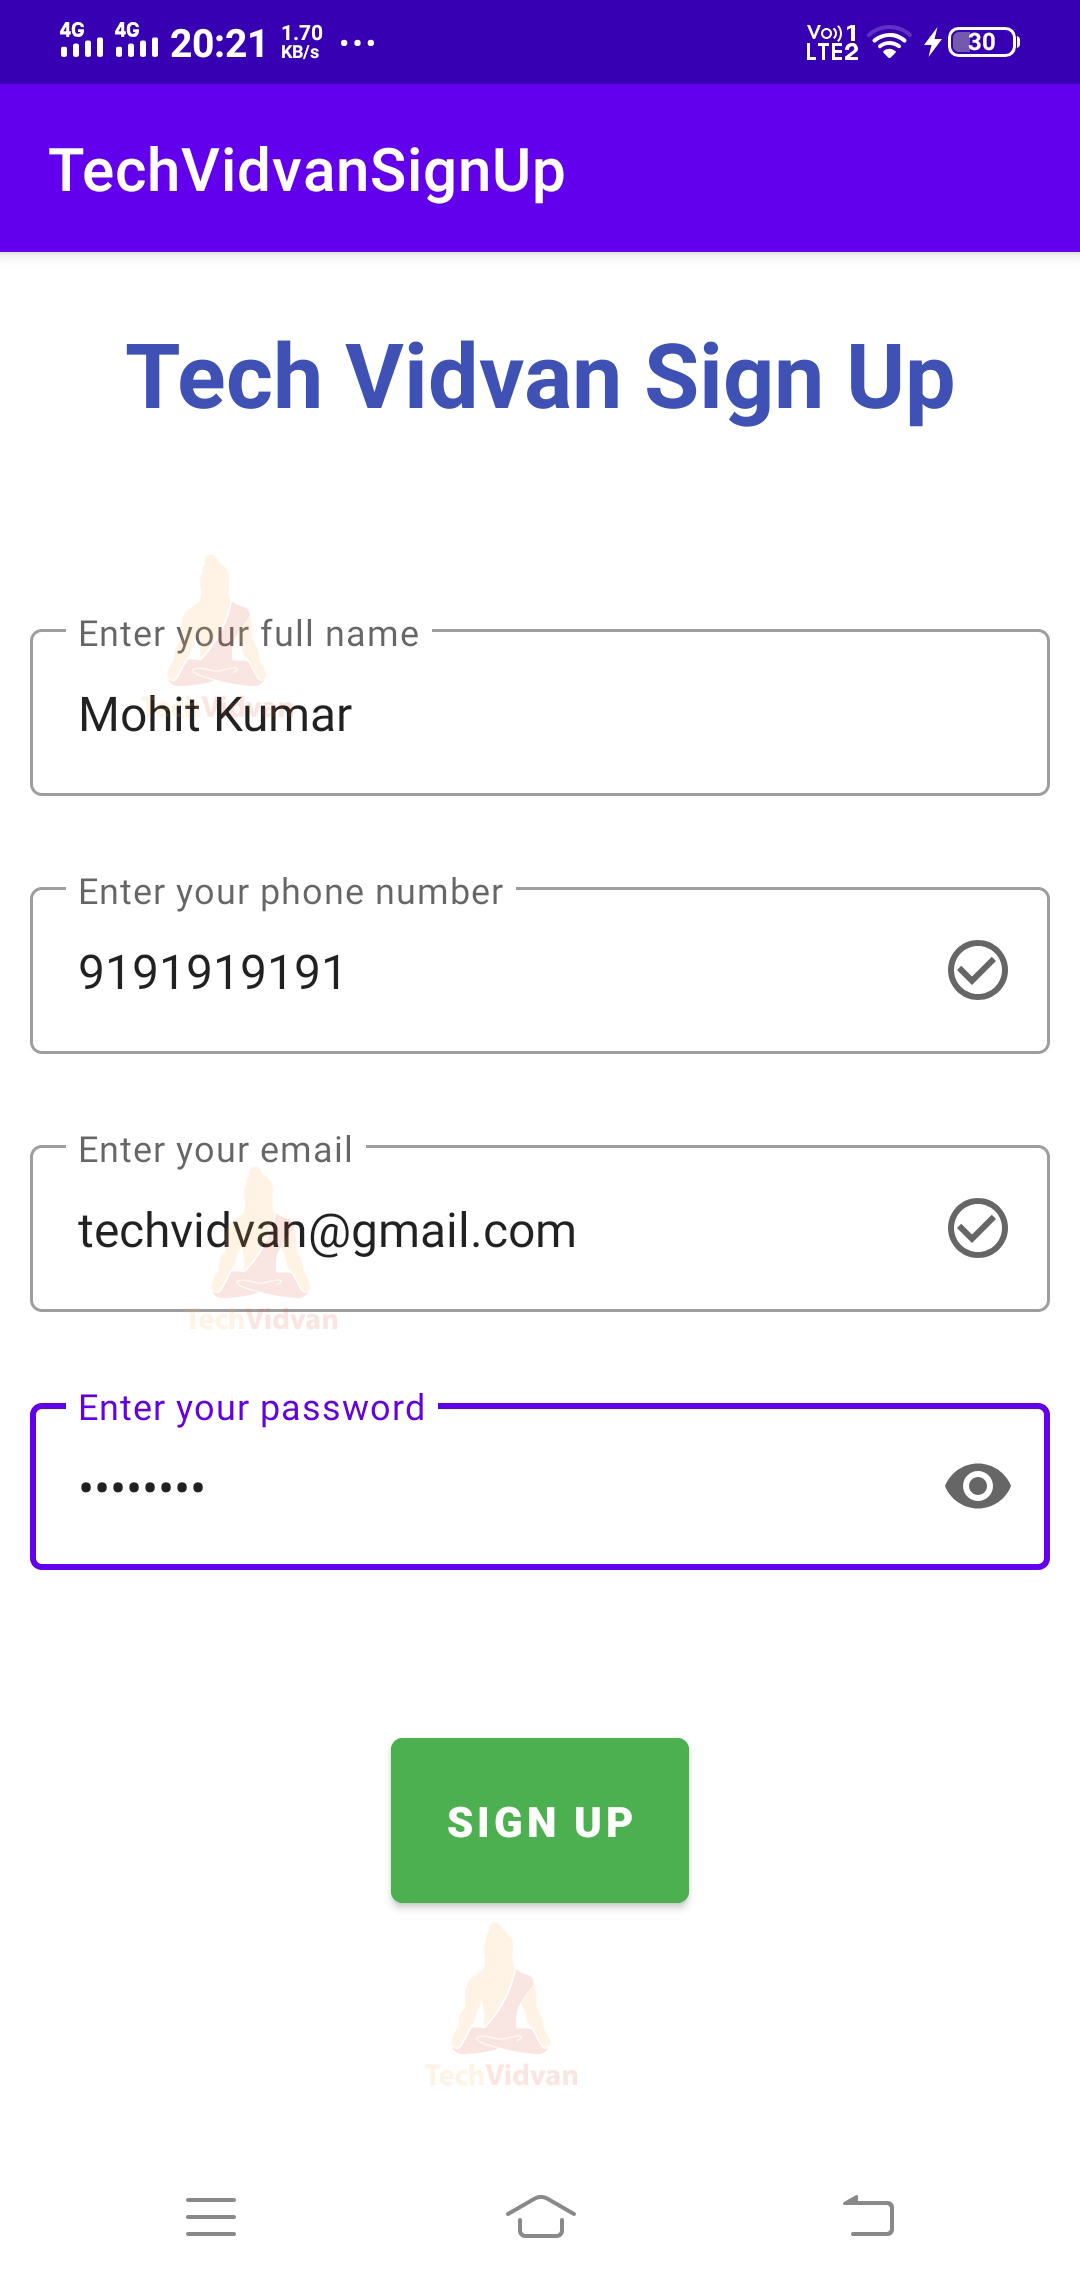
So now, you can see the Sign-Up Screen. On this screen, you need to add your details. After you have entered your details, then you need to click on the sign-up button.
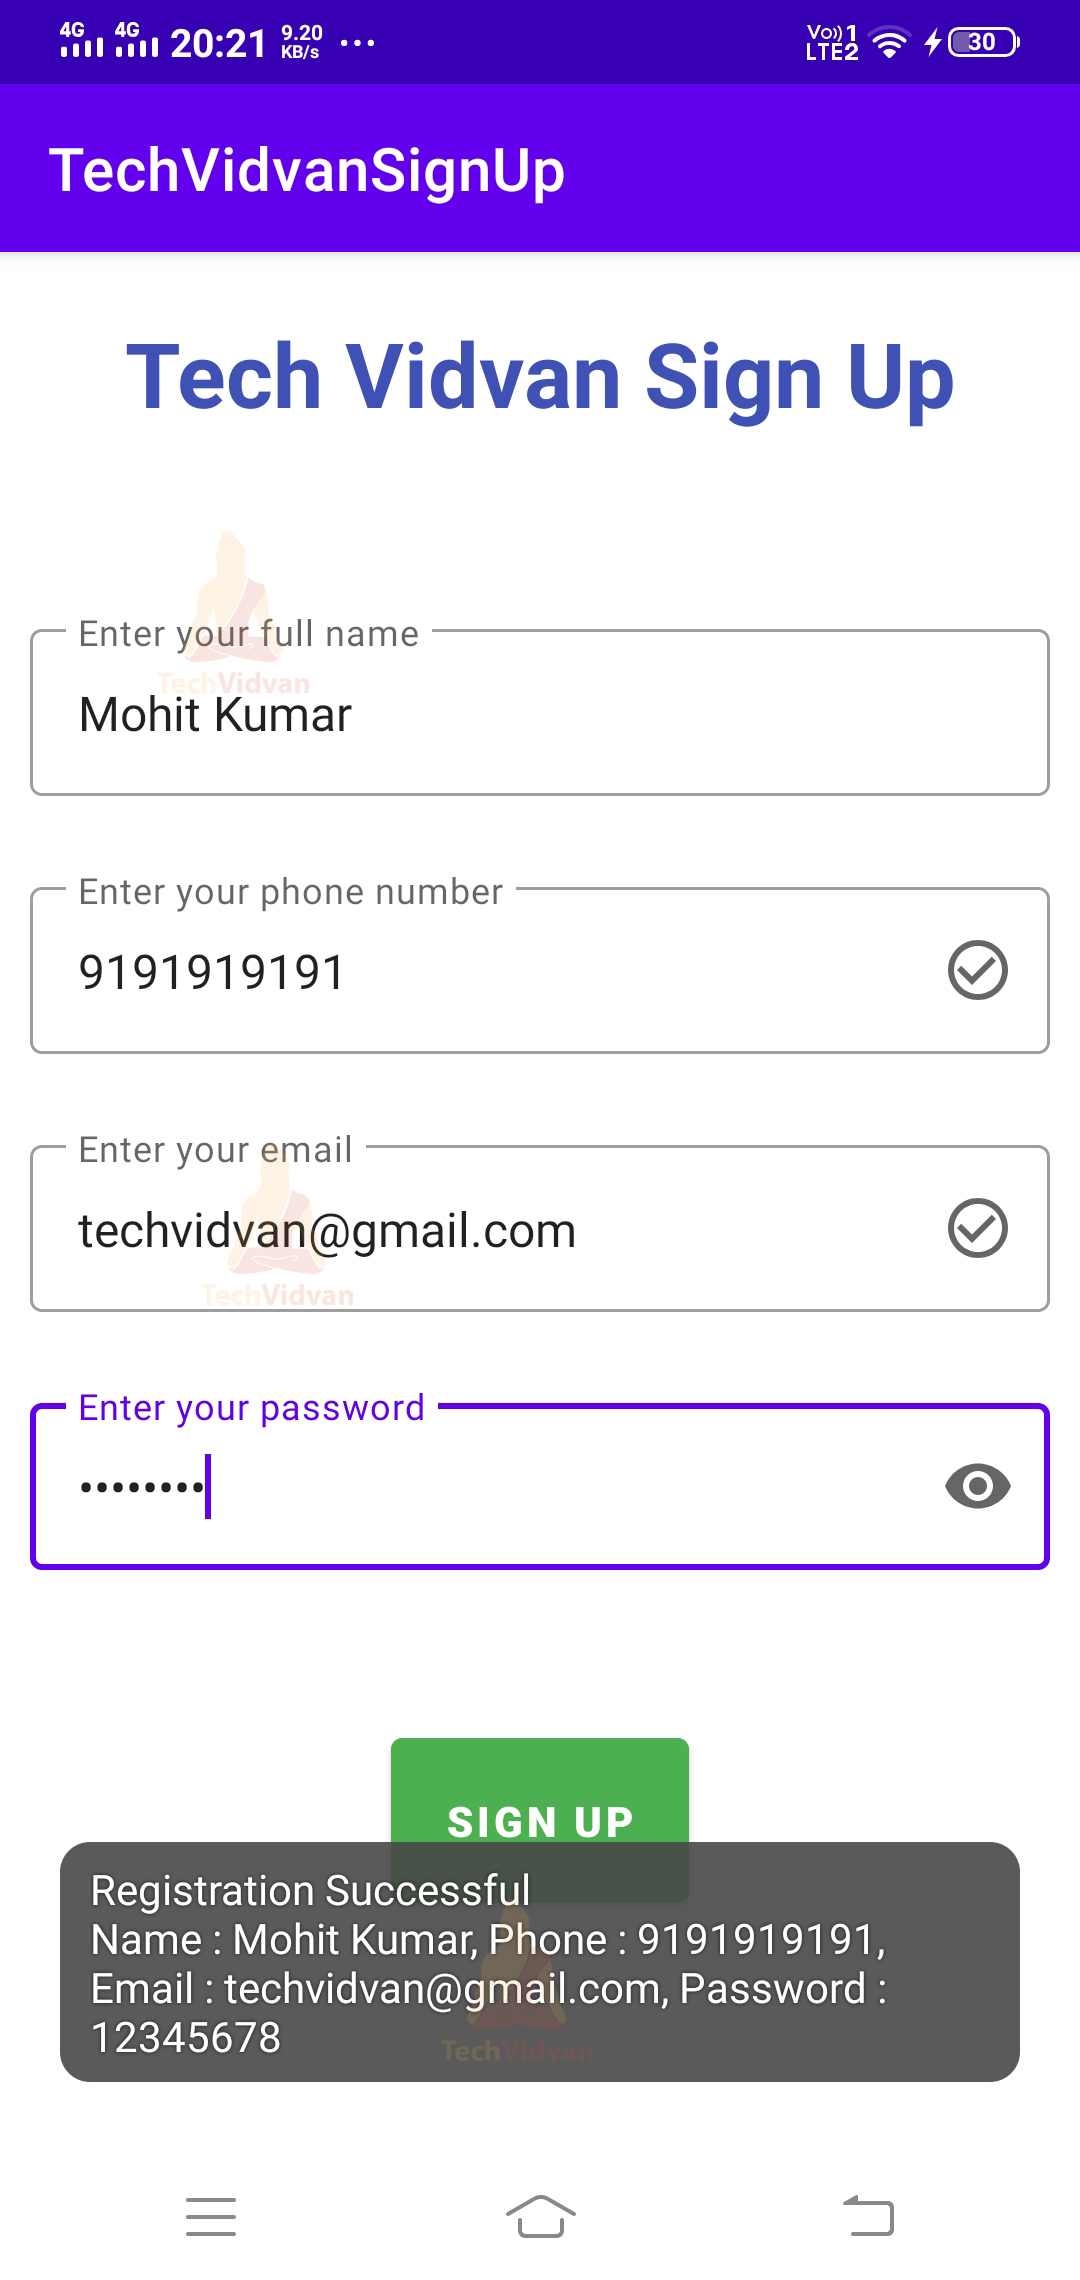
If all your entered details are corrected, the app shows you the toast that your registration is successful.
Summary
So through this article, you came across several use cases where EditText is useful. You saw how EditText makes your app more interactive to the user. You even went across the way you can integrate EditText in your application. Later on, you saw the various attributes present in the Android EditText.
Finally, you saw an implementation of the Android EditText with a simple sign-up application. I hope you enjoyed the article and will go ahead and develop more such awesome apps.