Android Project – Your Own Custom Keyboard
Build Your Own Custom Keyboard Using Android
Are you interested in developing your own custom Android keyboard? Look no further! This comprehensive guide will walk you through the process, providing step-by-step instructions and valuable insights to help you create a customised typing experience for Android users.
About Custom Keyboard Using Android:
A custom Android keyboard is an alternative keyboard that users can design and install on their Android devices. Unlike the default system keyboard, a custom keyboard allows users to personalise their typing experience and may provide additional features and functionalities depending on the way the user builds it.
Flow of Application
The flow of the custom Android keyboard application involves several steps that outline how the keyboard integrates with the Android system and interacts with users and the active apps. Let’s explore the flow in detail:
1. Activation and Selection:
Users activate the custom Android keyboard by selecting it as their default input method in the system settings or by tapping on the input field and choosing the keyboard from the system input options. Once activated, the custom keyboard becomes the primary input method for the device.
2. Keyboard Appearance:
When users tap on an input field in any app, the custom keyboard appears on the screen, providing a specialised typing interface. The appearance of the keyboard is controlled by the layout and design you define for the keyboard.
3 User Interaction:
Users interact with the custom keyboard by tapping on the keys or using gestures, depending on the features you implement. When a key is pressed, the corresponding key event, for example, delete event, shift event, etc., is triggered, and one can handle it within your keyboard code.
4. Text Input and Display:
As users type on the custom keyboard, the entered text is sent to the active app where the input field is located. The active app receives the text and displays it in the appropriate input field, just as it would with the default system keyboard.
5. Symbols and Other Characters:
If the user wants to add special characters, the keyboard should have a variety of symbols to offer the user accessible easily through one single button.
6. Switching Between Keyboards:
Users can switch between the custom keyboard and other available keyboards by tapping the keyboard switch key on the system input options or by long-pressing the spacebar, depending on the keyboard configuration.
Prerequisites For Custom Keyboard Using Android:
To develop a custom Android keyboard project, you’ll need the following requirements:
· Knowledge of Java or Kotlin.
· Android Studio.
· Understanding of Android Input Methods.
· Knowledge of XML Layout Design.
· Android Keyboard API
· User Interface Design Concepts
· Object Oriented Programming Concepts
By fulfilling these requirements, you’ll be well-equipped to develop a custom Android keyboard project.
Download the Android Custom Keyboard
Please download the source code of the Android Custom Keyboard from the following link: Android Custom Keyboard Project Code.
Project Description:
On downloading the code, you are going to see many folders. This section gives you a brief about which folders and files are essential for your project:
- Manifest File (AndroidManifest.xml): The manifest file contains vital details regarding your app for the Android system, including the package name, activities, services, permissions, and hardware prerequisites.
- Java Class Code (MyInputMethodService.java): An Input Method Service is a component that enables users to enter text or other data into an app. It acts as a bridge between the user’s input and the application, providing a customised interface for text input. The Input Method Service manages the keyboard layout, handles key events, and interacts with the Android system to deliver the user’s input to the active app.
- Resource:
1. drawable: Contains the icons/vectors required for the application.
2. layout: Contains the basic designs of the keyboard.
3. values(colors.xml): Contains the references to different colours used in the application
4. xml(keys_layout, method, qwerty): Contains the actual layout of the keyboard and a basic description of the layout. - Gradle Scripts: Contains all the dependencies and libraries that we will import into our project.
Steps To Implement the Android Custom Keyboard Project:
1. Download the source code.
2. Locate the zip file and unzip it.
3. Open Android Studio and click on “Open an Existing Project”.
4. Locate and select the source code folder.
5. On opening the folder in Android Studio, tinker around and try to figure out the different files mentioned in the Project Description above.
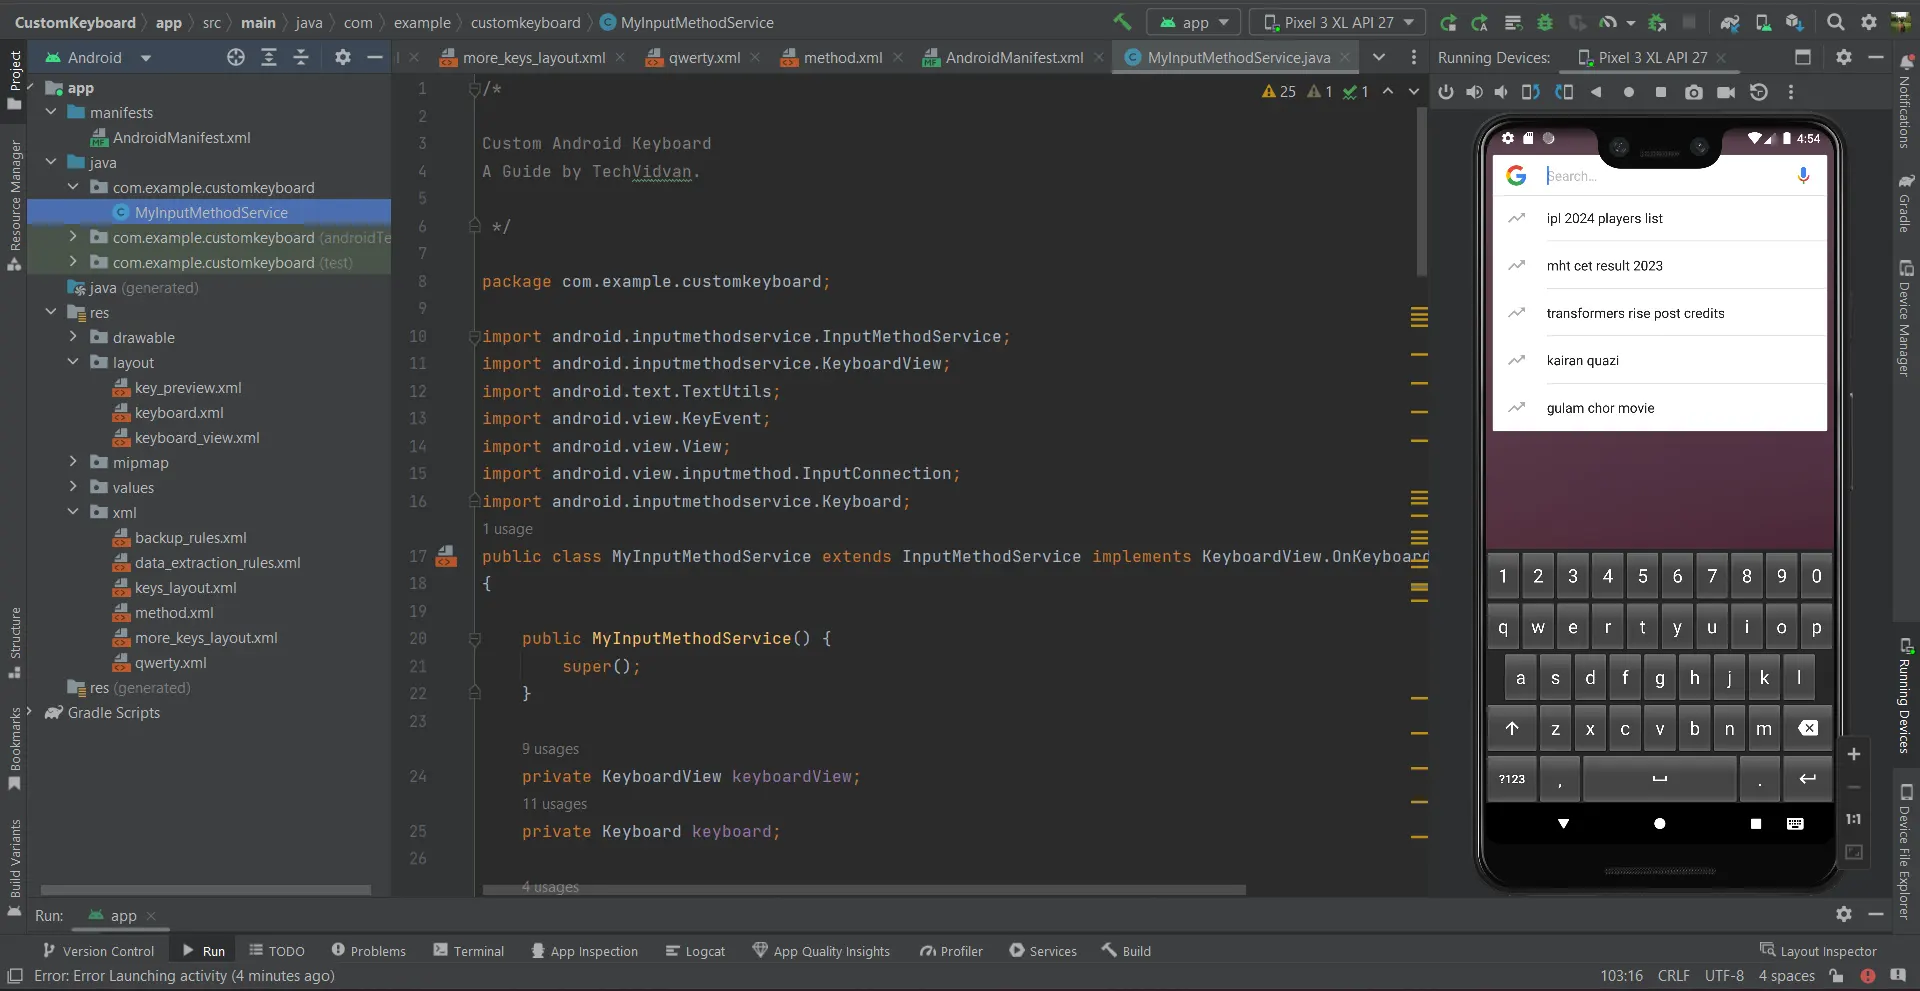
6. The IDE should look like this:
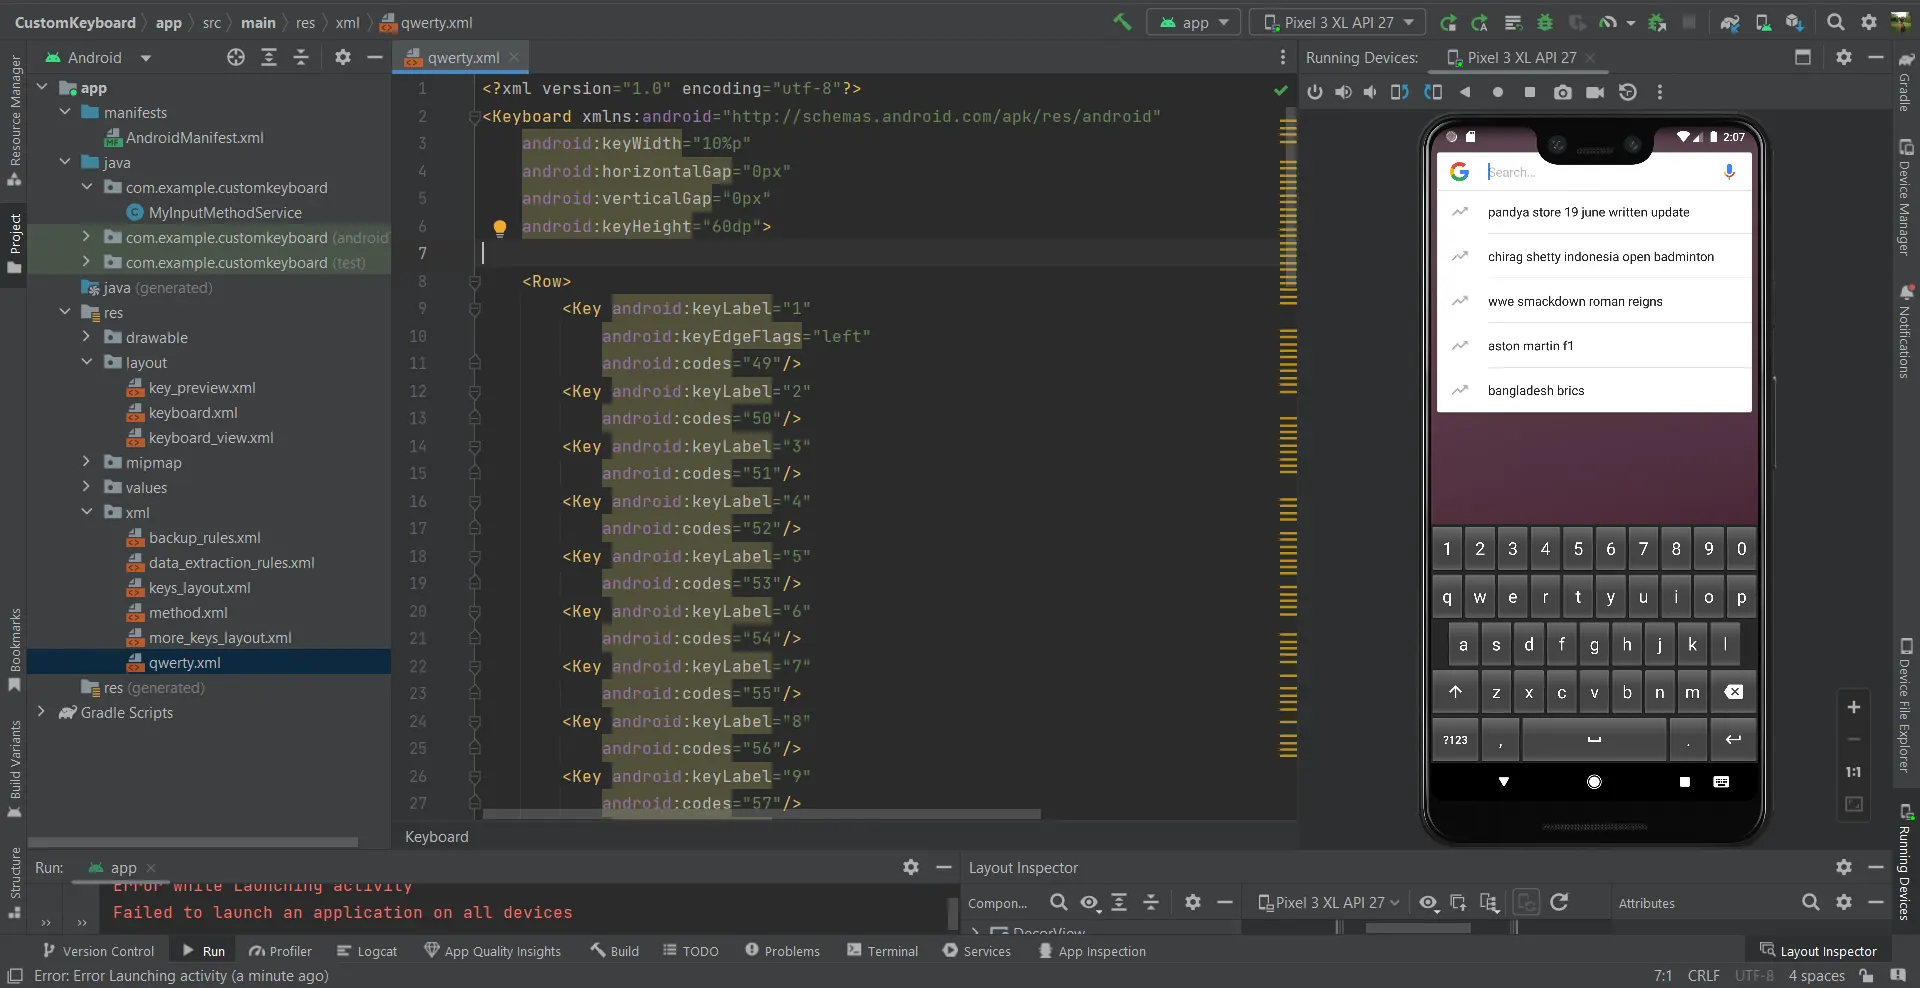
Keyboard layout (qwerty.xml, keys_layout.xml, more_keys_layout.xml)
The UI of the keyboard can be edited here. Every associated key in our code is a button. Each of the buttons is given a code, which will later be associated with their ASCII values. :
<?xml version="1.0" encoding="utf-8"?>
<Keyboard xmlns:android="http://schemas.android.com/apk/res/android"
    android:keyWidth="10%p"
    android:horizontalGap="0px"
    android:verticalGap="0px"
    android:keyHeight="60dp">

    <Row>
        <Key android:keyLabel="1"
            android:keyEdgeFlags="left"
            android:codes="49"/>
        <Key android:keyLabel="2"
            android:codes="50"/>
        <Key android:keyLabel="3"
            android:codes="51"/>
        <Key android:keyLabel="4"
            android:codes="52"/>
        <Key android:keyLabel="5"
            android:codes="53"/>
        <Key android:keyLabel="6"
            android:codes="54"/>
        <Key android:keyLabel="7"
            android:codes="55"/>
        <Key android:keyLabel="8"
            android:codes="56"/>
        <Key android:keyLabel="9"
            android:codes="57"/>
        <Key android:keyLabel="0"
            android:keyEdgeFlags="right"
            android:codes="48"/>
    </Row>

    <Row>
        <Key android:keyLabel="q" android:keyEdgeFlags="left" android:codes="113"/>
        <Key android:keyLabel="w" android:codes="119"/>
        <Key android:keyLabel="e" android:codes="101"/>
        <Key android:keyLabel="r" android:codes="114"/>
        <Key android:keyLabel="t" android:codes="116"/>
        <Key android:keyLabel="y" android:codes="121"/>
        <Key android:keyLabel="u" android:codes="117"/>
        <Key android:keyLabel="i" android:codes="105"/>
        <Key android:keyLabel="o" android:codes="111"/>
        <Key android:keyLabel="p" android:keyEdgeFlags="right" android:codes="112"/>
    </Row>

    <Row>
        <Key android:keyLabel="a" android:horizontalGap="5%p" android:keyEdgeFlags="left" android:codes="97"/>
        <Key android:keyLabel="s" android:codes="115"/>
        <Key android:keyLabel="d" android:codes="100"/>
        <Key android:keyLabel="f" android:codes="102"/>
        <Key android:keyLabel="g" android:codes="103"/>
        <Key android:keyLabel="h" android:codes="104"/>
        <Key android:keyLabel="j" android:codes="106"/>
        <Key android:keyLabel="k" android:codes="107"/>
        <Key android:keyLabel="l" android:keyEdgeFlags="right" android:codes="108"/>
    </Row>

    <Row>
        <Key android:keyIcon="@drawable/baseline_arrow_upward_24"
            android:keyWidth="15%p"
            android:keyEdgeFlags="left"
            android:codes="-1"/>

        <Key android:keyLabel="z" android:keyWidth="10%p" android:codes="122"/>
        <Key android:keyLabel="x" android:keyWidth="10%p" android:codes="120"/>
        <Key android:keyLabel="c" android:keyWidth="10%p" android:codes="99"/>
        <Key android:keyLabel="v" android:keyWidth="10%p" android:codes="118"/>
        <Key android:keyLabel="b" android:keyWidth="10%p" android:codes="98"/>
        <Key android:keyLabel="n" android:keyWidth="10%p" android:codes="110"/>
        <Key android:keyLabel="m" android:keyWidth="10%p" android:codes="109"/>

        <Key android:keyIcon="@drawable/baseline_backspace_24"
            android:keyWidth="15%p"
            android:isRepeatable="true"
            android:keyEdgeFlags="right"
            android:codes="-5"/>
    </Row>

    <Row android:rowEdgeFlags="bottom">
        <Key android:keyLabel="\?123"
            android:keyWidth="15%p"
            android:keyEdgeFlags="left"
            android:codes="-2"/>

        <Key android:keyLabel="," android:keyWidth="12.5%p" android:codes="44"/>

        <Key android:keyIcon="@drawable/baseline_space_bar_24"
            android:keyWidth="45%p"
            android:isRepeatable="true"
            android:codes="32"/>

        <Key android:keyLabel="." android:keyWidth="12.5%p" android:codes="46"/>

        <Key android:keyIcon="@drawable/baseline_keyboard_return_24"
            android:keyWidth="15%p"
            android:keyEdgeFlags="right"
            android:codes="10"/>

    </Row>
</Keyboard>
MyInputMethodService.java:
This is the main java file that controls the functionality of the keyboard. Like mentioned before, each button is related to a code which is basically its ASCII value. That ASCII value is used to print/access the character in the program. Additionally, Delete, Shift, Extra character, Enter also have separate codes. If the system encounters any of these keys, their respective functionalities are performed.
package com.example.customkeyboard;
import android.inputmethodservice.InputMethodService;
import android.inputmethodservice.KeyboardView;
import android.text.TextUtils;
import android.view.KeyEvent;
import android.view.View;
import android.view.inputmethod.InputConnection;
import android.inputmethodservice.Keyboard;
public class MyInputMethodService extends InputMethodService implements KeyboardView.OnKeyboardActionListener
{

    public MyInputMethodService() {
        super();
    }

    private KeyboardView keyboardView;
    private Keyboard keyboard;

    private boolean caps = false;

    @Override
    public View onCreateInputView() {
        keyboardView = (KeyboardView) getLayoutInflater().inflate(R.layout.keyboard_view, null);
        keyboard = new Keyboard(this, R.xml.qwerty);
        keyboardView.setKeyboard(keyboard);
        keyboardView.setOnKeyboardActionListener(this);
        return keyboardView;
    }

    @Override
    public void onPress(int primaryCode) {

    }

    @Override
    public void onRelease(int primaryCode) {

    }

    @Override
    public void onKey(int primaryCode, int[] keyCodes) {
        InputConnection inputConnection = getCurrentInputConnection();
        if (inputConnection != null) {
            switch(primaryCode) {

                case  Keyboard.KEYCODE_DELETE:
                    CharSequence selectedText = inputConnection.getSelectedText(0);

                    if (TextUtils.isEmpty(selectedText)) {
                        inputConnection.deleteSurroundingText(1, 0);
                    } else {
                        inputConnection.commitText("", 1);
                    }
                    break;
                case Keyboard.KEYCODE_SHIFT:
                    keyboard = new Keyboard(this, R.xml.qwerty);
                    keyboardView.setKeyboard(keyboard);
                    caps = !caps;
                    keyboard.setShifted(caps);
                    keyboardView.invalidateAllKeys();
                    break;
                case Keyboard.KEYCODE_MODE_CHANGE:
                    keyboard = new Keyboard(this, R.xml.keys_layout);
                    keyboardView.setKeyboard(keyboard);
                    break;
                case -10:
                    keyboard = new Keyboard(this, R.xml.more_keys_layout);
                    keyboardView.setKeyboard(keyboard);
                    break;
                case -11:
                    keyboard = new Keyboard(this, R.xml.keys_layout);
                    keyboardView.setKeyboard(keyboard);
                    break;
                case Keyboard.KEYCODE_DONE:
                    inputConnection.sendKeyEvent(new KeyEvent(KeyEvent.ACTION_DOWN, KeyEvent.KEYCODE_ENTER));
                    break;
                default :
                    char code = (char) primaryCode;
                    if(Character.isLetter(code) && caps){
                        code = Character.toUpperCase(code);
                    }
                    inputConnection.commitText(String.valueOf(code), 1);

            }
        }

    }

    @Override
    public void onText(CharSequence text) {

    }

    @Override
    public void swipeLeft() {

    }

    @Override
    public void swipeRight() {

    }

    @Override
    public void swipeDown() {

    }

    @Override
    public void swipeUp() {

    }
}
7. Press the run button at the top bar; it will install the application on a virtual device.
8. Test if the application runs correctly.
9. Customise to your taste.
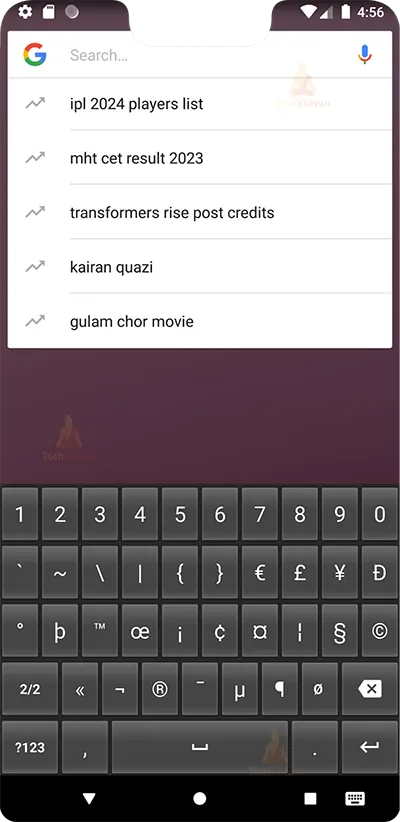
Android Custom Keyboard Output:
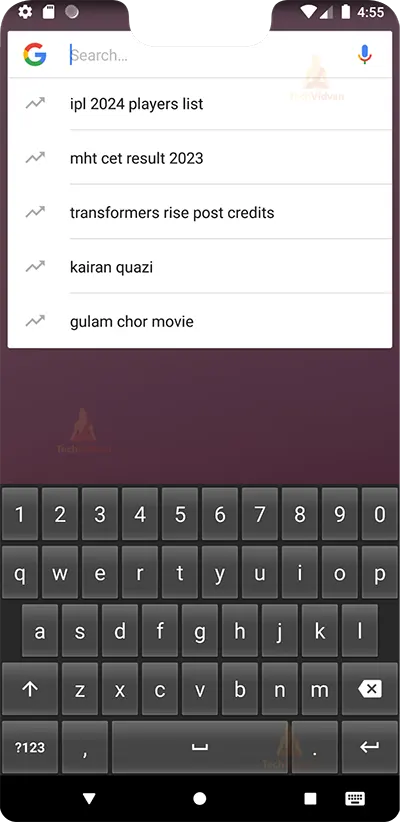
The keyboard should look like this:
Summary
The guide covers the entire process, including understanding the application flow, meeting the necessary requirements, describing the project, and providing step-by-step implementation instructions. By following this guide, readers can create personalised keyboards that enhance the typing experience, cater to user preferences, and integrate seamlessly with the Android system. I hope you found this guide insightful. Thank you for reading!