Android Push Notifications
Did you ever imagine how Amazon, Flipkart, Zomato, or Myntra like apps update you about upcoming or ongoing sales and offers? They use push notifications to update you about any offers or sales or any other stuff. You must have noticed some popup messages on your device. These popup messages are nothing but notifications. Notifications are a way through which the developers of an application update you about any upcoming events.
So through this article, we will understand what push notifications are and how to implement them in android.
Android Push Notification
Push Notifications have evolved a lot in terms of communication with the users through the app. Whether it’s about informing the users about sales, offers, delivery updates, or any other task, push notifications play an important role. Consider a scenario where users are not often opening your apps daily. If you keep a sale or any offer in your app, how will the users know about it? In such a scenario, it’s better to use push notifications.
Push Notifications works on both the foreground and background of the app. In other words, even if your app is open or not open, you still would receive a notification. You can even keep images along with the text while publishing your push notifications. Push notifications even allow you to redirect your users to a specific page on your app or web.
Push Notifications comes up with channels. These channels help you segregate your users and send specific messages to specific users. Suppose if your app has both premium and non-premium users, then your notifications may vary. For example, suppose you want to notify the premium users which has more offers for them.
Push Notifications usually use two APIs: the Push API itself and your device Notification API. The Push API helps your device to connect to the server and receive the push data. With the help of the Notification API, this Push Data is displayed in the form of a notification.
History of Android Push Notifications
Push Notifications, yet an emerging technology, has a long history which we will discuss below.
- Push notifications were first introduced in 2003 by Blackberry Push Email.
- In 2009, Apple released a Push Service.
- In 2010, Google Cloud to Device Messaging (C2DM) took up the function.
- GCM took the role of Google C2DM in 2012.
- In 2013, Android 4.2 ICS was introduced, including Rich Notifications, pictures, and buttons, among other features.
- In 2014, Push Notifications received interactive buttons and interactive modifications. Content format, trigger points, and customizable
- scales were all included.
Terminologies involved in Android Push Notifications
Before proceeding further with Push Notifications, we need to understand the various terms involved in Push Notifications.
- Notification: Notification is like a popup message usually triggered by your application. It appears in the notification bar of your device, providing quick and concise information about an event or update from the app.
- Push Message: The push message includes text, images, or other data transferred from the server to the user. It is the content that gets sent to the device, which can then be displayed as a notification, ensuring that users receive timely updates even when the app isn’t open.
- Push Notification: Push Notification can be thought of as the actual notification you receive from the server. It is the end product that appears on the user’s device, alerting them with sounds, vibrations, or visual cues about new content, messages, or updates from the app.
- Push API: Push API sends messages from the server to the app’s notification API. It facilitates the communication between the server and the user’s device, ensuring that messages are delivered accurately and efficiently, enabling real-time interaction.
- Push Service: Push Service behaves as a channel to send push notifications. The medium may differ depending on the users; for example, premium and non-premium users may have a separate channel. It manages the delivery of push messages, ensuring they reach the intended recipients based on their subscription level and preferences.
Methods involved in Push Notifications
Push Notifications, as we know, are sent from the server still at the receiver(or the app), and we have some functions used to receive and display the notifications. The below-mentioned functions are present in the Notification Manager Class.
| Function Name | Function Description |
| cancel(id: Int) | It cancels the notification with the specified id. |
| cancel(tag: String, id: int) | It cancels the notification with the species tag and the id. |
| cancelAll() | It is used to cancel all the available notifications. |
| notify(id: Int, notification: Notification) | It is used to generate a notification from the source app in the status bar. |
| notify(tag: String, id: Int, notification: Notification) | It generates a notification with a specific tag from the source app in the status bar. |
Uses of Push Notifications in Android
Following are some of the uses of push notifications:
1. Marketing: Most companies use push notifications for marketing their app. They provide information related to sales, offers, delivery updates, etc., using push notifications. These messages help engage users and drive traffic to the app or website, often leading to increased sales.
2. Scheduled Notifications: You can even schedule the notifications based on when you wish to send them. This allows businesses to time their messages for maximum impact, such as sending reminders for events, promotions at specific times, or daily updates to keep users engaged.
3. Works on both Foreground and Background: Whether you are using or not using your app at a particular movement, you still receive the push notification. This ensures that important updates, alerts, and messages reach the user no matter what they are doing, maintaining constant communication.
4. Supports Multiple Channels: If you have different kinds of users like premium, elite, platinum, or non-premium users, you can create separate channels for them and target notifications accordingly. This customization allows for more personalized and relevant content delivery, improving user satisfaction and engagement.
5. Feature to opt-in and opt-out: If you wish to receive push notifications, you can easily opt-in, and if you feel that some push notifications are not helpful for you, you can even opt-out of them. This flexibility enhances user control over their notification preferences, contributing to a better user experience.
Implementation of Push Notifications in Android
Now, let’s see how you can have push notifications enabled for your applications. To implement this, we will use Google FCM, also known as Firebase Cloud Messaging.
Step 1: Start your Android Studio and Create a new project with the name “TechVidvanPushNotification.”
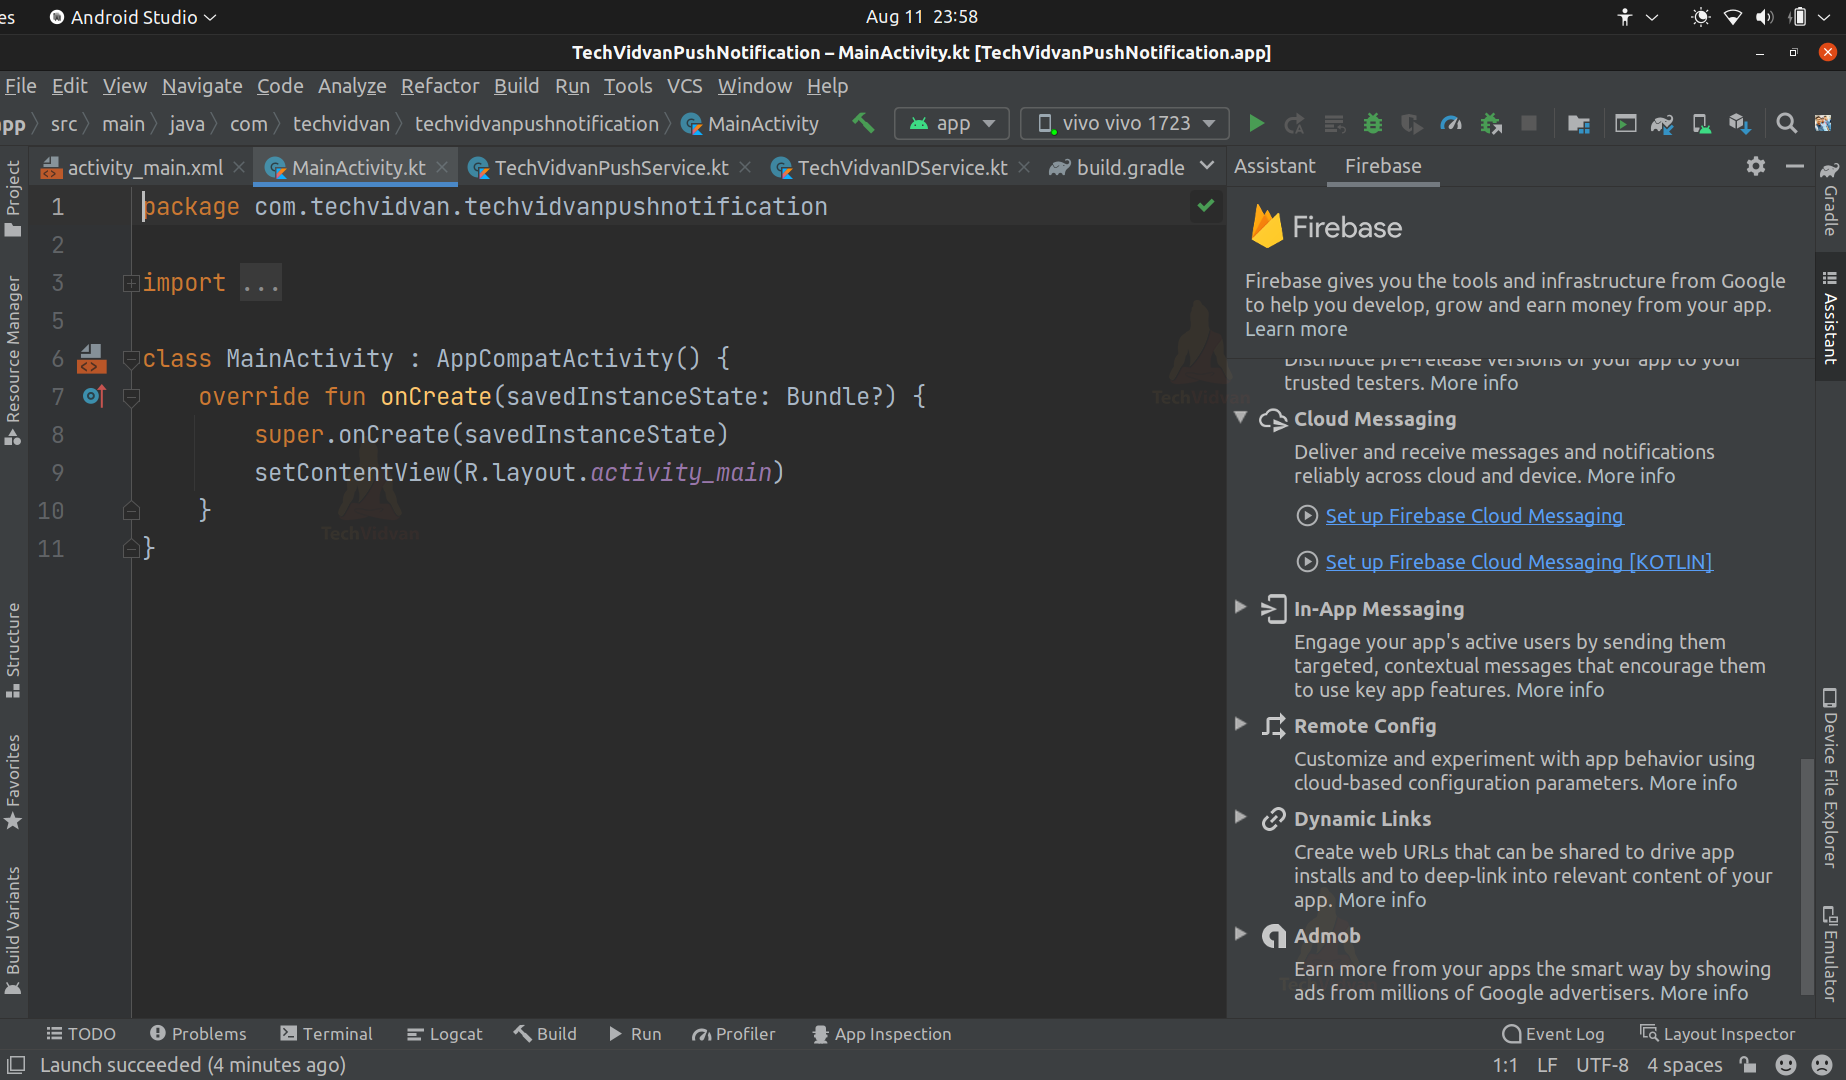
Step 2: Go to Tools —> Firebase and select Cloud Messaging there, as shown below. Click on Set up Firebase. If it prompts you to connect to firebase, then just choose your Gmail account and proceed.
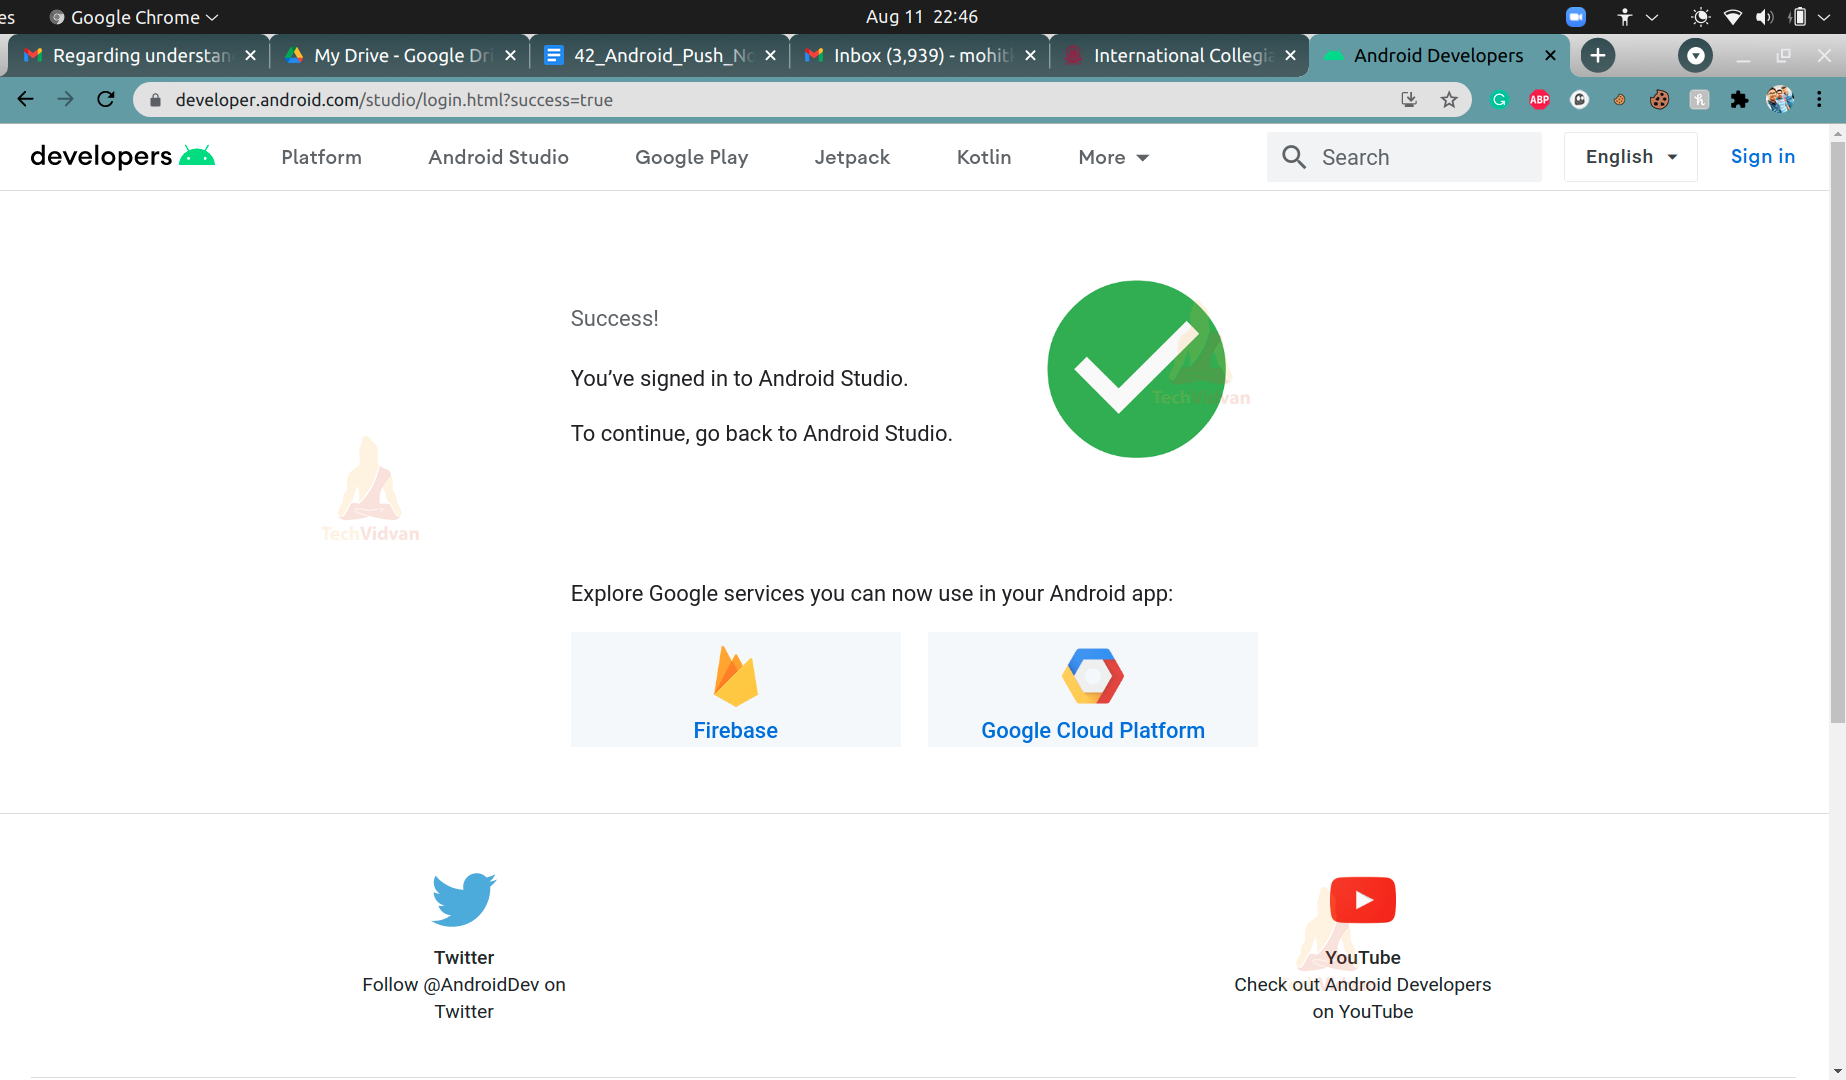
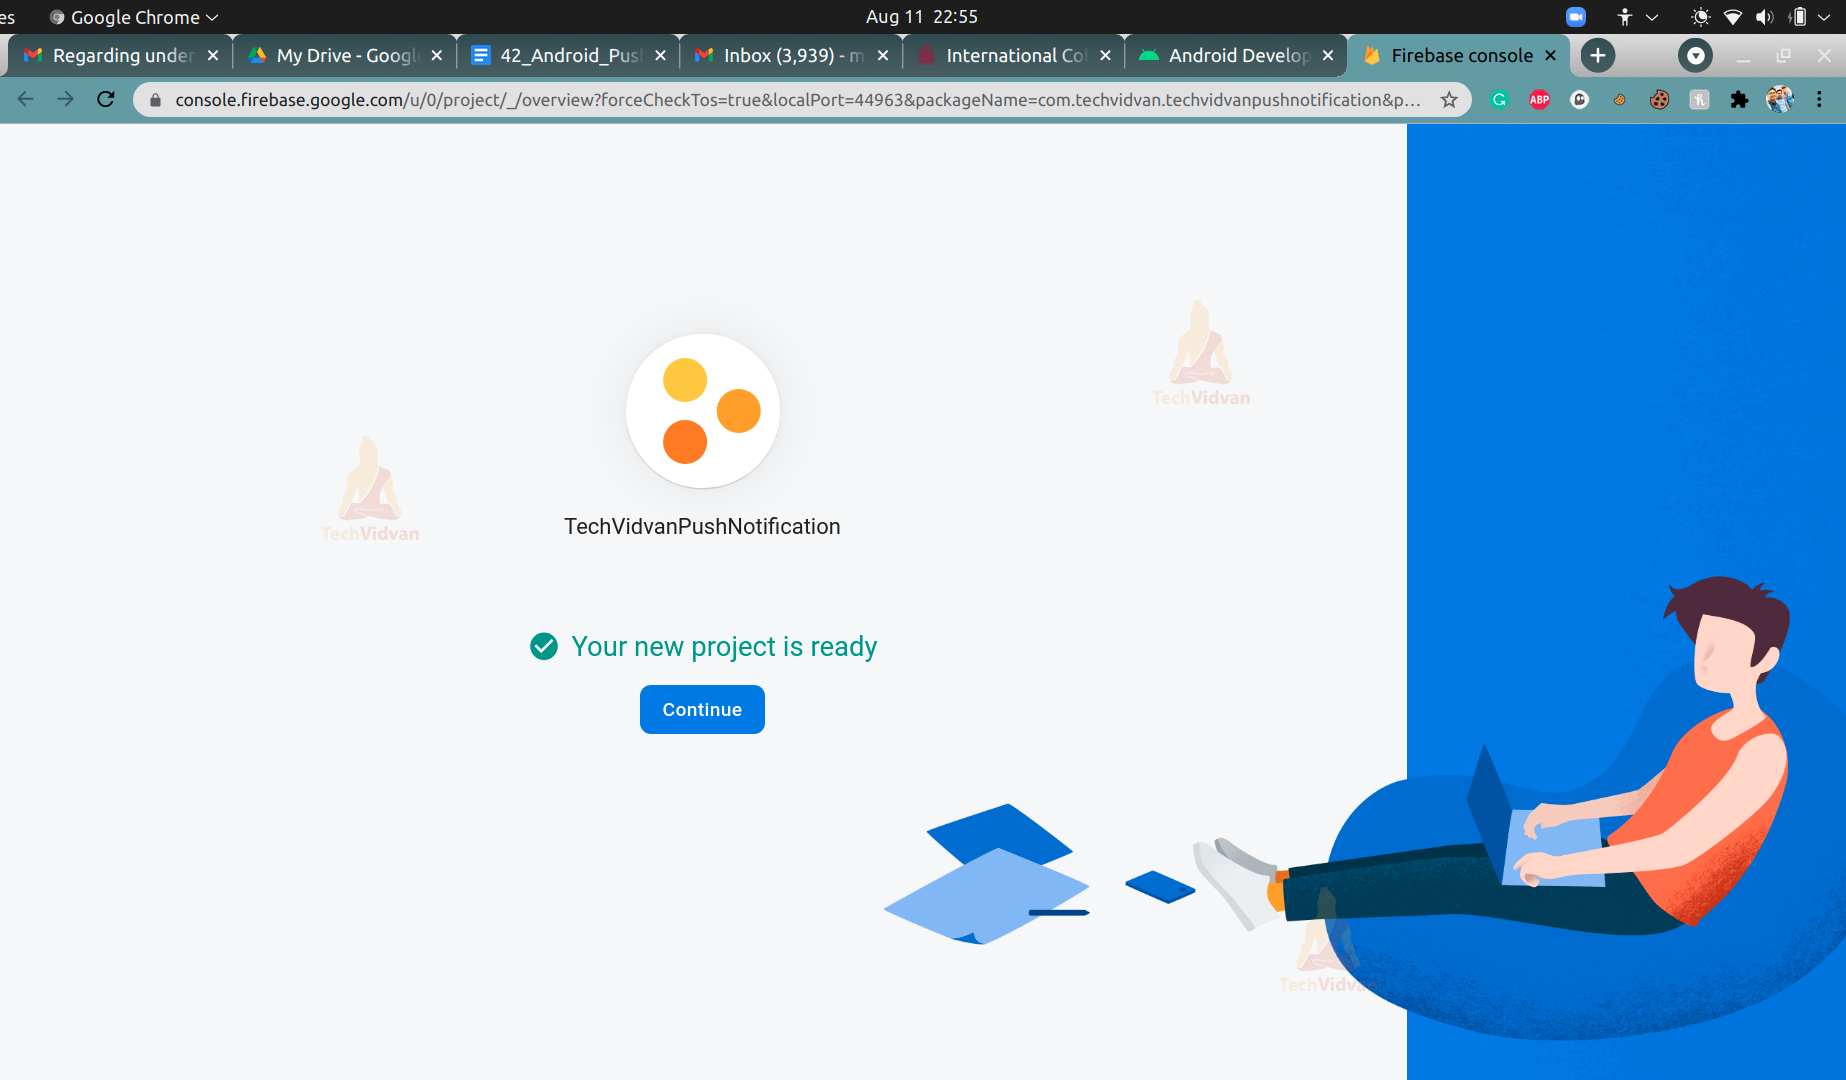
Step 3: You would be redirected to Firebase Console, where you would see an option to create a project and proceed, as shown below.

From the above image, you can see I am creating a project named TechVidvanPushNotification. Just click Continue.
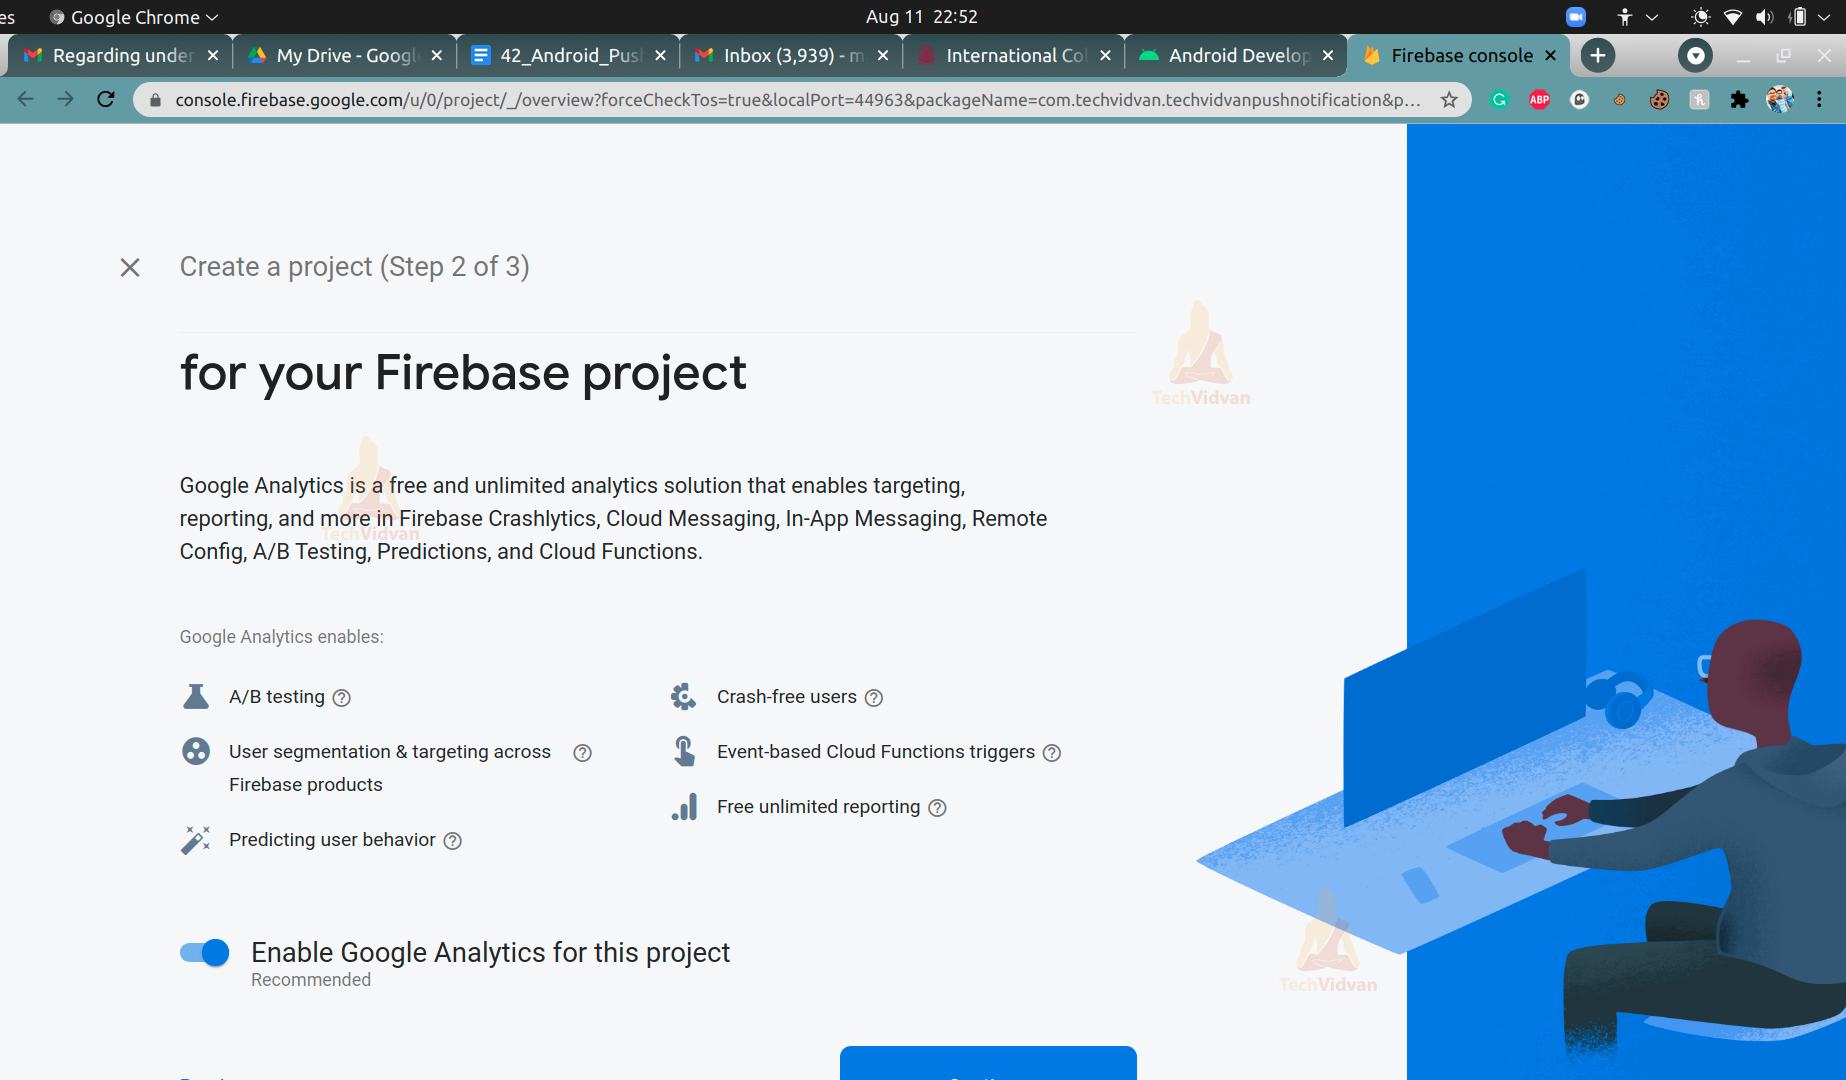
Enable Google Analytics for this project and proceed.
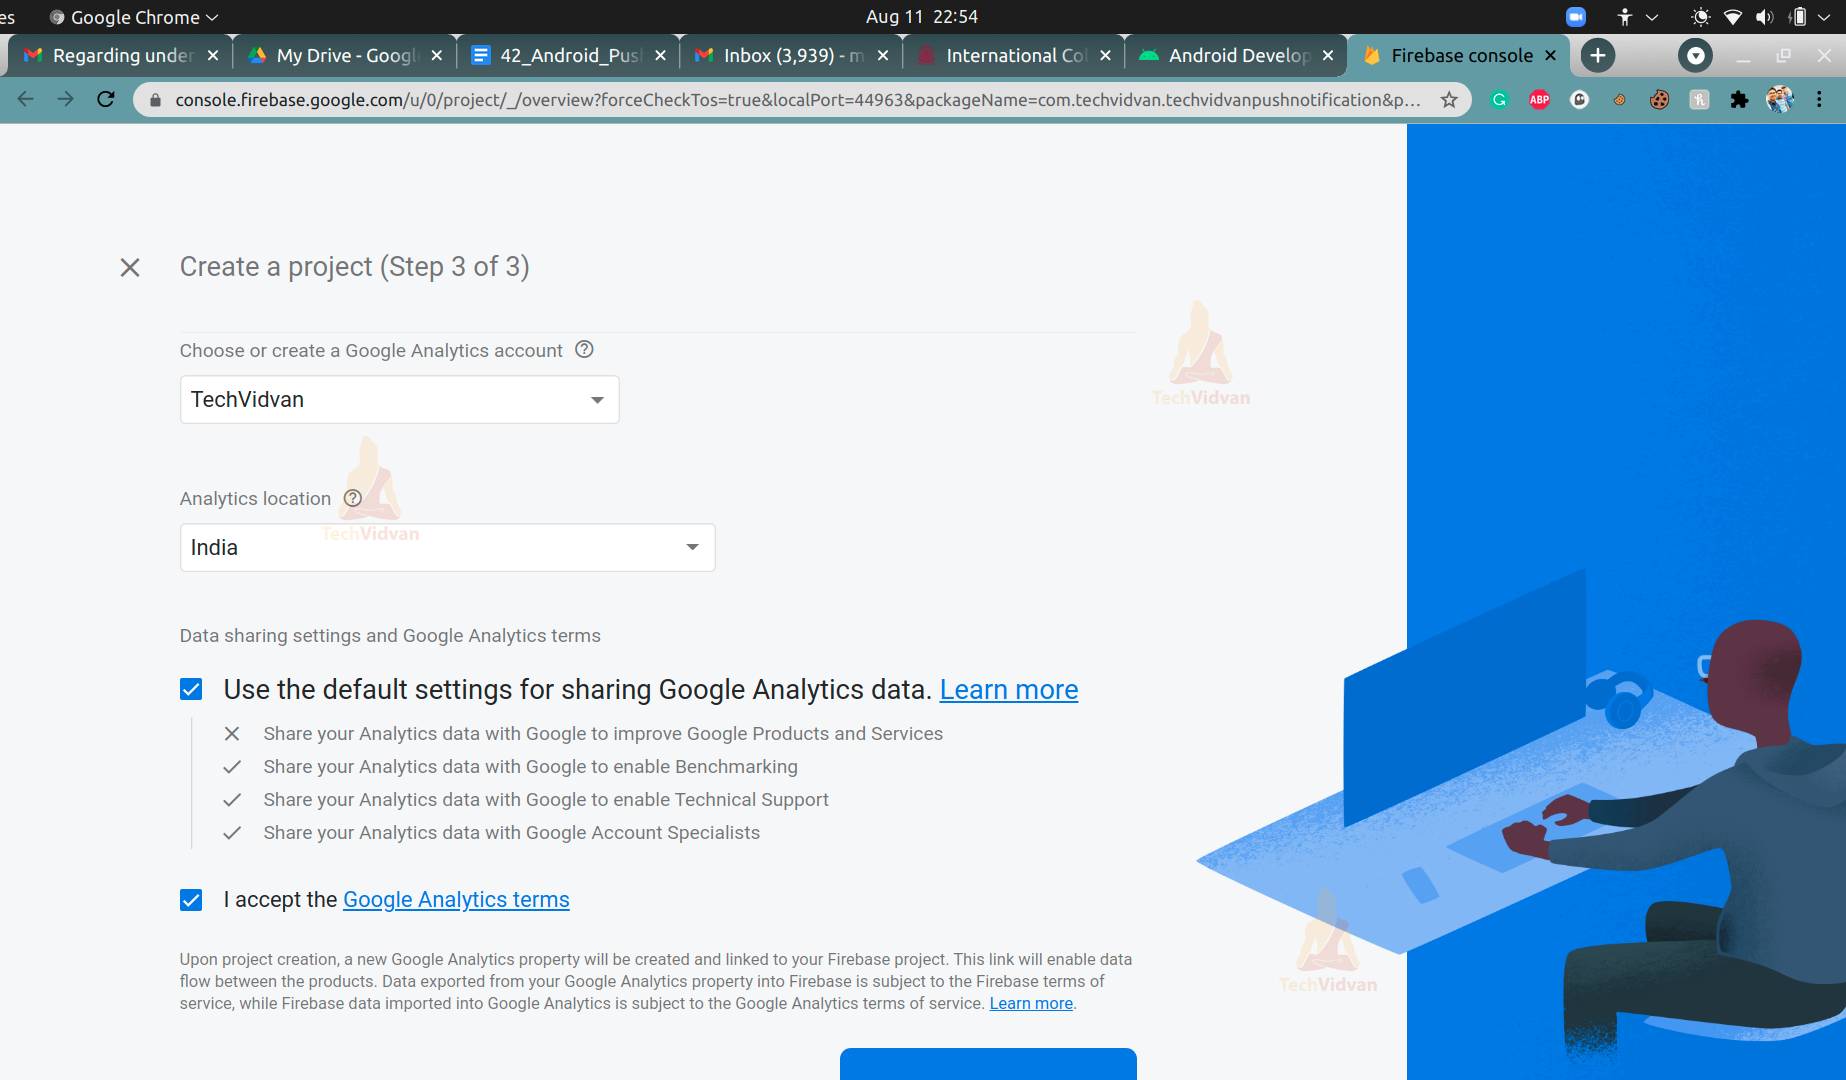
Now select Create Account and provide a name and region and then click Create Project.
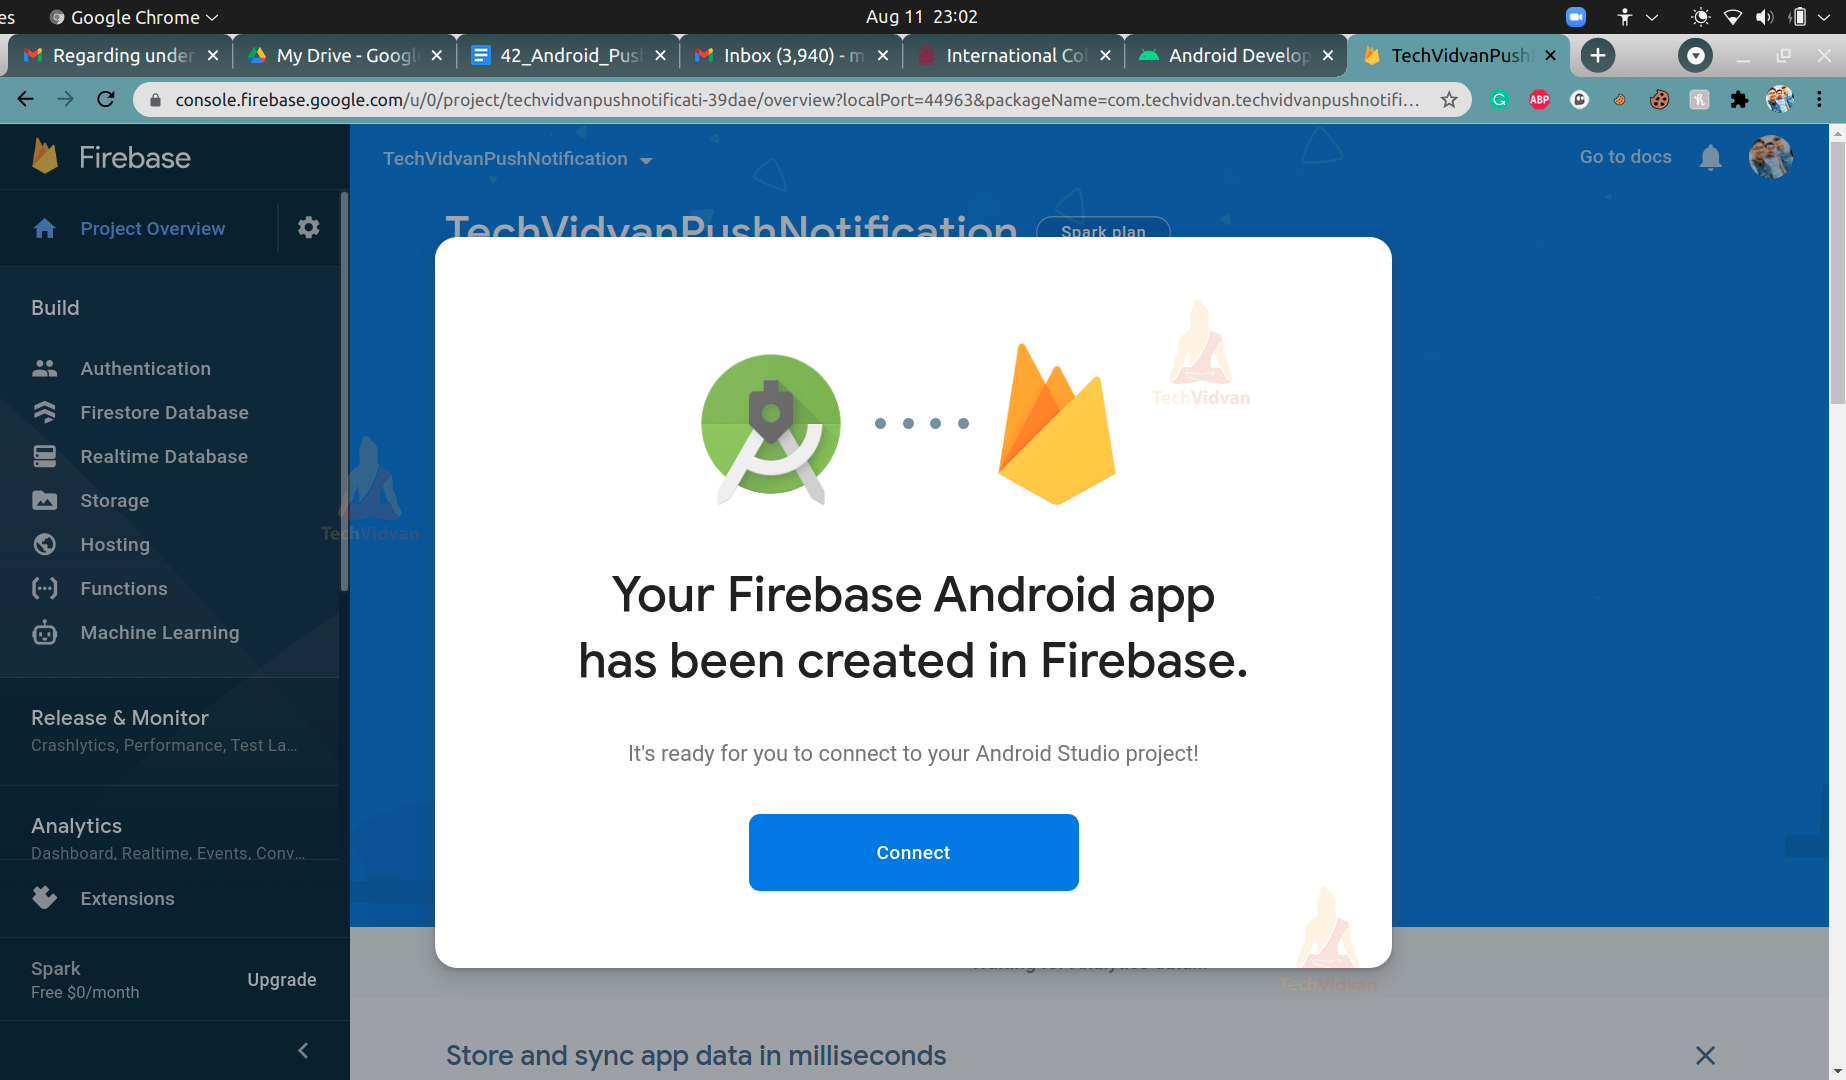
Step 4: After you have completed the above steps, you will get a message that your project is ready. Then simply press Continue and jump back to your Android Studio for further integrations.
Step 5: Now, you will see an option to add FCM in your app. Simply select it and proceed as shown below in the screenshot.
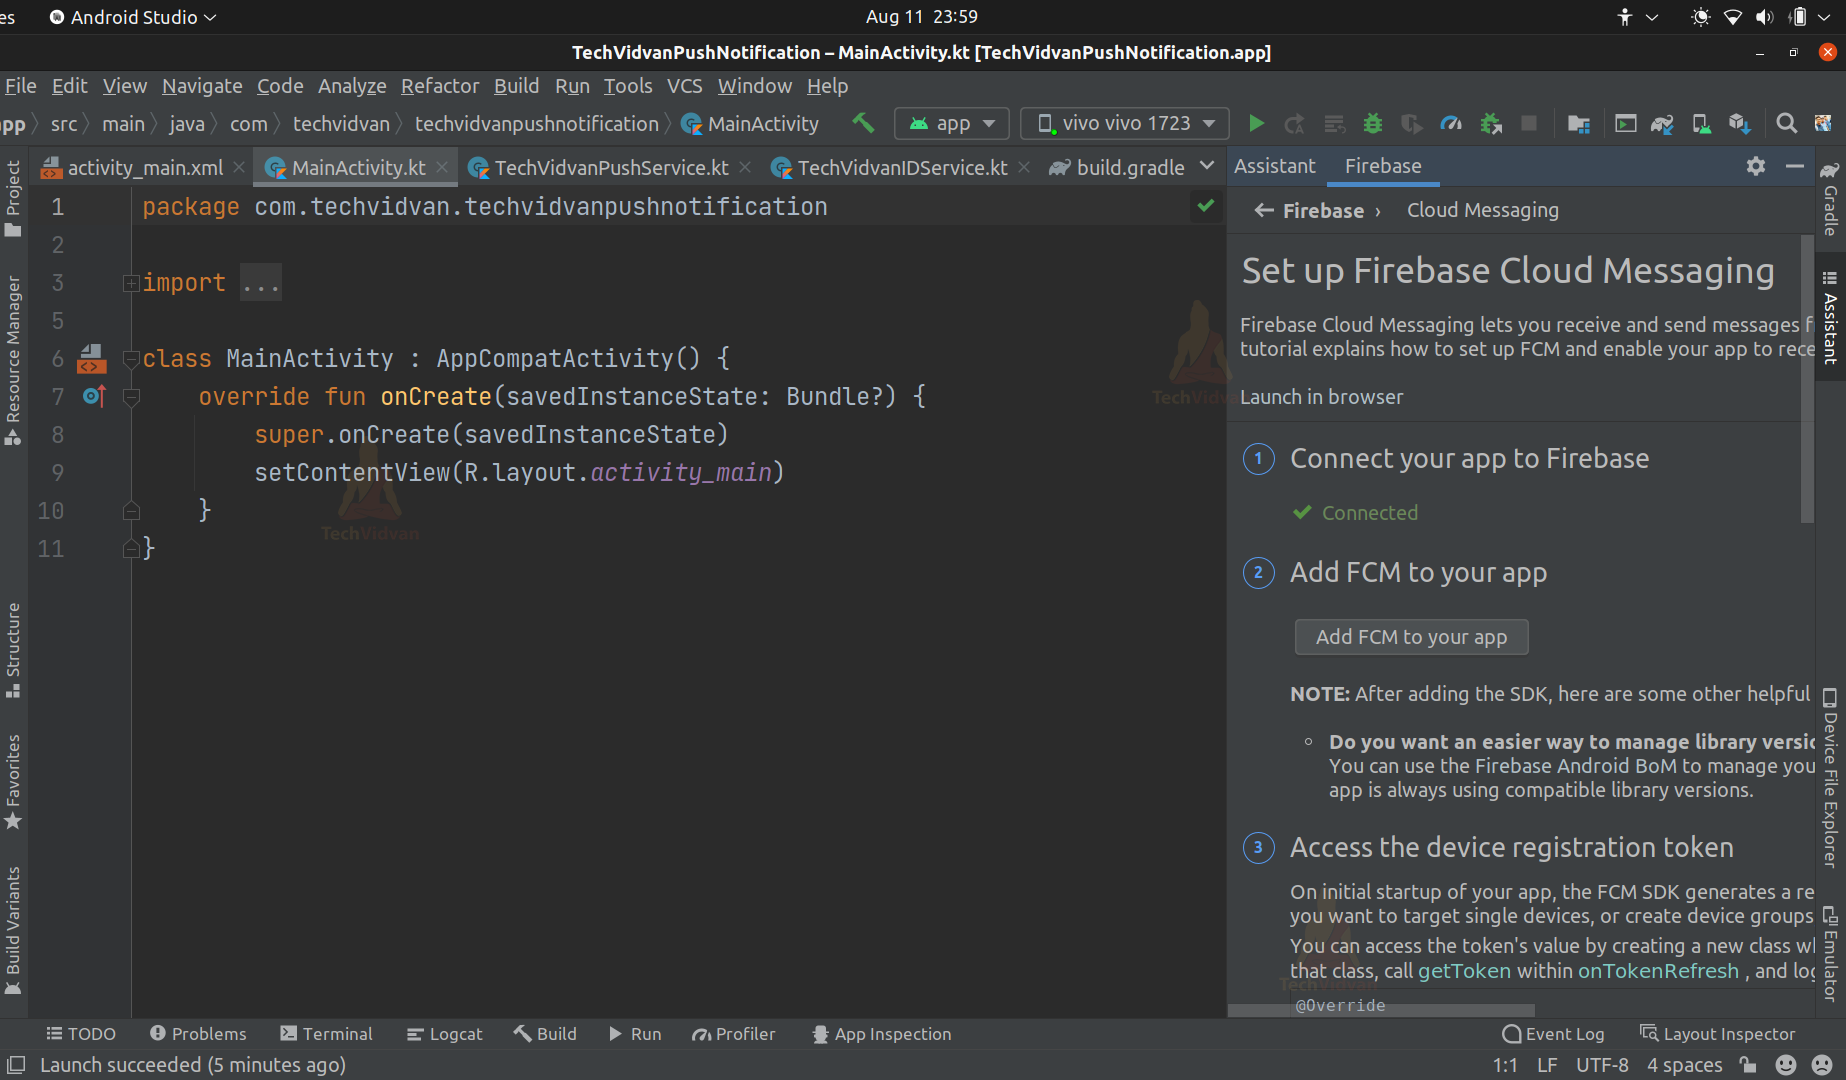
After pressing that, the Android will add some dependencies in your Gradle file and rebuild the project.
Step 6: Add the below dependency in your App level Gradle file and then rebuild the project.
Code:
implementation 'com.google.firebase:firebase-messaging:17.0.0'
Step 7: Now open your AndroidManifest.xml file and add the below service there.
Code:
<service
            android:name=".TechVidvanIDService"
            android:exported="false"
            >
            <intent-filter>
                <action android:name="com.google.firebase.INSTANCE_ID_EVENT"/>
            </intent-filter>
        </service>

        <service
            android:name=".TechVidvanPushService"
            android:exported="false">
            <intent-filter>
                <action android:name="com.google.firebase.MESSAGING_EVENT"/>
            </intent-filter>
        </service>
After adding that, your AndroidManifest File would look as follows:
Code: AndroidManifest.xml
<?xml version="1.0" encoding="utf-8"?>
<manifest xmlns:android="http://schemas.android.com/apk/res/android"
    xmlns:tools="http://schemas.android.com/tools"
    package="com.techvidvan.techvidvanpushnotification">

    <uses-permission android:name="android.permission.INTERNET"/>
    <application
        android:allowBackup="true"
        android:icon="@mipmap/ic_launcher"
        android:label="@string/app_name"
        android:roundIcon="@mipmap/ic_launcher_round"
        android:supportsRtl="true"
        android:theme="@style/Theme.TechVidvanPushNotification">
        <activity
            android:name=".MainActivity"
            android:exported="true">
            <intent-filter>
                <action android:name="android.intent.action.MAIN" />

                <category android:name="android.intent.category.LAUNCHER" />
            </intent-filter>
        </activity>

        <service
            android:name=".TechVidvanIDService"
            android:exported="false"
            >
            <intent-filter>
                <action android:name="com.google.firebase.INSTANCE_ID_EVENT"/>
            </intent-filter>
        </service>

        <service
            android:name=".TechVidvanPushService"
            android:exported="false">
            <intent-filter>
                <action android:name="com.google.firebase.MESSAGING_EVENT"/>
            </intent-filter>
        </service>

    </application>

</manifest>
Step 8: Create a Kotlin Class file named TechVidvanIDService and paste the below code there.
Code: TechVidvanIDService.kt
package com.techvidvan.techvidvanpushnotification


import android.util.Log
import com.google.firebase.iid.FirebaseInstanceId
import com.google.firebase.iid.FirebaseInstanceIdService

class TechVidvanIDService : FirebaseInstanceIdService() {

    val TAG = "TechVidvanIDService"
    lateinit var name: String

    override fun onTokenRefresh() {
        // Getting the FCM Token from firebase
        val token = FirebaseInstanceId.getInstance().token
        Log.d(TAG, "Your FCM Token is: ${token}")
    }

}
Step 9: Create a Kotlin Class file named TechVidvanPsuhService and paste the below code there.
Code: TechVidvanPushService.kt
package com.techvidvan.techvidvanpushnotification

import android.annotation.SuppressLint
import android.app.NotificationManager
import android.app.PendingIntent
import android.app.PendingIntent.FLAG_ONE_SHOT
import android.content.Context
import android.content.Intent
import android.media.RingtoneManager
import android.util.Log
import androidx.core.app.NotificationCompat
import com.google.firebase.messaging.FirebaseMessagingService
import com.google.firebase.messaging.RemoteMessage


@SuppressLint("MissingFirebaseInstanceTokenRefresh")
class TechVidvanPushService : FirebaseMessagingService() {
    val TAG = "TechVidvanPushService"

    @SuppressLint("LongLogTag")
    override fun onMessageReceived(remoteMessage: RemoteMessage) {
        Log.d(TAG, "Server Message: ${remoteMessage.from}")

        if (remoteMessage.notification != null)
        {
            //If the received notification is not null then display it
            showNotification(remoteMessage.notification?.title, remoteMessage.notification?.body)
        }
    }

    private fun showNotification(title: String?, body: String?)
    {
        //Defining the showNotification Function
        //Make an intent to the MainActivity file
        val intent = Intent(this, MainActivity::class.java)
        intent.addFlags(Intent.FLAG_ACTIVITY_CLEAR_TOP)
        //Declare a pending intent
        val pendingIntent = PendingIntent.getActivity(this, 0, intent,
            FLAG_ONE_SHOT
        )

        //Incase if you want to keep notification sounds
        val soundUri = RingtoneManager.getDefaultUri(RingtoneManager.TYPE_NOTIFICATION)
        val notificationBuilder = NotificationCompat.Builder(this)
            .setSmallIcon(R.mipmap.ic_launcher)
            .setContentTitle(title)
            .setContentText(body)
            .setAutoCancel(true)
            .setSound(soundUri)
            .setContentIntent(pendingIntent)

        //Notifying our notification on the status bar
        val notificationManager = getSystemService(Context.NOTIFICATION_SERVICE) as NotificationManager
        notificationManager.notify(0, notificationBuilder.build())
    }
}
Step 10: Now, Rebuild the project and run it on your device or emulator.
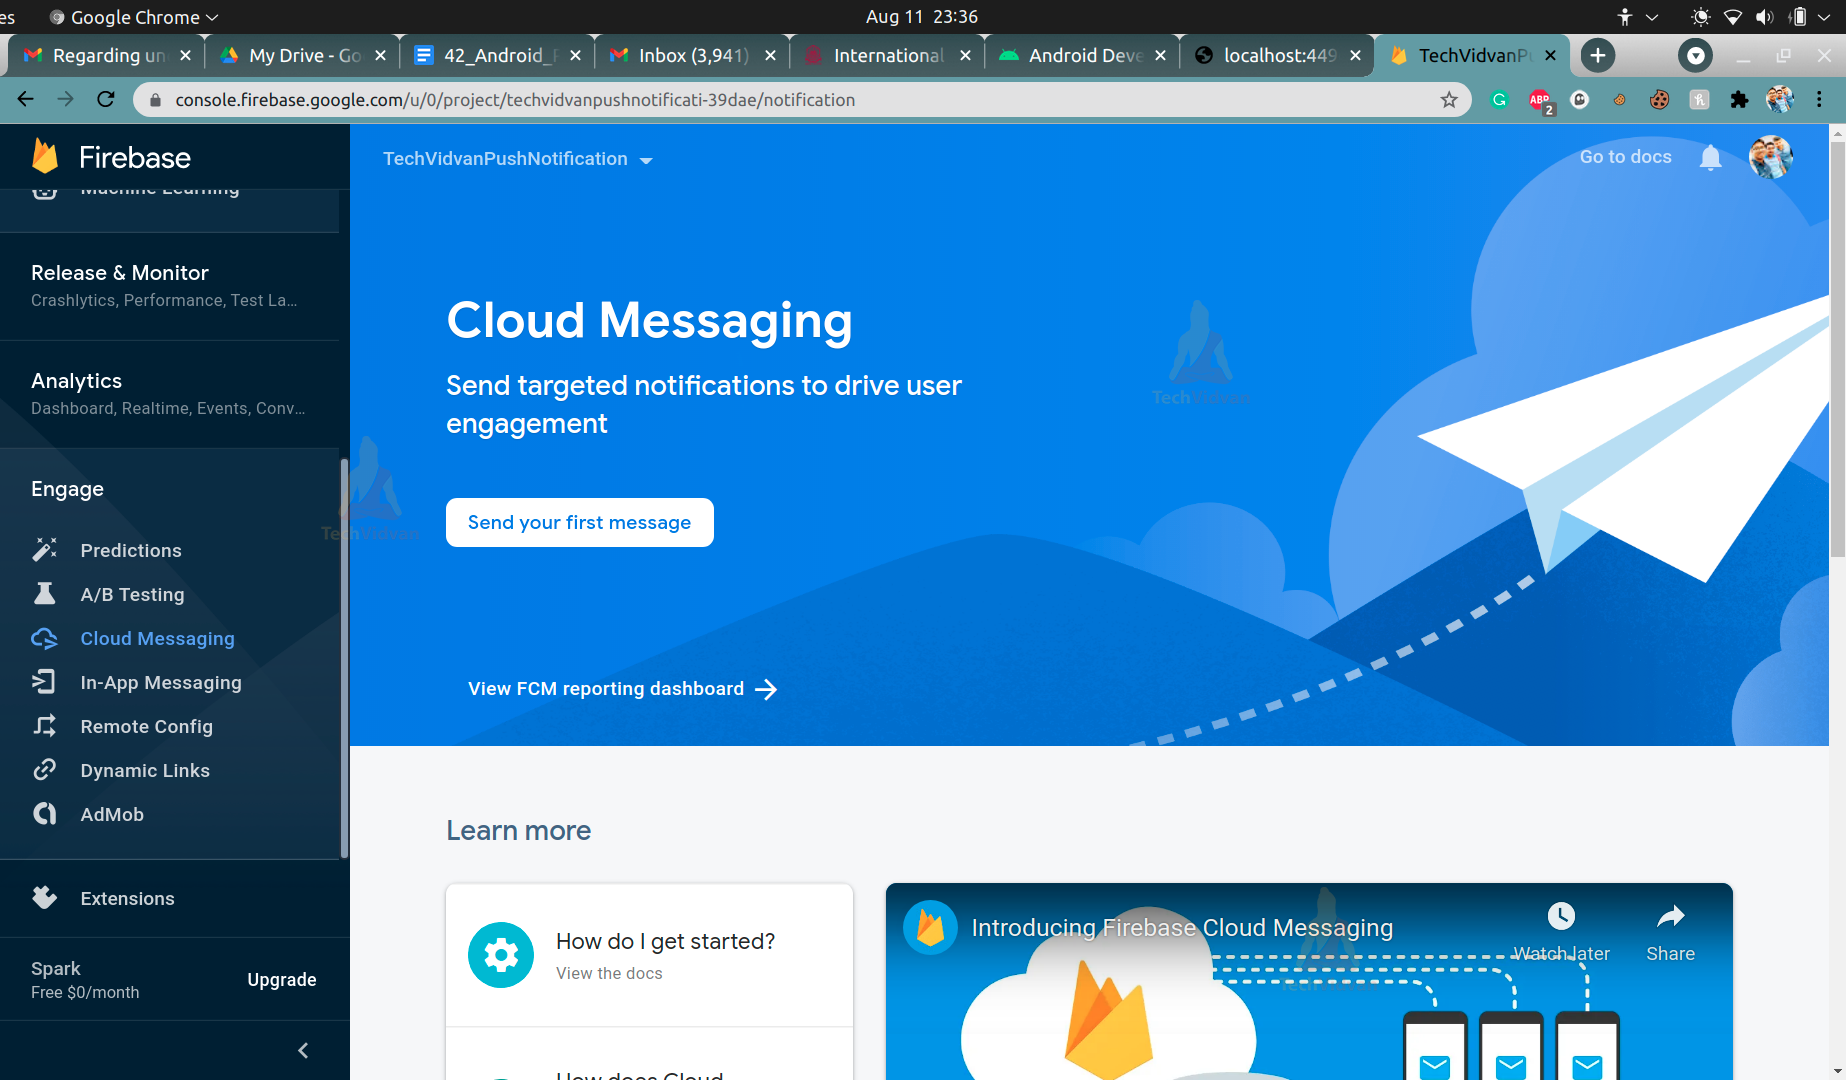
Step 11: Now browse over the Firebase console. Navigate to Cloud Messaging and follow the steps shown below.
Now select your project and proceed with navigation of the cloud messaging option there.
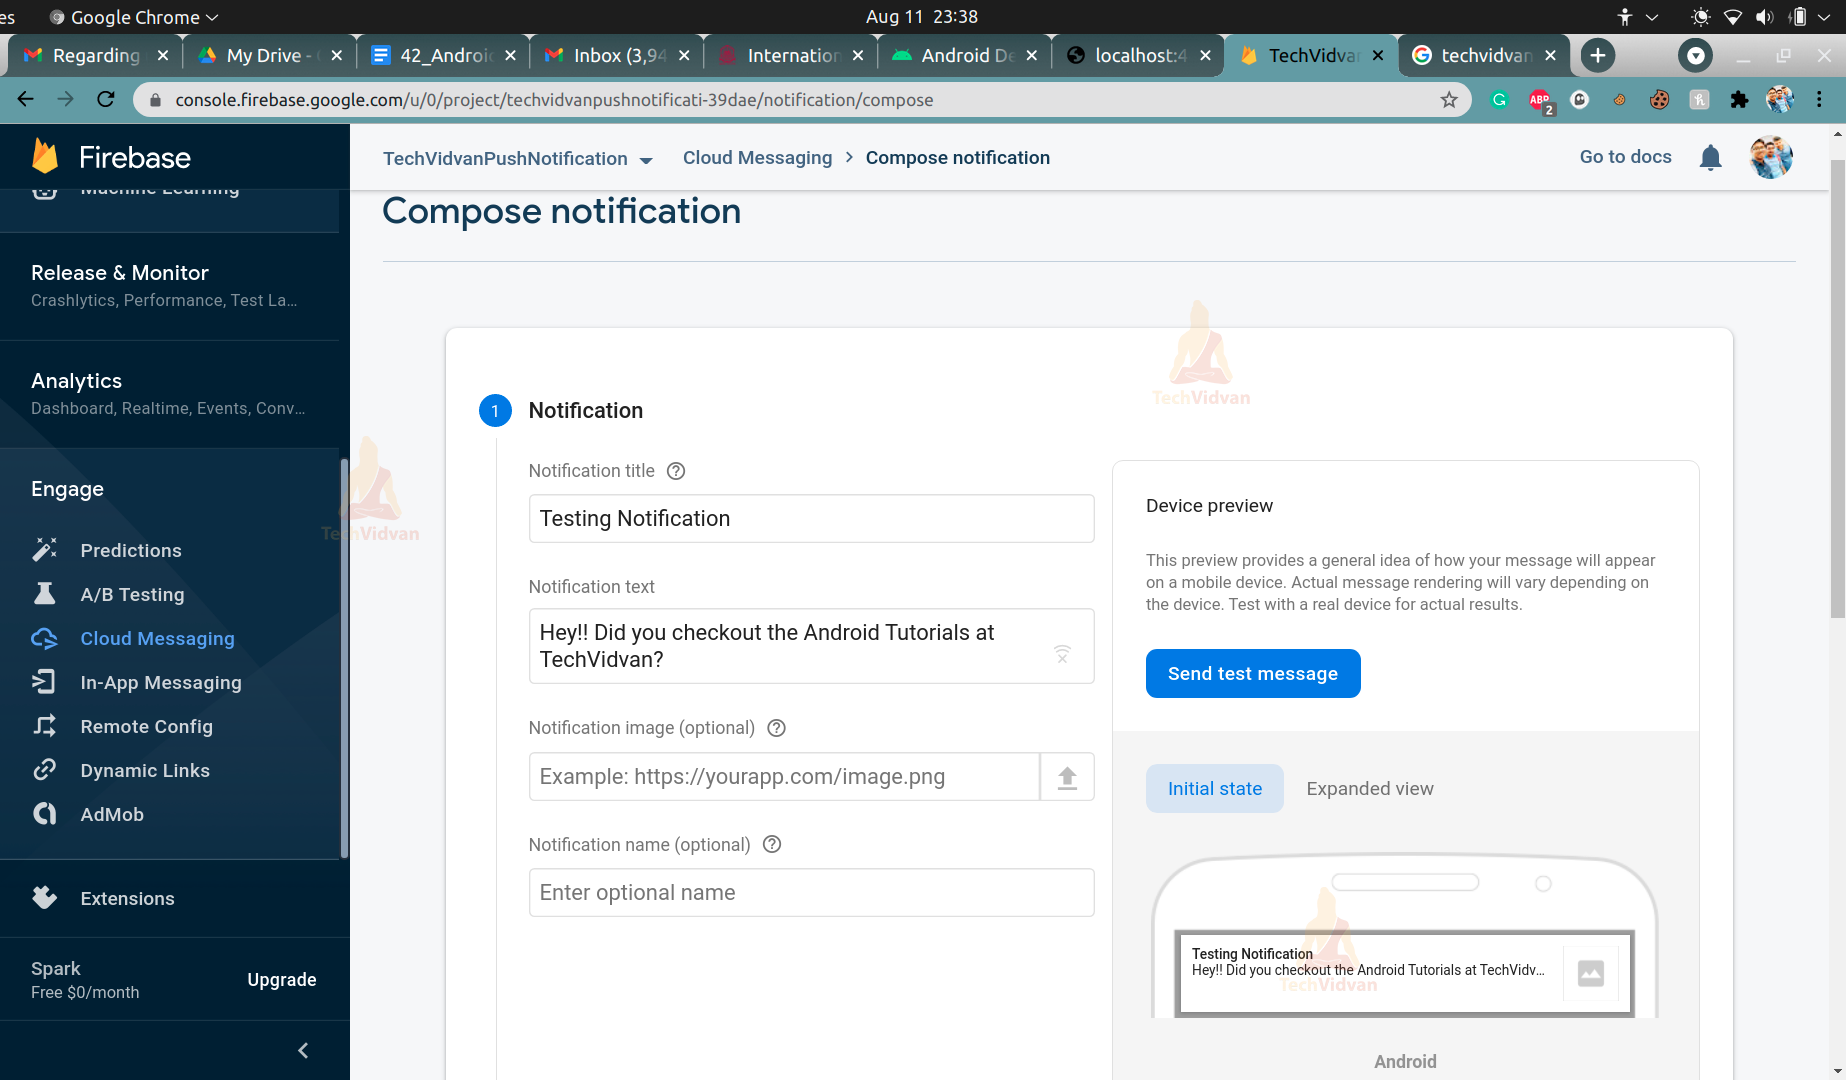
Now click on Send Your First Message. Here just provide the title and the notification body and then proceed.
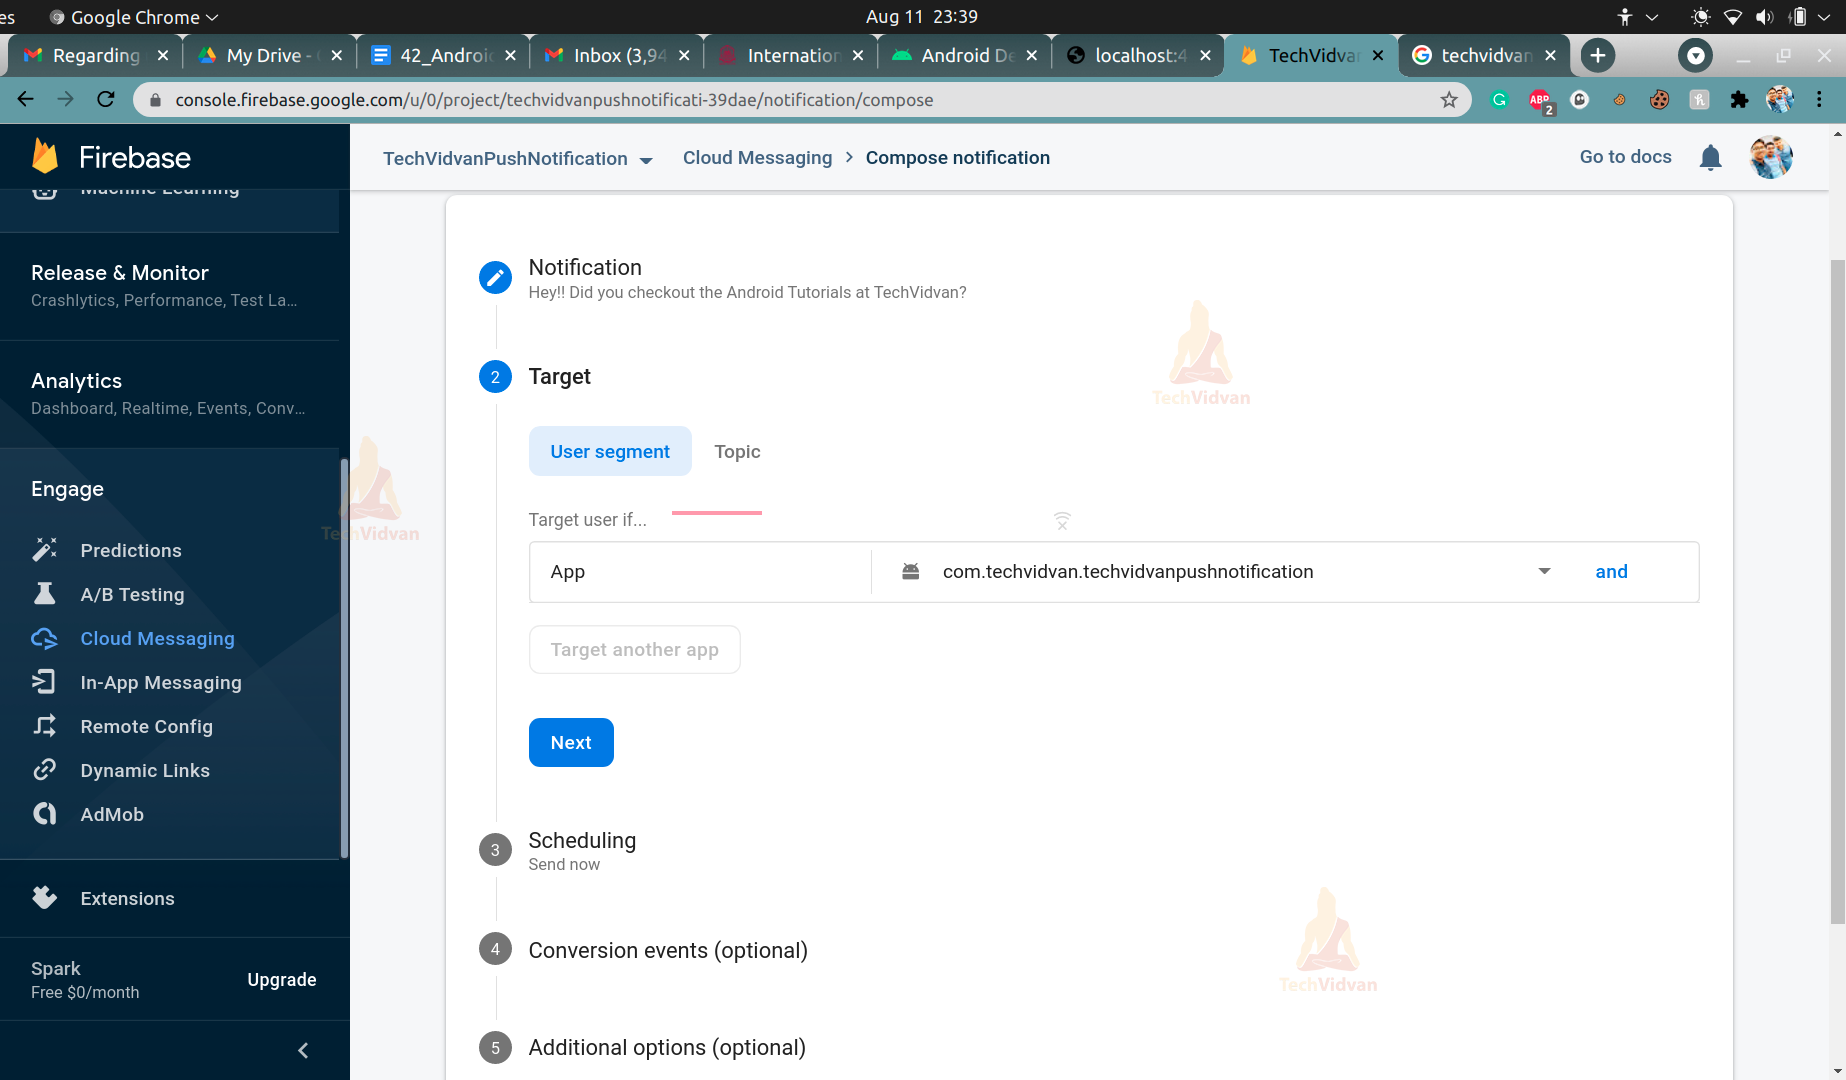
Click on next and select your target as shown below.
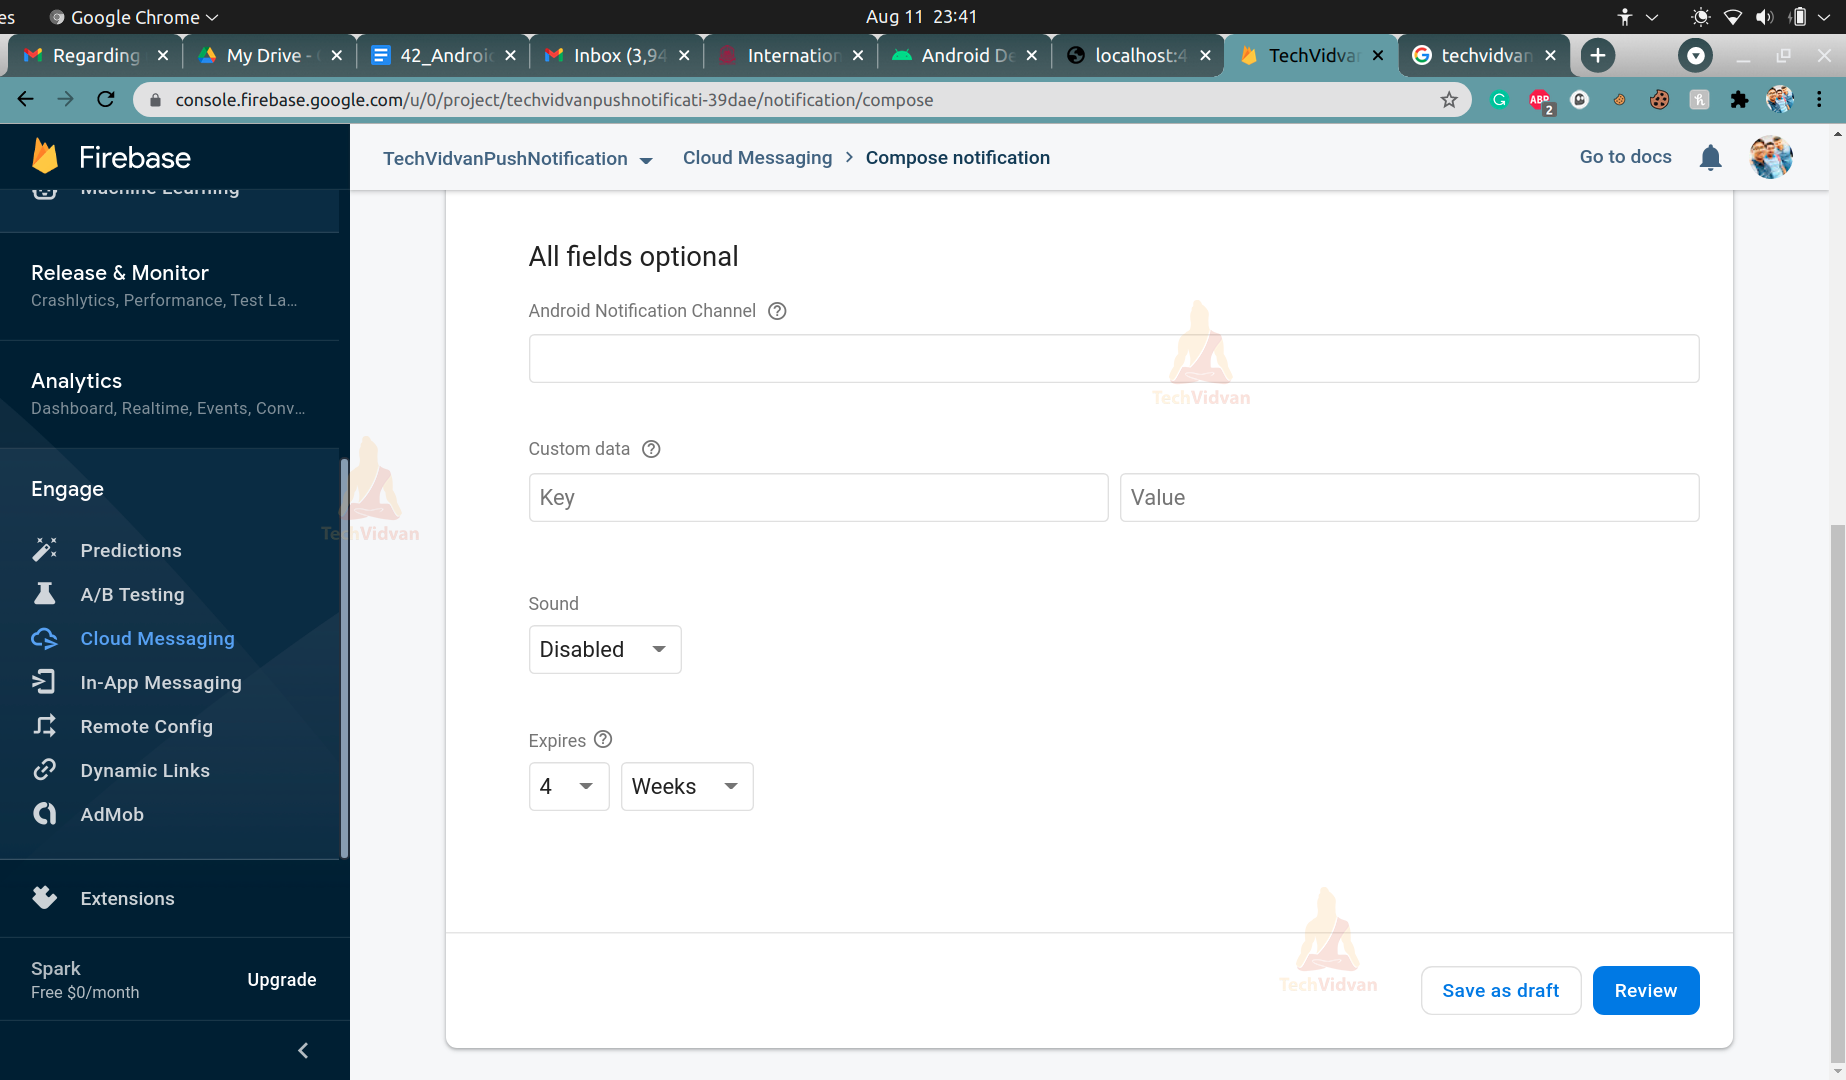
Now you will get an option to schedule. Since I want to send it now only so I will keep it as “Now.”
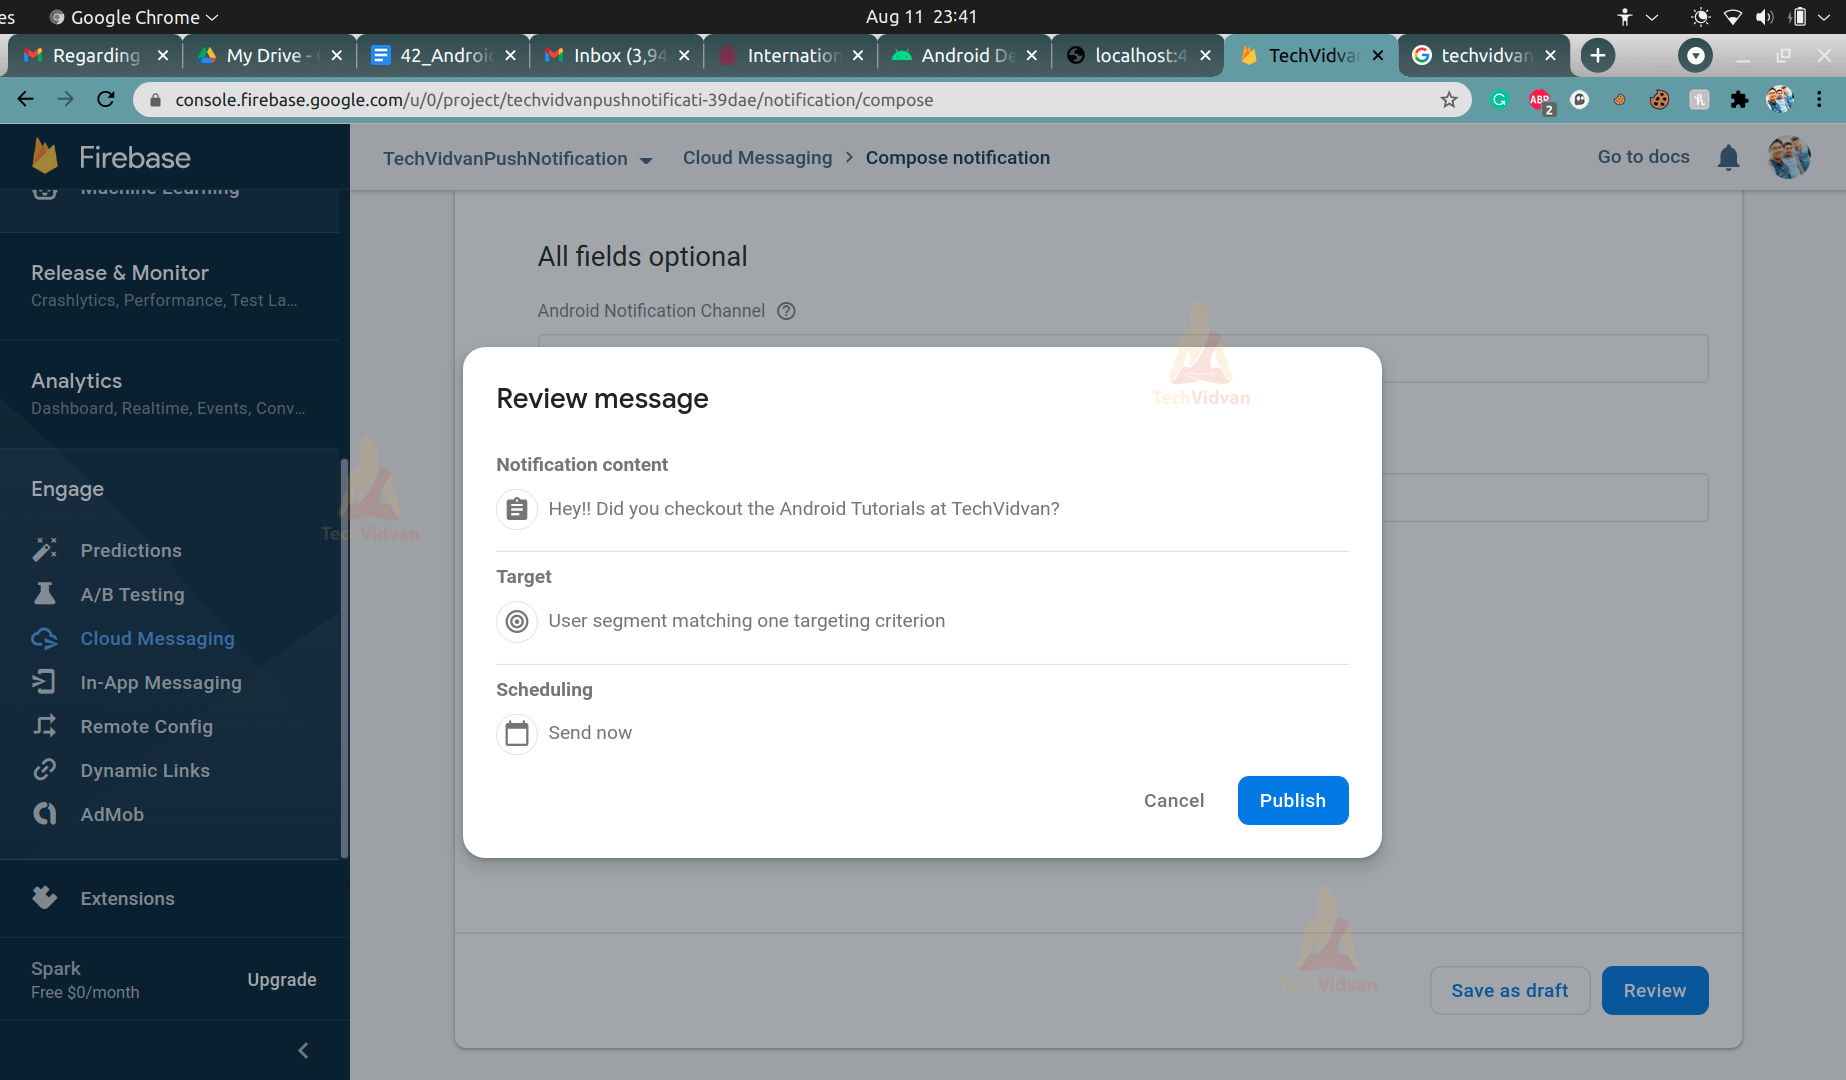
The last two fields are optional, so you can omit them and click on next. Now click on Review and then Publish your message.
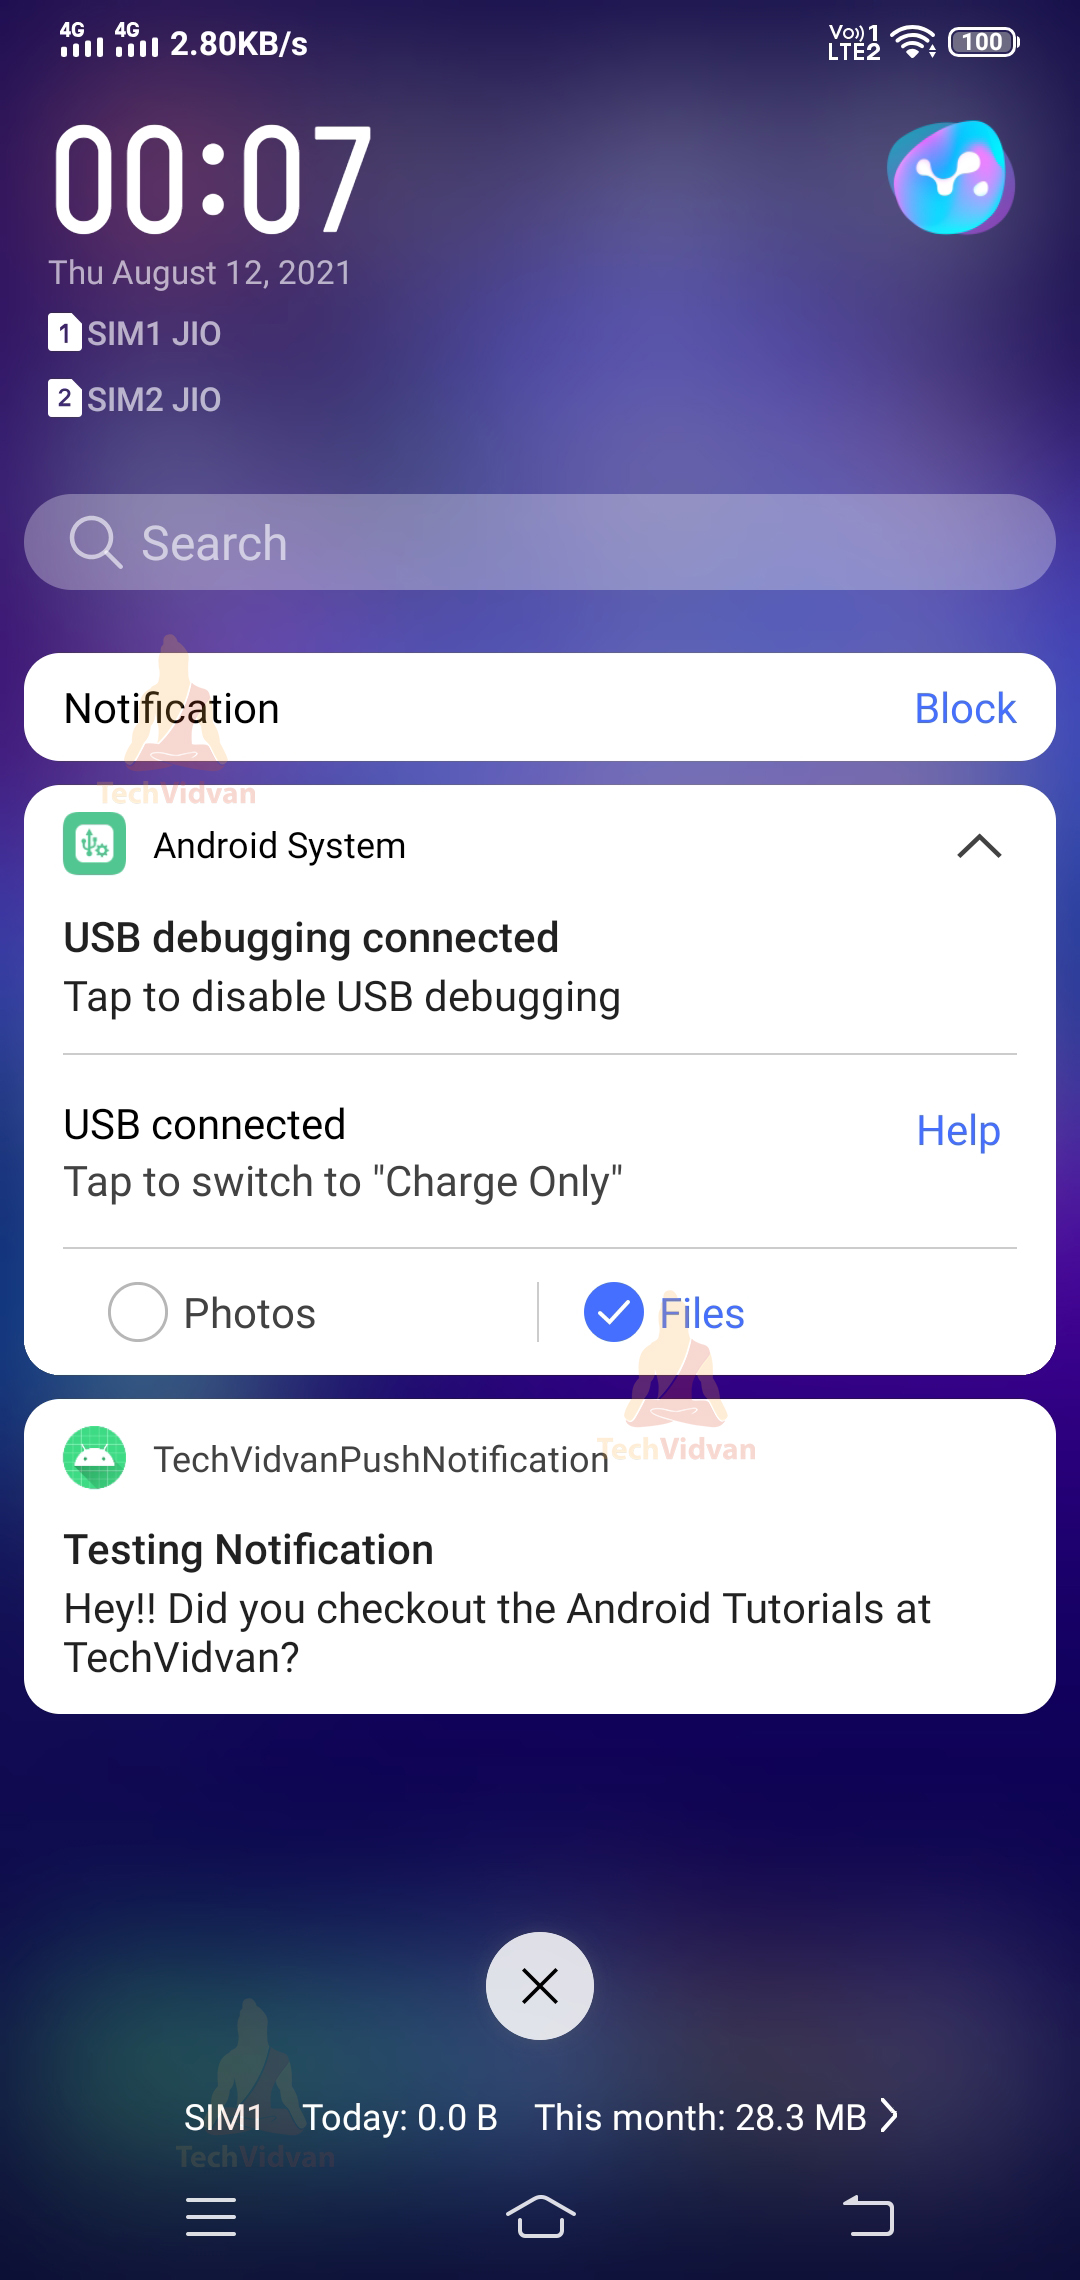
After publishing, go back to your device and emulator, and you can find that the notification is visible on your status bar.
Note: In some cases, you may not get a notification; if that happens, you need to go to Google Cloud Platform and enable the FireBase In-app messaging there, publishing below.
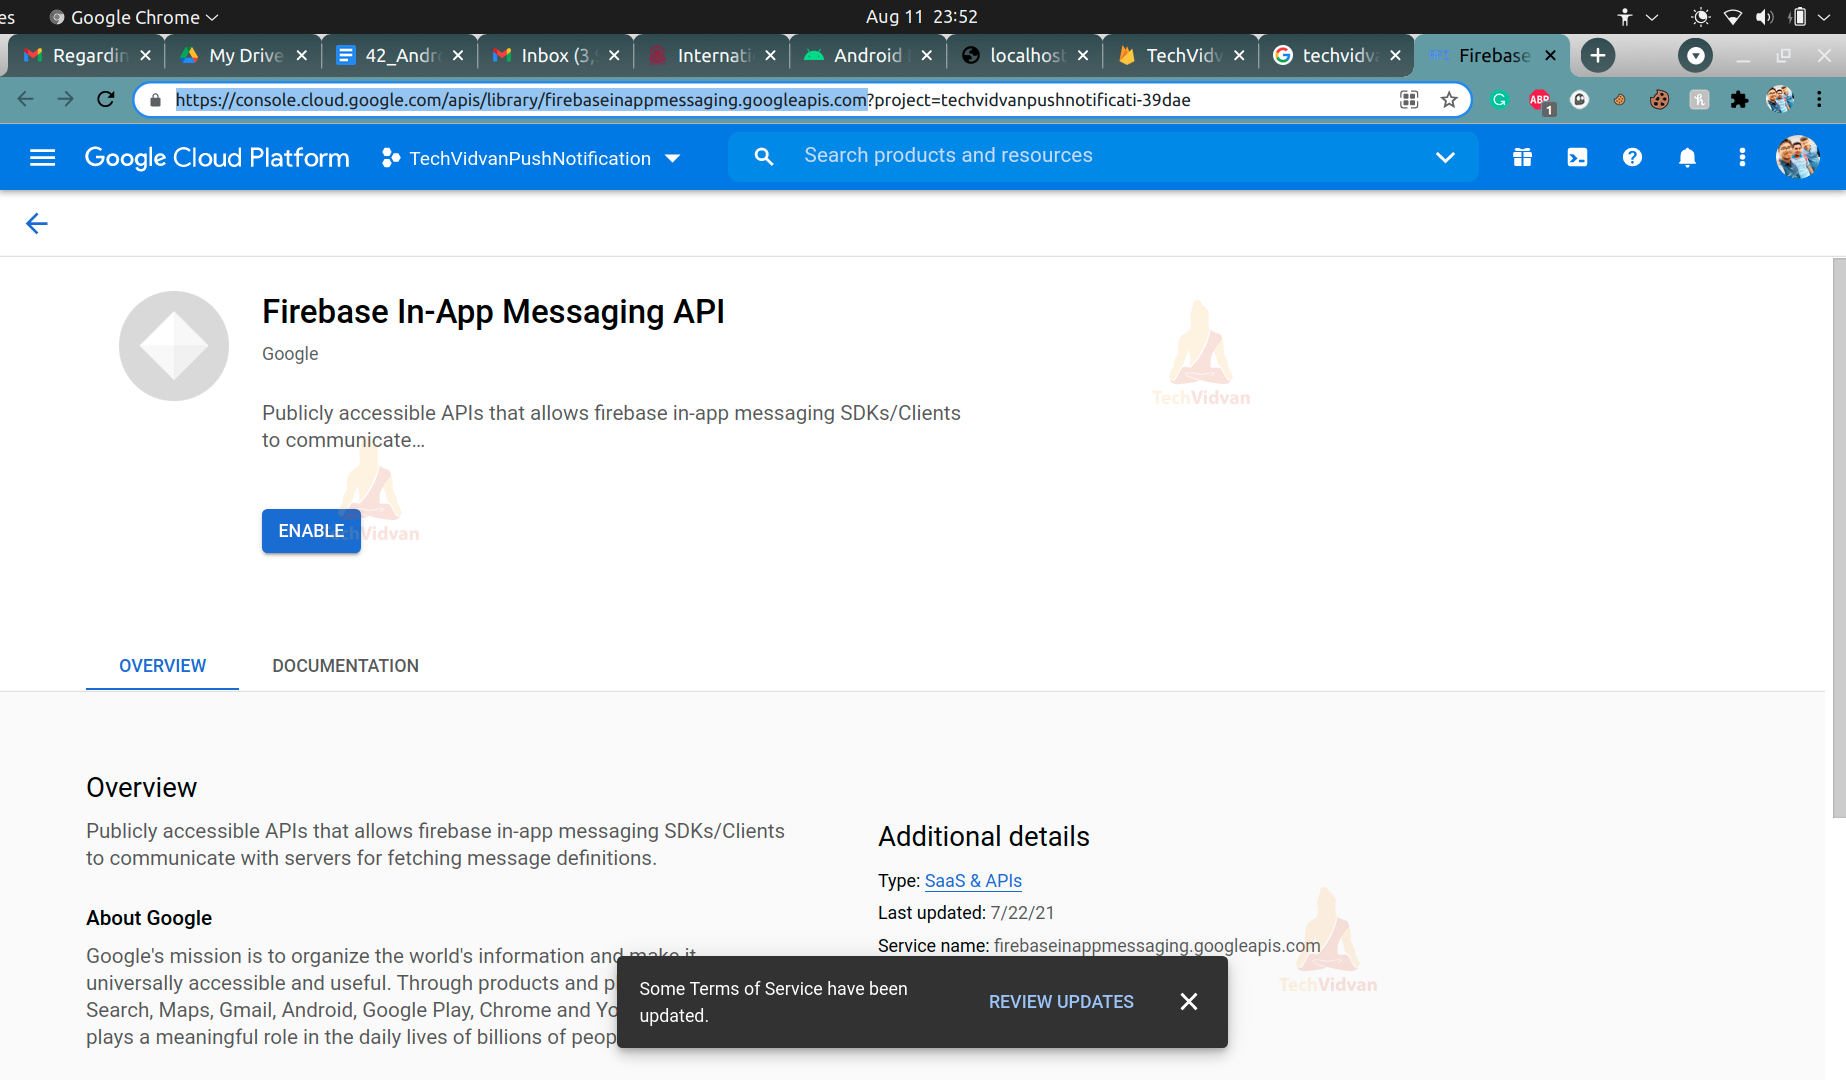
After enabling it, retest your application and notice the output.
Summary
Through this article, you came across Push Notifications which are pretty essential and play an indispensable role in updating your app users. You saw several terminologies involved in Push Notifications and found several methods present in the Notification Manager class. You even saw the history and the uses of the Push Notifications. Finally, you came across the implementation of the Push Notifications and understood how it works.