Android Telephony and Telephony Manager
Did you ever think about how calls, SMS, MMS, etc., work on your device? Did you ever try to know or check your device’s IMEI number? Using Android Telephony and Telephony Manager, you can quickly figure out how these things work. Along with this, it also provides you details of the network type, IMEI, SMS, etc.
So, through this article, we will try to cover Android Telephony in detail and try to understand how you can implement it.
Android Telephony and Telephony Manager
Android Telephony is a package provided by Android to operate and get information about the network interfaces and device details. It has several interfaces and classes that are used to provide various functionalities.
Android Telephony Manager is one such class that is present in the android.telephony package. It provides you with several methods to get the network or telephony information and know its current state. Along with this, you also get the subscriber information using the Telephony Manager methods.
To access the Telephony Manager in your programming, you can simply import the android.telphony.TelephonyManager class.
After that, you need to use the getSystemService() to create the TelephonyManager object, and then you can use it to get system information.
Code:
val telephonyManager = getSystemService(Context.TELEPHONY_SERVICE) as
                TelephonyManager
Typical applications that use Telephony and Telephony Manager are your SIM Toolkit, Dialer, IMEI Checker, Browser, etc.
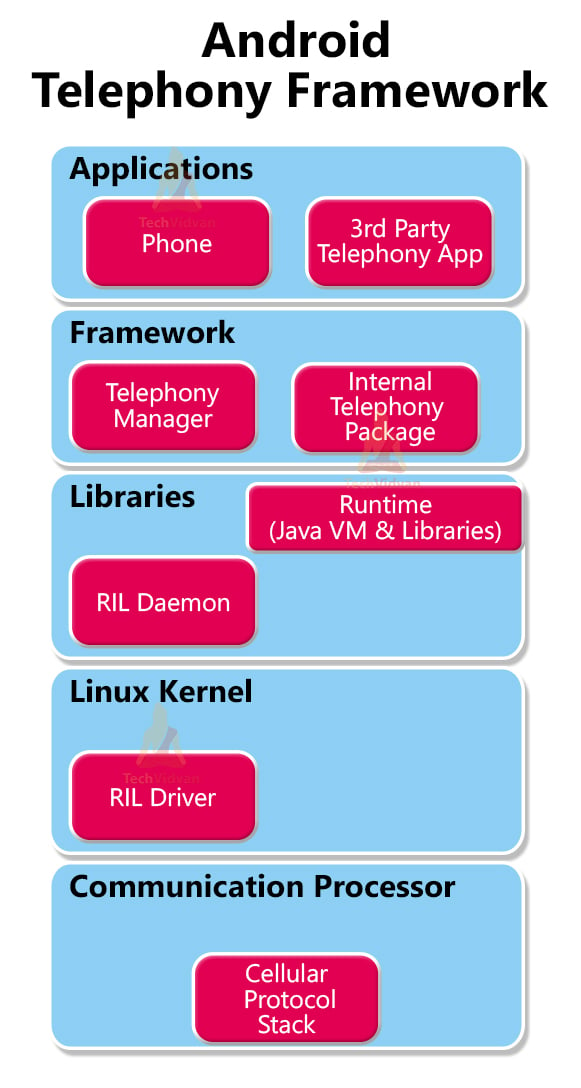
Architecture of Android Telephony
The architecture of Android Telephony is subdivided into four layers. These four layers help it interact with users and low-level devices like your network adapters.
The four layers involved in the Android Telephony are described below:
1. Communication Processor
The communication processor in an Android device is responsible for handling communication tasks and collecting data from various peripherals. It takes inputs from devices such as sensors, GPS modules, and Wi-Fi chips, processes this information, and distributes it across the communication network. This processor ensures seamless connectivity and efficient data transfer between different components, making it crucial for maintaining network performance and reliability.
2. Radio Interface Layer (RIL)
The Radio Interface Layer is an interface through which the hardware components interact with the frameworks. It’s a bridge with protocols for the Telephony services and is therefore known as protocol stack for Telephone. The RIL consist of two components that are as follows:
a. RIL Daemon – The RIL Daemon (rild) is a crucial background process that starts up immediately when your device powers on. It is responsible for initializing the Radio Interface Layer and reading system properties to configure telephony services. The RIL Daemon ensures that the necessary libraries and resources are loaded and ready, allowing the Vendor RIL to function properly and enabling the device to communicate with the network.
b. Vendor RIL – The Vendor RIL is a library specific to each network modem and is tailored to the hardware capabilities and protocols of the device’s modem. This library translates generic telephony requests from the Android telephony framework into specific commands that the modem can understand and execute. The Vendor RIL ensures compatibility and optimal performance between the Android operating system and the network hardware, facilitating tasks like call handling, SMS, and data connectivity.
3. Framework Services
Framework services consist of various packages and assists the Telephony Manager in directing all the application API requests to RIL. The framework services start immediately when the device boots up.
4. Application
Applications are the last layer of the Telephony architecture. The applications are used directly by the user to interact with the Telephony Services. Some of the standard applications are IMEI checker, Dialer, SIM Toolkit, Browser, etc.
Implementation of Android Telephony
Now, let’s see how you can implement the telephony and get information about your device and subscribers. Follow the below steps:
1: Run your Android Studio and create a new project.
2: Select Empty Activity, name your project and choose API level 22 and proceed.
3: After the Gradle build is finished, open your AndroidManifest.xml file and add the permissions below.
<uses-permission android:name="android.permission.READ_PHONE_STATE" />
After adding the above permissions, your AndroidManifest.xml file would appear as follows.
Code: AndroidManifest.xml
<?xml version="1.0" encoding="utf-8"?>
<manifest xmlns:android="http://schemas.android.com/apk/res/android"
    package="com.techvidvan.techvidvanandroidtelephony">

    <uses-permission android:name="android.permission.READ_PHONE_STATE" />

    <application
        android:allowBackup="true"
        android:icon="@mipmap/ic_launcher"
        android:label="@string/app_name"
        android:roundIcon="@mipmap/ic_launcher_round"
        android:supportsRtl="true"
        android:theme="@style/Theme.TechVidvanAndroidTelephony">
        <activity android:name=".MainActivity">
            <intent-filter>
                <action android:name="android.intent.action.MAIN" />

                <category android:name="android.intent.category.LAUNCHER" />
            </intent-filter>
        </activity>
    </application>

</manifest>
4: Now, open your activity_main.xml and paste the below code there.
Code: activity_main.xml
<?xml version="1.0" encoding="utf-8"?>
<LinearLayout xmlns:android="http://schemas.android.com/apk/res/android"
    xmlns:tools="http://schemas.android.com/tools"
    android:layout_width="match_parent"
    android:orientation="vertical"
    android:layout_height="match_parent"
    tools:context=".MainActivity">

    <TextView
        android:id="@+id/title"
        android:layout_width="match_parent"
        android:layout_height="wrap_content"
        android:text="TechVidvan"
        android:textSize="30sp"
        android:textColor="#4CAF50"
        android:gravity="center"
        android:textStyle="bold"
        android:layout_marginTop="20dp"
        android:layout_marginBottom="20dp"/>

    <TextView
        android:id="@+id/telephonyResult"
        android:layout_width="match_parent"
        android:layout_height="wrap_content"
        android:textSize="30sp"
        android:textColor="@color/black"
        android:gravity="center"
        android:layout_marginTop="20dp"
        android:layout_marginBottom="20dp"/>

</LinearLayout>
5: Finally, copy the below code and paste it into your MainActivity.kt file.
Code: MainActivity.kt
package com.techvidvan.techvidvanandroidtelephony
import android.content.Context
import android.os.Bundle
import android.telephony.TelephonyManager
import android.widget.TextView
import androidx.appcompat.app.AppCompatActivity
class MainActivity : AppCompatActivity()
{
//declaring variables
lateinit var telephonyResult:TextView
override fun onCreate(savedInstanceState: Bundle?)
{
super.onCreate(savedInstanceState)
setContentView(R.layout.activity_main)
//binding variables with text view
telephonyResult = findViewById(R.id.telephonyResult)
//creating a Telephony Manager object
val telephonyManager = getSystemService(Context.TELEPHONY_SERVICE) as
TelephonyManager
var result = "";
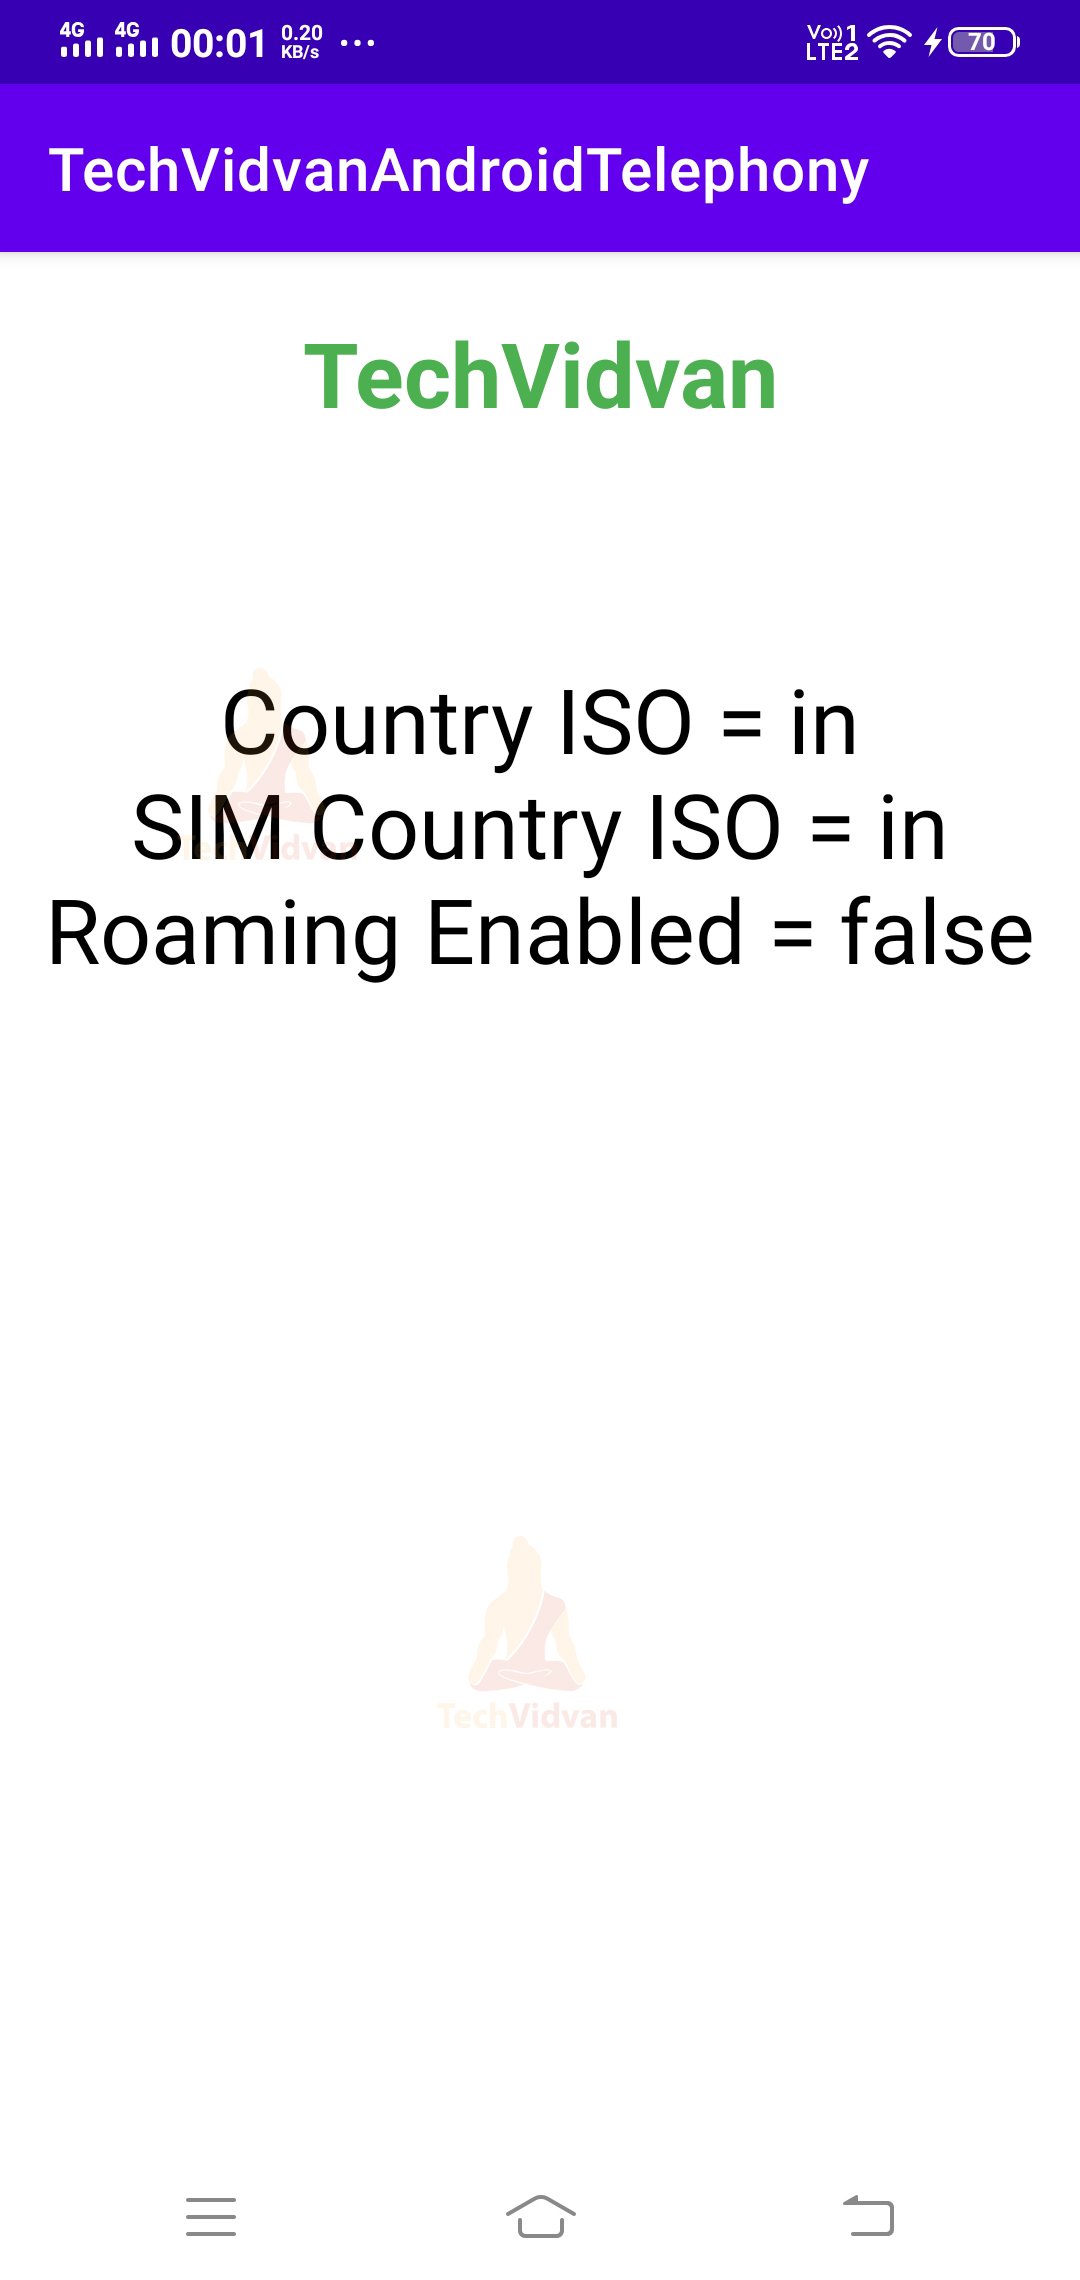
//fetching information of your device using telephony manager
//and storing them in result
result = result + "\nCountry ISO = "+ telephonyManager.networkCountryIso
result = result+ "\nSIM Country ISO = "+ telephonyManager.simCountryIso
result = result+ "\nRoaming Enabled = "+ telephonyManager.isNetworkRoaming
//displaying our results
telephonyResult.text = result
}
}
Now run your application and observe the device details which you receive.
Summary
So, through this article, you came across Android Telephony and Telephony Manager. Using these two, you can quickly get information about your device, network, and subscriber. You came across the architecture and the four layers present in it. Finally, you saw an implementation of the Android Telephony by displaying your device details.