Convolutional Neural Network in Keras
Keras is very famous in the field of Deep Learning. It is an open-source Python library and is very simple. It focuses on the ease of developers. Hence, it is user-friendly. It has a very simple syntax and high readability.
Its main aim is to focus on quick implementation. It enables you to compile your code very fast and also helps you to reduce the lines of code. It provides you many in-build methods, functions, models, layers, etc and focuses on the idea of Models.
Let us learn about Convolutional Neural Network in Keras.
Convolutional Neural Network in Keras
It is a case of the Neural Network. It is most influential in the field of computer vision. CNN’s are achieving very powerful and successful results in the field of image processing, image recognition, and the field of computer vision.
Neurons are the basic units of Convolutional Neural Networks. The neurons have parameters in the form of weights. The most attractive feature of CNN is that they have the capacity to make explicit predictions about the entry.
That the entry is an image. This feature allows you to encode certain properties.
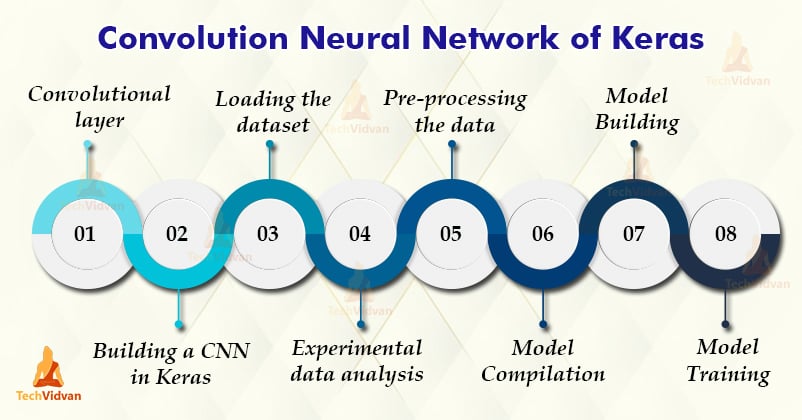
Convolutional Layer
It comprises more than one convolutional layer. These layers are connected the same way as in the Standard Multilayer neural network. In CNN, the layers present between the first input layer and the final output layers are considered to be the Hidden layers.
There can be varying numbers of hidden layers. It depends on the task you are accomplishing. The convolution layer is the very first layer that helps you to extract features from the image as an input.
This layer reserves the relationship between pixels. It does the same by learning image features by enhancing the small squares of input data.
Building a Convolutional Neural Network in Keras
Convolutional Neural Networks become most important when it comes to Deep Learning to classify images. The Python library Keras is the best to deal with CNN. It makes it very easy to build a CNN. Being the fact that, the computer recognizes the image as pixels.
Groups of pixels help to identify a small part of an image. Convolutional Neural Network uses the same concept. It uses the concept of pixels to recognize the image.
As you know, CNN has layers. Among these layers, each layer is learning different levels of abstraction. With the help of a network of many layers, it is possible to identify any complex image.
Further, a convolution multiplies the matrix of the pixel with the ‘kernel’ matrix. And then it sums up the multiplication value. Then, here comes the role of sliders. The convolution slides over the next pixel. Repeat the same process until you cover all the image pixels.
Let us know to identify handwritten digits 0-9 using CNN. For this, we’ll use the MNIST dataset. It contains around 70,000 images of handwritten digits 0-9.
Loading the Dataset
It is the very first step to start our task. Keras library provides the mnist dataset. It is easy to load this dataset in Keras. It provides 60,000 images for training purposes and rests 10,000 images for testing purposes.
First, you need to import mnist dataset.
from keras.datasets import mnist
(x_train, y_train), (x_test, y_test) = mnist.load_data()
Here, the x_train and x_test contains the actual image. y_train and y_test contain the digits that those images represent. The above code helps you to successfully load the dataset.
Experimental Data Analysis
To study further, we need to take an image from our datasets. You need to plot the first image from the dataset. And now check its size. To check its size using the ‘shaping’ function. You do not need to check the size of all the images.
The default size of the image is 28 x 28. It is a very convenient size for CNN to load the image quickly.
import matplotlib.pyplot as plt
plt.imshow(X_train[0])
X_train[0].shape
The last line allows you to check the shape of the image.
Pre-Processing the Data
After the shaping of the data, you need to reshape the data inputs. Here, you need to use ‘one_hot_encode’ to encode the target variable. This will create a column for each output category. Further, a binary variable is put for each column.
X_train = X_train.reshape(60000,28,28,1)
X_test = X_test.reshape(10000,28,28,1)
Code for one_hot_encode:
from keras.utils import to_categorical
y_train = to_categorical(y_train)
y_test = to_categorical(y_test)y_train[0]
Model Building
We will use the sequential model. As it is the easiest method to build a model. To add layers to your model, use add() function. The first 2 layers will be Convolutional 2D layers. These layers will help you to deal with the image input.
The number of nodes in the layers is 64 in the first layer and 32 in the second layer. To set the size of filter matrix convolution use kernel size.
The activation is the activation function of the layer. Rectified Linear Activation function suits best for the neural networks. Specify the input shape to the first layer.
Use a flatten layer between the dense layer and the convolutional 2D layer. This flattens layer connects these two layers. A dense layer is the standard layer for neural networks.
from keras.models import Sequential

from keras.layers import Dense, Conv2D, Flatten

model = Sequential()

model.add(Conv2D(64, kernel_size=3, activation=’relu’, input_shape=(28,28,1)))

model.add(Conv2D(32, kernel_size=3, activation=’relu’))

model.add(Flatten())

model.add(Dense(10, activation=’softmax’))
Model Compilation
You now need to compile your model. There are three methods to compile your model.
- Optimizers: It gives you a list of optimizers’ functions. It contains built-in optimizer classes.
- Losses: It enables you to use built-in losses functions.
- Metrics: It provides you a list of built-in metrics functions. It enables you to use them while dealing with metrics.
model.compile(optimizer=’adam’,loss=’categorical_crossentropy’,metrics=[‘accuracy’])
Model Training
Now, you need to train your model. It is an important step. Use the fit() function to train your model. It has some parameters: training data (train_X), target data (train_y), validation data, and the number of epochs.
model.fit(X_train, y_train, validation_data=(X_test, y_test), epochs=3)
Model Prediction using our Model
To predict our model, we use the predict() method. It helps you to make actual predictions your model made for the data. It produces an array with 10 numbers.
model.predict(X_test[:4])
Conclusion
Keras is an open-source Python library. When you have to deal with deep learning and neural networks CNN is the best. It supports the concept of the pixels. It has a combination of layers.
Convolutional Neural Network in Keras is popular for image processing, image recognition, etc. It is very influential in the field of computer vision.
Due to its popularity in computer vision, it is gaining hype in recent years. CNN comprises more than one convolutional layer. It is very helpful while dealing with computer vision.