Android Studio Tutorial
Through this article, we will cover one of the most popular and trending tools for Android Development, known as Android Studio. You will get every detail about Android Studio and how you can use it for Android Development.
Android Development is one of the fast-growing careers in the IT sector. Most companies and service providers use android apps to target their users. Most of us prefer apps over websites, which is why apps are trending these days. Some of the most trending applications are Zomato, WhatsApp, Facebook, Swiggy, Google Maps, etc.
Let’s start with Android Studio tutorial.
What is Android Studio?
Android Studio is one of the most versatile and trending tools for developing native Android applications. It is an integrated development environment designed over the IntelliJ IDEA Software of JetBrains. Android Studio is quite a heavy IDE and requires a higher system configuration to operate. However, it’s one of the easiest and the best tools to develop android applications.
Earlier, people used to develop android applications using Eclipse, but Eclipse is getting replaced by Android Studio. Android Studio comes up with a very straightforward user interface that is easy to operate on.
Android Studio supports both Java and Kotlin as its development language. Java was earlier known as the official language for android development. However, in 2019, the official language for android development has shifted from Java to Kotlin.
Using Android Studio, you can develop several kinds of apps supported on several versions of android.
Why Android Studio?
Currently, in the market, there are several IDE and frameworks present for Android Development. Some of them are React Native, Flutter, Ionic, etc. There are pros and cons for each of the frameworks and IDE. However, Android Studio has retained its place in the market and is still used by many developers.
The only reason is the simplicity, and the support Android Studio provides. Google backs Android Studio, and we all know the vast community support which Google provides its developers. Using Android Studio, you can accelerate your development process. Android Studio comes up with many inbuilt tools like SDK Manager, Gradle, APK Analyzer, layout Inspector, etc., which makes our task a lot easier.
Android Studio even provides you with an emulator that helps you in testing and executing your applications. In other words, you don’t need separate tools for development, debugging, and testing. You can do it all using Android Studio itself. So, that’s the reason why the android studio is one of the best IDEs for Android Development.
Features of Android Studio
Android Studio brings some exciting features to its developers; let’s see some of them below:
1. This is built over the IntelliJ IDEA of Jet brains, due to which it provides features of code autocomplete and error detection.
2. Android Studio has both layout designing and code editor in the same IDE.
3. It allows you to create beautiful UI by simply using drag and drop features.
4. Android Studio has a build tool known as Gradle that automates the whole application build process.
5. Android Studio IDE is entirely customizable. You can select your desired theme, font, and other styles for your IDE.
6. This has lint tools that fix cache optimization issues, usability, or compatibility issues.
7. Android Studio comes up with a proguard tool that helps us in shrinking and optimizing our source code.
8. Android Studio supports platform tools like ADB and fastboot that allow the developer to interact with the android device.
9. It has some predefined templates which you can use while creating your applications.
10. Android Studio allows easy integration of backend services like Firebase.
11. Android Studio provides you with an exciting user interface that makes the development and debugging processes very easy.
12. It has its emulator known as Android Virtual Device, using which you simulate your android applications.
Installation of Android Studio
Before proceeding further with Android Studio, you need to install it on your system. If you have already installed Android Studio on your system, then move to next, or else see the article covering How to install Android Studio.
Android Studio User Interface
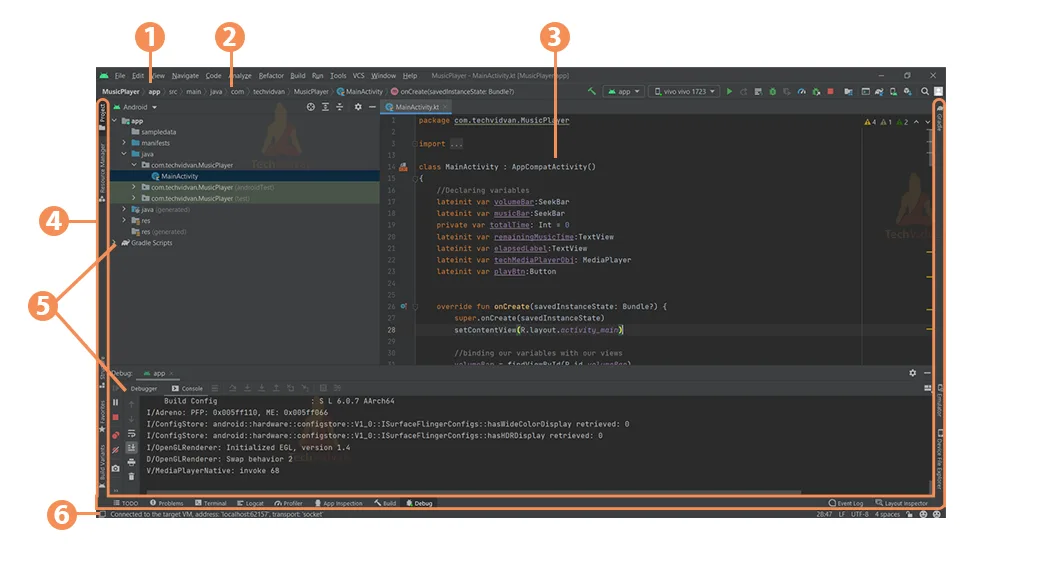
1. Toolbar – The toolbar provides quick access to essential tools and commands needed for managing and running your application. It includes buttons for actions like building, running, and debugging your project, streamlining your development workflow.
2. Navigation Bar – The Navigation Bar shows the path of the current file within your project and helps you navigate through different files and directories. It provides a visual guide to your project’s structure, making it easier to switch between files.
3. Editor Window – The Editor Window is where you write and modify your application’s source code. It offers features like syntax highlighting, code completion, and error checking, which help in efficient coding and maintaining your codebase.
4. Tool Window Bar – The Tool Window Bar allows you to manage the visibility of various tool windows in Android Studio. It helps you open, close, or rearrange these windows to customize your workspace according to your needs.
5. Tool Windows – Tool Windows provide access to various development tools and utilities, such as version control, search, and project management. They can be arranged or hidden based on your workflow preferences.
6. Status Bar – The Status Bar displays real-time updates about the state of Android Studio, including build progress and notifications. It helps you monitor the IDE’s status and stay informed about ongoing processes.
Android Studio Walkthrough
Let’s see the things that Android Studio brings to its developers:
1. Visual Layout Editor:
Android provides a full-featured layout editor for its developers. Using the visual layout editor, you can create complex layouts and can even use drag and drop. With the coming of ConstraintLayout, you can even build some impressive designs by putting constraints on the views.
2. APK Analyzer:
Android Studio provides you an APK Analyzer tool to examine any APK(even those not built on Android Studio). By inspecting the APK, you can understand the contents of the APK and compare two APKs (based on their size and version). It helps to understand the APK and the places where you need to work on the application.
3. Fast Emulator:
Android Studio comes up with a fast and stable emulator. Emulators in Android Studio are known as Android Virtual Devices. They allow you to run your applications hustle-free even if you don’t have an actual physical android device.
4. Intelligent Code Editor:
Android Studio comes with an intelligent code editor that allows you to write clean and concise codes. It supports code autocomplete and syntax checks that make your task pretty easy. You can create and modify codes in a fast and straightforward way using the code editor.
5. Flexible Build System:
Android Studio has its build tool known as Gradle that automates the whole build process of the application. Using Gradle, you can generate several build variants of the same application.
6. Realtime Profilers:
Android Studio has a built-in real-time profiling tool that helps us profile the CPU usage, network usage, memory usage, and application performance. Using this tool, you can understand the applications working and predict the system requirements for your application. Along with this, you can also keep track of the incoming and outgoing network payload.
7. Testing and Debugging Tools:
Android Studio comes in with in-built testing and debugging tools, using which you can debug your code at a faster rate. You can even test the functionality of your UI parts.
8. Proguard Tool:
Android Studio comes up with a proguard tool that has features to make your code concise and optimized before converting it to APK.
9. Available on most platforms:
Android Studio is available for most operating systems like Windows, Linux, or macOS. Installing Android Studio on any platform is relatively easy and takes only around 10-15 mins to install the whole Android Studio.
10. Templates and Sample Apps:
The Android Studio has several inbuilt templates and sample apps to help you get started with Android Development.
Android Studio Keyboard Shortcuts
Android Studio has several keyboard shortcuts using which you can access tools or perform some tasks. Some of the keyboard shortcuts of Android Studio are discussed in the below table.
Shortcut
| Shortcut | Task Performed |
| Ctrl+F | It helps you to find a specific character or set of characters in a given piece of code. |
| Ctrl+R | It helps you to replace a character or string with a desired character or string. |
| Ctrl+N | It helps you in locating a class file in your project. |
| Ctrl+ (+/-) | It helps you in zooming in and out in your code editor. |
| Ctrl+Shift+N | It helps you in locating any type of file within your project. |
| Ctrl+B | It helps you in opening XML files. |
| Ctrl+I | It is used to implement the methods required for that class. |
| Shift+F6 | It helps you in renaming a file or a class within your project. |
| Shift+F10 | It helps you in running your Project. By pressing the shortcut, your project starts running on the selected device. |
| Shift+F9 | It helps you in debugging your project. By pressing this shortcut, the debug tool opens in Android Studio. |
| F5 | It helps you in copying particular sections from your project. |
| F11 | It helps you in making your Android Studio cover the entire screen. |
Creating your first app in Android Studio
So, until now, you understood what Android Studio is and what its features are. Now, you can proceed to create your first app using Android Studio.
To do so, you need to have the above knowledge and some knowledge of programming and XML. For programming, I recommend you to go with Kotlin. In case you are comfortable with Java, then you can even start with Java. So, before proceeding to create your first app in Android Studio, please ensure that you are aware of the following:
- Android Studio Basics
- XML Basics
- Kotlin/Java Basics
- Object-Oriented Programming
After you are ready with the above, then you can proceed with your first app in Android.
Summary
Through this article, you came across Android Studio and its features. You saw why Android Studio is so trending in the field of Android Development. Then you saw the user interface of Android Studio and saw how you could install it on your device. Later on, you saw the Keyboard shortcuts present in Android Studio. Finally, you saw the way to create your first ever Android App.