Python PDF to Image Converter – Transform Your Boring PDFs into Beautiful Images
In this project, we will be creating a PDF to Image Converter using the python library PyMuPDF (fitz). This project will allow users to select a PDF file and convert it into images, with the option to select specific pages to convert. The output images will be saved in a user-specified directory.
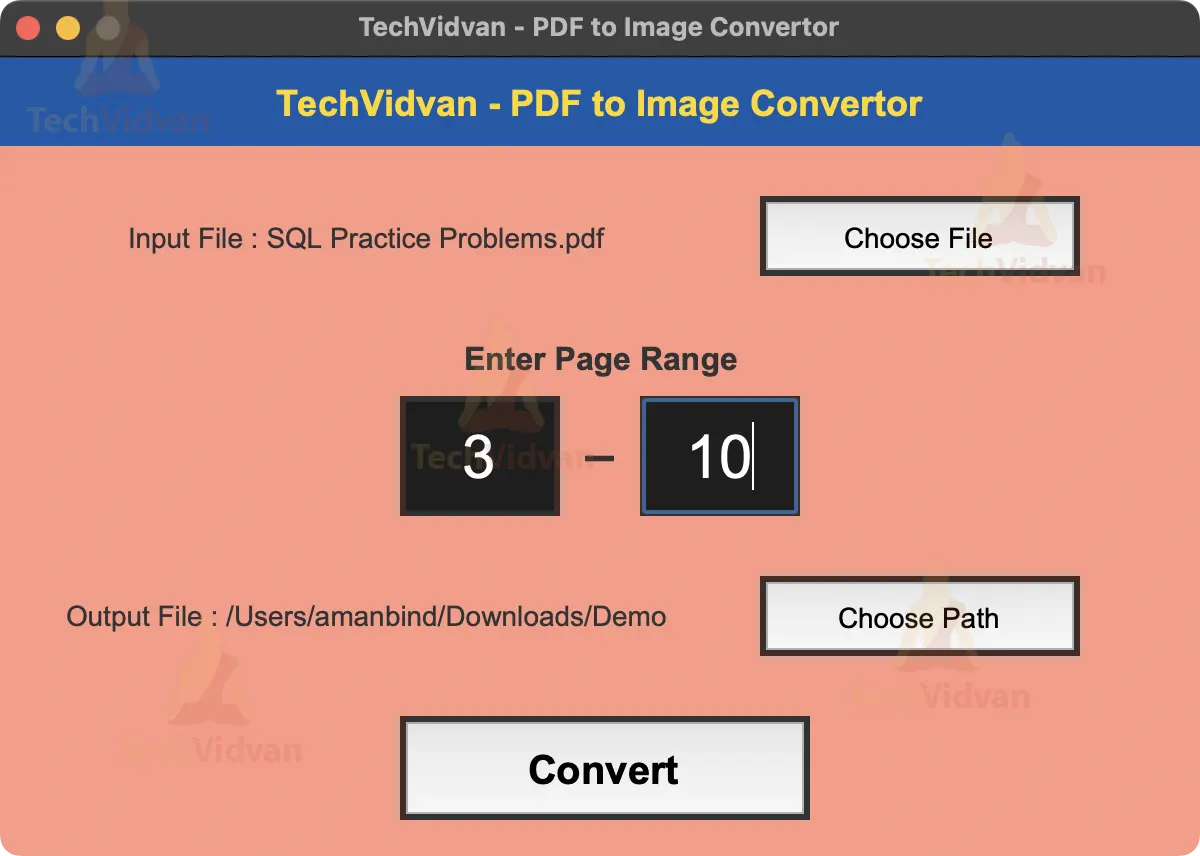
Python PDF to Image Converter
The objective of this project is to guide the readers on how to create a PDF to Image Converter using the PyMuPDF library in Python.
Prerequisites for Python PDF to Image Converter
- Basic knowledge of Python programming.
- Tkinter should be installed on your machine.
- PyMuPDF library (fitz) should be installed on the machine (can be installed by running pip install pymupdf command in terminal).
Download Python PDF to Image Converter Project
Please download the source code of python PDF to Image Converter project from the following link: Python PDF to Image Converter Code
Steps to Create PDF to Image Converter using Python
Following are the steps for developing the PDF to Image Converter python project:
Step 1: Importing Libraries
We begin by importing the necessary libraries for our app. These include Tkinter for creating the UI, filedialog for allowing the user to select a file and a directory, and fitz from PyMuPDF for converting the PDF to images.
# Importing required modules
import tkinter as tk
from tkinter import filedialog
import tkinter.messagebox as msgbox
import fitz
Step 2: Creating the main window
We use Tkinter to create the main window for our app. We start by creating a Tk() instance, which is the main window of our app. We set the title, size, and background color of the window.
# Creating root window
root = tk.Tk()


# Setting window title, size and background color
root.title("TechVidvan - PDF to Image Convertor")
root.geometry("600x400")
root.resizable(width=False, height=False)
root.configure(background="#FF9986")
Step 3: Input File Selection
We create a function called input_file() that allows the user to select the input PDF file. The function uses the filedialog module to open a file explorer where the user can select a file. Once the file is selected, the function updates the input_label text to display the selected file’s name.
# function to open file dialog box to select file
def input_file():
   global input_file_name

   # filetypes parameter is used to limit user to select only pdf files
   input_file_name = filedialog.askopenfilename(initialdir = "/", title = "Select file", filetypes = (("PDF files", "*.pdf"), ("all files", "*.*")))

   # To display only file name in label
   input_label.configure(text="Input File : " + input_file_name.split("/")[-1])
Step 4: Output File Selection
We create a function called output_file() that allows the user to select the output directory where the converted images will be saved. The function uses the filedialog module to open a file explorer where the user can select a directory. Once the directory is selected, the function updates the output_label text to display the selected directory’s name.
# function to open file dialog box to select path to save file
def output_file():
   global output_file_name


   # Ask user to select a directory and store it in global var
   output_file_name = filedialog.askdirectory()


   # To display only file name in label
   output_label.configure(text="Output File : " + output_file_name)
Step 5: PDF to Image Conversion
We create a function called convert_pdf_to_images() that converts the selected PDF file to images. The function first checks if the input and output file paths have been provided. If not, a message box is displayed to prompt the user to provide the file paths.
# function to convert pdf to images
def convert_pdf_to_images():


   # Get input and output file path
   pdf_file = input_file_name
   save_path = output_file_name


   # Check if file path is not empty
   if pdf_file == "" or save_path == "":
       msgbox.showinfo("File Path not Provided", "Please Provide File Path")
       return


   # Get page range from entry box
   start_page = int(start_range.get())
   end_page = int(stop_range.get())


   # Open pdf file using fitz to get page count
   doc = fitz.open(pdf_file)


   # Iterate over the range of pages
   for page_number in range(start_page, end_page + 1):
       page = doc[page_number - 1]
       zoom = 2
       trans = fitz.Matrix(zoom, zoom)


       # Get page pixmap and save it as image
       pm = page.get_pixmap(matrix=trans, alpha=False)
       pm.save(f"{save_path}/page_{page_number}.png")


   # Show success message after conversion
   msgbox.showinfo("Success", "PDF is successfully converted to Image")
Step 6: Creating the UI
We create the UI for our app using Tkinter. We create a label for the title, input file, page range, and output file. We also create a button for selecting the input file, page range, output file, and converting the PDF to images.
# Creating title label
title_label=tk.Label(root)
title_label.configure(background="#095aaa",foreground="#ffd700",font="Arial 18 bold",justify="center",text="TechVidvan - PDF to Image Convertor")
title_label.place(x=0,y=0,width=600,height=45)


# Creating input file label and button
input_label=tk.Label(root)
input_label.configure(background="#FF9986",foreground="#333333",font="Arial 14",justify="center",text="Input File : ")
input_label.place(x=20,y=70,width=328,height=40)


input_button=tk.Button(root)
input_button.configure(font="Arial 14",justify="center",text="Choose File", command=input_file)
input_button.place(x=380,y=70,width=160,height=40)


# Creating page range label and entry box
range_label=tk.Label(root)
range_label.configure(background="#FF9986",foreground="#333333",font="Arial 16 bold",justify="center",text="Enter Page Range")
range_label.place(x=230,y=130,width=140,height=41)


start_range=tk.Entry(root)
start_range.configure(font="Arial 30",justify="center", background="#1E1E1E", foreground="white")
start_range.place(x=200,y=170,width=80,height=60)


stop_range=tk.Entry(root)
stop_range.configure(font="Arial 30",justify="center", background="#1E1E1E", foreground="white")
stop_range.place(x=320,y=170,width=80,height=60)


range_label2=tk.Label(root)
range_label2.configure(background="#FF9986",foreground="#333333",font="Arial 30",justify="center",text="−")
range_label2.place(x=280,y=170,width=40,height=60)


# Creating output file label and button
output_label=tk.Label(root)
output_label.configure(background="#FF9986",foreground="#333333",font="Arial 14",justify="center",text="Output File : ")
output_label.place(x=20,y=260,width=328,height=38)


output_button=tk.Button(root)
output_button.configure(font="Arial 14",justify="center",text="Choose Path", command=output_file)
output_button.place(x=380,y=260,width=160,height=40)


# Creating convert button to convert pdf to images
convert_button=tk.Button(root)
convert_button.configure(font="Arial 20 bold",justify="center",text="Convert", command=convert_pdf_to_images)
convert_button.place(x=200,y=330,width=205,height=52)
Step 7: Running the main window
We run the main window using the mainloop() method.
# Running root window
root.mainloop()
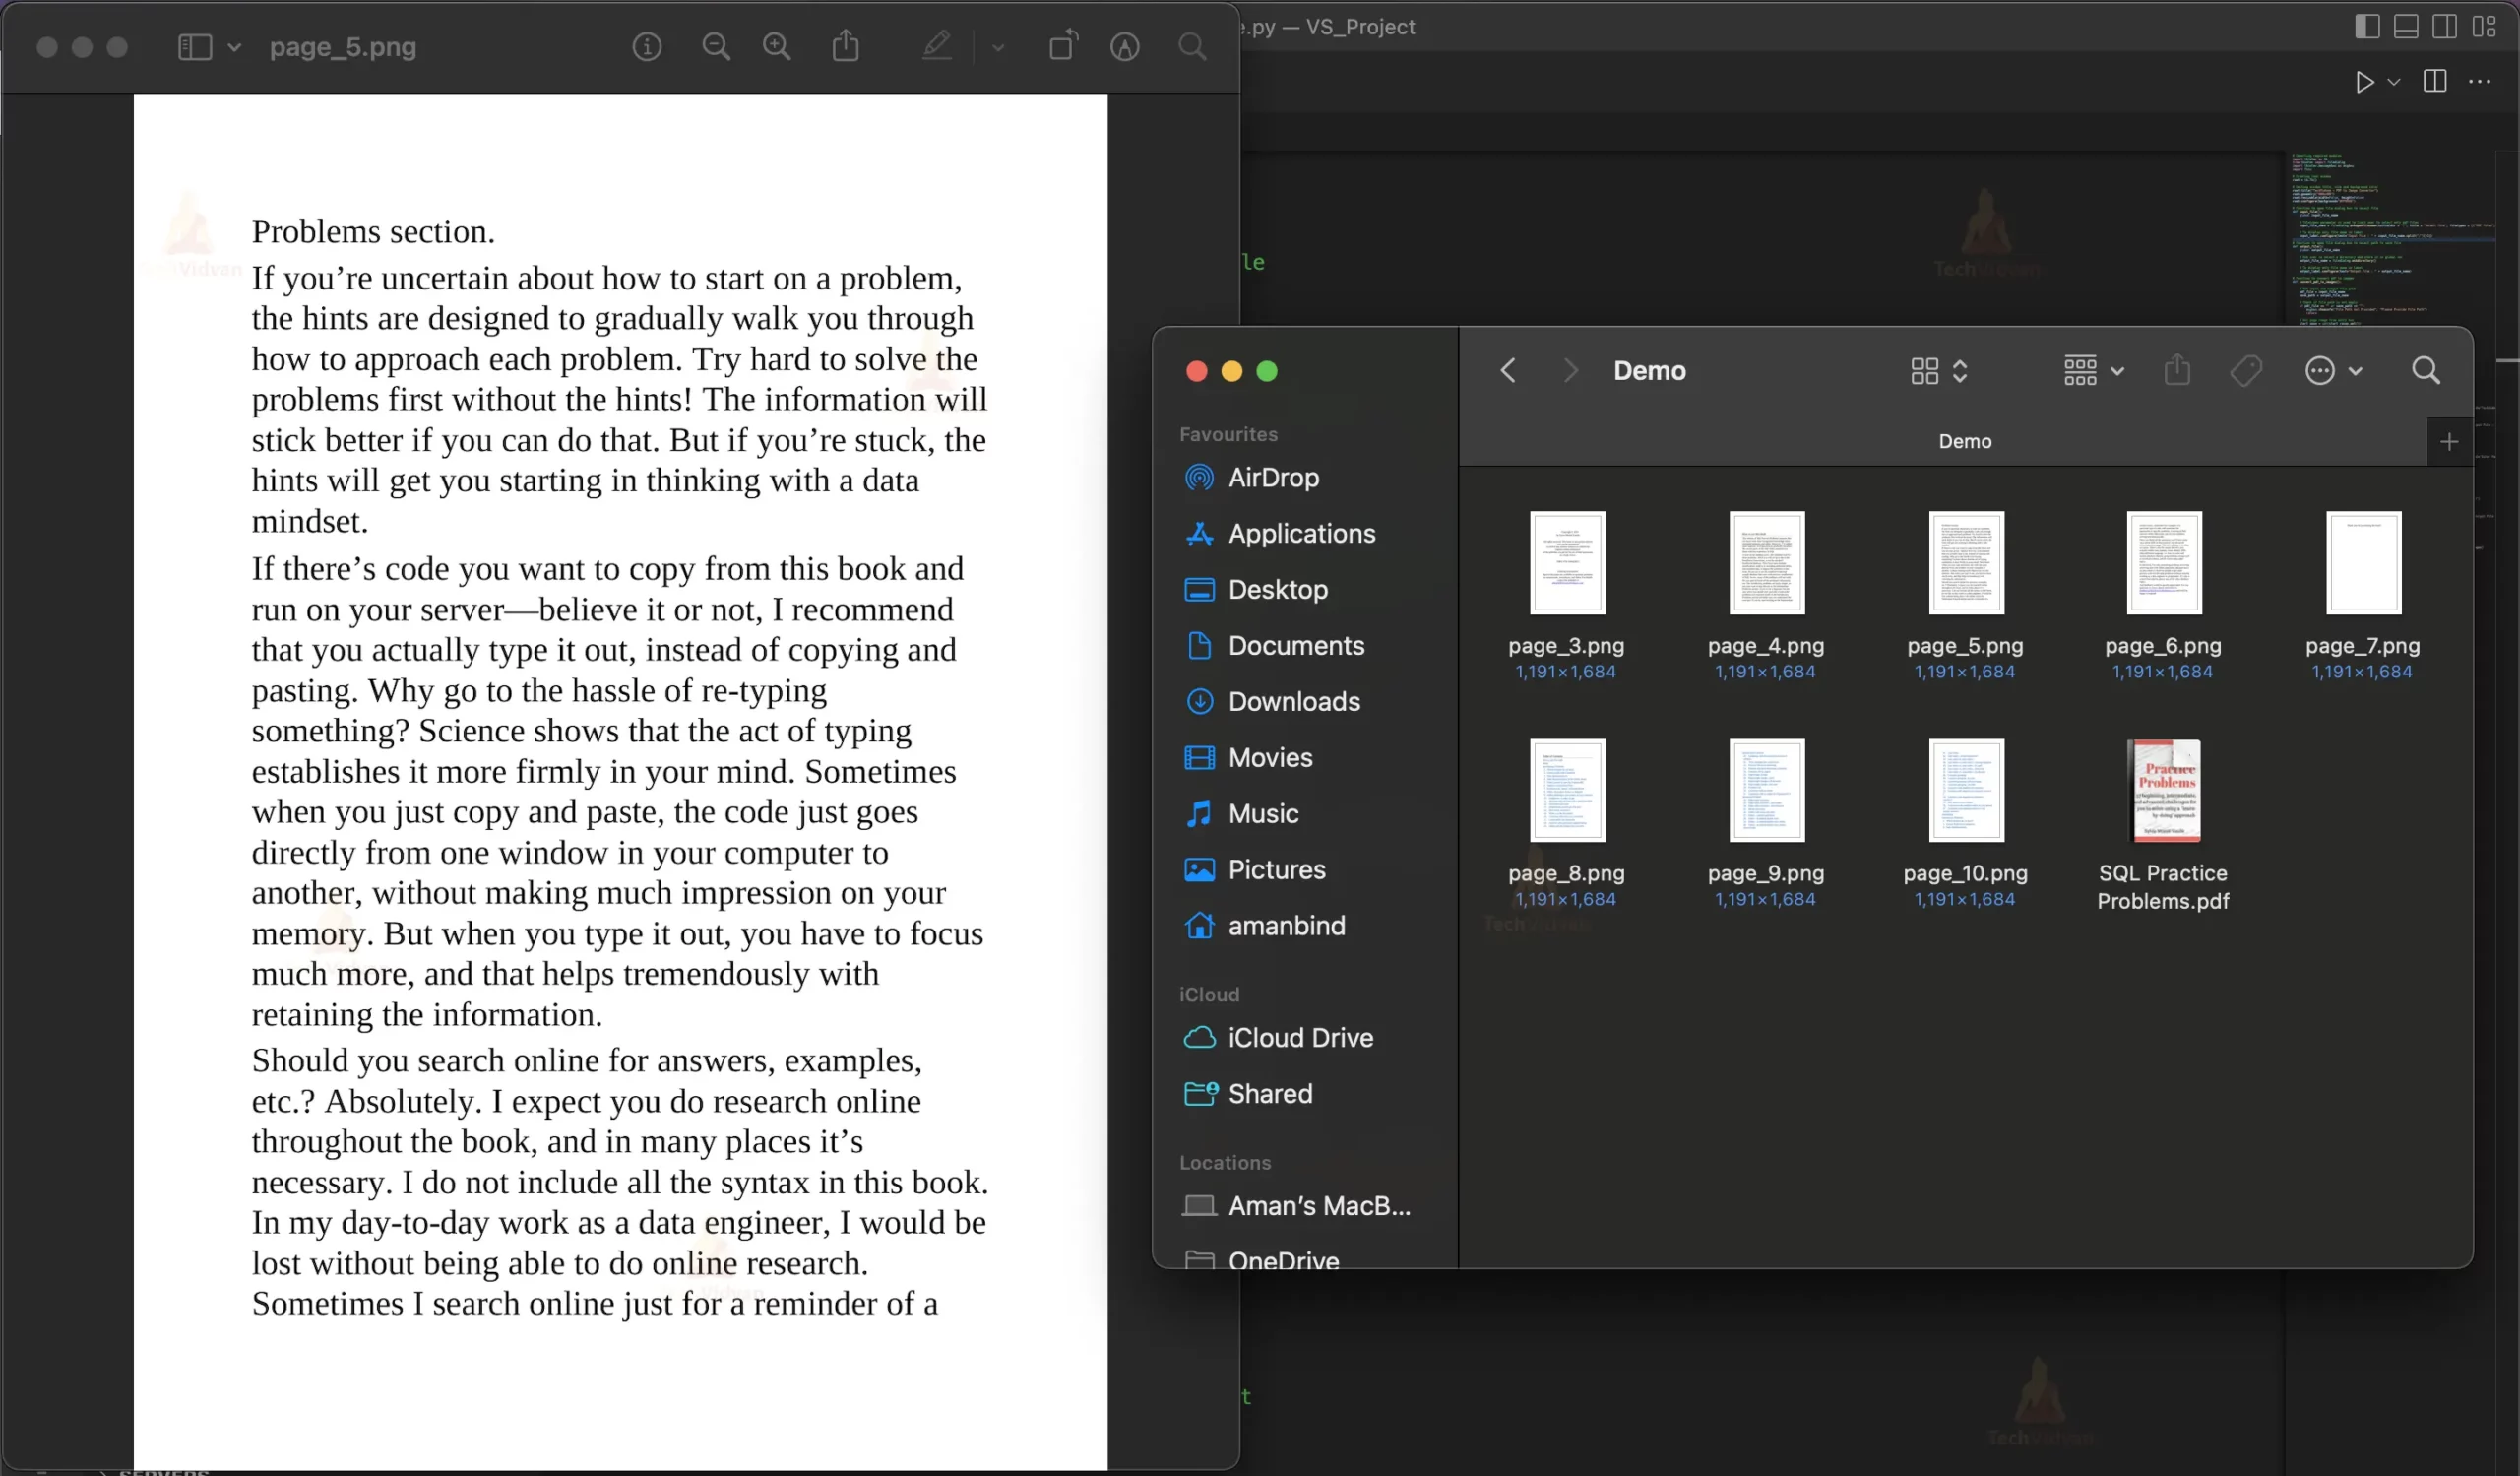
Python PDF to Image Converter Output
Summary
Congratulations, you have completed the process of converting a PDF document to an image using python PDF to Image Converter.
You have learned how to use the Python library Pillow to open and manipulate image files, as well as how to use the PyMuPDF library to open and extract pages from a PDF document.
Now you can use this knowledge to automate the process of converting multiple PDFs to images or to add image manipulation functionality to your own Python projects.