How to Create a Web Browser with Python and PyQT
Enough of browsing, let’s create a browser with python
In today’s world, almost everyone is using the internet. To access the world wide web we need a browser.
In this article, we will be creating a simple web browser with python and PyQT5.
PyQT is a widely used module which is used to make GUI applications with much ease. We can develop many complex GUI applications using PyQT very easily. It has a modern look and light user interface. Even if you are not familiar with this module, you will be able to create a web browser as each and every line is explained in the code itself using comments.
We often confused between the terms web browser and search engine, so let’s quickly have a look at these two terms.
Search Engine: It is used to search the required information from the World Wide Web using a web browser. It actually allows us to search the internet.
Web Browser: It is used to access the World Wide Web / Internet.
Now, you might have a clear picture of the mentioned terms. We can use any search engine, so we will be using Google search engine in our project.
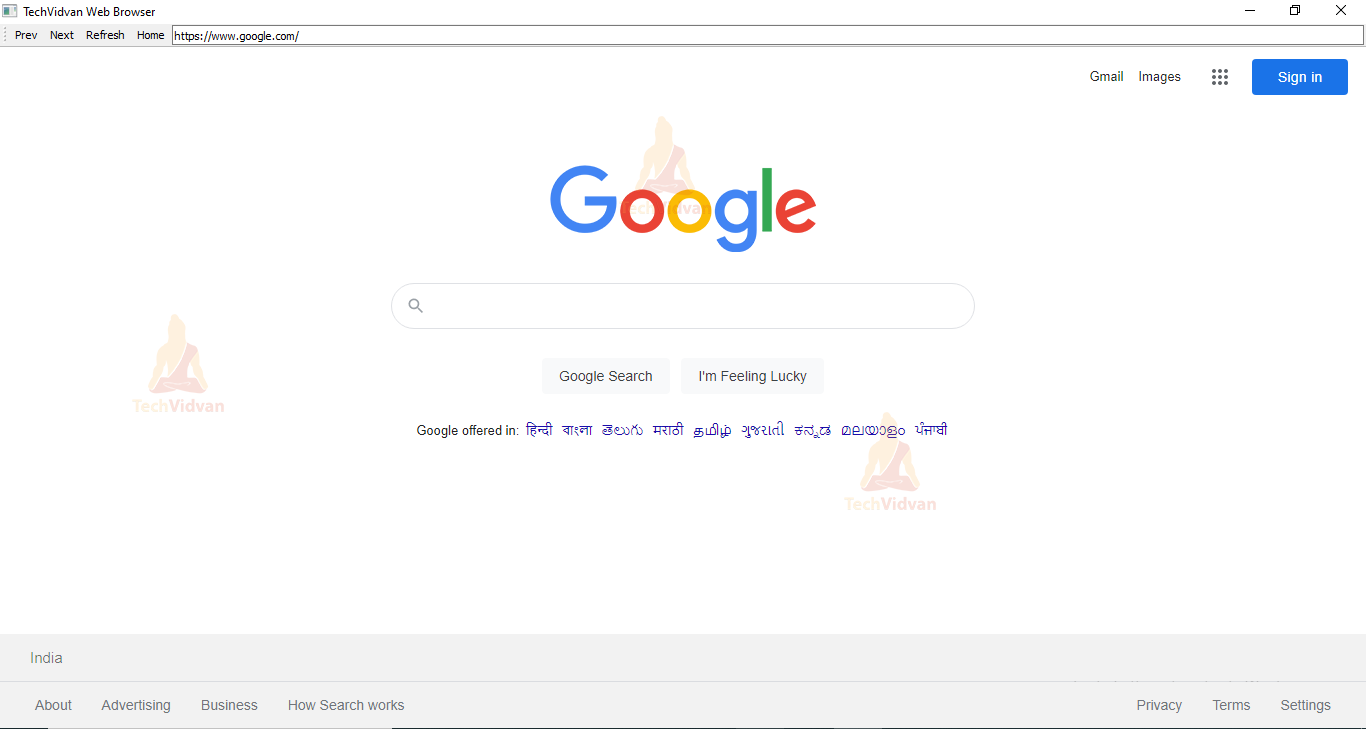
Create a Web Browser in Python
Our python web browser will have the following features:
- A Previous Button: to navigate to the previously visited site.
- A Next Button: to navigate to the next visited site.
- A Refresh Button: to reload the current site.
- A Search Bar: to load the entered url.
- A home button: to navigate back to home.
Prerequisites to create a web browser
To install the required libraries, please use pip installer from the cmd prompt/Terminal:
To install pyQT5:
pip install PyQt5
To install pyQtWebEngine
pip install PyQtWebEngine
Download python web browser code
Please download the source code of web browser python project: Web Browser Python Code
Create Web Browser Python File
main.py
import sys

#importing Widgtes
from PyQt5.QtWidgets import *

#importing Engine Widgets
from PyQt5.QtWebEngineWidgets import *

#importing QtCore to use Qurl
from PyQt5.QtCore import *

#main window class (to create a window)-sub class of QMainWindow class
class Window(QMainWindow):

    #defining constructor function
    def __init__(self):
        #creating connnection with parent class constructor
        super(Window,self).__init__()

        #---------------------adding browser-------------------
        self.browser = QWebEngineView()

        #setting url for browser, you can use any other url also
        self.browser.setUrl(QUrl('http://google.com'))

        #to display google search engine on our browser
        self.setCentralWidget(self.browser)

        #-------------------full screen mode------------------
        #to display browser in full screen mode, you may comment below line if you don't want to open your browser in full screen mode
        self.showMaximized()

        #----------------------navbar-------------------------
        #creating a navigation bar for the browser
        navbar = QToolBar()
        #adding created navbar
        self.addToolBar(navbar)

        #-----------------prev Button-----------------
        #creating prev button
        prevBtn = QAction('Prev',self)
        #when triggered set connection
        prevBtn.triggered.connect(self.browser.back)
        # adding prev button to the navbar
        navbar.addAction(prevBtn)

        #-----------------next Button---------------
        nextBtn = QAction('Next',self)
        nextBtn.triggered.connect(self.browser.forward)
        navbar.addAction(nextBtn)

        #-----------refresh Button--------------------
        refreshBtn = QAction('Refresh',self)
        refreshBtn.triggered.connect(self.browser.reload)
        navbar.addAction(refreshBtn)

        #-----------home button----------------------
        homeBtn = QAction('Home',self)
        #when triggered call home method
        homeBtn.triggered.connect(self.home)
        navbar.addAction(homeBtn)

        #---------------------search bar---------------------------------
        #to maintain a single line
        self.searchBar = QLineEdit()
        #when someone presses return(enter) call loadUrl method
        self.searchBar.returnPressed.connect(self.loadUrl)
        #adding created seach bar to navbar
        navbar.addWidget(self.searchBar)

        #if url in the searchBar is changed then call updateUrl method
        self.browser.urlChanged.connect(self.updateUrl)

    #method to navigate back to home page
    def home(self):
        self.browser.setUrl(QUrl('http://google.com'))

    #method to load the required url
    def loadUrl(self):
        #fetching entered url from searchBar
        url = self.searchBar.text()
        #loading url
        self.browser.setUrl(QUrl(url))

    #method to update the url
    def updateUrl(self, url):
        #changing the content(text) of searchBar
        self.searchBar.setText(url.toString())


MyApp = QApplication(sys.argv)

#setting application name
QApplication.setApplicationName('TechVidvan Web Browser')

#creating window
window = Window()

#executing created app
MyApp.exec_()
Python Web Browser Output

Summary
We have successfully created a web browser using python and pyqt5. Now you are familiar with another python’s GUI module (apart from tkinter).
We have explained the code using the comments in the code itself but still if you have any doubts. You may ask in the comment section.
Happy Coding !!!