Learn How to Create 2048 Game in Python
2048 is a popular simple mathematical sliding puzzle game played by a single player. 2048 is a very addictive game and the main thing which is performed in this 2048 game is addition and combining the tiles. So let’s build this 2048 game using python and Tkinter.
What is the 2048 Game?
In this game, players have to swipe the numbered tiles using arrow keys of the keyboard and create a tile with number 2048 by combining the tiles. And by combining scores get increases. Once every tile on board gets occupied you will lose.
Python 2048 game Project Details
The main aim of this project is to build a 2048 game using python in GUI. This is a simple 2048 game in python programming. Here we use the tkinter python library for creating a graphical user interface that is a GUI and also we have to import random python module.
Here we’ve tried our best to make the same color code as the original 2048 game contains. In this game we have to combine numbered tile to make high numbered tile. The goal of the 2048 game is to get 2048 in one of the cells.
This game includes a single player. The game starts with only two tiles and the lowest number tile is two, then player have to combine the titles and make a high numbers tile. Once you got 2048 in any row you won the game and the player lost the game which means that every tile on the board is occupied and there are no possible moves left. So the game is over.
Project Prerequisite
This project requires good knowledge of python and the Tkinter library. Tkinter is the python binding to the Tk toolkit which is used across many programming languages for building Graphical user interface which is GUI.
Download 2048 Python Code
Please download the source code of Python 2048 game from the following link: Python 2048 Game Project
Steps to Build Python Project on 2048 Game
Below are the steps to develop python 2048 game from scratch:
- Import module
- Creating Game class
- Making Color Coding
- Create a function To make GUI
- Creating Score header
- Create a function to start game
- Make matrix manipulation functions
- Create a function to randomly add new tile
- Create a function to update GUI
- Create a function for pressing arrow buttons for playing game
- Create a function to check if any moves are possible
- Function to check if game is over
Step 1- Importing Modules random and tkinter
#2048 python code - import modules
import tkinter as tk
import random
Code Explanation-
- Tkinter module – Tkinter is the standard interface in python for creating a GUI that is Graphical User Interface.
- Random module – Random module is an in-built module of Python which is used to generate random words from list[].
Step 2- Creating Game class
class Game(tk.Frame):
    def __init__(self):
        tk.Frame.__init__(self)
        self.grid()
        self.master.title("2048 by TechVidvan")

        self.grid_main = tk.Frame(
            self, bg=Game.Color_grid, bd=3, width=600, height=600
        )
        self.grid_main.grid(pady=(110,0))

        self.GUI_maker()
        self.start_game()

        self.master.bind("<Left>", self.left)
        self.master.bind("<Right>", self.right)
        self.master.bind("<Up>", self.up)
        self.master.bind("<Down>", self.down)

        self.mainloop()
Code Explanation-
- Game() – Game class will inherit from the Tkinter Frame widget. This function manages the GUI and the entire 2048 game will run using the Game function.
- def __init__() – This is the constructor on self.
- tk.frame – This is a frame constructor to construct a game as a frame widget.
- self.grid() – Here we have a call grid to allow us to create our game grid.
- self.master.title – For setting the title of the game window.
- self.main_grid – Parent of this function is self and here we are setting background color to grid color, border of 3 pixels and make both width and height 600.
- self.main_grid.grid(pady())) – Here we are calling grid on main_grid, giving padding at the top for the score header.
- self.GUI_maker() – Calling GUI_maker function in the constructor.
- self.start_game() – Calling start_game function in the constructor.
- self.master.bind(“<Left>”, self.left) – Calling left arrow function.
- self.master.bind(“<Right>”, self.right) – Calling Right arrow function.
- self.master.bind(“<Up>”, self.up) – Calling Up arrow function.
- self.master.bind(“<Down>”, self.down) – Calling Down arrow function.
- self.mainloop() – Calling main loop.
Step 3- Making Color Coding
#TechVidvan- Making Color Coding

    Color_grid = "#b8afa9"
    Color_EmptyCell = "#ffd5b5"
    Font_ScoreLabel = ("Verdana", 24)
    Font_Score = ("Helvetica", 48, "bold")
    Font_GameOver = ("Helvetica", 48, "bold")
    Font_Color_GameOver = "#ffffff"
    Winner_BG = "#ffcc00"
    Loser_BG = "#a39489"

    Color_Cells = {
        2: "#fcefe6",
        4: "#f2e8cb",
        8: "#f5b682",
        16: "#f29446",
        32: "#ff775c",
        64: "#e64c2e",
        128: "#ede291",
        256: "#fce130",
        512: "#ffdb4a",
        1024: "#f0b922",
        2048: "#fad74d"
    }

    Color_CellNumber = {
        2: "#695c57",
        4: "#695c57",
        8: "#ffffff",
        16: "#ffffff",
        32: "#ffffff",
        64: "#ffffff",
        128: "#ffffff",
        256: "#ffffff",
        512: "#ffffff",
        12048: "#ffffff"
    }

    Fonts_CellNumebr = {
        2: ("Helvetica", 55, "bold"),
        4: ("Helvetica", 55, "bold"),
        8: ("Helvetica", 55, "bold"),
        16: ("Helvetica", 50, "bold"),
        32: ("Helvetica", 50, "bold"),
        64: ("Helvetica", 50, "bold"),
        128: ("Helvetica", 45, "bold"),
        256: ("Helvetica", 45, "bold"),
        512: ("Helvetica", 45, "bold"),
        1024: ("Helvetica", 40, "bold"),
        2048: ("Helvetica", 40, "bold"),
    }
Code Explanation-
- This is color coding for holding the game’s color palette and font selection. We did our best to match each color and the font of the original 2048 game.
- Here we create color and font coding of each cell of the grid.
Step 4- Create a function To make GUI
#TechVidvan- Create a function To make GUI

    def GUI_maker(self):
        #make grid
        self.cells = []
        for i in range(4):
            row = []
            for j in range(4):
                frame_cells = tk.Frame(
                    self.grid_main,
                    bg=Game.Color_EmptyCell,
                    width=150,
                    height=150
                )
                frame_cells.grid(row=i, column=j, padx=5, pady=5)
                cell_number = tk.Label(self.grid_main, bg=Game.Color_EmptyCell)
                cell_data = {"frame":frame_cells, "number": cell_number}

                cell_number.grid(row=i, column=j)
                row.append(cell_data)
            self.cells.append(row)
Code Explanation-
- GUI_maker() – Function to make a GUI.
- self.cell[] – This is a 2D list holding the information contained in each cell of the grid.
- Make a nested for loop to append cells row by row.
- Frame_cells() – Each cell will create a self frame which will inherit from the main grid and we will set bg color as an empty cell color and width of 150 and height of 150.
- cells_frame.grid – We will call a grid on each cell frame with row is i and column is j and adding five pixels of padding.
- cell_number – Tkinter label widget which we have used to display the number value of the cell. We will pass the main grid to this and set the bg to empty cell color.
- cell_number.grid() – Call each of these cell display and again call the grid with rows i and column as j.
- cell_data – Create a dictionary called cell data to store data for these widgets making cell frame the value to the key frame and cell number the value to the key number.
- .append() – Appending the cell data.
Step 5- Creating Score header
#TechVidvan - Creating Score header

        frame_score = tk.Frame(self)
        frame_score.place(relx=0.5, y=60, anchor="center")
        tk.Label(
            frame_score,
            text="Score",
            font=Game.Font_ScoreLabel
        ).grid(row=0)
        self.label_score = tk.Label(frame_score, text="0", font= Game.Font_Score)
        self.label_score.grid(row=1)
Code Explanation-
- frame_score – Another frame variable called score frame.
- frame_score.place – Here we will position this at the center top of the window by calling place with a relx is 0.5 and y is 45 for top padding and anchor as center to justify it in the center.
- tk.label – We add a label that says score with our defined font.
- .grid(row=0) – We have also called grid row equals to one on this label to position at the top.
- .label_score – For displaying the actual score and setting the text initially to zero and setting the font to score font.
- .label_score.grid – Here we call grid row equals one, to place this right below the score label.
Step 6- Create a function to start game
#TechVidvan- Create a function to start game

    def start_game(self):
        #create matrix of zeros
        self.matrix = [[0] * 4 for _ in range(4)]

        #fill 2 random cells with 2s
        row = random.randint(0,3)
        col = random.randint(0,3)
        self.matrix[row][col] = 2
        self.cells[row][col]["frame"].configure(bg=Game.Color_Cells[2])
        self.cells[row][col]["number"].configure(
            bg=Game.Color_Cells[2],
            fg=Game.Color_CellNumber[2],
            font=Game.Fonts_CellNumber[2],
            text="2"
        )
        while(self.matrix[row][col] != 0):
            row = random.randint(0,3)
            col = random.randint(0,3)
        self.matrix[row][col] = 2
        self.cells[row][col]["frame"].configure(bg=Game.Color_Cells[2])
        self.cells[row][col]["number"].configure(
            bg=Game.Color_Cells[2],
            fg=Game.Color_CellNumber[2],
            font=Game.Fonts_CellNumber[2],
            text="2"
        )

        self.score = 0
Code Explanation-
- def start_game() – This is the function to start a game. This will create the 4 by 4 matrix or a 2D list and will hold all the values shown on the board. At each turn we first initialize the matrix with all zeros.
- Random.randint – It returns an integer number of rows and columns from 0 to 3.
- self.matrix[row][col] = 2 – We have to display these two on the GUI by editing both the cell frame and the cell number. We have already stored this information in the dictionary. And then call configure to set its background color to our specific cell color for two.
- Now we will index into number and configure the background color, font color and text is 2.
- We will do it the same way for one more time, ensuring we choose a different cell of python 2048 game.
- self.score – Use to keep track of the players score over the course of the game. We set this to zero; this will be the initial state of python 2048 game.
Step 7- Make matrix manipulation functions
#TechVidvan- Make Matrix manipulation functions

    def stack(self):
        Matrix_1 = [[0] * 4 for _ in range(4)]
        for i in range(4):
            position_fill = 0
            for j in range(4):
                if self.matrix[i][j] != 0:
                    Matrix_1[i][position_fill] = self.matrix[i][j]
                    position_fill += 1
        self.matrix = Matrix_1

    def combine(self):
        for i in range(4):
            for j in range(3):
                if self.matrix[i][j] != 0 and self.matrix[i][j] == self .matrix[i][j + 1]:
                    self.matrix[i][j] *= 2
                    self.matrix[i][j + 1] = 0
                    self.score += self.matrix[i][j]

    def reverse(self):
        Matrix_1 = []
        for i in range(4):
            Matrix_1.append([])
            for j in range(4):
                Matrix_1[i].append(self.matrix[i][3-j])
        self.matrix = Matrix_1

    def transpose(self):
        Matrix_1 = [[0] * 4 for _ in range(4)]
        for i in range(4):
            for j in range(4):
                Matrix_1[i][j] = self.matrix[j][i]
        self.matrix = Matrix_1
Code Explanation-
- def stack() – Stack will compress all nonzero numbers in the matrix towards one side of the board eliminating all the gaps of empty cells between them.
- We write our stack function to compress to the left side.
- Matrix_1 – this is the matrix containing all zeros in our nested for loop for each row in our matrix.
- We are going to keep track of the number cell containing a nonzero number and variable called position fill.
- If the value in the cell is nonzero we set the value in the new matrix at i fill position to the value. Then we increment the fill position by one and after for loop set.matrix equals to matrix 1.
- def combine() – This function adds together all horizontally adjacent nonzero numbers of the same value in the matrix of 2048 game and merges them to the left position.
- When two tiles of the same value merge together and collapse in one tile of their sum.
- So in this nested for loop we are only looping until column two so we can index with j+1. Then we will be checking if the value at i, j in the matrix is not zero and is equal to the value i, j+1.
- We multiply the value at i, j by 2 and make the value i, j+1 equal to zero. Combine the function where we update our score by adding newly combined values to self.score…
- def reverse() – This function reverse the order of each row on the matrix
- Creating a matrix 1 that is an empty list.
- In the outer for loop we will append an empty list to matrix 1.
- Value gets reversed after the nested for loop we set.matrix equal to matrix 1.
- def transpose() – This function will flip the matrix over its diagonal.
- Create matrix1 of all zeros then in our nested for loop we set every value at i, j in matrix 1 with the values at j, i in the current matrix. We set.matrix equal to matrix 1.
Step 8- Create a function to randomly add new tile
#TechVidvan- Create a function to randomly add new 2 or 4 tile to an empty cell

    def add_tile(self):
        row = random.randint(0,3)
        col = random.randint(0,3)
        while(self.matrix[row][col] != 0):
            row = random.randint(0,3)
            col = random.randint(0,3)
        self.matrix[row][col] = random.choice([2,4])
Code Explanation-
- add_tile() – This function adds 2 or 4 new tiles randomly to an empty cell.
- Here we are applying the same logic that we have applied in the start game function.
- In this function, it will randomly select either 2 or 4 to fill the matrix at the row column.
Step 9- Create a function to update GUI
#TechVidvan- Create a function to update GUI to match the matrix

    def GUI_update(self):
        for i in range(4):
            for j in range(4):
                cell_value = self.matrix[i][j]
                if cell_value == 0:
                    self.cells[i][j]["frame"].configure(bg=Game.Color_EmptyCell)
                    self.cells[i][j]["number"].configure(bg=Game.Color_EmptyCell, text="")
                else:
                    self.cells[i][j]["frame"].configure(bg=Game.Color_Cells[cell_value])
                    self.cells[i][j]["number"].configure(
                        bg=Game.Color_Cells[cell_value],
                        fg=Game.Color_CellNumber[cell_value],
                        font=Game.Fonts_CellNumebr[cell_value],
                        text=str(cell_value)
                    )
        self.label_score.configure(text=self.score)
        self.update_idletasks()
Code Explanation-
- def GUI_update – This function updates the GUI to correspond to the newly manipulated matrix.
- Here we have a nested for loop and in this we check which cells have a zero value and display the cell with the empty cell color and no text.
- We set the background color specified in cell colors, font color, cell number colors and the font type specified in cell number fonts as well as set the text in that cell to the appropriate value.
- self.score – Update and display score and then call configure on the score label with text as self.score.
- update_idletasks()- This is the tkinter frame member function. Use it to display the widget immediately.
Step 10- Create a function for pressing arrow buttons for playing game
#TechVidvan- Create a function for pressing arrow buttons for playing game

    def left(self, event):
        self.stack()
        self.combine()
        self.stack()
        self.add_tile()
        self.GUI_update()
        self.game_over()

    def right(self, event):
        self.reverse()
        self.stack()
        self.combine()
        self.stack()
        self.reverse()
        self.add_tile()
        self.GUI_update()
        self.game_over()

    def up(self, event):
        self.transpose()
        self.stack()
        self.combine()
        self.stack()
        self.transpose()
        self.add_tile()
        self.GUI_update()
        self.game_over()

    def down(self, event):
        self.transpose()
        self.reverse()
        self.stack()
        self.combine()
        self.stack()
        self.reverse()
        self.transpose()
        self.add_tile()
        self.GUI_update()
        self.game_over()
Code Explanation-
- This function consists of a sequence of different combinations of matrix manipulation functions.
- def left() – Left move is the most straightforward sequence of matrix manipulation functions.
- Calling stack function for compressing non zero numbers to the left side of the matrix.
- Calling combine() for combining horizontally adjacent numbers.
- Again calling stack to eliminate newly created zeros cells from the combine function.
- Then add a new title and GUI update which we do in each of these 4 funcs.
- Also, call game over function to over game.
- def right() –
- Calling the reverse function to transform, right swipe into left swipe.
- Calling stack function for compressing non zero numbers to the left side of the matrix.
- Calling combine() for combining horizontally adjacent numbers.
- Again calling stack to eliminate newly created zeros cells from the combine function.
- Again calling reverse function for reversing the matrix back into its original orientation.
- Then add a new title and GUI update. Also call game over function to over game.
- def up() –
- We will transpose the matrix to make it work like the left move.
- Calling stack function for compressing non zero numbers to the left side of the matrix.
- Calling combine() for combining horizontally adjacent numbers.
- Again calling stack to eliminate newly created zeros cells from the combine function.
- Again call transpose. Then add a new title and GUI update. Also call game over function to over game.
- def down() –
- For this we have to transpose and reverse the matrix so a leftward moment can have a downward effect.
- Calling stack function for compressing non-zero numbers to the left side of the matrix.
- Calling combine() for combining horizontally adjacent numbers.
- Again calling stack to eliminate newly created zeros cells from the combine function.
- Again call transpose. Then add a new title and GUI update. Also call game over function to over game.
Step 11- Create a function to check if any moves are possible
#TechVidvan - check if any moves are possible

    def Exists_horizontalMoves(self):
        for i in range(4):
            for j in range(3):
                if self.matrix[i][j] == self.matrix[i][j + 1]:
                    return True
        return False

    def Exists_verticalMoves(self):
        for i in range(3):
            for j in range(4):
                if self.matrix[i][j] == self.matrix[i + 1][j]:
                    return True
        return False
Code Explanation-
- def Exists_horizontalMoves() – To check any possible horizontal move.
- We make a nested for loop which checks whether any value in our matrix at i, j is equal to the value at i, j+1. If yes we return true otherwise false.
- def Exists_verticalMoves() – To check any possible vertical move.
- We make a nested for loop which checks whether any value in our matrix at i, j is equal to the value at i+1, j. If yes we return true otherwise false.
Step 12- Function to check if the game is over
#TechVidvan- check if game is over (Win/lose)

    def game_over(self):
        if any(2048 in row for row in self.matrix):
            game_over_frame = tk.Frame(self.grid_main, borderwidth=2)
            game_over_frame.place(relx=0.5, rely= 0.5, anchor="center")
            tk.Label(
                game_over_frame,
                text = "YOU WIN!!",
                bg=Game.Winner_BG,
                fg=Game.Font_Color_GameOver,
                font=Game.Font_GameOver
            ).pack()
        elif not any(0 in row for row in self. matrix) and not self.Exists_horizontalMoves() and not self.Exists_verticalMoves():
            game_over_frame = tk.Frame(self.grid_main, borderwidth=2)
            game_over_frame.place(relx=0.5, rely= 0.5, anchor="center")
            tk.Label(
                game_over_frame,
                text = "GAME OVER!!",
                bg=Game.Loser_BG,
                fg=Game.Font_Color_GameOver,
                font=Game.Font_GameOver
            ).pack()

def main():
    Game()

if __name__ == "__main__":
    main()
Code Explanation-
- def game_over() – Function to check game win or lose.
- Here we are using a built-in function any. saying whether any 2048 in row. If so then we will create a new frame called game over frame whose parent will be the main grid and give it a border width of 2.
- After that we have to place the game over frame onto the main grid.
- tk.label – Add a label to game over frame on which will be written you win and we will set background color, font color and font to our specified colors.
- .pack() – To display labels on the game over frame.
- We first check non zeroes left in the matrix. Then to check whether legal moves remain we write a couple functions. One to check horizontal moves and one to check vertical moves. Then we will repeat the same code for the game over.
- At the end call the main function.
Python 2048 Game Output
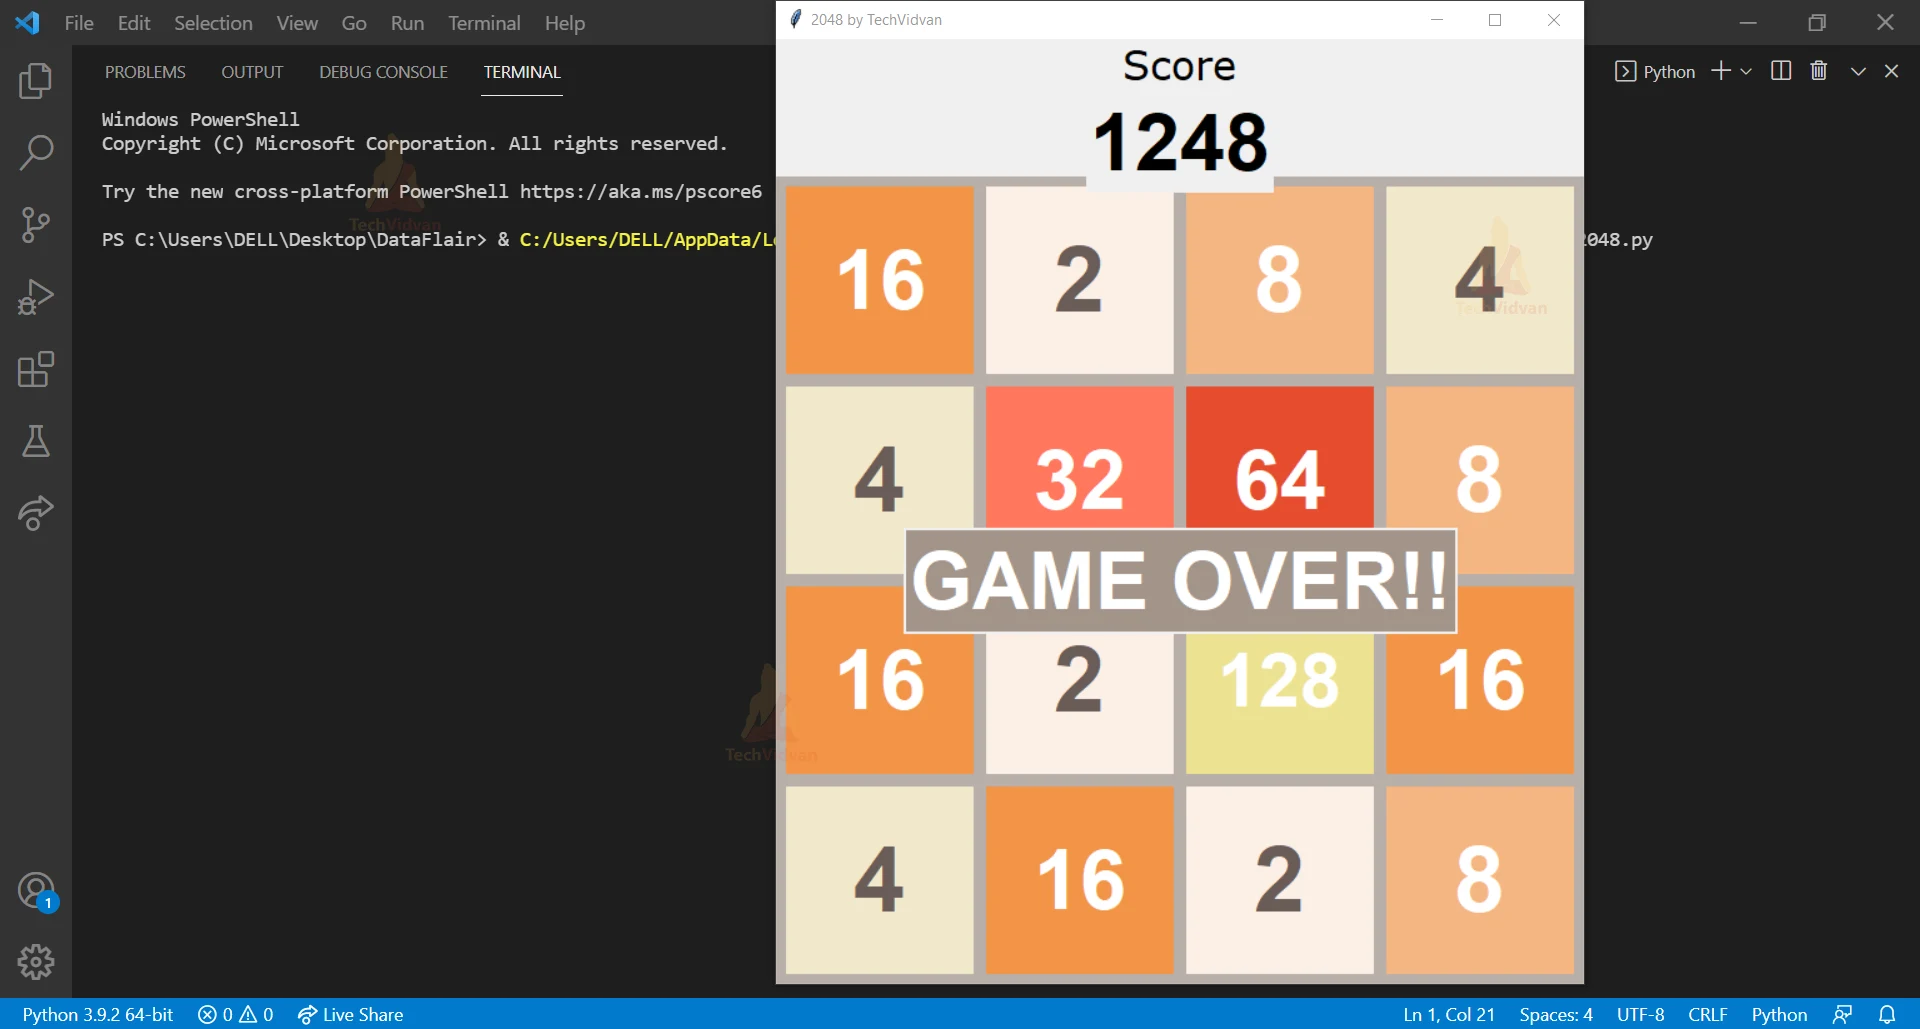
Summary
We have successfully created a python 2048 game using Graphical user Interface(GUI). We have learned about the Tkinter module and the function that module provides. It is really great fun to develop a 2048 game in python using GUI rather than playing, now we will play the 2048 game which we have developed.