Convert Text to Speech and Speech to Text in Python
The developing technology has a lot of influence on us making us choose simpler and easier ways to do tasks. One of them is using the speech option rather than typing. Have you ever wished to build the same? Here we are with a Python project to convert the speech to text and vice versa. So, let’s start to know more about this project before going into the implementation part.
What is Speech to text and text to Speech Project?
This is a project that provides the user with two options, one to convert text to speech and the other to convert speech to text. For the first case, the user enters the text and then gets to listen to it. And in the latter case, the user either speaks or chooses an mp3/wav file and then gets the text shown on the window.
Speech to text and text to Speech Project in Python
We will be first building a GUI using the Tkinter module, where we take the inputs of speech/text and also give the respective outputs. And then we will be using the audio form to text using PyDub, and convert audio file to text using PyTtsx3 and SpeechRecognition
Download the Speech to text and text to Speech Project
Please download the source code for speech to text and text to speech converter python project using the link: Speech to text and text to Speech Project
Project Prerequisites
It is suggested to have prior knowledge in Python and basic ideas about the Tkinter module. All the above modules can be installed using the following commands.
pip install tkinter
pip install pyttsx3
pip install pydub
pip install SpeechRecognition
Project Structure
Steps to build the project are:
1. Importing the required modules
2. Creating the main window
3. Function to convert text to audio
4. Writing the function to create window to take text input
5. Function to create a window for showing text output
6. Writing function to get the audio
1. Importing the required modules
import tkinter
from tkinter import filedialog
from tkinter import *

from path import Path
import pyttsx3
from speech_recognition import Recognizer, AudioFile
import speech_recognition as sr
from pydub import AudioSegment
import os
from time import sleep
Code explanation:
Here, we first initially start by importing all the required modules discussed above.
2. Creating the main window
wn = tkinter.Tk()
wn.title("PythonGeeks Text to Audio and Audio to Text converter")
wn.geometry('700x300')
wn.config(bg='LightBlue1')

Label(wn, text='TechVidvan Text to Audio and Audio to Text converter',
      fg='black', font=('Courier', 15)).place(x=40, y=10)

global textBox,showText,command
go=1

Button(wn, text="Convert Text to Audio", bg='ivory3',font=('Courier', 15),
       command=text_to_audio).place(x=230, y=80)
Button(wn, text="Convert Audio to Text", bg='ivory3',font=('Courier', 15),
       command=audio_to_text).place(x=230, y=150)

wn.mainloop()
Code explanation:
In this step we create a window ‘wn’ using Tkinter to create a window with two buttons for converting text to audio and audio to text vice versa. On clicking this button, respective functions text_to_audio() or audio_to_text(), give as command parameters, get executed.
3. Function to convert text to audio
#text to voice
voiceEngine = pyttsx3.init('sapi5')
voices = voiceEngine.getProperty('voices')
voiceEngine.setProperty('voice', voices[1].id)

def speak():
    global textBox
    text=textBox.get(1.0, "end-1c")
    print(text)
    voiceEngine.say(text)
    voiceEngine.runAndWait()
Code explanation:
This function speak() takes text as input and converts it into audio output by creating a voice engine using the pyttsx3 module. Here, the getProperty() and setProperty() methods are used to access the device audio system.
And the text to be spoken is taken from the widget ‘textBox’ using the get() method. Finally, the say() method is the function that does this job of giving audio output.
4. Writing the function to create window to take text input
def text_to_audio():
    #Creating a window
    global textBox
    wn1 = tkinter.Tk()
    wn1.title("TechVidvan Text to Audio converter")
    wn1.geometry('500x500')
    wn1.config(bg='snow3')

    Label(wn1, text='TechVidvan Text to Audio converter',
      fg='black', font=('Courier', 15)).place(x=60, y=10)

    v=Scrollbar(wn1, orient='vertical')
    v.pack(side=RIGHT, fill='y')
    textBox=Text(wn1, font=("Calibre, 14"), yscrollcommand=v.set)
    textBox.focus()
    textBox.place(x=20, y=80,width=450,height=300)

    v.config(command=textBox.yview)
    Button(wn1, text="Convert", bg='ivory3',font=('Courier', 13),
       command=speak).place(x=230, y=400)

    wn1.mainloop()
Code explanation:
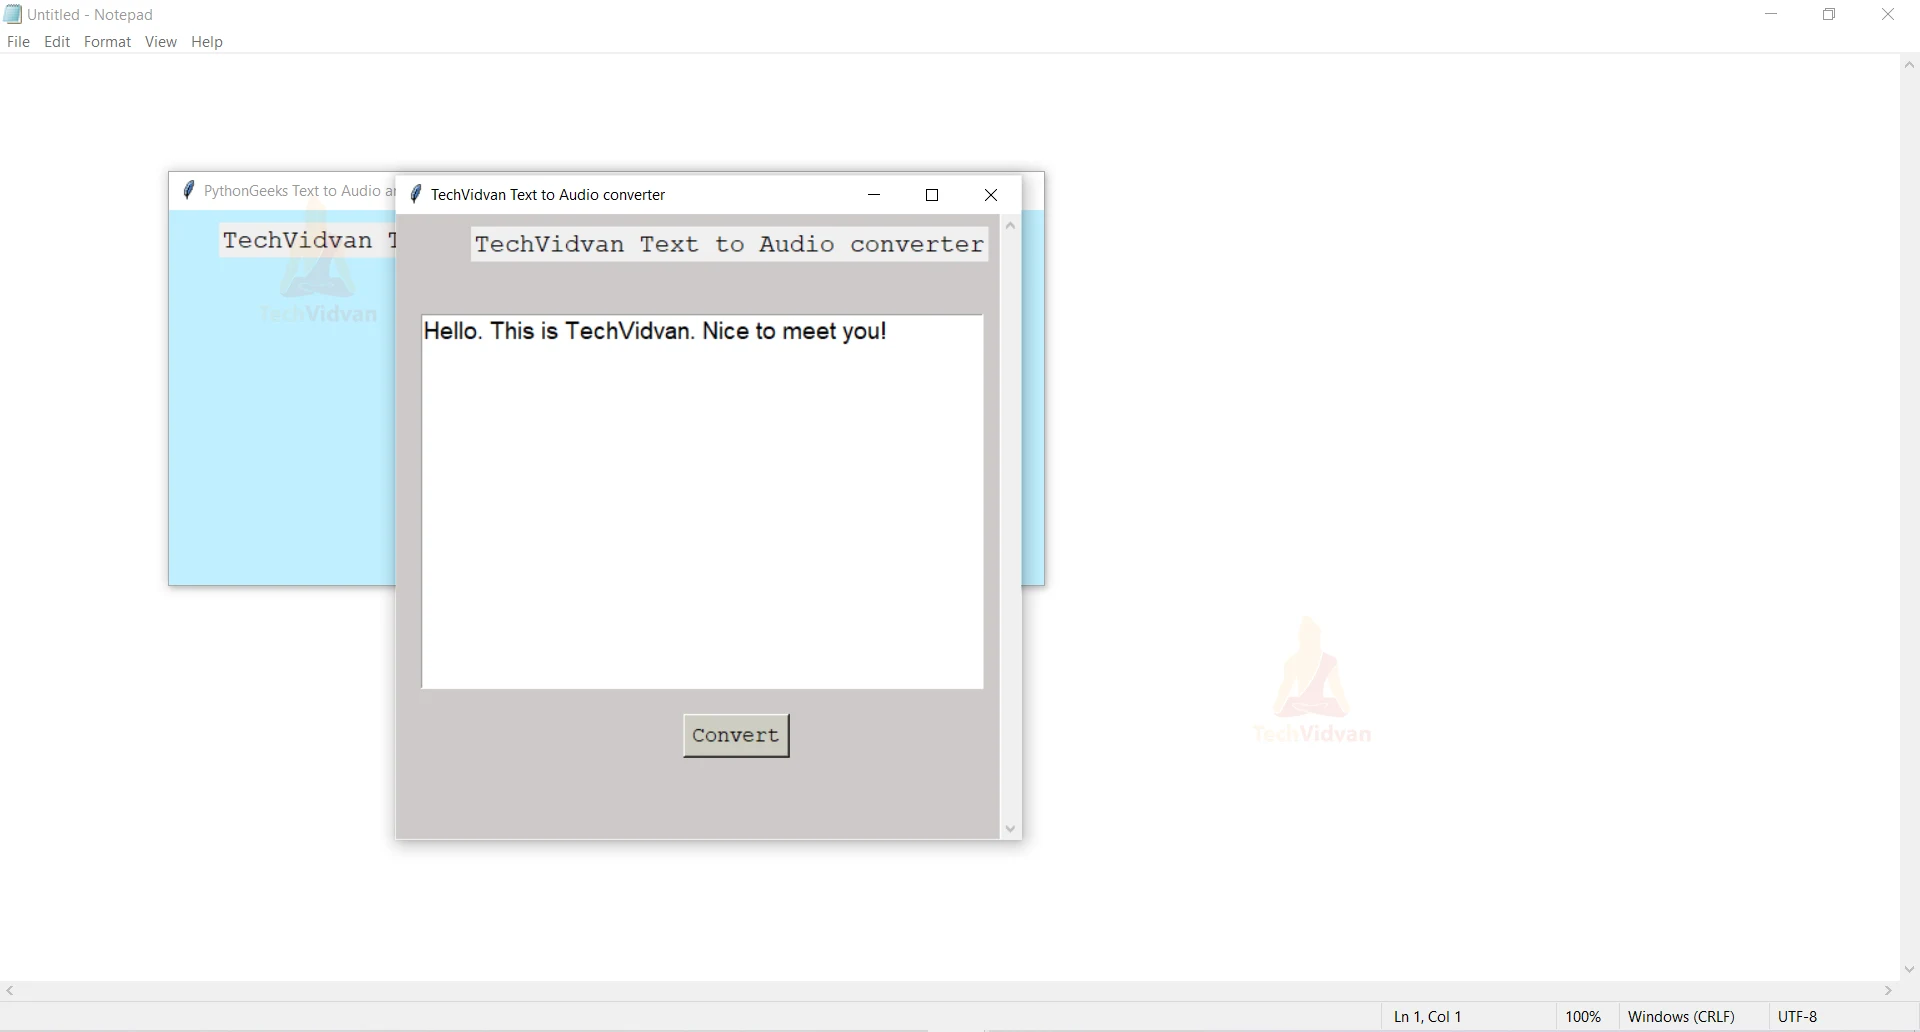
This function runs when the user clicks the ‘Convert Text to Audio’ button on the main window. This function contains a scrollable text box where the user can give the input text that is to be converted. On writing text and clicking the ‘Convert’ button, the function speak() executes.
5. Function to create a window for showing text output
def audio_to_text():
    #Creating a window
    global showText
    wn2= tkinter.Tk()
    wn2.title("TechVidvan Audio to Text converter")
    wn2.geometry('500x500')
    wn2.config(bg='snow3')

    res=IntVar()
    pdfPath = StringVar(wn2) #Variable to get the PDF path input

    Label(wn2, text='TechVidvan Audio to PDF converter',
      fg='black', font=('Courier', 15)).place(x=60, y=10)

    #Getting the PDF path input
    Label(wn2, text='Click the start and end buttons to speak and end speech').place(x=20, y=50)

    Button(wn2, text='Start', bg='ivory3',font=('Courier', 13),
       command=takeCommand).place(x=100, y=100)

    #Button to select the audio file and do the conversion
    Button(wn2, text='Stop', bg='ivory3',font=('Courier', 13),
       command=stop).place(x=200, y=100)

    v=Scrollbar(wn2, orient='vertical')
    v.pack(side=RIGHT, fill='y')
    showText=Text(wn2, font=("Calibre, 14"), yscrollcommand=v.set)
    showText.focus()
    showText.place(x=20, y=130,width=450,height=300)

    v.config(command=showText.yview)
    wn2.mainloop() #Runs the window till it is closed
Code explanation:
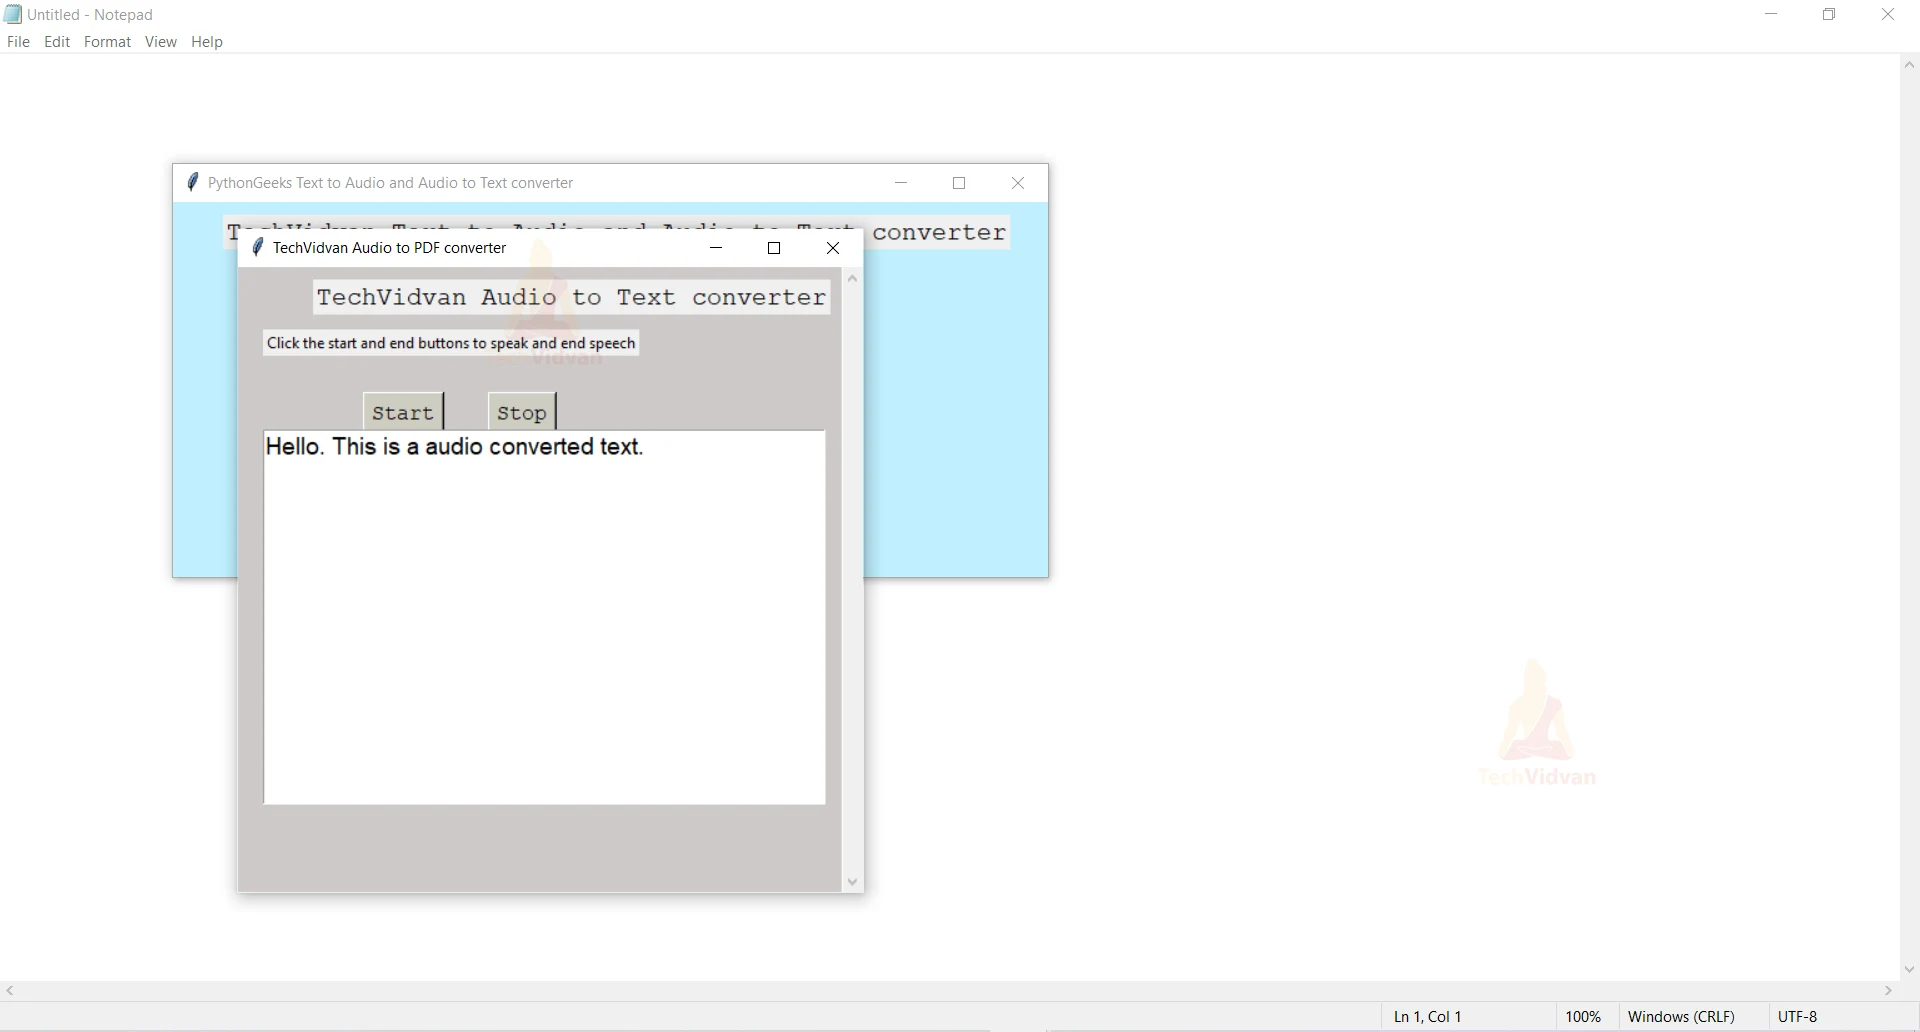
This function executes when the user clicks the ‘Convert Audio to Text’ button on the main window. It has two buttons to start and stop speaking. And everytime the user clicks the stop button the voice gets captured using the takeCommand() function, till the stop button is clicked.
When the stop button is clicked, the function stop() gets executed, which converts audio to text from using the below, which is shown on the text box.
6. Writing function to get the audio
def takeCommand():
    global showText,go,command
    showText.delete(1.0,"end")
    showText.insert(END,"Listening....")

    recog = sr.Recognizer()
    command=''

    while go:
        with sr.Microphone() as source:
            print("Listening to the user")
            recog.pause_threshold = 1
            userInput = recog.listen(source)

        try:
            print("Recognizing the command")
            command=command+' '+( recog.recognize_google(userInput, language ='en-in'))
            print(f"Command is: {command}\n")

        except Exception as e:
            print(e)
            print("Unable to Recognize the voice.")
            return "None"

def stop():
    global go,command
    print("q pressed, exiting...")
    go = 0
    showText.delete(1.0,"end")
    showText.insert(END,command)
Code explanation:
The takeCommand() shows the ‘Listening….’ command on the text box indicating that the user’s audio is getting captured. It then creates a Recognizer() object to get the audio input from one of the microphones attached to the device. Here, ‘go’ variable decides whether the user audio input should be taken or not. It keeps listening to the audio which is converted to texe using the recognize_google() method and stored in ‘command’ variable.
And the stop function stops the process of taking audio and shows the information stored in the ‘commad’ variable on the text box ‘showText’.
Output of Speech to text and text to Speech Python Project
Python Text to Speech conversion GUI
Python Audio to Text conversion GUI
Conclusion
Congratulations! You have successfully completed building the speech to text and text to speech project. I hope you could grab the concepts covered as a part of this project and enjoy building with us!