Python Hangman Game – Word Guessing Game
In this Python project, we will build a GUI-based Hangman game using the Tkinter, random, screeninfo and PIL modules. It is an intermediate level project, and you will get to use many modules and apply them in real life. Let’s get started!
About Hangman game:
A hangman game is the first game that most programmers make, but they make it command-line based, and we are going to make it GUI based. In this game, you need to guess the letters of a word in only a limited number of guesses, or you lose and a man dies!
About the project:
The objective of this project is to create a GUI based Hangman game. To build this, you will need intermediate understanding of Tkinter library and PIL’s GUI elements, and basic understanding of the random and screeninfo libraries.
Project Prerequisites:
To build this project, we will need the following libraries:
1. Tkinter – To create the GUI.
2. PIL (Pillow) – This is Python’s Image Library used for image manipulation. Here, we will use it to convert the Hangman progress images to PhotoImage format, which allows them to be displayed on Tkinter.
3. screeninfo.get_monitors() – To get the info of the screen’s dimension to set the height and width of the GUI window and its elements.
4. random.choice() – To get a random word from our list that the user of the game will guess.
5. os – To exit the script.
Some of the libraries do not come pre-installed with Python, so you will have to type the following command in your CMD to install them:
python -m pip install pillow screeninfo
The python wrapper is used because the pip command alone is not supported by some computers.
Download Python Hangman Project code
You can download python source code for the hangman word guessing game from the following link: Hangman Project Code
Tkinter Elements used:
1. The Tk() class is used to initialize a GUI window. The attributes and methods that need to be set during initialization are:
a. .title() method is used to set a title to the window.
b. .geometry() method is used to set the geometry of the window.
c. .resizable() method is used to allow/forbid the user to resize the window.
d. .update() and .mainloop() methods are used to prevent the window from closing milliseconds after it opens.
Note: These are the last lines that will be executed that edit the window in any way.
2. The Label widget is used to display static text to the window.
a. The image parameter is used to specify the PhotoImage object that will be used in place of/along with text in the Label.
3. The Button class is used to add a button to the window that executes a function as a command when pressed.
a. The command parameter is the function to be executed when the button is pressed.
4. The .place() method is used to place the widget it is associated with as though it is on a Cartesian plane.
a. The anchor parameter specifies the origin of the Cartesian for that widget. It can be a corner or a side of the root window.
b. The relx, rely parameters are used to set the horizontal and vertical offsets of the widget as a float number between 0.0 and 1.0
c. The x, y parameters are used to set the horizontal and vertical offsets of the widget
- The master parameter is the parent widget of the class it is associated with.
- The text parameter is the text to be displayed.
- The font parameter is used to specify the font family and effects to the text.
- The bg parameter is used to give a background color.
Project File Structure:
These are the files used in this project:
1. main.py – This will be our main python file.
2. words.txt – This is the word file where all the words to guess will be there.
3. Steps Images (folder): In this folder, we have kept all the progress images that will be displayed as the user guesses an incorrect letter
a. Step 0.png – Image to be displayed in the beginning where only the basic setup is visible.
b. Step 1.png – Image to be displayed after 1 incorrect guess. No body part is visible.
c. Step 2.png – Image to be displayed after 2 incorrect guesses. Only the head is visible.
d. Step 3.png – Image to be displayed after 3 incorrect guesses. The torso appears.
e. Step 4.png – Image to be displayed after 4 incorrect guesses. The arms appear.
f. Step 5.png – Image to be displayed after 5 incorrect guesses. The legs appear and Man gets scared!
g. Step 6.png – Image to be displayed after the sixth incorrect guess. Man is hung in this step and the user loses!
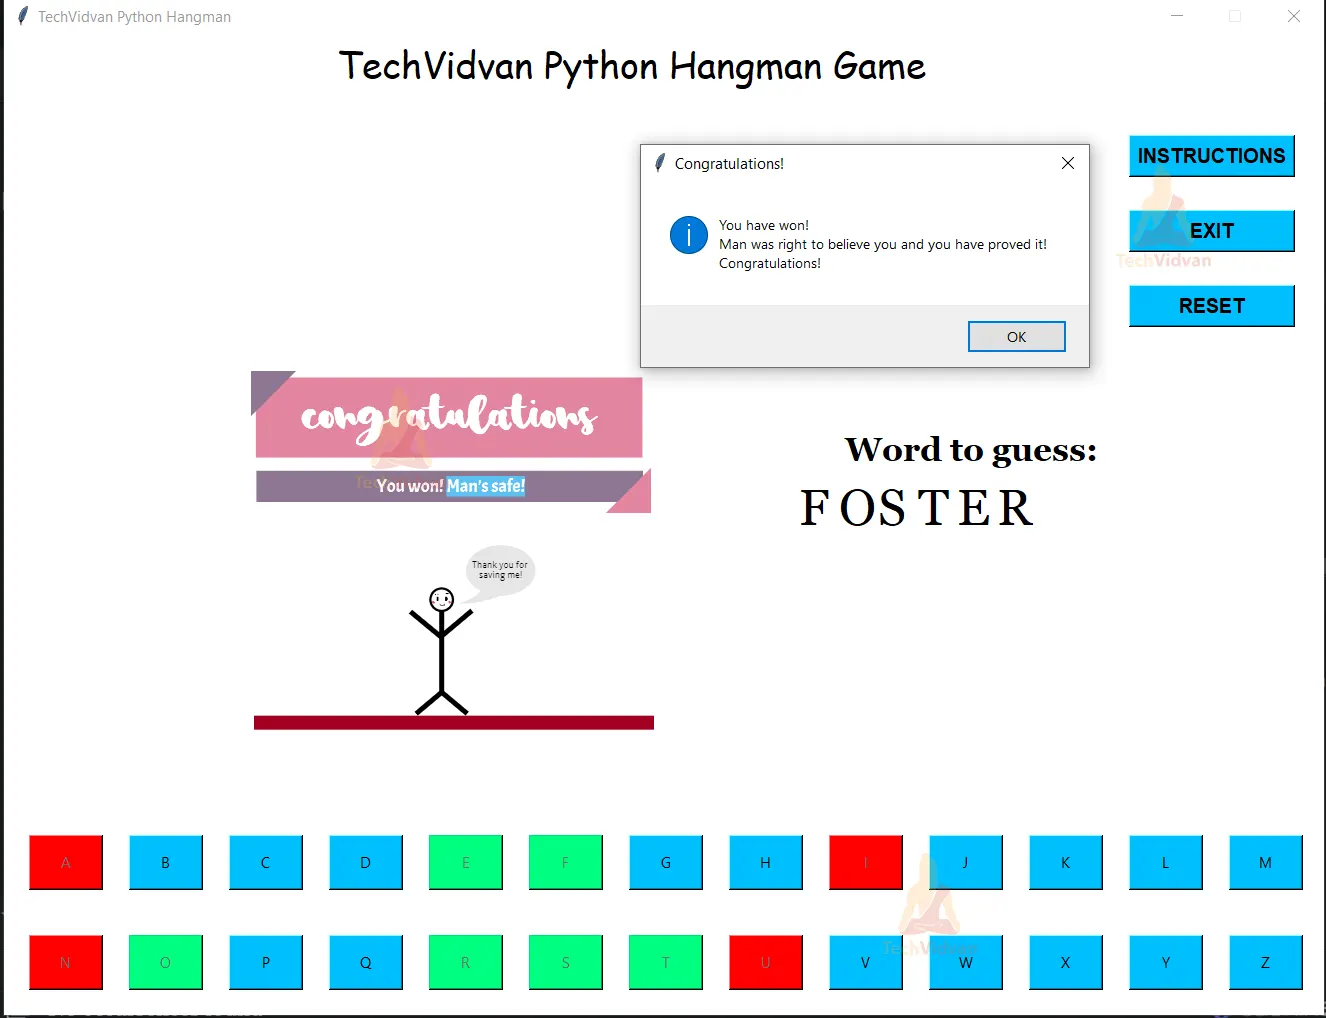
h. Winner.png – Image to be displayed after the user has successfully guessed the word with 1 or more incorrect guesses remaining. A banner with Congratulations appears, and man thanks you for saving his life.
Note: All the images were created using Fotor.
Here are the steps you will need to execute to build this project:
1. Importing all the necessary modules
2. Setting the variables and getting the monitor’s height and width
3. Creating all the functions
4. Initializing the GUI window, placing components in it and asking if the user wants to play or not
Let’s take a closer look at these steps:
1. Importing all the necessary modules:
from tkinter import *
import tkinter.messagebox as mb

from PIL import ImageTk, Image
from screeninfo import get_monitors
from random import choice
from os import system
Explanation:
- The get_monitors() function will be used to get the information of the local machine’s monitors.
- The system() function will be used (here) only to rerun our Python file if the user decides to reset the game.
2. Setting the variables and getting the monitor’s height and width:
# Variables
buttons_details = [["a", "A", 25, 800], ["b", "B", 125, 800], ["c", "C", 225, 800], ["d", "D", 325, 800], ["e", "E", 425, 800], ["f", "F", 525, 800], ["g", "G", 625, 800], ['h', "H", 725, 800], ['i', "I", 825, 800], ['j', "J", 925, 800], ['k', "K", 1025, 800], ['l', "L", 1125, 800], ['m', "M", 1225, 800], ['n', "N", 25, 900], ['o', "O", 125, 900], ['p', "P", 225, 900], ['q', "Q", 325, 900], ['r', "R", 425, 900], ['s', "S", 525, 900], ['t', "T", 625, 900], ['u', "U", 725, 900], ['v', "V", 825, 900], ['w', "W", 925, 900], ['x', "X", 1025, 900], ['y', "Y", 1125, 900], ['z', "Z", 1225, 900]]

word = get_word()
word_length = len(word)-1

correct_guesses = 0
incorrect_guesses = 0

li_word = [char.upper() for char in word]
# Getting the computer screen's dimensions
monitor = get_monitors()[0]

width = monitor.width - 600
height = monitor.height - 100
Explanation:
- We will define the get_word function later.
- Slice the get_monitors() so that we can get the dimensions of the monitor that we are using.
- We decreased the width and height so the game doesn’t go into full screen mode and hides the taskbar.
- The incorrect_guesses and correct_guesses are used to keep a counter as to how many correct and incorrect guesses have been made by the user.
- We have decremented the value of word_length by 1 because in our words.txt file, the last character of all the words is a blank space by default.
3. Creating all the functions:
# Basic Hangman functions
def get_word():
   words = []

   with open('words.txt', 'r') as wordlist:
       for line in wordlist:
           words.append(line)

   chosen_word = choice(words)

   return chosen_word


def main_function(btn: Button):
   global image_lbl, li_word, correct_guesses, incorrect_guesses
   global step_1, step_2, step_3, step_4, step_5, step_6

   if btn['text'] in li_word:
       btn.config(bg='SpringGreen', fg='Black')
       indices = [indx for indx, val in enumerate(li_word) if val == btn['text']]
       for index in indices:
           exec(f'ltr_{index}["text"] = btn["text"]')
           correct_guesses += 1

   else:
       btn.config(bg='Red', fg='White')
       incorrect_guesses += 1
       exec(f'image_lbl.config(image=step_{incorrect_guesses})')

   btn.config(state='disabled')

   if correct_guesses == word_length:
       image_lbl.config(image=won_image)
       mb.showinfo('Congratulations!', 'You have won!\nMan was right to believe you and you have proved it!\nCongratulations!')
       root.destroy()

   if incorrect_guesses == 6:
       mb.showerror('Man\'s dead!', 'Man counted on you to save him, and you have let him down!')
       root.destroy()


# Command functions for the buttons at the top-right of the screen
def instructions():
   mb.showinfo('',
"""The instructions are simple:
You have 6 chances of saving Man, if you get 6 incorrect guesses while trying to guess the detective's word, Man's going to be hung.
If you make less than 6 incorrect guesses while guessing the word, you will be successful in saving Man's life and he will be eternally grateful to you.""")


def end_game():
   surety = mb.askyesno('', 'Are you sure you want to exit the game? \nYour progress will not be saved')

   if surety:
       root.destroy()


def reset():
   surety = mb.askyesno('', "Are you sure you want to reset your game?")

   if surety:
       root.destroy()
       system('python main.py')
Explanation:
- In this step, we will create all the functions used in our game.
- The instructions() function simply displays a mb.showinfo() box detailing some of the rules and instructions of the game.
- The reset() function asks the user if they really want to reset the game using a mb.askyesno() box. If they want to, we will destroy our root window, and use the system() function of the OS library to rerun our main.py python file.
- How mb.askyesno() works is that if the user presses the “Yes” button, it returns True and returns False if the “No” button is pressed.
- The end_game() function does the same thing as the reset() function, but if the user wants to end the game, we will use the built-in exit() function to end our Python then-and-there.
- In the get_word() function, we will parse through our word.txt file by opening it in the read mode and store all the words in the file (lines) in a list.
The word for our game will be a word that will be chosen at random by the choice() function of the random library, which the user will need to guess. - Our main() function, which will essentially do everything to be done when a user presses any letter button, might seem complex, but is very easy once comprehended.
- Whenever the user presses any button, the button will record itself as the argument to its command parameter’s argument (any function) [We’ll get into it later when we talk about the GUI window].
- In this function, we will firstly get all the PhotoImage objects and variables to be usable in the function using the global keyword.
- Then, we will check if btn[“text”] (text inside the button) is an element in li_word (the list form of our word), and if it is, we will make that button’s bg color as Spring Green and get all the indices where that letter is present in the word.
Then we will parse through that list of indices we made earlier, and change the text of the corresponding letter Label to the character of the word, thus revealing it and we will increment the value of correct_guesses by one. - If the button pressed isn’t in the word, then it will turn red and we will increment the value of incorrect_guesses by one, and change the PhotoImage object visible to one that shows the next step.
- After this conditional pair, we will configure the button to disable, meaning that it can no longer be pressed.
- Eventually, if the value of correct_guesses is equal to the length of our word, the user will win and the image will change accordingly. And if the value of incorrect_guesses maximises, the user will lose and Man will die.
4. Initializing the GUI window, placing components in it and asking if the user wants to play or not:
# Initializing the window
root = Tk()
root.title('TechVidvan Python Hangman')
root.geometry(f'{width}x{height}')
root.resizable(0, 0)
root.config(bg='White')


# Title Label
Label(text='TechVidvan Python Hangman Game', font=("Comic Sans MS", 22), bg='White').place(relx=0.25, y=0)

# Asking if the user wants to play
start_ques = mb.askyesno('Storyline',
'''Man -- yes, that's his name -- has been wrongfully imprisoned and is about to be given the capital punishment.
However, the old detective came across some proof that proves Man is innocent. So, the detective wants Man to decide
his fate and has asked Man to guess a random word he has chosen fully aware that Man himself cannot guess this word
because it is too tough for him. And Man has asked you to guess this word for him, and has literally given his life to you.
You will have 6 lifelines to save Man. If you get 6 incorrect guesses, Man's dead but if you get the word before
these lifelines end, Man will live and be eternally grateful to you.
\nWhat do you say, feeling like saving an innocent's life today?''')

if not start_ques:
   root.destroy()
   exit()

# Creating all the steps images in PhotoImage format
step_0 = ImageTk.PhotoImage(Image.open('Steps Images/Step 0.png'))
step_1 = ImageTk.PhotoImage(Image.open('Steps Images/Step 1.png'))
step_2 = ImageTk.PhotoImage(Image.open('Steps Images/Step 2.png'))
step_3 = ImageTk.PhotoImage(Image.open('Steps Images/Step 3.png'))
step_4 = ImageTk.PhotoImage(Image.open('Steps Images/Step 4.png'))
step_5 = ImageTk.PhotoImage(Image.open('Steps Images/Step 5.png'))
step_6 = ImageTk.PhotoImage(Image.open('Steps Images/Step 6.png'))
won_image = ImageTk.PhotoImage(Image.open('Steps Images/Winner.png'))

image_lbl = Label(root, image=step_0, bg='White')
image_lbl.place(relx=0.15, rely=0.1)

# Placing the word on the window
Label(root, text='Word to guess:', font=("Georgia", 20, 'bold'), bg='White').place(relx=0.635, rely=0.4)

x = 0.6
i = 0
while i < word_length:
   exec(f'''ltr_{i} = Label(root, text="_", bg="White", font=("Georgia", 30)); ltr_{i}.place(relx={x}, rely=0.45)''')
   x += 0.03
   i += 1

# Creating all the letter buttons
for button in buttons_details:
   exec(f'''{button[0]}_btn = Button(root, text=button[1], width=8, height=2, bg="DeepSkyBlue",
        command=lambda: main_function({button[0]}_btn))''')
   exec(f'{button[0]}_btn.place(x=button[2], y=button[3])')

Button(root, text='INSTRUCTIONS', font=("PlayfairDisplay", 12, 'bold'), bg='DeepSkyBlue',
      command=instructions).place(x=1125, y=100)

Button(root, text='EXIT', font=("PlayfairDisplay", 12, 'bold'), width=13, bg='DeepSkyBlue',
      command=end_game).place(x=1125, y=175)

Button(root, text='RESET', font=("PlayfairDisplay", 12, 'bold'), width=13, bg='DeepSkyBlue',
      command=reset).place(x=1125, y=250)

# Finalizing the window
root.mainloop()
Explanation:
- In this step, we will create our GUI window of the game.
- After we define the heading label, we will provide the user with a storyline and ask if they want to play. If they do, we will continue but if they don’t, we’ll use exit() function to end our script.
- Then we will open our images in the “Steps Images” folder and convert them to PhotoImage objects which will be displayed by the image_lbl, which is a Label widget.
- We will then place the word on the window, towards the right of the image in the form of underscores to denote the number of characters it is.
- At the bottom side, we will have all the buttons that the user needs to press in order for the game to progress.
- The built-in exec() is used to execute what is provided to it as an argument as a python script.
- The button_details variable that we defined earlier contains the latter part of the variable name, text to be displayed,
- x-offset and y-offset of the button respectively in each nested list.
Using the exec() function, we will successfully create all the buttons and provide those buttons as arguments to the function we put in in the command parameter while defining the button.
- On the top right side of the window, we have 3 buttons that will execute the instructions(), reset(), and end_game() functions when pressed.
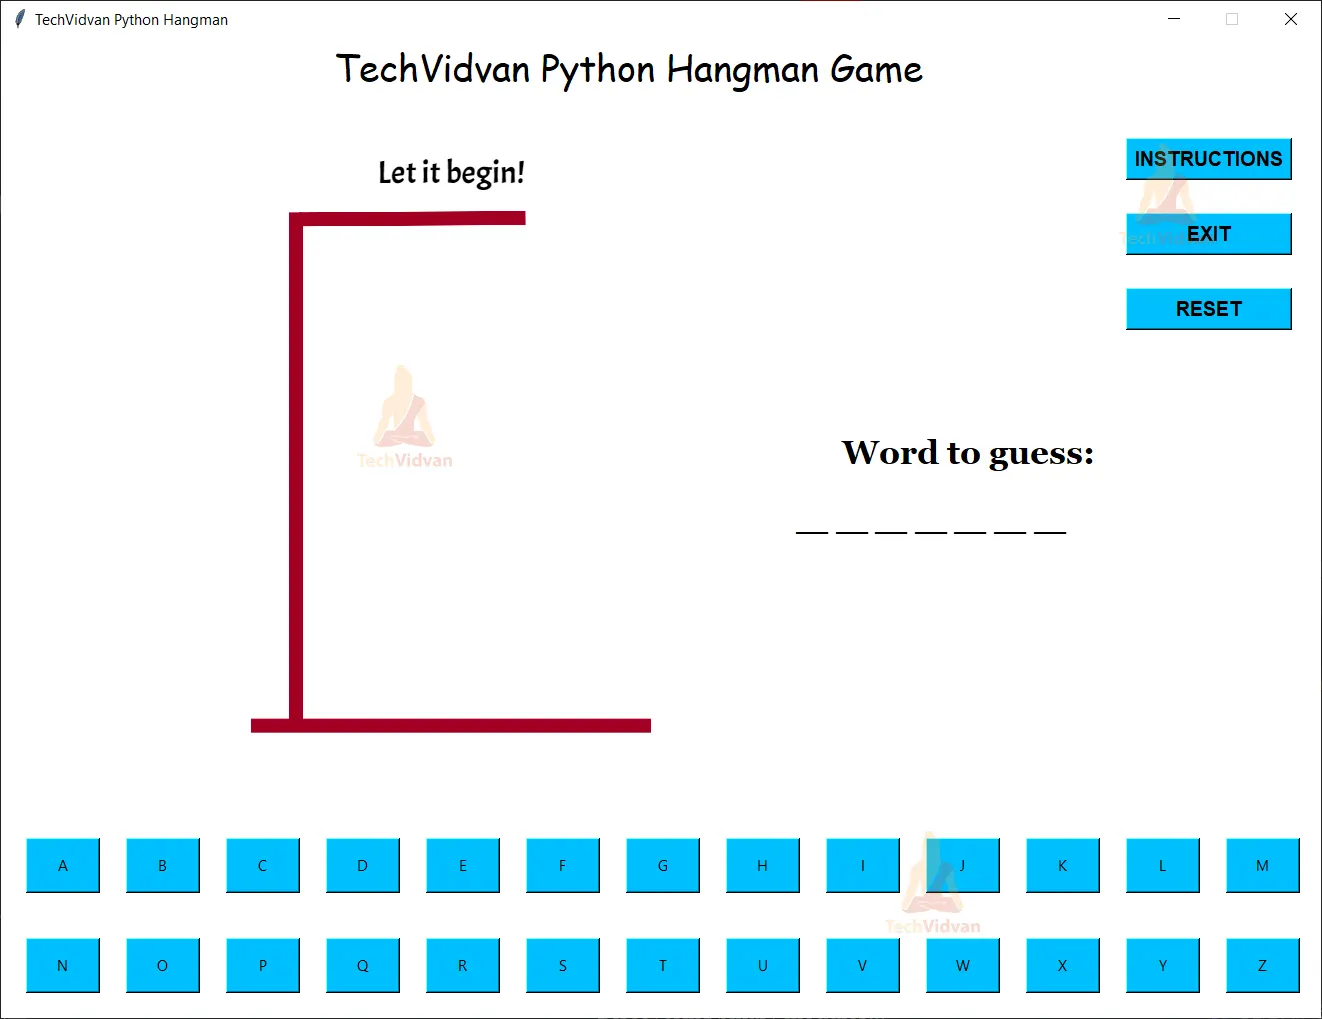
Python Hangman Game Output
Summary
Congratulations! You have now created your own GUI based Hangman game using the Tkinter, random, screeninfo and the PIL modules. This is an incredible pass time that also enhances your vocabulary and you get to be a superhero who saved an innocent’s life!
Have fun coding! 😊