Python Video to Audio Converter – Audio Extraction Made Effortless
In this project, we will create a python video to audio converter project using Tkinter module and Pydub library. This project will have a GUI that allows users to browse and select a video file and an output location to save the converted audio file.
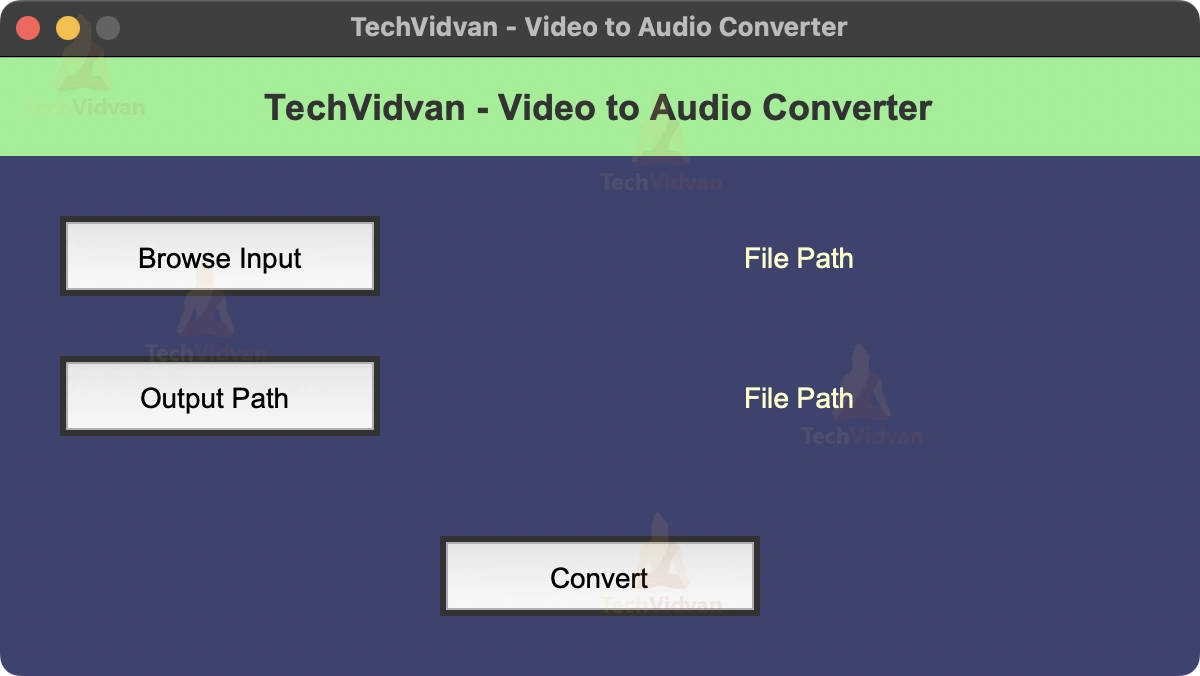
Python Video to Audio Converter
The objective of Python Video to Audio Converter is to demonstrate how to create a simple video to audio converter project using Python’s Tkinter module and Pydub library.
Prerequisites for Video to Audio Converter using Python
- Basic understanding of Python programming
- Basic understanding of Tkinter module
- Pydub library installed (can be installed using pip by running “pip install pydub”)
Download Python Video to Audio Converter Project
Please download the source code of python Video to Audio Converter project from the following link: Python Video to Audio Converter Code
Steps to Create Video to Audio Converter using Python
Following are the steps for developing the python Video to Audio Converter project:
Step 1: Importing Libraries
Before we start creating the GUI for our project, we need to import the required libraries. In this case, we will be importing Tkinter for creating the GUI, filedialog for browsing files, Pydub for converting the video to audio and messagebox for displaying success messages.
# Importing the required libraries
import tkinter as tk
from tkinter import filedialog
from pydub import AudioSegment
from tkinter import messagebox
Step 2: Creating the main window
In this step, we will create the main window for our project using the Tk() method from the Tkinter module. We will also set the title, background color, and size of the window.
# Creating main window
root = tk.Tk()


# Setting the title, background color and size of the tkinter window and resizing property
root.title("TechVidvan - Video to Audio Converter")
root.geometry("600x310")
root.resizable(width=False, height=False)
root.configure(background="#3b4370")
Step 3: Creating the browse input function
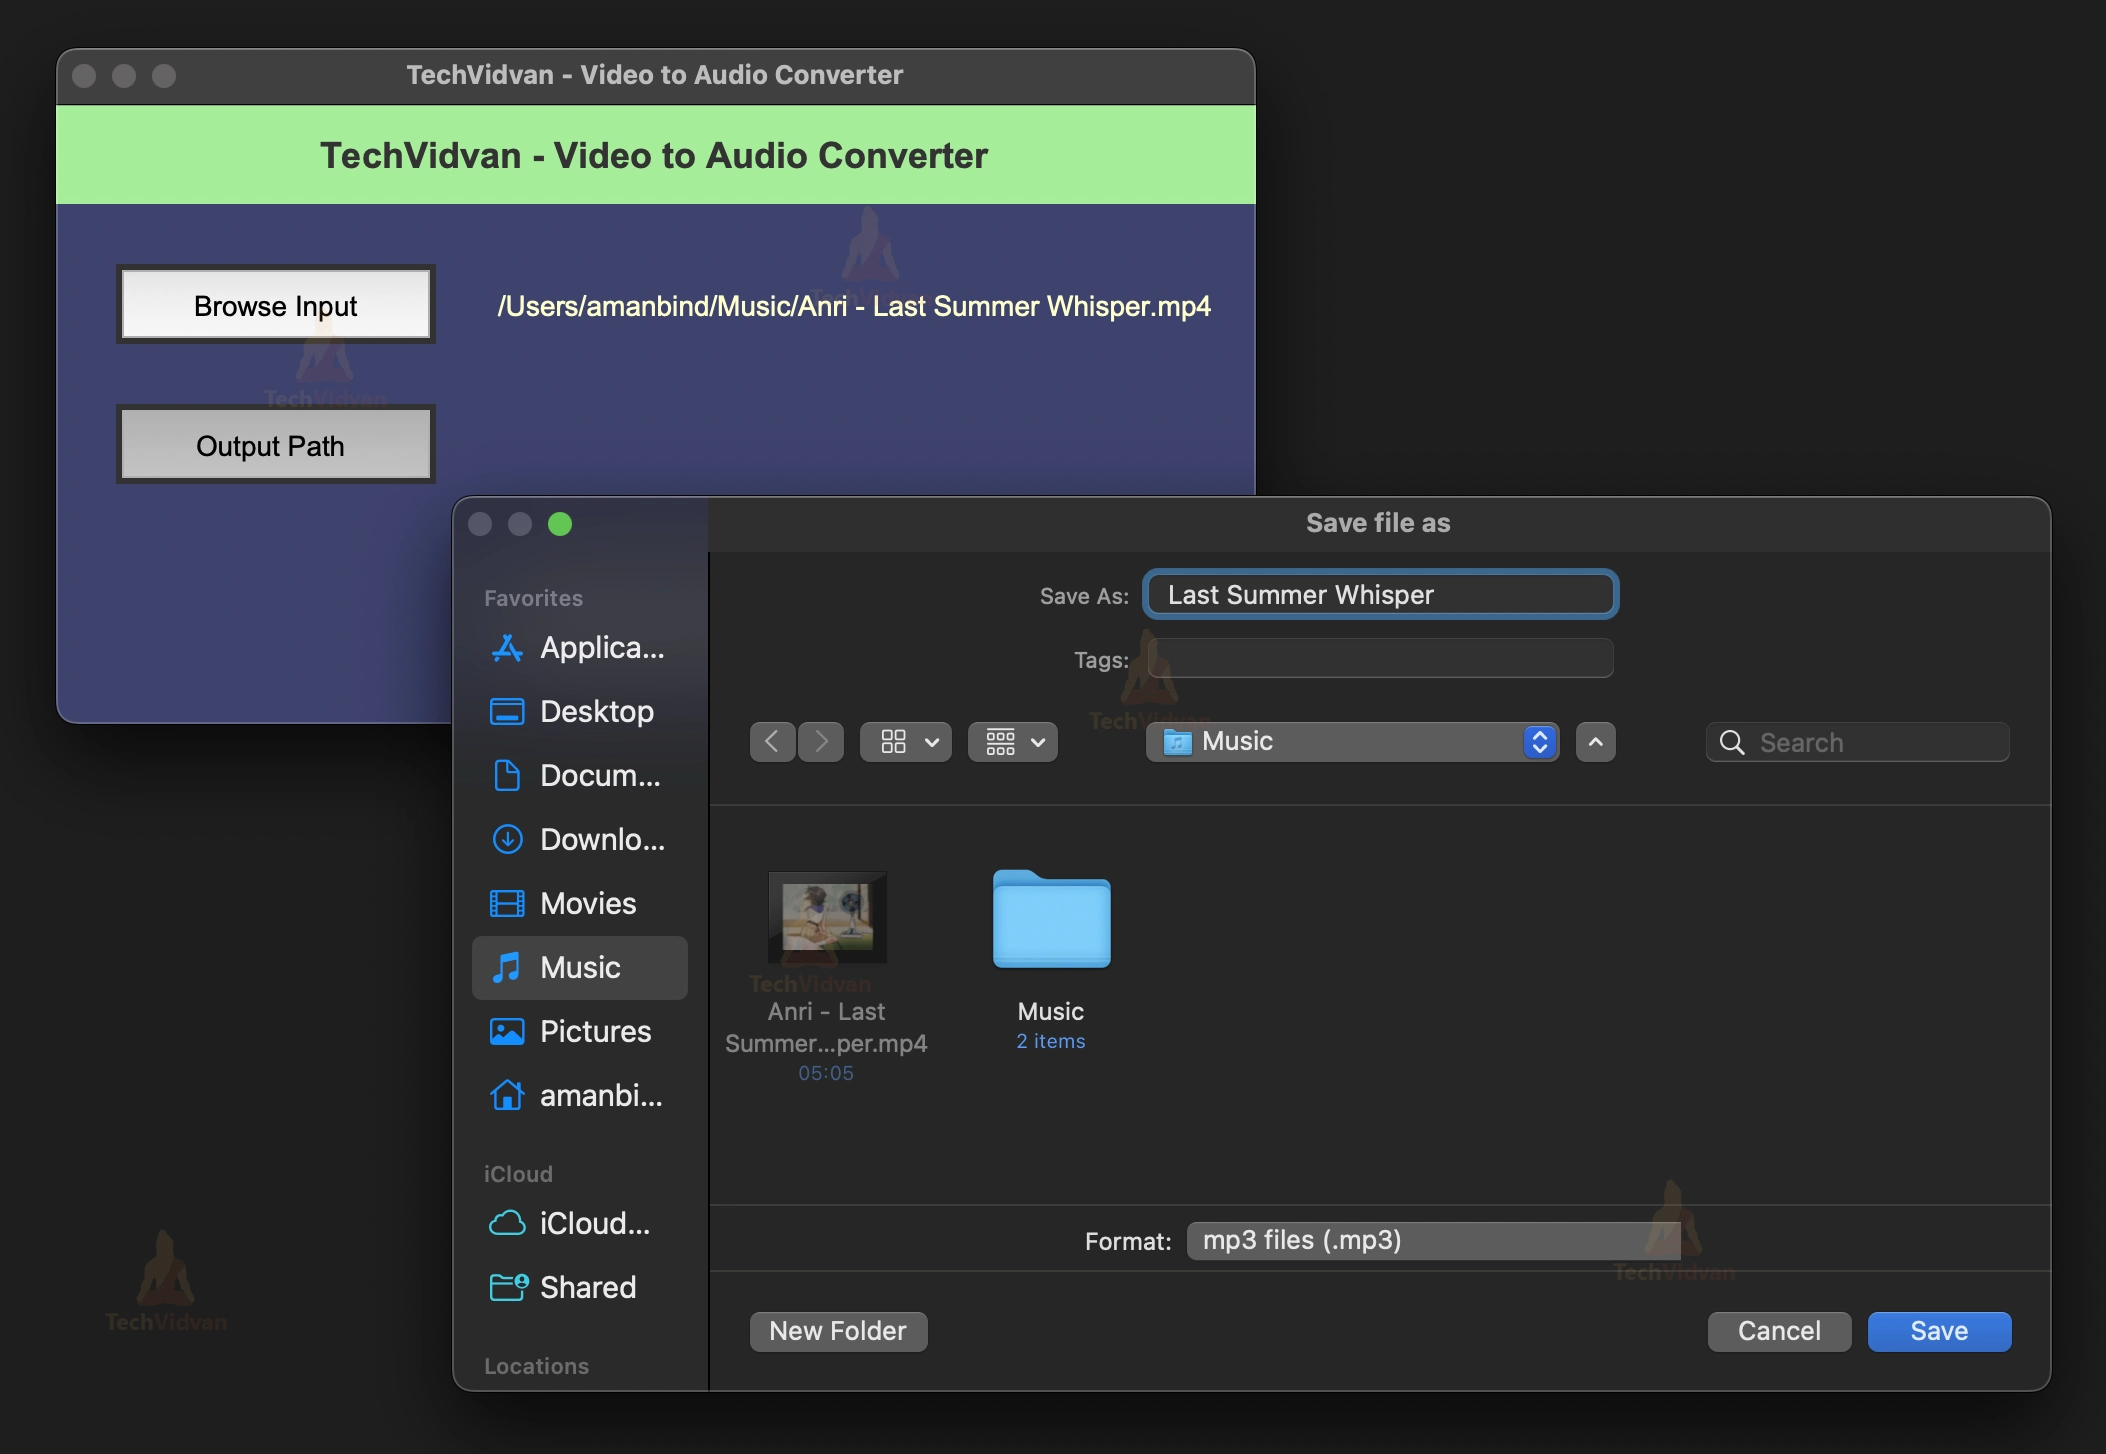
In this step, we will create a function which will allow users to browse and select a video file. We will use the askopenfilename() method from the filedialog module to open the file browser and select a file. The selected file path will be displayed in a label on the GUI.
# function to browse input file
def browse_input_command():
    global file_path
    file_path = filedialog.askopenfilename(initialdir="/", title="Select file", filetypes=(("mp3 files", "*.mp4"), ("all files", "*.*")))

   # display file path in label
    input_file_path_label.config(text=file_path)
Step 4: Creating the browse output function
In this step, we will create a function which will allow users to browse and select a location to save the converted audio file. We will use the asksaveasfilename() method from the filedialog module to open the file browser and select a location. The selected location will be displayed on a label on the GUI.
# function to browse output file
def browse_output_command():
    global output_path
    output_path = filedialog.asksaveasfilename(initialdir="/", title="Save file as", filetypes=(("mp3 files", "*.mp3"), ("all files", "*.*")))

   # display file path in label
    output_file_path_label.config(text=output_path)
Step 5: Creating the convert function
We will now create the function that will convert the video file to audio. In this function, we will use the AudioSegment.from_file() method from the pydub library to convert the video file to audio. We will then use the export() method to save the audio file to the specified output path.
def convert_command():


   # convert video to audio
    video = AudioSegment.from_file(file_path)


   # save audio file
    video.export(output_path, format="mp3")


   # show success message
    messagebox.showinfo("Success", "Video converted to Audio successfully")
Step 6: Creating the GUI
The next step is to create the Graphical User Interface (GUI) for our project. We will use the Tkinter library for this purpose.
In this step, we will create various elements such as labels, buttons and file path labels that will be used in the project. These elements are created using the Tkinter classes such as Label, Button, and Entry.
# Create a label to display the title
title_label=tk.Label(root)
title_label.configure(background="#90f090", foreground="#333333", font="Arial 18 bold", justify="center", text="TechVidvan - Video to Audio Converter")
title_label.place(x=0,y=0,width=600,height=50)


# Create a button to browse input file
browse_input_button=tk.Button(root)
browse_input_button.configure(font="Arial 14", justify="center", text="Browse Input", command=browse_input_command)
browse_input_button.place(x=30,y=80,width=160,height=40)


# Create a label to display file path
input_file_path_label=tk.Label(root)
input_file_path_label.configure(background="#3b4370", foreground="#ffffc5", font="Arial 14", justify="center", text="File Path")
input_file_path_label.place(x=220,y=80,width=360,height=40)


# Create a button to browse output file
browse_output_button=tk.Button(root)
browse_output_button.configure(font="Arial 14", justify="center", text="Output Path ", command=browse_output_command)
browse_output_button.place(x=30,y=150,width=160,height=40)


# Create a label to display file path
output_file_path_label=tk.Label(root)
output_file_path_label.configure(background="#3b4370", foreground="#ffffc5", font="Arial 14", justify="center", text="File Path")
output_file_path_label.place(x=220,y=150,width=360,height=40)


# Create a button to convert video to audio
convert_button=tk.Button(root)
convert_button.configure(font="Arial 14", justify="center", text="Convert", command=convert_command)
convert_button.place(x=220,y=240,width=160,height=40)
Step 7: Running the main loop
The final step is to run the main loop of the project using the root.mainloop() command. This command is responsible for keeping the project running and handling all the user interactions.
# Run the main window loop
root.mainloop()
Python Video to Audio Converter Output
Summary:
Congratulations! You have successfully created a video to audio converter project using Tkinter in Python. In this Python Video to Audio Converter, we learned how to create a video to audio converter project using the Tkinter library in Python. You can now use this project to convert any video file to an audio file in MP3 format.