Django Models and the Steps to Create Your First Model
In our previous article on Django’s MVT architecture, we have done an overview of what Django models are. Till now we know that models are useful for storing and maintaining data in the database.
When a user interacts with a web application through the template, then models are responsible to fulfill the user’s request. The user’s request can either be retrieving some information or making changes to the database. To get a deeper look at models we need to know first what objects are?
Object in Django
In easier words, an object is a collection of properties and actions. Confused? Just continue reading, it’s going to be very interesting.
Well, the main objective of introducing an object is that instead of writing everything as a tedious set of programming instructions, we can club everything and define how they interconnect with each other.
Let me give you an example. Just create an object Dog that will have some properties such as color, breed, and age. Then it will have some actions such as bark, eat, run.
Dog
color
breed
age
bark()
eat()
run()
So we aim to describe the real things in code with properties (object properties) and actions ( methods).
Django Models
Model in Django is an object that is saved in the database. A database is a place in which a user’s information is stored. We can think of a model in the database as a spreadsheet with columns (fields) and rows (data). Generally, each model represents a single database table.
You want to create a web application, right? That means there is a need to interact with the database. The retrieval and interaction with the database are achieved by knowing Structured Query Language (SQL). Does that mean you have to learn SQL? Well, the answer is no. In Django, the complex problem of SQL is easily handled by the models themselves.
Here, Django’s models provide an Object-Relational Mapping (ORM) to the database. ORM is a robust programming technique that makes working with data and relational databases effortless.
ORM simplifies the database programming by providing an easy mapping between the object ( ‘O’ in ORM) and the database that is put in use. This releases the programmer headache to know about the database structure and the task of learning the complex SQL to manipulate and retrieve data.
After the creation of the model, Dango executes SQL to generate a corresponding table in the database( as shown below in the image). Django also prefixes the table name along with the name of the Django application.
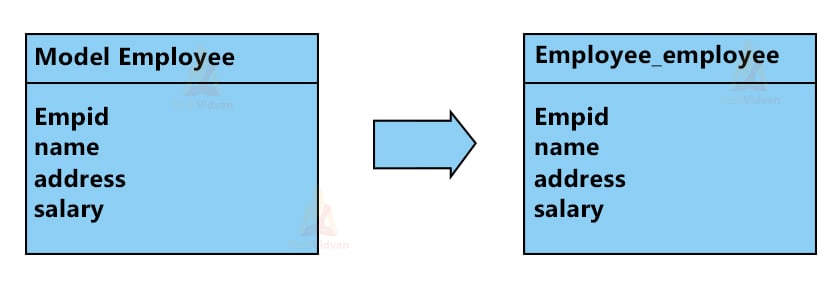
Django model creates a corresponding table in the database
‘R’ in ORM stands for Relationship. It is used to associate two tables.
The relationship is created by linking both the models with a foreign key. In the above case the ‘Empid’ field in the Employee table is a key linked to the ‘Empid’ field in the foreign table Department.
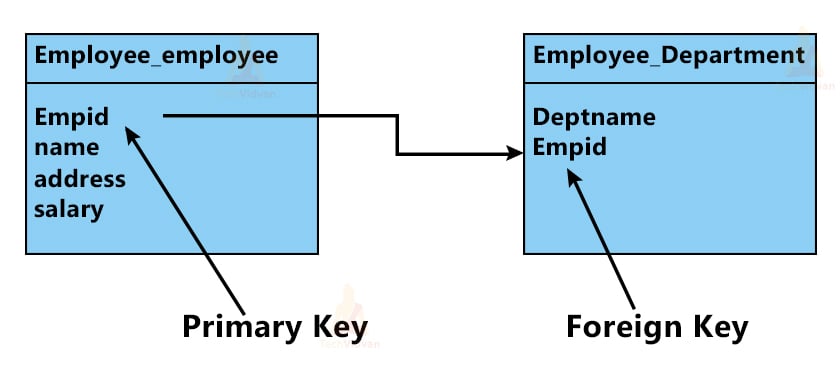
Foreign key links in Django models create relationships between tables.
This is how the ORM works. It describes the ORM way of using the model data to create a table in the database.
Syntax
This is how the syntax of models.py file appears.
from django.db import models
class ModelName(models.Model):
field_name = models.Field(**options)
Create Your First Django Model
Now we have a good idea about Django models, it’s time to discuss the steps to create your first model.
Well, installing and configuring a database is quite a hefty task, especially for beginners. The Django developers realize this and hence Django installs SQLite automatically. In this tutorial, we will use SQLite to make things unchallenging for you.
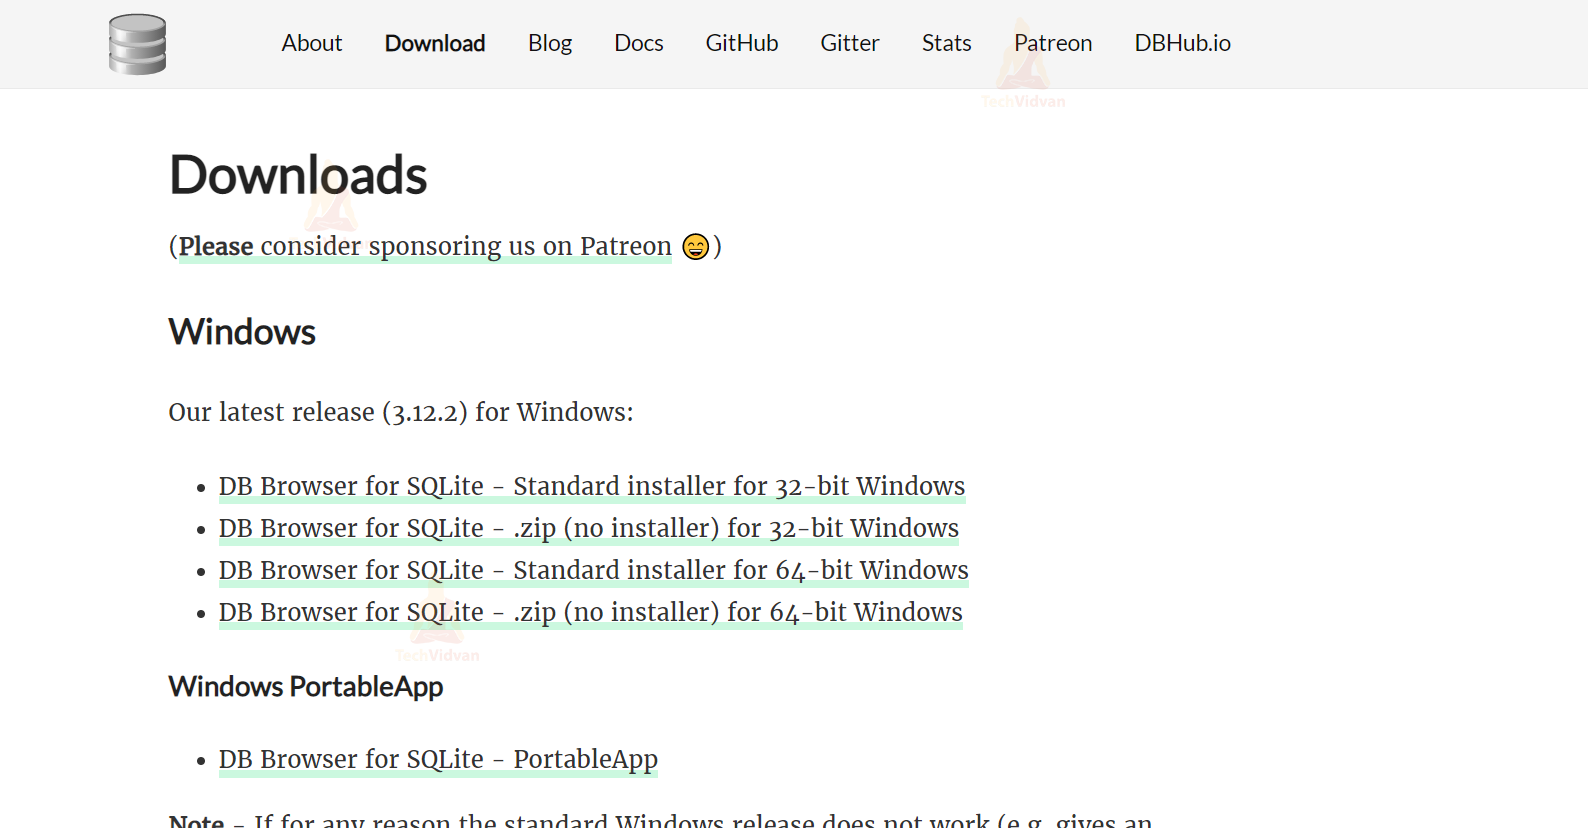
For interacting with the database, we need to download a DB Browser for SQLite. Download the standard installer according to your operating system.
Step 1: Activating Virtual Environment
Activating your virtual environment is the foremost step. Start your Windows PowerShell or Command prompt. Proceed to the directory where you have made the setup for the Virtual environment.
Activate your Virtual environment by using the following command:
(virtual-environment-name)\Scripts\activate.bat

This activates the Virtual environment.
Change the directory to your project folder. Here it is named “TechVidvan2”.
Step 2: Create a new app
Create a new app by using the following command in your Command Prompt or Windows PowerShell.
Django-admin startapp Employee
Step 3: Install the App
After creating the app the next important step is to install it on the system.
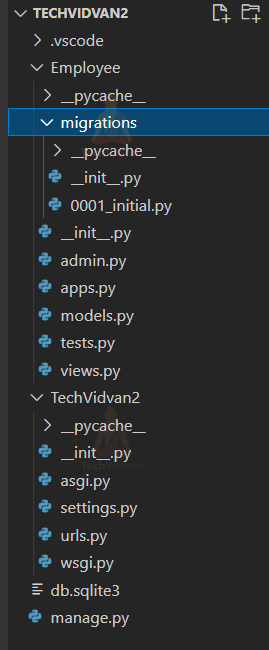
Go to Visual Studios. Here, you can see the name of the newly created App (Employee) written above the project folder name (TechVidvan2).
Go to the settings.py file under your Project. Add ‘Employee’ ( Application_name) under the INSTALLED_APPS.
Don’t forget to add a comma after your Application_name.
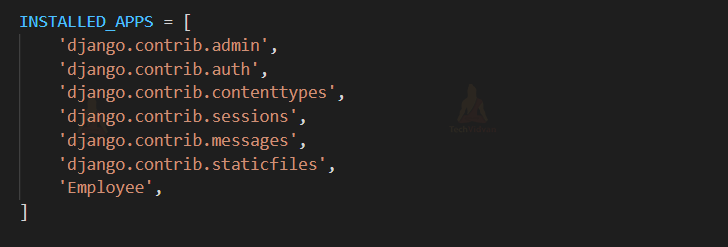
Save your changes.
Step 4: Making changes to the model.py file
Open the models.py file under your Application_name (‘Employee’) and write the following code in it.
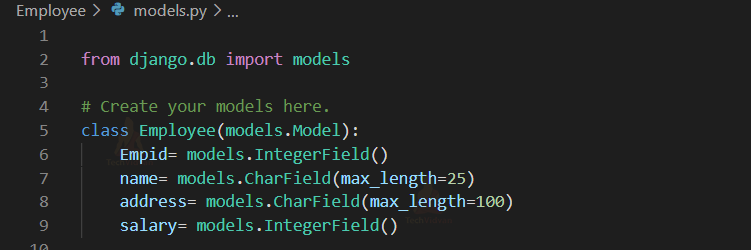
It is always recommended to use database-friendly names for the fields.
Each of our model fields has a related Django field type and field options. The ‘Employee’ model uses two different field types— IntegerField and CharField. Let’s understand the field options in more detail.
Line 6 and 9: The ‘Empid’ and ‘salary’ is a Django IntegerField. An integer field has a value from -2147483648 to 2147483647 which is considered safe in all databases supported by Django.
Line 7 and 8: The ‘name’ and ‘address’ field is a Django CharField. A CharField is a short line of text (up to 255 characters). Here, the max_length option sets the maximum length.
There are a lot more field types and field options. We will discuss it in upcoming articles.
Django Model Fields
The Model class’s fields are the names of the mapped table’s columns. The field names should not contain python reserved words such as clean, save, or delete, etc.
Django comes with a number of built-in field types.
| Field Name | Description |
| AutoField | It’s an IntegerField that increments on its own. |
| BigAutoField | It’s a 64-bit integer, similar to an AutoField but guaranteed to fit integers between 1 and 9223372036854775807. |
| BigIntegerField | It’s a 64-bit integer, similar to an IntegerField but guaranteed to fit integers between -9223372036854775808 and 9223372036854775807. |
| BinaryField | A field for storing binary data in its raw form. |
| BooleanField | There is a true/false field in this field.
A CheckboxInput is the default form widget for this field. |
| CharField | It’s a date, which is represented by a datetime in Python. Instance of a date |
| DateField | In Python, a date is represented by a datetime. example of a date |
| DecimalField | It’s a decimal number with a fixed precision that’s represented in Python by a Decimal object. |
| DurationField | A field for storing time periods. |
| EmailField | It’s a CharField that verifies the value is an email address. |
| FileField | It’s a field for uploading files. |
| FloatField | A float instance in Python represents a floating-point number. |
| ImageField | It inherits all of FileField’s properties and methods, but it also verifies that the uploaded object is a genuine picture. |
| IntegerField | It’s a number field. In all Django-supported databases, values ranging from -2147483648 to 2147483647 are safe. |
| GenericIPAddressField | In string format, an IPv4 or IPv6 address (e.g. 192.0.2.30 or 2a02:42fe::4). |
| NullBooleanField | Like a BooleanField, but with the addition of NULL as an option. |
| PositiveIntegerField | Similar to an IntegerField, however it must be positive or zero (0). |
| PositiveSmallIntegerField | Similar to a PositiveIntegerField, but only accepts values below a specific (database-dependent) threshold. |
| SlugField | The term “slug” comes from the newspaper industry. Slugs are brief labels that contain only letters, numbers, underscores, or hyphens. They’re commonly found in URLs. |
| TextField | There is a large text field. A Textarea is the default form widget for this field. |
| TimeField | A datetime.time instance in Python represents a time. |
| URLField | URLValidator validates a CharField for a URL. |
| UUIDField | A field for storing IDs that are universally unique. The UUID class in Python is used. This stores in an uuid data type in PostgreSQL, otherwise in a char data type (32). |
Field Options
Field Options are the arguments given to each field in order to apply a constraint or impart a specific attribute to that field. If you give CharField the option null = True, it will allow you to store empty values for that table in a relational database.
The field choices and attributes that a CharField can use are listed below.
| Field Options | Description |
| Null | If True, Django stores empty values in the database as NULL. False is the default value. |
| Blank | If True, the field can be left blank. False is the default value. |
| db_column | The name of the database column that will be used to populate this field. Django will use the field’s name if this isn’t specified. |
| Default | This is the field’s default value. This can be a callable object or a value. If it’s callable, it’ll be invoked whenever a new object is created. |
| help_text | Additional “help” text to be displayed in conjunction with the form widget. Even if your field isn’t used on a form, it’s useful for documentation. |
| primary_key | If True, this field is the model’s primary key. |
| editable | The field will not be seen in the admin or any other ModelForm if False. They’re also left out of model validation. True is the default value. |
Relationship Fields
Django additionally has a set of fields for representing relationships.
| Field Name | Description |
| Foreignkey | It’s a one-to-many relationship. The class to which the model is connected, as well as the on delete option, are also required positional inputs. |
| ManyToManyField | There is a many-to-many relationship here. Requires a positional argument: the class to which the model is linked, which operates similarly to ForeignKey, including recursive and lazy relationships. |
|
OneToOneField |
It’s a one-on-one situation. This is comparable to a ForeignKey with unique=True in terms of concept, but the “reverse” side of the relation will yield a single object. |
Step 5: Making Migrations
With the above steps, we have created a model. Let’s add this to our database.
Execute the following steps,
python manage.py makemigrations
You will see a new file named ‘0001_initial.py’ under migrations.
SQL Query has created the above model as a Table.
Then, execute this command.
python manage.py migrate
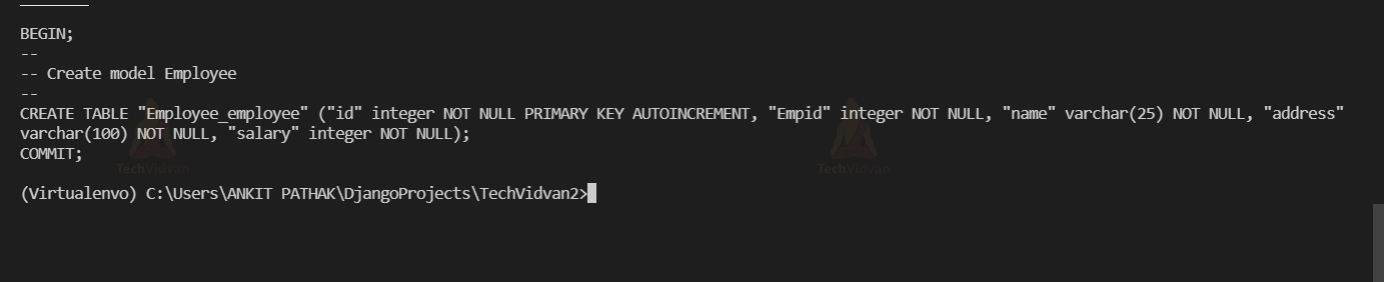
With this, your new model is added to the database. Let’s have a look at how Django uses the model to generate SQL.
Write the following command in the terminal,
python manage.py sqlmigrate Employee 0001
You will come across an output like this:
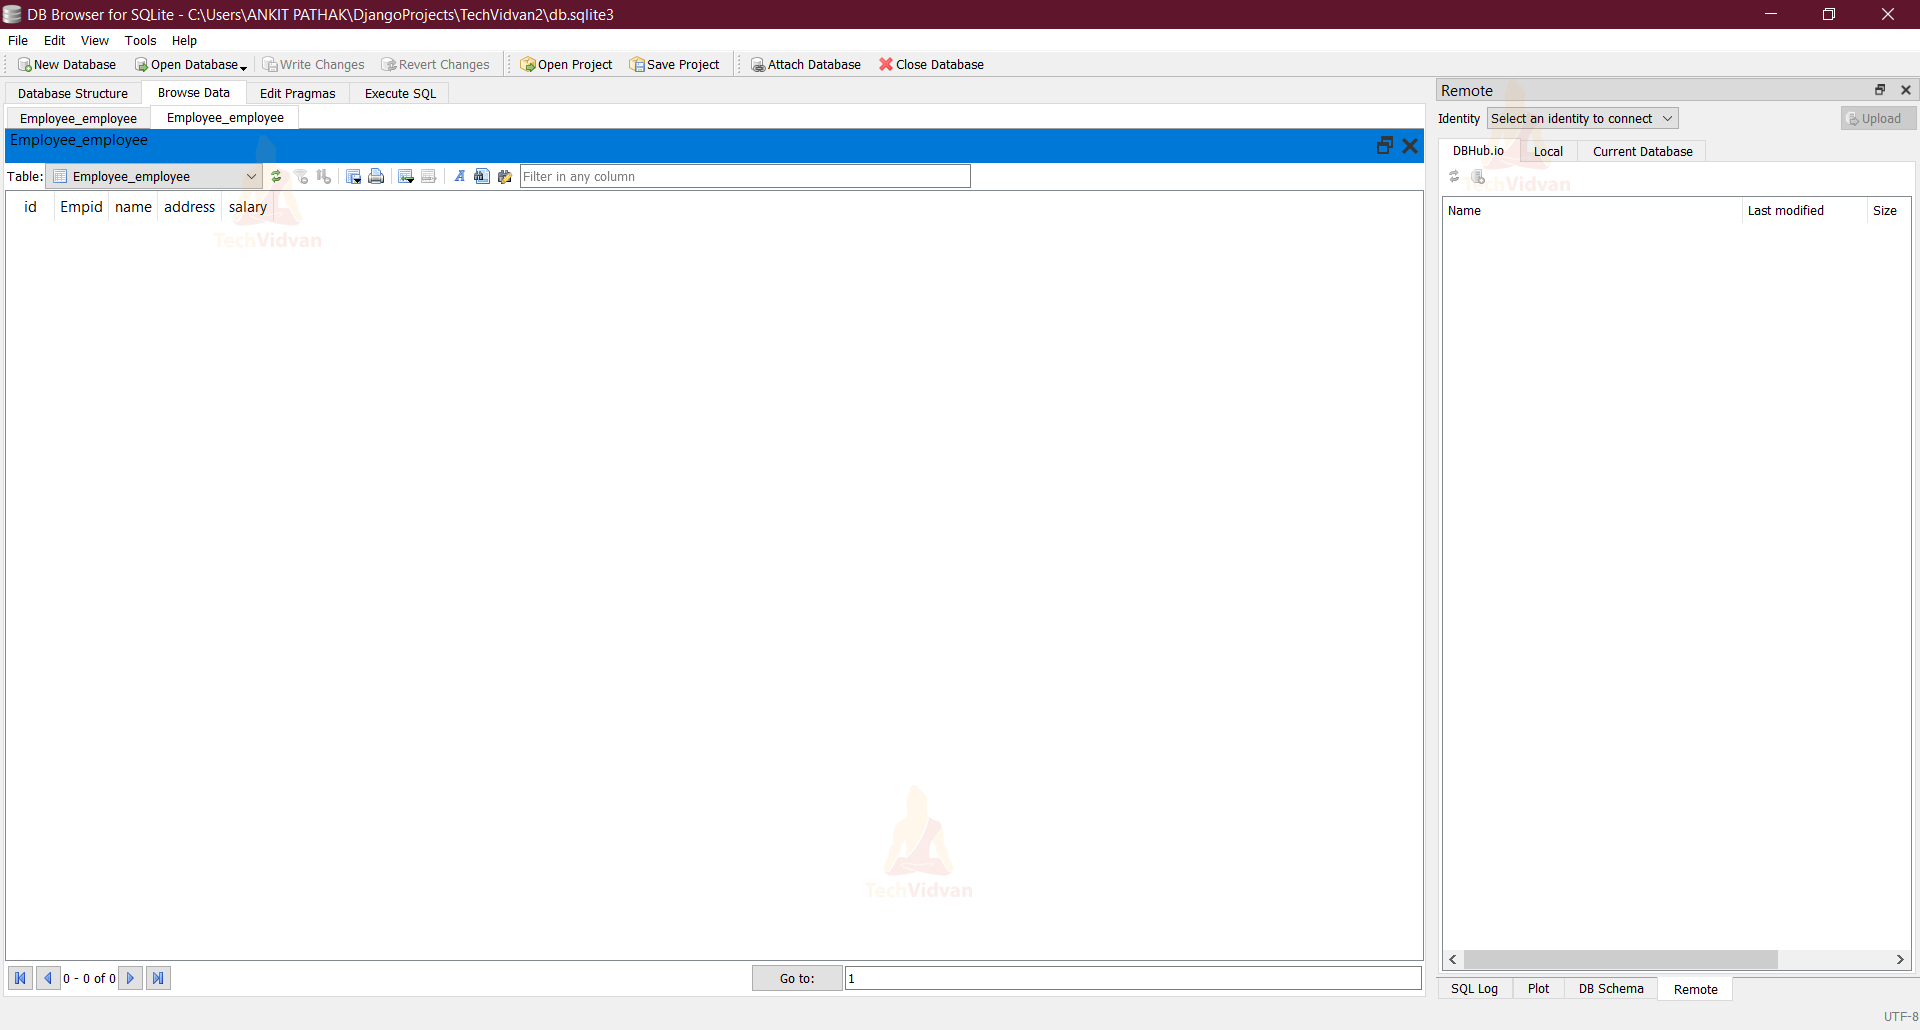
Step 6: Open the DB Browser (SQLite)
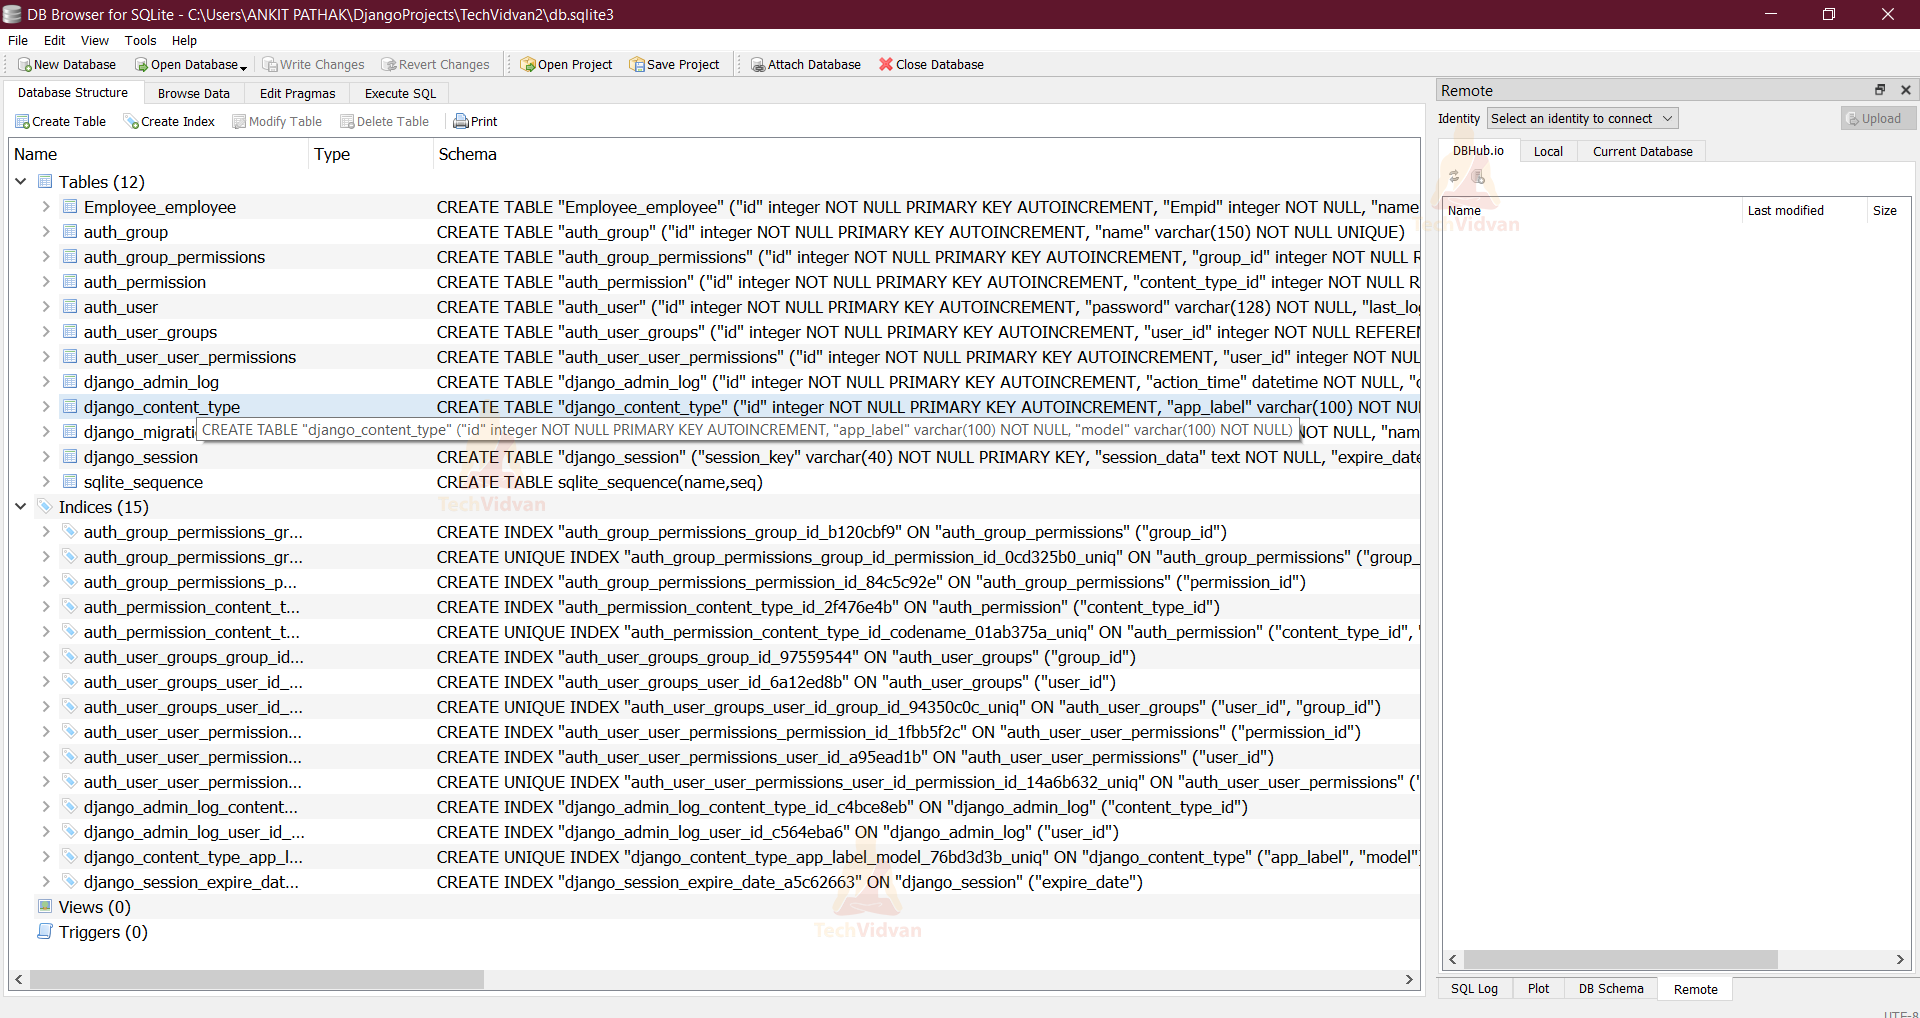
Now click on the ‘Open Database’ and move to the directory where you have saved your Project (TechVidvan2). Select the ‘db.sqlite3’.
So, this is the newly created table.
Advantages Of Django Models
As we have discussed earlier, a model is a link between the server and the database. These are some of the advantages of models in Django:
- Simplicity: Using Python is not only much easier than SQL, but it is also less error-prone.
- Explicit description: The application has to know something about the database structure that is put in use. Django provided an explicit description of the data in the application code.
- Admin panel to create, update, delete or retrieve fields of a model.
- Version control
- Advanced Metadata
Built-in support for almost all the databases
Django provides a “Batteries included” approach. With Django, we can use any Relational database. We can even use cloud databases with Django, which is still lacking in many web frameworks out in the market.
Summary
This tutorial covered Django’s model in more depth and created our first Django model. We have also used the SQLite database. We discussed the advantages of the model, and have also seen how the Django models are different.
If you have any queries, feel free to comment down below.