Creating Views in Django in Just 5 Simple Steps
The view component of the model view controller (MVC) architecture is responsible for presenting data to users for consumption and viewing. Views are Python functions or classes that accept a web request and generate a web response in the Django framework. The response can be a plain HTTP response, an HTML template response, or an HTTP redirect response, which sends the user to another website. Views provide the logic that is required to return information to the user in any layout. In a Django app, the logic that deals with views should be kept in the views.py file as a standard practice.
The view determines what data is sent to the template, either in response to user input or in response to several other business logic and internal procedures. Each Django view has its own template and performs a specific function.
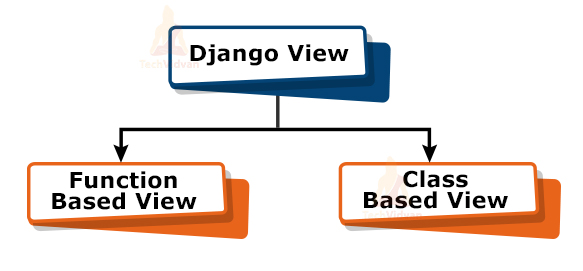
This tutorial will show you how to utilise views in Django to display and view data. It will also look at the two main types of views: class-based views and function-based views. There were just function-based views in the early days of Django, but as the project grew, Django’s developers added class-based views. Django’s views are more extensible with class-based views. Django also comes with a number of built-in class-based views that make common views (such as displaying a list of articles) much easier to develop.
You must be familiar with Django at least at the introductory level and have a basic comprehension of the Django MVC.
Django Views in MVC
In the Django MVC design, a view is a component that includes the logic that will be displayed to the user. It accomplishes this in a standard MVC design by coordinating with both the model and the controller. It creates difficulty because the views are dependent on both the model and the controller, requiring two components to render. This goes against the MVC design paradigm since one component is overly reliant on another.
The website design changes considerably more frequently than the business logic, and the view is usually responsible for both of them, thus it coordinates with both the controller and the model. This makes it difficult for front-end and back-end developers to coordinate data with display components.
Django Views in MVT
The aforementioned issues were handled by Django’s MTV design, in which the view only contained business logic, i.e., which web page should be produced at particular input, and also served as a mediator between the model and template.
Is the view controller in Django? This is one of the most crucial questions that arise from this. The answer is negative because Django Views simply correspond to a specific template; they do not, in fact, select a model or view on their own.
This question arises because the controller in MVC is responsible for selecting the appropriate view for the given data.
The question that will arise in your mind now is: Which component is the controller?
Actually, it’s the Django Framework itself, which is why it’s the best framework. The controller is the most complex part of the code because it has to control and communicate with all of the components in an efficient manner. As a result, it must be written precisely, which the Django Framework takes care of.
Class-Based Views in Django
Class-based views make coding views easier by allowing you to generate views from inherited classes.
Views can be implemented as Python objects instead of functions, using class-based views. They do not substitute function-based views, but they do have several advantages and differences when compared to them:
- Separate methods, rather than conditional branching, can be used to organise code relevant to various HTTP methods (GET, POST, etc.).
- Mixins (multiple inheritance) and other object-oriented approaches can be used to fold code into reusable components.
Class-based views are easier to manage and more efficient than function-based views. A function-based view with a large number of lines of code can be transformed into a class-based view with only a few lines of code. Object-Oriented Programming (OOP) comes into play here.
In general, any common web program has five sorts of common class-based views (generic) that perform the CRUD (create, retrieve, update, and delete) actions. All of these views entail using a model object to manipulate data.
Function-Based Views in Django
Function-based views are created by passing an HttpRequest object as a parameter to a Python function that produces a HttpResponse object. The HTML content of a Web page, an XML document, a redirect, a 404 error, or a picture are all examples of responses.
Function-based views are divided into 4 strategies; CRUD (Create, Retrieve, Update, Delete). CRUD is the foundation of any framework for development.
This function is simple to implement and fairly helpful, but the biggest disadvantage is that there are usually several such functions in the views in a large Django project. For example, all items in a Django project have CRUD actions, therefore this code is duplicated unnecessarily. Generic Class-based views are primarily for this purpose.
Step-by-Step Process for Creating Django Views
We created a model in the last tutorial, and now we’ll connect it to the view. We used view.py in our Django App tutorial, but we’ll go over it again from the beginning here.
The steps for creating Django views for our project are as follows:
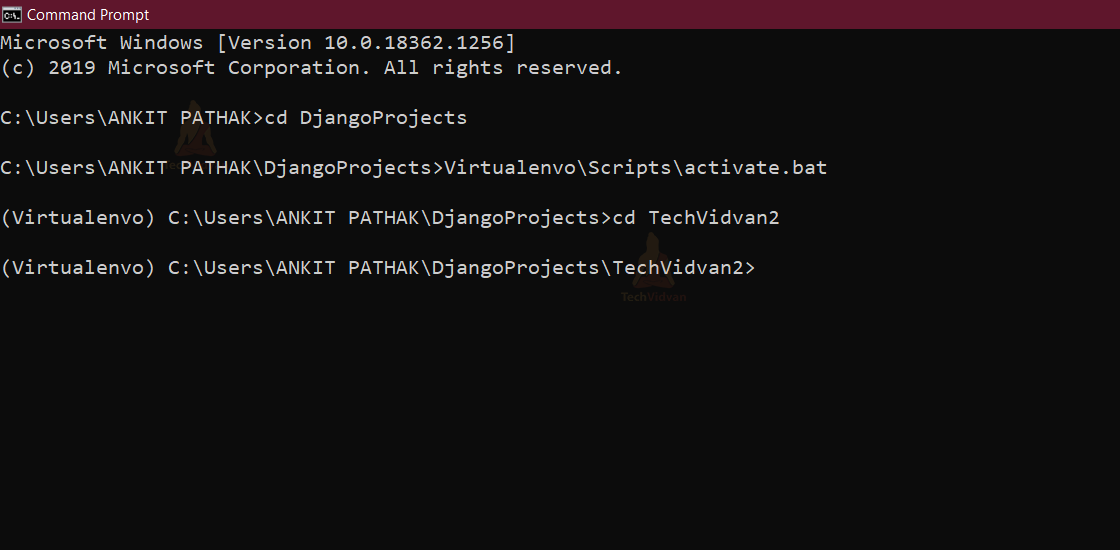
Step 1: Launch Windows PowerShell or Command Prompt.
Navigate to the location where you created the Virtual Environment setup.
Type the following command to activate your virtual environment:
(virtual-environment-name)\Scripts\activate.bat
Your virtual environment is now active.
Change the directory to your project folder. Here it is “TechVidvan2”.
Step 2: Inserting the app into the urls.py file
The reason we included the app in our urls.py file is so that anyone searching for the app’s URL can see it.
First, we’ll work on our app. In our Employee directory, we’ll need to make a new python file. To do so, drag your mouse on the new file logo, which is right above your app’s name. This will bring up a search field. It will create a new file inside your app directory if you type urls.py in it.
Simply copy and paste the following command into the urls.py file you just created:
Line1      from django.urls import path
Line 2     from.import views
Line 3
Line 4    urlpatterns = [
Line 5      path('', views.index, name='index'),
Line 6           ]
Line 1 path() is a function that is imported. This import is common to all urls.py files and is required for the URL dispatcher to function.
Line 2 imports the views.py file from the local directory. In this situation, the dot operator (“.”) stands for the current package, therefore this means “import all views from the current package”.
Line 4 talks about urlpatterns. The list is divided into numerous lines for reading, with one URL pattern per line.
Let’s understand it one by one:
” is equivalent to an empty string. It will also match the “/” because Django eliminates the slash automatically. In other words, http://example.com and http://example.com/ are both valid.
Views.index refers to the index view. The dot operator, in other words, points to the index view in the views.py file we imported on line 2.
name=’index’. You should always name your URLs, even if it’s not required. We give URLs names so that they may be referenced in code (reverse lookup).
Step 3: Changing the urls.py file in the Root Folder.
Open the project’s urls.py file, which is under the root folder. Add this to the urlpatterns list now.
from django.contrib import admin
from django.urls import include, path

urlpatterns = [
path('admin/', admin.site.urls),
path('TechVidvan2/', views.Employee_Info),
]
Step 4: Making addition in view.py
Views.py is in charge of presenting text in our web application.
In the views.py file in the Employee directory (app directory), paste the following code:
from django.http import HttpResponse

def Employee_Info(request):
    return HttpResponse("<h1>Welcome to TechVidvan Employee Portal</h1>")
We’ve imported a HttpResponse and written a function called Employee_Info that takes a request as an input. In the urls.py file, we used the index function.
We return the HttpResponse from this function, which takes an argument as a request ().
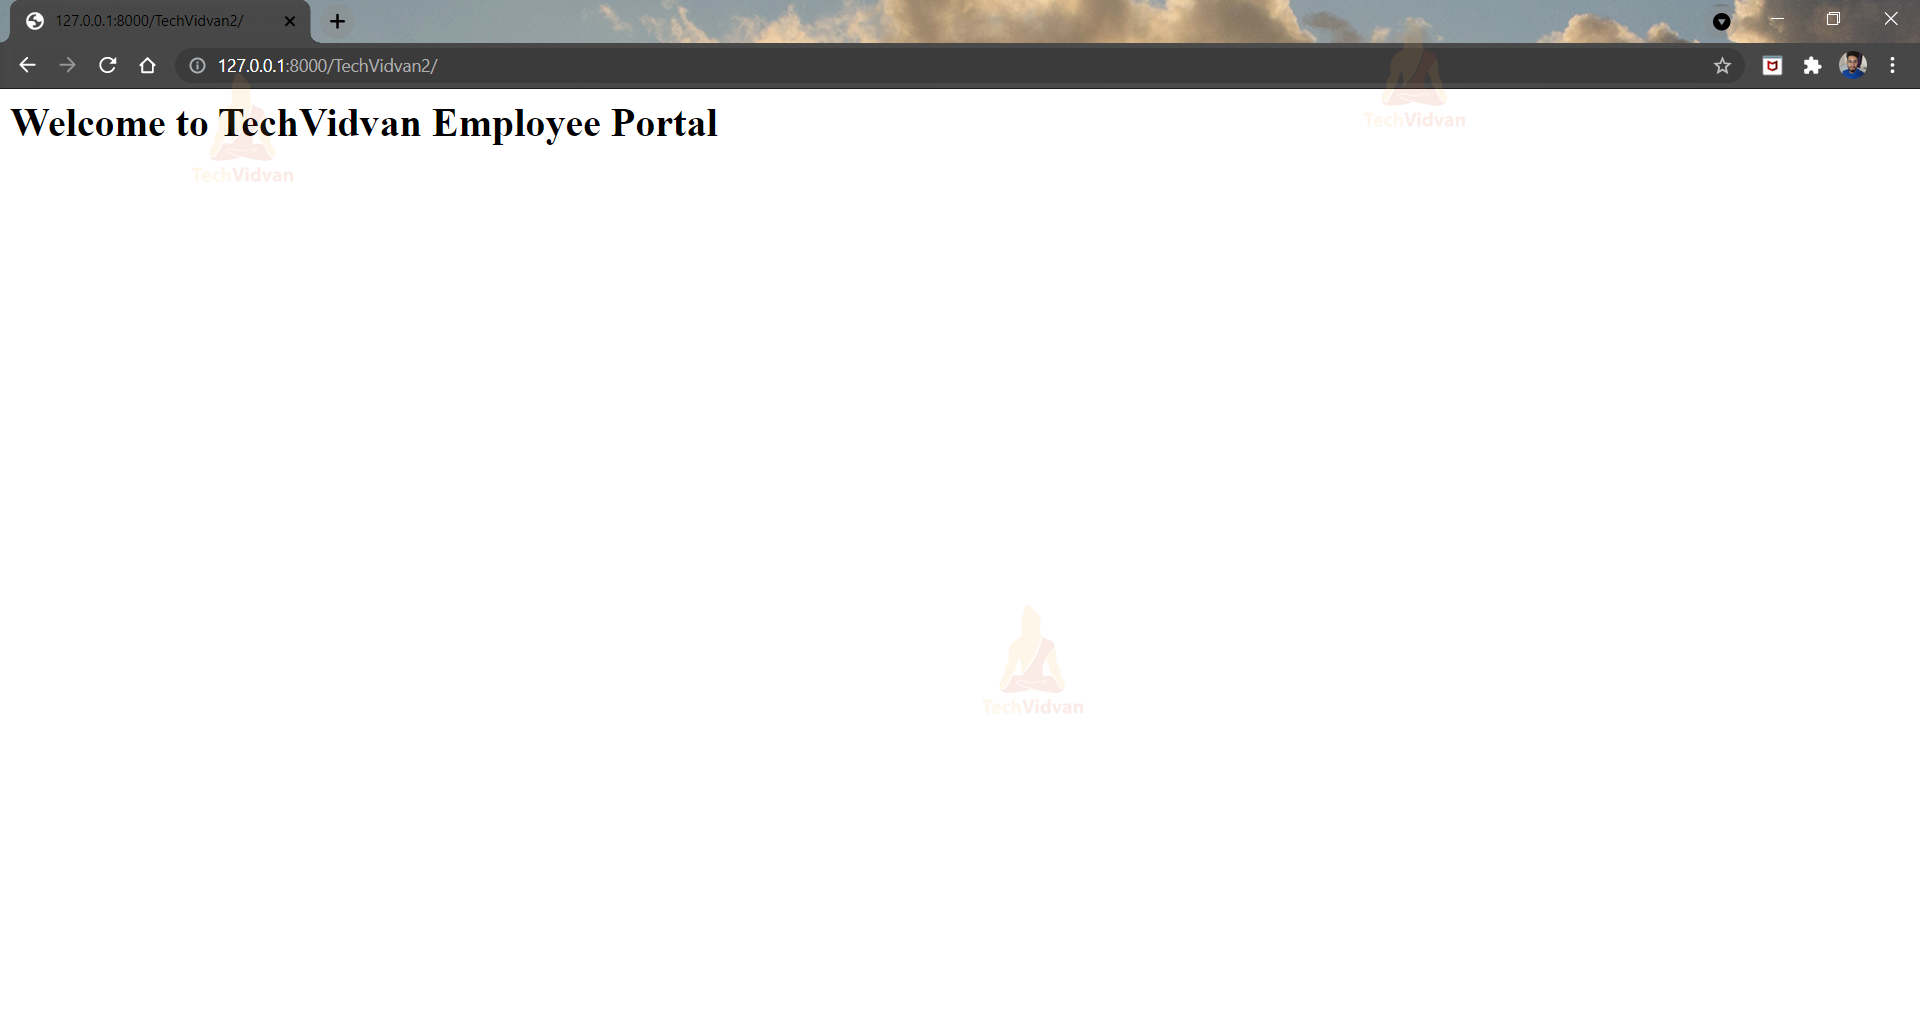
Step 5: View in Action
Run the following command in the terminal of Visual Studio Code:
python manage.py runserver
To run this view, type the following in the URL bar;
http://127.0.0.1:8000/TechVidvan2/
This will start your app and give you the following results.
Returning Errors in Django
Django comes with a number of built-in error classes, all of which are subclasses of HttpResponse and are used to display error messages as HTTP responses. The following are some of the classes available.
| Class | Description |
| class HttpResponseNotModified | It indicates that a page hasn’t been changed since the user’s last request (status code 304). |
| class HttpResponseBadRequest | It works in the same way as HttpResponse, but with a 400 status code. |
| class HttpResponseNotFound | It behaves similarly to HttpResponse, but with a 404 status code. |
| class HttpResponseNotAllowed | It behaves similarly to HttpResponse, but with a 410 status code. |
| HttpResponseServerError | It works in the same way as HttpResponse, but with a 500 status code. |
Django View HTTP Decorators
HTTP Decorators are used to limiting access to a view based on the method of request.
These decorators are specified in django.views.decorators.http, and if the conditions aren’t met, they return a django.http.HttpResponseNotAllowed.
Syntax:
django.http.HttpResponseNotAllowed.
Django Http Decorator Example
Views.py
def show(request):
    return HttpResponse('<h1>This is Http GET request.</h1>')
Urls.py
path('shows', views.show)
Output:

Summary
Views are a crucial part of web development, especially when adopting MVC frameworks like Django. This essential ability is advantageous for Python developers who work as Django developers, backend engineers, or full-stack engineers.
Django is different from other frameworks in that it has a specific way of doing things called The Django Way. Although Django is sometimes criticised for its monolithic style, it is fairly nice to use because it has a very rational approach to performing tasks.
Now you should have a good understanding of Django Views. If you have any questions on the topic, please leave them in the comments area. We’ll get to the bottom of it as soon as possible.