Python Django Project – Online Car Rental System
Online Car Rental System
An online car rental system is a digital platform that allows individuals or businesses to rent vehicles over the Internet. It facilitates the process of finding, booking, and managing car rentals without the need for physical interactions or visits to a rental agency. These systems are designed to provide convenience and efficiency to both customers and car rental companies.
About Python Django Online Car Rental System
An online car rental management system (CRMS) aims to streamline car rental operations by efficiently managing the vehicle inventory, automating reservation processes, and enhancing customer relationship management. It provides a user-friendly platform for customers to find and book rental vehicles while offering rental companies a centralized system to manage their fleets effectively.
Prerequisite For Python Django Online Car Rental System
- Proficiency in the Python programming language and a comprehensive grasp of the Django web framework are essential requirements.
- A strong understanding of HTML, CSS, and JavaScript is required to develop the project’s user interface.
- Relational Database: You will need to have a good understanding of relational databases, such as SQLite, MySQL, or PostgreSQL, to create and manage the database for the Online Car Rental system project.
Download Python Django Online Car Rental System Project
Please download the source code of the Python Django Online Car Rental System App Project: Python Django Online Car Rental System Project Code.
Project Setup
Minimum system configuration:
- The operating system requirements include Windows 7 or later, macOS 10.11 or later, or a modern operating system.
- Linux distribution.
- Processor: Intel Core i3 or equivalent.
- RAM: 4 GB or more
- Disk Space: 5 GB or more.
- You have the flexibility to utilize browsers like Google Chrome, Mozilla Firefox, or Microsoft Edge for your browsing needs.
Visual Studio Code can be downloaded from the official website.
When accessing the download page, you have the option to choose the appropriate installer based on your operating system, be it Windows, macOS, or Linux. After downloading the installer, run it and proceed with the installation instructions to install VS Code on your computer.
Here’s a brief explanation of each step, along with the commands to execute:
1. To ensure Python is installed, please download and install the most recent version of Python from the official website. Follow the installation instructions provided for your specific operating system.
2. Install pip: Download the get-pip.py script and run python get-pip.py to install pip.
3. Create a virtual environment: Run python -m venv myenv to create a new virtual environment named ‘myenv’.
4. Activate the virtual environment: Run source myenv/bin/activate on Linux/Mac or myenv\Scripts\activate on Windows to activate the virtual environment.
5. Install Django: Run pip install django to install the latest stable version of Django.
6. Verify installation: Run python -m django –version to verify that Django is installed correctly.
7. Create a new Django project: Run Django-admin start project project to create a new Django project named ‘project’.
8. Start the development server: Run python manage.py runserver to start the development server.
That’s it! A working installation of Django should now be in place, and you should be ready to start building your web application.
Steps to Create “Online Car Rental System” Project
1. Open the terminal from the folder where we want to create the project. Right-click on mouse -> open in terminal -> write “code .” (space is mandatory between code and “.”)
2. Then go to the project folder -> urls.py and inside urls.py of project, do this -> add “include” in import as shown in the code below and add “path(“”, include(“app.urls”))”
3. Create urls.py in the app of the Online Car Rental System project(urls.py is mandatory in both project and app).
4. In setting.py, add the ‘app name”.
5. Now, runserver to check if everything is working or not. If you see the below image, then we are done with the installation part. To runserver, run command in terminal as follows “py manage.py runserver”.
6. Now, create the models.py using the ORM technique as follows.
To create the above field in the database, run the following commands as follows:
● Py manage.py makemigrations
● Py manage.py migrate
The file structure will look like this for our project:
App(main) -> Templates -> app(folder inside app) -> registration.html, login.html, votingpage.html.
Now, execute the project step by step with code as follows:
Let’s Move ahead with an amazing Python Django Online Car Rental System Project:
1. Open the terminal from the folder where we want to create the project.
Right-click on mouse -> open in terminal -> write “code .” (space is mandatory between code and “.”)
2. Open the terminal from the folder where we want to create the project.
Right-click on mouse -> open in terminal -> write “code .” (space is mandatory between code and “.”)
3. Then go to the project folder -> urls.py and inside urls.py of project, do this -> add “include” in import as shown in the code below and add “path(“”, include(“app.urls”))”
from django.db import models
from django.contrib.auth.models import User

class CarManager(models.Manager):
    def create_car(self, model, price_per_hour, image):
        car = self.model(model=model, price_per_hour=price_per_hour, image=image)
        car.save()
        return car

class Car(models.Model):
    model = models.CharField(max_length=100)
    price_per_hour = models.DecimalField(max_digits=6, decimal_places=2)
    image = models.ImageField(upload_to='car_images')
    created_by = models.ForeignKey(User, on_delete=models.CASCADE)
    is_rented = models.BooleanField(default=False)

    objects = CarManager()

    def __str__(self):
        return self.model

class CartItem(models.Model):
    car = models.ForeignKey(Car, on_delete=models.CASCADE)
    user = models.ForeignKey(User, on_delete=models.CASCADE)
    quantity = models.PositiveIntegerField(default=1)

    def __str__(self):
        return f"{self.quantity} x {self.car.model}"
Model Definitions: The code defines three Django models – Car, CartItem, and CarManager.
Car Model: Represents a car with model name, rental price per hour, image, owner, and rental status.
CartItem Model: Represents an item (car) added to a user’s shopping cart with quantity.
CarManager: A custom manager for the Car model, providing a method for convenient car creation.
4. Create data
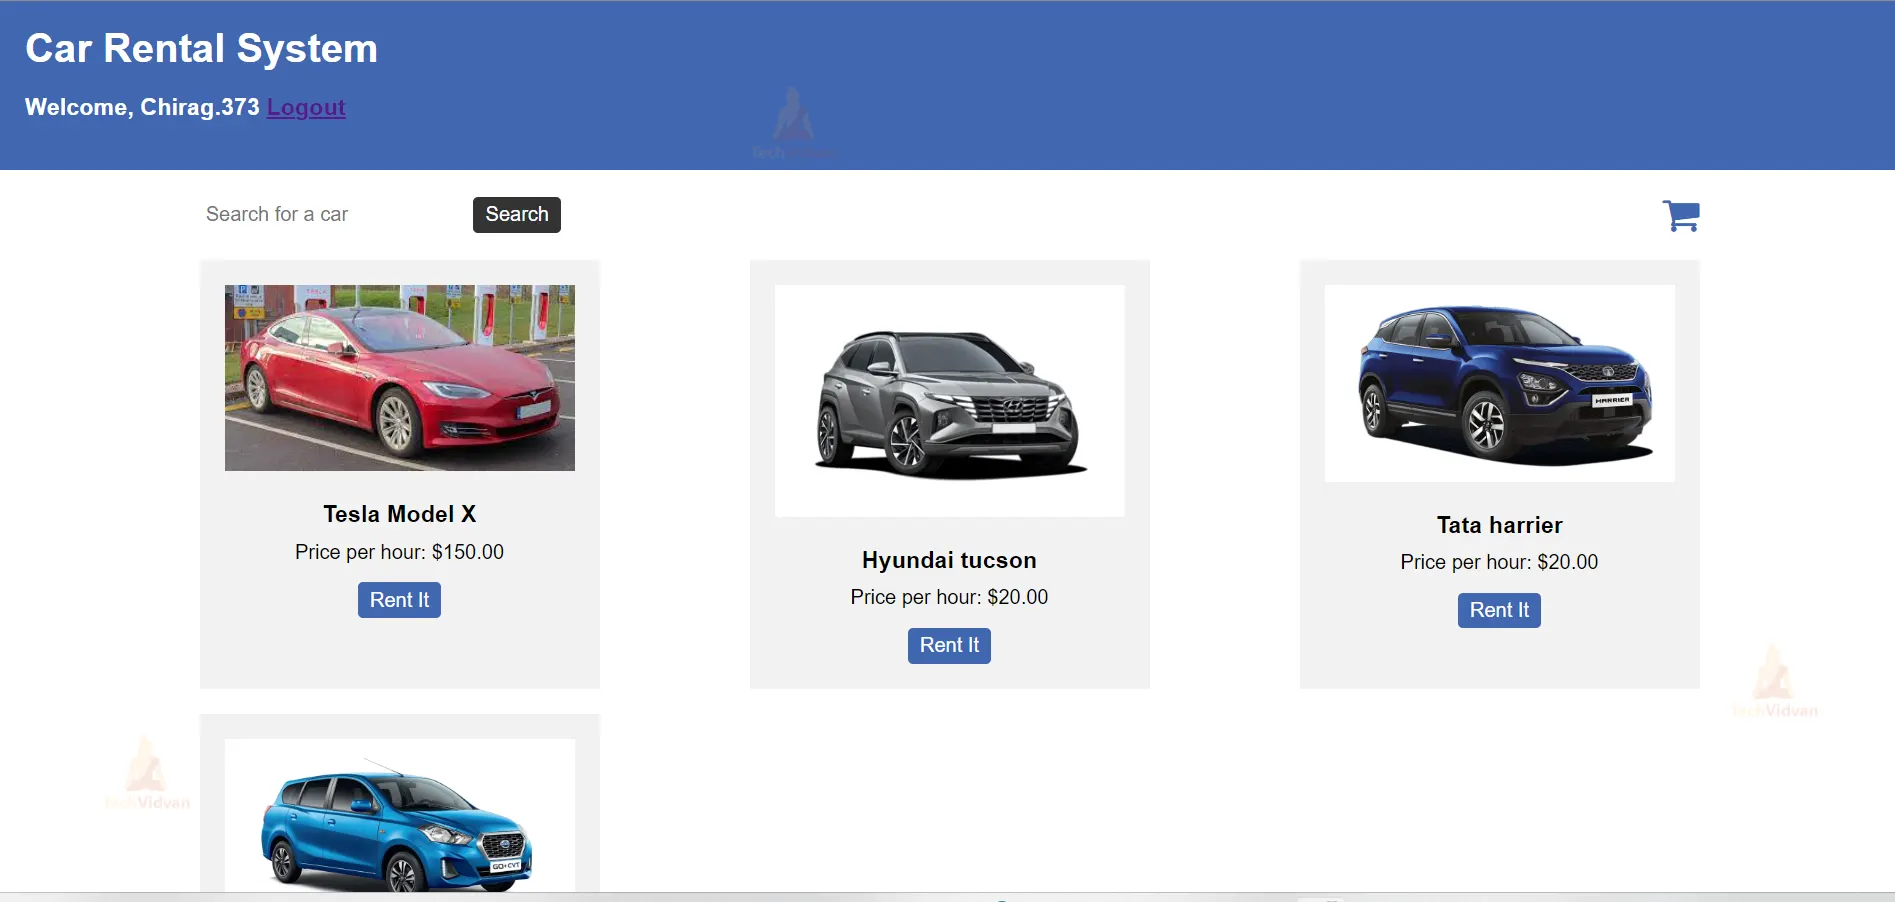
templates/app -> homepage.html
<div class="container">
        <div class="search-bar">
            <form action="" method="GET">
                <input type="text" name="q" placeholder="Search for a car" value="{{ search_query }}">
                <button type="submit">Search</button>
            </form>
            <a href="{% url 'cart' %}" class="cart_btn" style="text-decoration: none;"><i class="fa fa-shopping-cart" style="font-size:32px;color: #4267B2;" ></i></a>
        </div>

        <div class="product-container">
            {% if cars %}
            {% for car in cars %}
            <div class="product-card">
                <img src="{{ car.image.url }}" alt="{{ car.model }}">
                <h3>{{ car.model }}</h3>
                <p>Price per hour: ${{ car.price_per_hour }}</p>
                <a href="{% url 'add_to_cart' pk=car.pk %}"><button>Rent It</button></a>
            </div>
            {% endfor %}
            {% else %}
            <p>No cars found.</p>
            {% endif %}
        </div>
    </div>
5. Views.py
@login_required(login_url="login")
def homepage(request):
    search_query = request.GET.get("q", "")
    cars = Car.objects.all()

    if search_query:
        cars = cars.filter(model__icontains=search_query)

    context = {
        "cars": cars,
        "search_query": search_query,
    }

    return render(request, "app/homepage.html", context)
The @login_required(login_url=”login”) decorator ensures that only authenticated users can access the view by redirecting unauthenticated users to the “login” URL.
The view function “homepage” receives a request object and retrieves the “q” parameter from the URL’s query string as the search query.
All car objects are fetched from the database and stored in the “cars” queryset.
If a search query is provided, the “cars” queryset is filtered to include only cars with model names containing the search query (case-insensitive). The filtered “cars” queryset and the search query itself are passed as context data to the “homepage.html” template for rendering.
Urls.py
path("", homepage, name="homepage"),
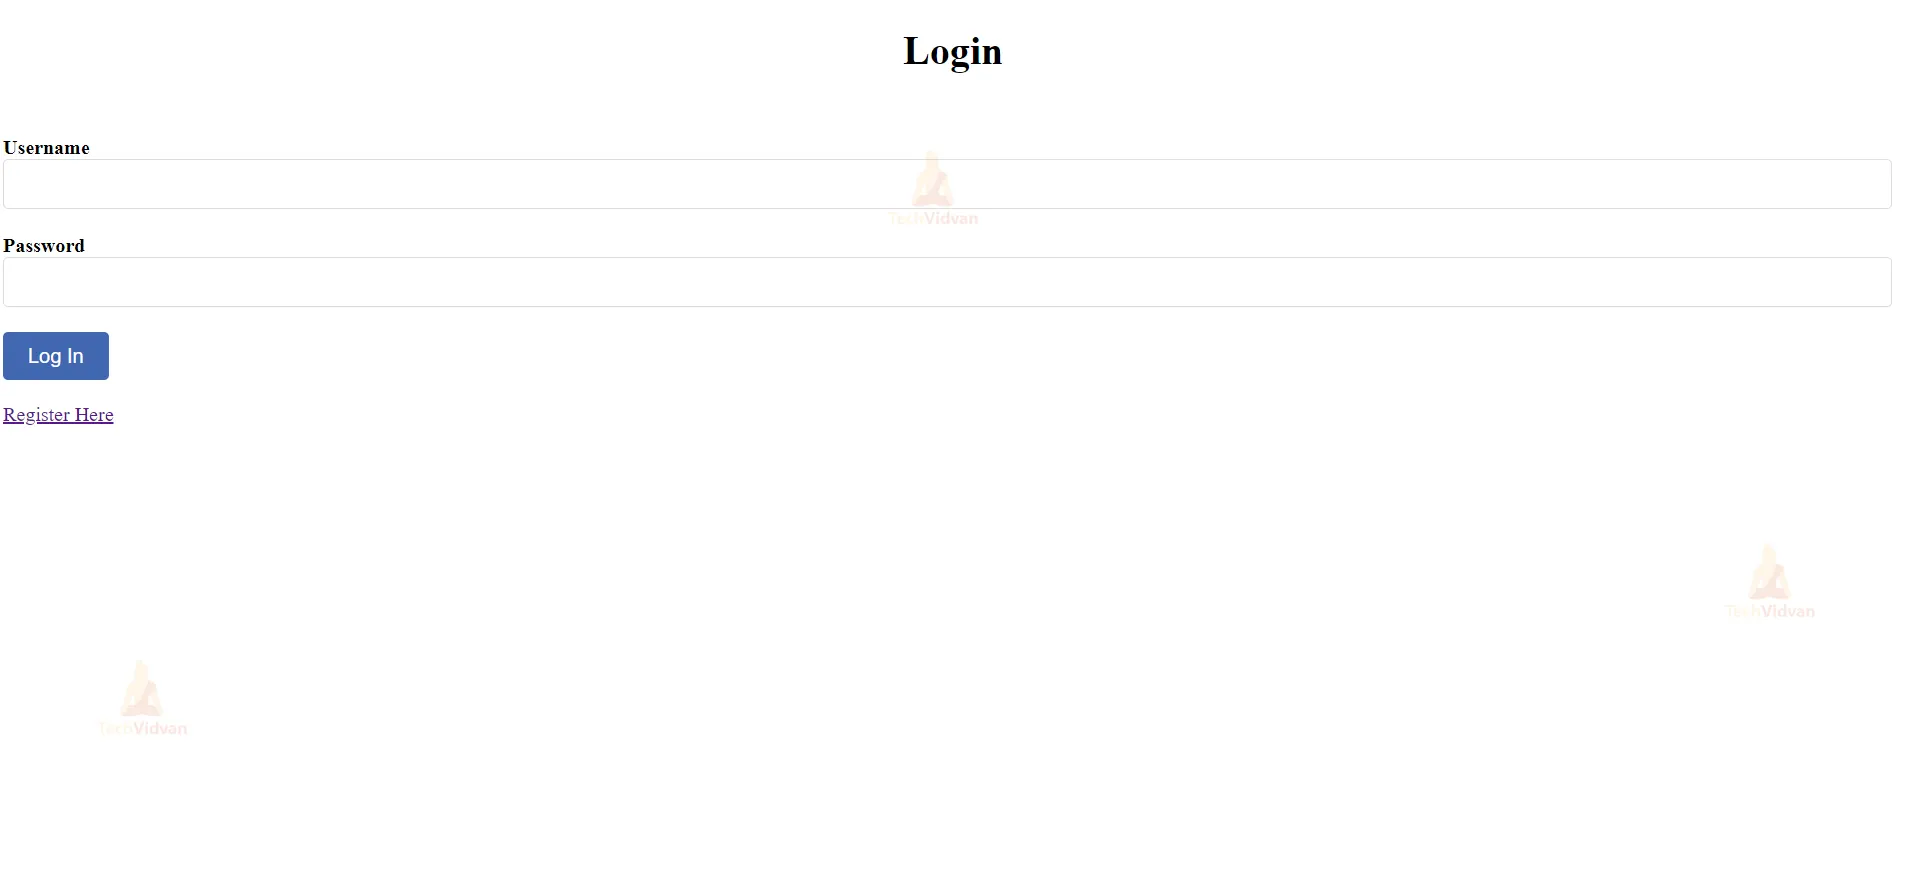
6. For the Login Process
<form method="POST" action="{% url 'login' %}">
                    {% csrf_token %}
                    <div class="form-group">
                        <label for="id_username">Username</label>
                        <input type="text" name="username" id="id_username" class="form-control" required>
                    </div>
                    <div class="form-group">
                        <label for="id_password">Password</label>
                        <input type="password" name="password" id="id_password" class="form-control" required>
                    </div>
                    <button type="submit" class="btn btn-primary">Log In</button>
                </form>
Views.py
def login_view(request):
    if request.method == "POST":
        username = request.POST["username"]
        password = request.POST["password"]

        user = authenticate(request, username=username, password=password)
        if user is not None:
            login(request, user)
            return redirect("homepage")
        else:
            messages.error(request, "Invalid username or password")
            return redirect("login")

    return render(request, "app/login.html")
The login_view function handles the login process. When a POST request is received (typically from a login form submission), it extracts the “username” and “password” fields from the request’s POST data. Then, it uses the authenticate function provided by Django to check if the given credentials are valid and correspond to a user in the database. If the credentials are valid, the user is logged in using the login function, and the user is redirected to the “homepage” URL. If the credentials are invalid, an error message is displayed using Django’s messages framework, and the user is redirected back to the “login” page.
If the request method is not POST (e.g., a GET request), it means the user is accessing the login page for the first time. In this case, the “login.html” template is rendered, presenting the user with the login form.
Urls.py
path('login_view', login_view, name='login'),
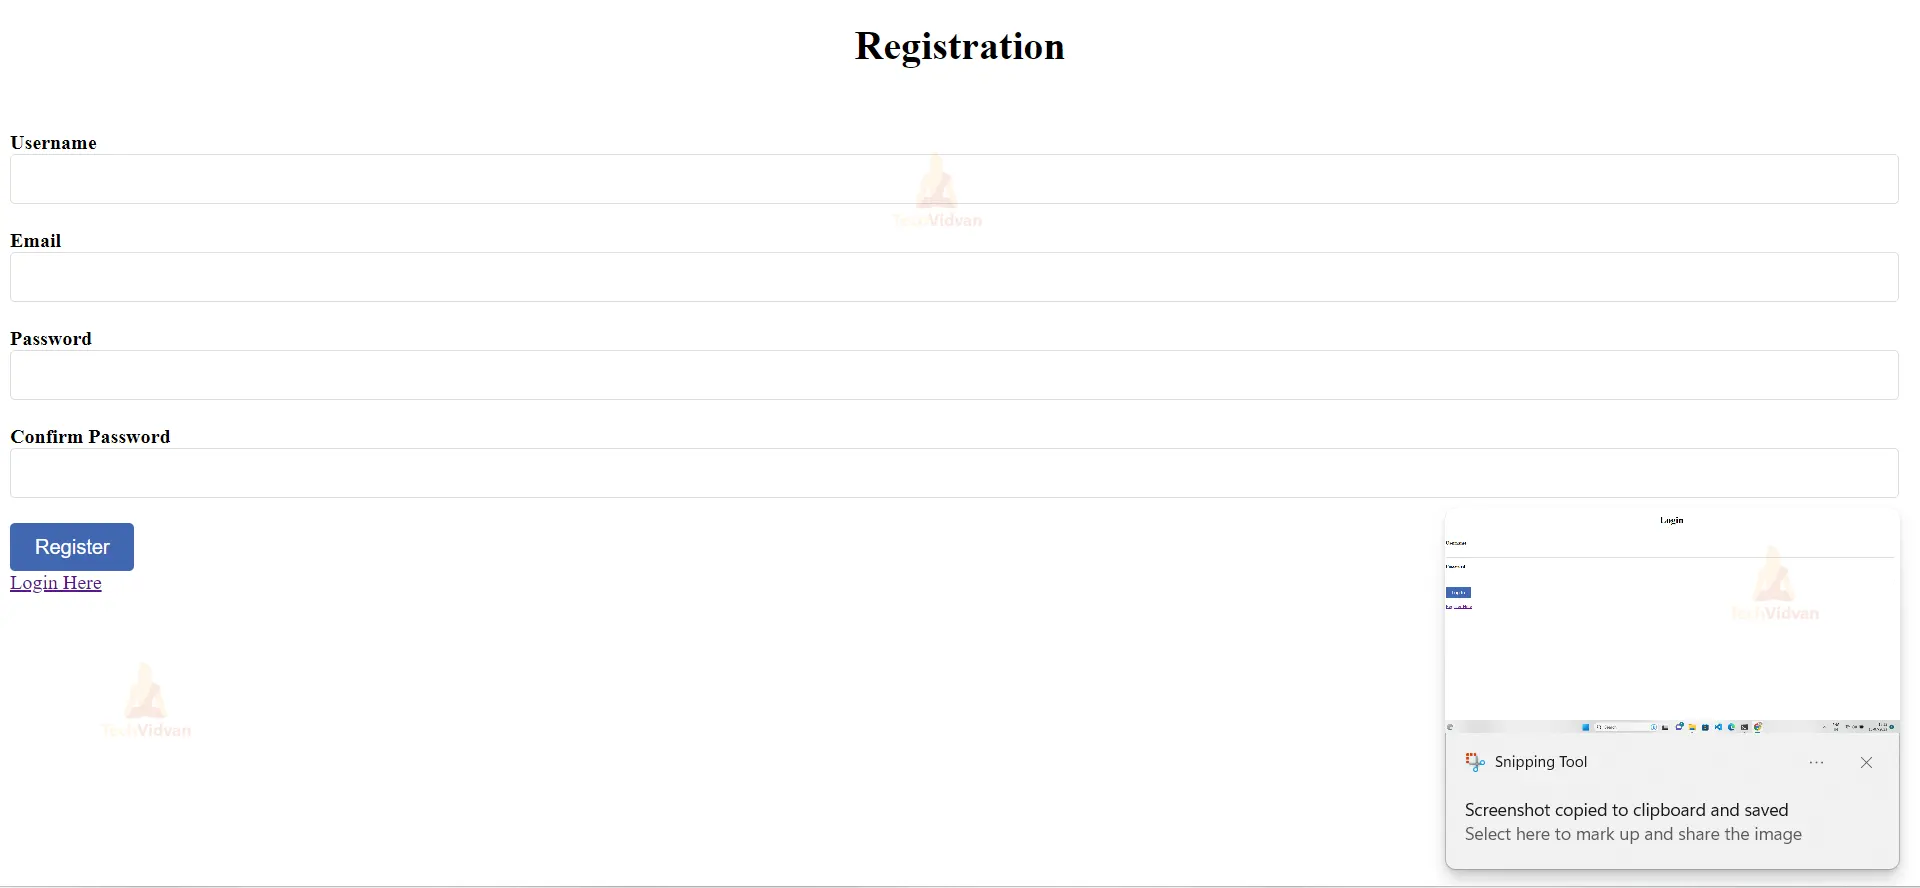
7. For Register Process
<form method="POST" action="{% url 'register' %}">
                    {% csrf_token %}
                    <div class="form-group">
                        <label for="id_username">Username</label>
                        <input type="text" name="username" id="id_username" class="form-control" required>
                    </div>
                    <div class="form-group">
                        <label for="id_email">Email</label>
                        <input type="email" name="email" id="id_email" class="form-control" required>
                    </div>
                    <div class="form-group">
                        <label for="id_password">Password</label>
                        <input type="password" name="password" id="id_password" class="form-control" required>
                    </div>
                    <div class="form-group">
                        <label for="id_confirm_password">Confirm Password</label>
                        <input type="password" name="confirm_password" id="id_confirm_password" class="form-control"
                            required>
                    </div>
                    <button type="submit" class="btn btn-primary">Register</button>
                    <br>
                    <a href="{% url 'login' %}">Login Here</a>
                </form>
Views.py
def register(request):
    if request.method == "POST":
        username = request.POST["username"]
        email = request.POST["email"]
        password = request.POST["password"]
        confirm_password = request.POST["confirm_password"]

        if password == confirm_password:
            if User.objects.filter(username=username).exists():
                messages.error(request, "Username is already taken")
                return redirect("register")
            elif User.objects.filter(email=email).exists():
                messages.error(request, "Email is already registered")
                return redirect("register")
            else:
                user = User.objects.create_user(
                    username=username, email=email, password=password
                )
                user.save()
                messages.success(
                    request, "Registration successful. You can now log in."
                )
                return redirect("login")
        else:
            messages.error(request, "Passwords do not match")
            return redirect("register")

    return render(request, "app/register.html")
The register function handles user registration. When a POST request is received (usually from a registration form submission), it extracts the “username,” “email,” “password,” and “confirm_password” fields from the request’s POST data. It then performs the following checks:
- Ensures that the passwords match (password == confirm_password).
- Check if the provided username or email already exists in the database using User.objects.filter(). If the username or email is already taken, an appropriate error message is displayed using Django’s messages framework, and the user is redirected back to the “register” page.
- If the username and email are available, a new user is created and saved to the database using User.objects.create_user(). A success message is displayed to the user, indicating that the registration was successful, and they are redirected to the “login” page.
If the request method is not POST (e.g., a GET request), it means the user is accessing the registration page for the first time. In this case, the “register.html” template is rendered, presenting the user with the registration form.
Urls.py
path('register/', register, name='register'),
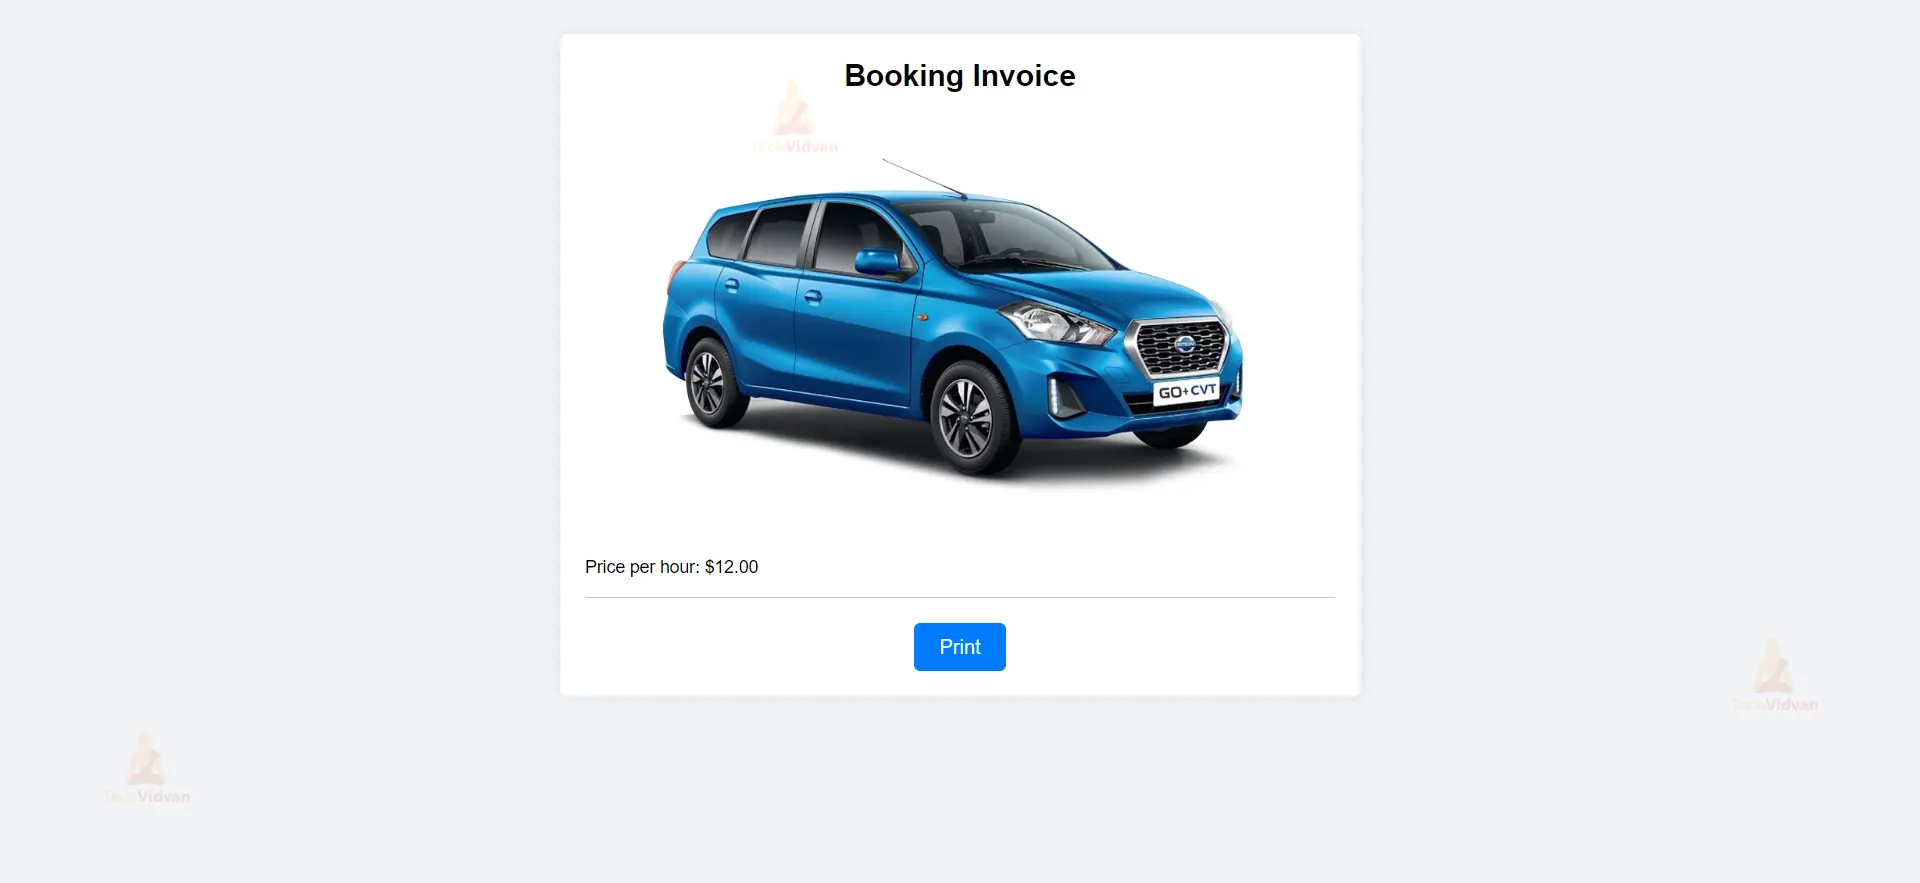
8. For Invoice
<div class="container">
    <h1>Booking Invoice</h1>

    <div class="product-details">
      <img src="{{ car.image.url }}" alt="{{ car.model }}">
      <h3>{{ cart_item.car.model }}</h3>
      <p>Price per hour: ${{ car.price_per_hour }}</p>
    </div>

    <div class="button-container">
      <button id="print-button" class="print-button">Print</button>
    </div>
  </div>
Views.py
@login_required(login_url="login")
def booking_invoice(request, pk):
    car = get_object_or_404(Car, pk=pk)

    if not car.is_rented:
        car.is_rented = True
        car.save()

    context = {
        'car': car,
    }

    return render(request, 'app/invoice.html', context)
The @login_required(login_url=”login”) decorator ensures that only authenticated users can access the view function “booking_invoice.” If a user who is not logged in tries to access this view, they will be redirected to the “login” URL.
The view function “booking_invoice” takes two parameters: request and pk. Pk is the primary key of the car that the user wants to book. The get_object_or_404 function is used to retrieve the Car object corresponding to the given primary key (pk) from the database. If the object with the specified primary key does not exist, a 404 Page Not Found response is returned.
The code checks whether the car is already rented or not (car.is_rented). If the car is not rented (is_rented is False), it updates the is_rented attribute of the car to True and saves the changes to the database. This presumably marks the car as “rented” after a successful booking.
The view creates a context dictionary containing the “car” object and passes it to the “invoice.html” template for rendering. The “invoice.html” template can now access the car details to generate the booking invoice.
views.py
@login_required(login_url="login")
def cartpage(request):
    return render(request, "app/cart.html")

@login_required(login_url="login")
def add_to_cart(request, pk):
    car = get_object_or_404(Car, pk=pk)
    user = request.user
    cart_item, created = CartItem.objects.get_or_create(car=car, user=user)
    if not created:
        cart_item.quantity += 1
        cart_item.save()
    return redirect('cart')

@login_required(login_url="login")
def cart(request):
    cart_items = CartItem.objects.filter(user=request.user)
    total_price = sum(cart_item.car.price_per_hour * cart_item.quantity for cart_item in cart_items)
    context = {
        'cart_items': cart_items,
        'total_price': total_price
    }
    return render(request, 'app/cart.html', context)

@login_required(login_url="login")
def remove_from_cart(request, pk):
    cart_item = get_object_or_404(CartItem, pk=pk, user=request.user)
    if cart_item.quantity > 1:
        cart_item.quantity -= 1
        cart_item.save()
    else:
        cart_item.delete()
    return redirect('cart')
- cartpage(): This function renders the cart page. It requires the user to be logged in.
- add_to_cart(): This function adds a car to the cart. It requires the user to be logged in. It gets the car from the database and creates a CartItem object for the user. If the car is already in the cart, the quantity is incremented.
- cart(): This function renders the cart page with the total price. It requires the user to be logged in. It gets all the CartItem objects for the user and calculates the total price.
- remove_from_cart(): This function removes a car from the cart. It requires the user to be logged in. It gets the CartItem object from the database and removes it. If the quantity of the car is 1, the CartItem object is deleted.
Here is the complete code for the project:
templates/app -> login.html
<!DOCTYPE html>
<html lang="en">

<head>
    <meta charset="UTF-8">
    <meta name="viewport" content="width=device-width, initial-scale=1.0">
    <title>Document</title>
    <style>
        .container {
            margin-top: 50px;
        }

        .form-group {
            margin-bottom: 20px;
        }

        label {
            font-weight: bold;
        }

        input[type="text"],
        input[type="password"] {
            width: 98%;
            padding: 10px;
            border: 1px solid #ddd;
            border-radius: 4px;
            font-size: 16px;
        }

        button[type="submit"] {
            padding: 10px 20px;
            background-color: #4267B2;
            color: #fff;
            border: none;
            border-radius: 4px;
            font-size: 16px;
            cursor: pointer;
        }

        button[type="submit"]:hover {
            background-color: #385898;
        }

        .error-message {
            color: red;
            margin-top: 10px;
        }
    </style>
</head>

<body>

    <center>
        <h1>Login</h1>
    </center>
    <center>
        <p style="color: tomato;">
            {% if messages %}
            {% for message in messages %}
            {{ message }}
            {% endfor %}
            {% endif %}
        </p>
    </center>
    <div class="container">
        <div class="row justify-content-center">
            <div class="col-md-6">
                <form method="POST" action="{% url 'login' %}">
                    {% csrf_token %}
                    <div class="form-group">
                        <label for="id_username">Username</label>
                        <input type="text" name="username" id="id_username" class="form-control" required>
                    </div>
                    <div class="form-group">
                        <label for="id_password">Password</label>
                        <input type="password" name="password" id="id_password" class="form-control" required>
                    </div>
                    <button type="submit" class="btn btn-primary">Log In</button>
                </form>
            </div><br>
            <a href="{% url 'register' %}">Register Here</a>
        </div>
    </div>
</body>

</html>
templates/app -> register.html
<!DOCTYPE html>
<html>
<head>
<title>Facebook-inspired Shopping Cart</title>
<style>
/* Global Styles */
body {
font-family: Arial, sans-serif;
}
/* Cart Styles */
.cart-container {
width: 500px;
margin: 0 auto;
}
.product {
display: flex;
align-items: center;
padding: 10px;
border-bottom: 1px solid #ccc;
}
.product img {
width: 80px;
margin-right: 10px;
}
.product-details {
flex-grow: 1;
}
.product-title {
font-weight: bold;
}
.product-price {
color: #888;
}
.product-remove {
color: red;
cursor: pointer;
}
.total-price {
text-align: right;
font-weight: bold;
margin-top: 10px;
}
</style>
</head>
<body>
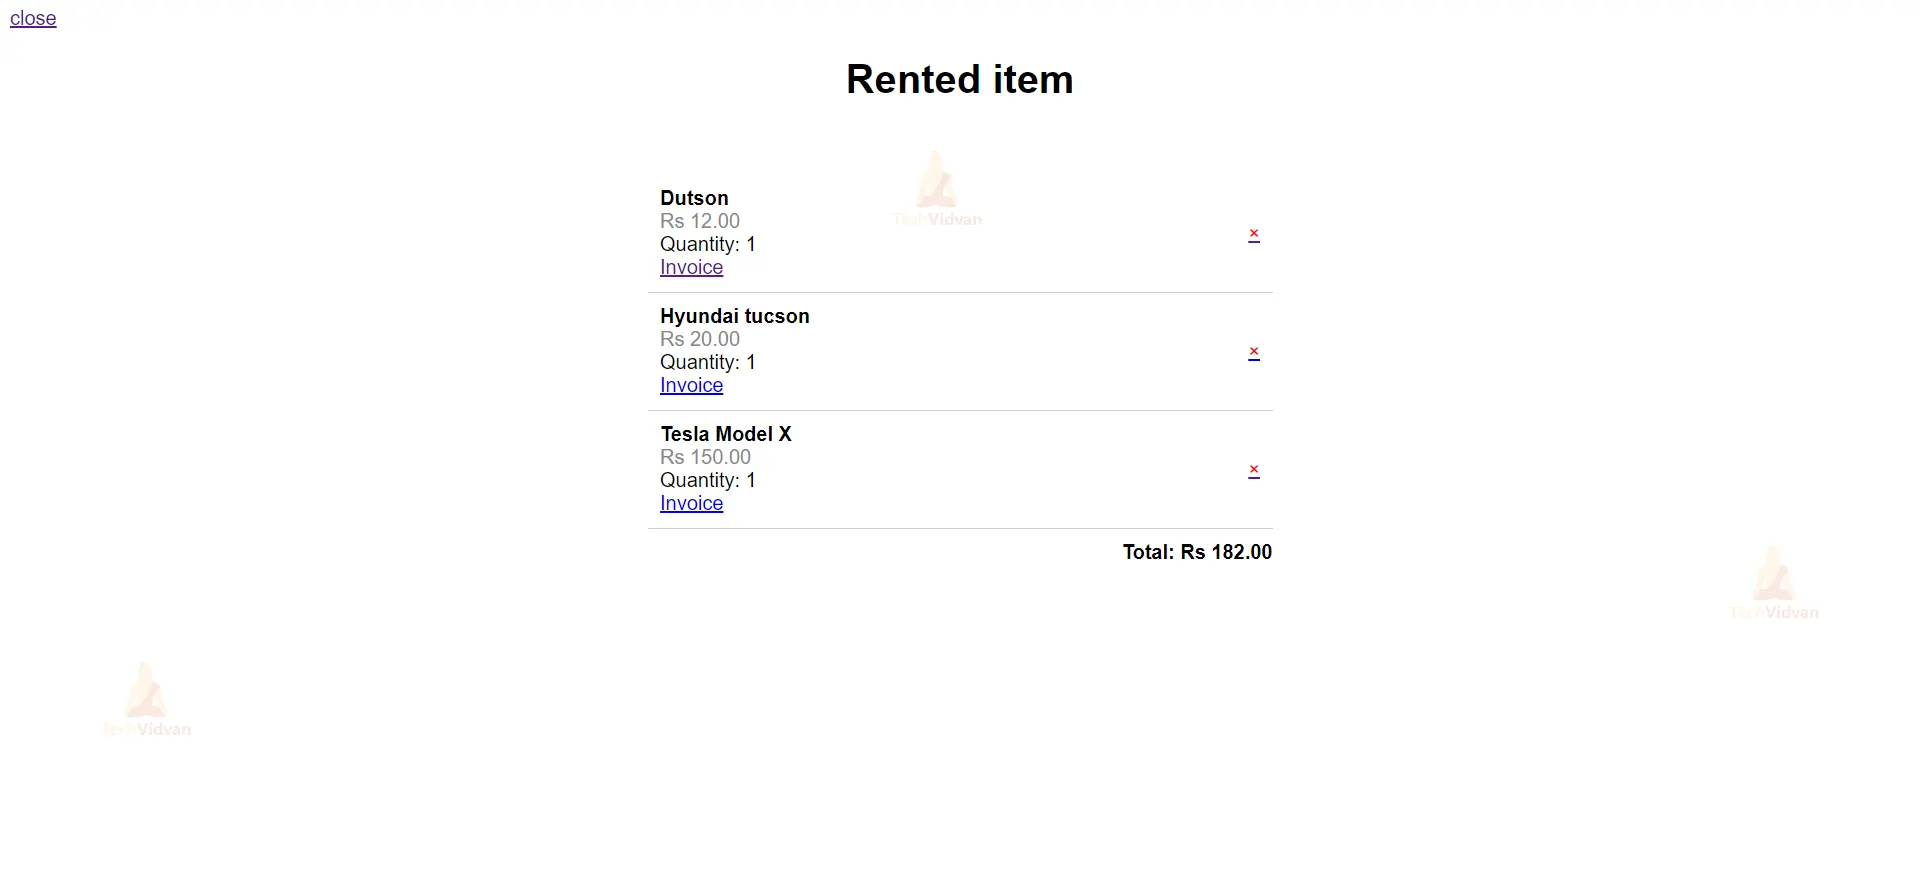
<a href="{% url 'homepage' %}">close</a>
<center><h1>Rented item</h1></center>
<br><br>
<div class="cart-container">
{% if cart_items %}
{% for cart_item in cart_items %}
<div class="product">
<div class="product-details">
<div class="product-title">{{ cart_item.car.model }}</div>
<div class="product-price">Rs {{cart_item.car.price_per_hour}}</div>
<div>Quantity: {{ cart_item.quantity }}</div>
<a href="{% url 'booking_invoice' pk=cart_item.pk %}">Invoice</a>
</div>
<a href="{% url 'remove_from_cart' pk=cart_item.pk %}"><div class="product-remove">×</div></a>
</div>
{% endfor %}
{% endif %}
{% if total_price %}
<div class="total-price">Total: Rs {{total_price}}</div>
{% endif %}
</div>
</body>
</html>
templates/app -> homepage.html
<!DOCTYPE html>
<html>

<head>
    <title>Car Rental System</title>
    <style>
        body {
            font-family: Arial, sans-serif;
            margin: 0;
            padding: 0;
        }

        header {
            background-color: #4267B2;
            color: #fff;
            padding: 20px;
            text-align: left;
        }

        h1 {
            margin: 0;
            display: inline-block;
        }

        .container {
            max-width: 1200px;
            margin: 20px auto;
            padding: 0 20px;
        }

        .search-bar {
            margin-bottom: 20px;
            display: flex;
            justify-content: space-between;
            align-items: center;
        }

        .search-bar input[type="text"] {
            padding: 5px;
            border: none;
            border-radius: 4px;
            font-size: 16px;
            flex-grow: 1;
        }

        .search-bar button {
            padding: 5px 10px;
            background-color: #333;
            color: #fff;
            border: none;
            border-radius: 4px;
            font-size: 16px;
            cursor: pointer;
            margin-left: 10px;
        }

        .product-container {
            display: flex;
            flex-wrap: wrap;
            justify-content: space-between;
        }

        .product-card {
            width: calc(25% - 20px);
            margin-bottom: 20px;
            background-color: #f2f2f2;
            padding: 20px;
            text-align: center;
        }

        .product-card img {
            max-width: 100%;
            height: auto;
            margin-bottom: 10px;
        }

        .product-card h3 {
            margin: 10px 0;
        }

        .product-card p {
            margin: 5px 0;
        }

        .product-card button {
            padding: 5px 10px;
            background-color: #4267B2;
            color: #fff;
            border: none;
            border-radius: 4px;
            font-size: 16px;
            cursor: pointer;
            margin-top: 10px;
        }
    </style>
    <link rel="stylesheet" href="https://cdnjs.cloudflare.com/ajax/libs/font-awesome/4.7.0/css/font-awesome.min.css">
</head>

<body>
    <header>
        <h1>Car Rental System</h1>
        {% if request.user.is_authenticated %}
        <h3>Welcome, {{ request.user }} <a href="{% url 'signout' %}">Logout</a></h3>
        {% endif %}
    </header>

    <div class="container">
        <div class="search-bar">
            <form action="" method="GET">
                <input type="text" name="q" placeholder="Search for a car" value="{{ search_query }}">
                <button type="submit">Search</button>
            </form>
            <a href="{% url 'cart' %}" class="cart_btn" style="text-decoration: none;"><i class="fa fa-shopping-cart" style="font-size:32px;color: #4267B2;" ></i></a>
        </div>

        <div class="product-container">
            {% if cars %}
            {% for car in cars %}
            <div class="product-card">
                <img src="{{ car.image.url }}" alt="{{ car.model }}">
                <h3>{{ car.model }}</h3>
                <p>Price per hour: ${{ car.price_per_hour }}</p>
                <a href="{% url 'add_to_cart' pk=car.pk %}"><button>Rent It</button></a>
            </div>
            {% endfor %}
            {% else %}
            <p>No cars found.</p>
            {% endif %}
        </div>
    </div>
</body>

</html>
templates/app -> cart
<!DOCTYPE html>
<html>
<head>
<title>Facebook-inspired Shopping Cart</title>
<style>
/* Global Styles */
body {
font-family: Arial, sans-serif;
}
/* Cart Styles */
.cart-container {
width: 500px;
margin: 0 auto;
}
.product {
display: flex;
align-items: center;
padding: 10px;
border-bottom: 1px solid #ccc;
}
.product img {
width: 80px;
margin-right: 10px;
}
.product-details {
flex-grow: 1;
}
.product-title {
font-weight: bold;
}
.product-price {
color: #888;
}
.product-remove {
color: red;
cursor: pointer;
}
.total-price {
text-align: right;
font-weight: bold;
margin-top: 10px;
}
</style>
</head>
<body>
<a href="{% url 'homepage' %}">close</a>
<center><h1>Rented item</h1></center>
<br><br>
<div class="cart-container">
{% if cart_items %}
{% for cart_item in cart_items %}
<div class="product">
<div class="product-details">
<div class="product-title">{{ cart_item.car.model }}</div>
<div class="product-price">Rs {{cart_item.car.price_per_hour}}</div>
<div>Quantity: {{ cart_item.quantity }}</div>
<a href="{% url 'booking_invoice' pk=cart_item.pk %}">Invoice</a>
</div>
<a href="{% url 'remove_from_cart' pk=cart_item.pk %}"><div class="product-remove">×</div></a>
</div>
{% endfor %}
{% endif %}
{% if total_price %}
<div class="total-price">Total: Rs {{total_price}}</div>
{% endif %}
</div>
</body>
</html>
templates/app -> invoice.html
<!DOCTYPE html>
<html>
<head>
  <title>Booking Invoice</title>
  <style>
    body {
      font-family: Arial, sans-serif;
      background-color: #f1f3f6;
      padding: 20px;
    }
    .container {
      max-width: 600px;
      margin: 0 auto;
      background-color: #fff;
      padding: 20px;
      border-radius: 5px;
      box-shadow: 0 0 10px rgba(0, 0, 0, 0.1);
    }
    h1 {
      margin: 0;
      font-size: 24px;
      font-weight: bold;
      text-align: center;
      margin-bottom: 20px;
    }
    p {
      margin: 5px 0;
    }
    .product-details {
      border-bottom: 1px solid #ccc;
      padding-bottom: 10px;
      margin-bottom: 20px;
    }
    .product-details img {
      max-width: 100%;
      height: auto;
    }
    .product-details h3 {
      margin: 10px 0;
      font-size: 18px;
      font-weight: bold;
    }
    .product-details p {
      font-size: 14px;
    }
    .button-container {
      text-align: center;
    }
    .print-button {
      background-color: #007bff;
      color: #fff;
      border: none;
      padding: 10px 20px;
      font-size: 16px;
      border-radius: 5px;
      cursor: pointer;
    }
    .rent-button {
      background-color: #28a745;
      color: #fff;
      border: none;
      padding: 10px 20px;
      font-size: 16px;
      border-radius: 5px;
      cursor: pointer;
    }
    .rent-button[disabled] {
      background-color: #ccc;
      cursor: not-allowed;
    }
  </style>
  <script src="https://code.jquery.com/jquery-3.6.0.min.js"></script>
  <script>
    $(document).ready(function() {
      // Function to print the page
      function printPage() {
        window.print();
      }

      // Attach click event to the "Print" button
      $('#print-button').click(function() {
        printPage();
      });

      // Change the "Rent It" button text to "Rented" after clicking
      $('#rent-button').click(function() {
        $(this).text('Rented');
        $(this).attr('disabled', 'disabled');
      });
    });
  </script>
</head>
<body>
  <div class="container">
    <h1>Booking Invoice</h1>

    <div class="product-details">
      <img src="{{ car.image.url }}" alt="{{ car.model }}">
      <h3>{{ cart_item.car.model }}</h3>
      <p>Price per hour: ${{ car.price_per_hour }}</p>
    </div>

    <div class="button-container">
      <button id="print-button" class="print-button">Print</button>
    </div>
  </div>
</body>
</html>
Python Django Online Car Rental System Output

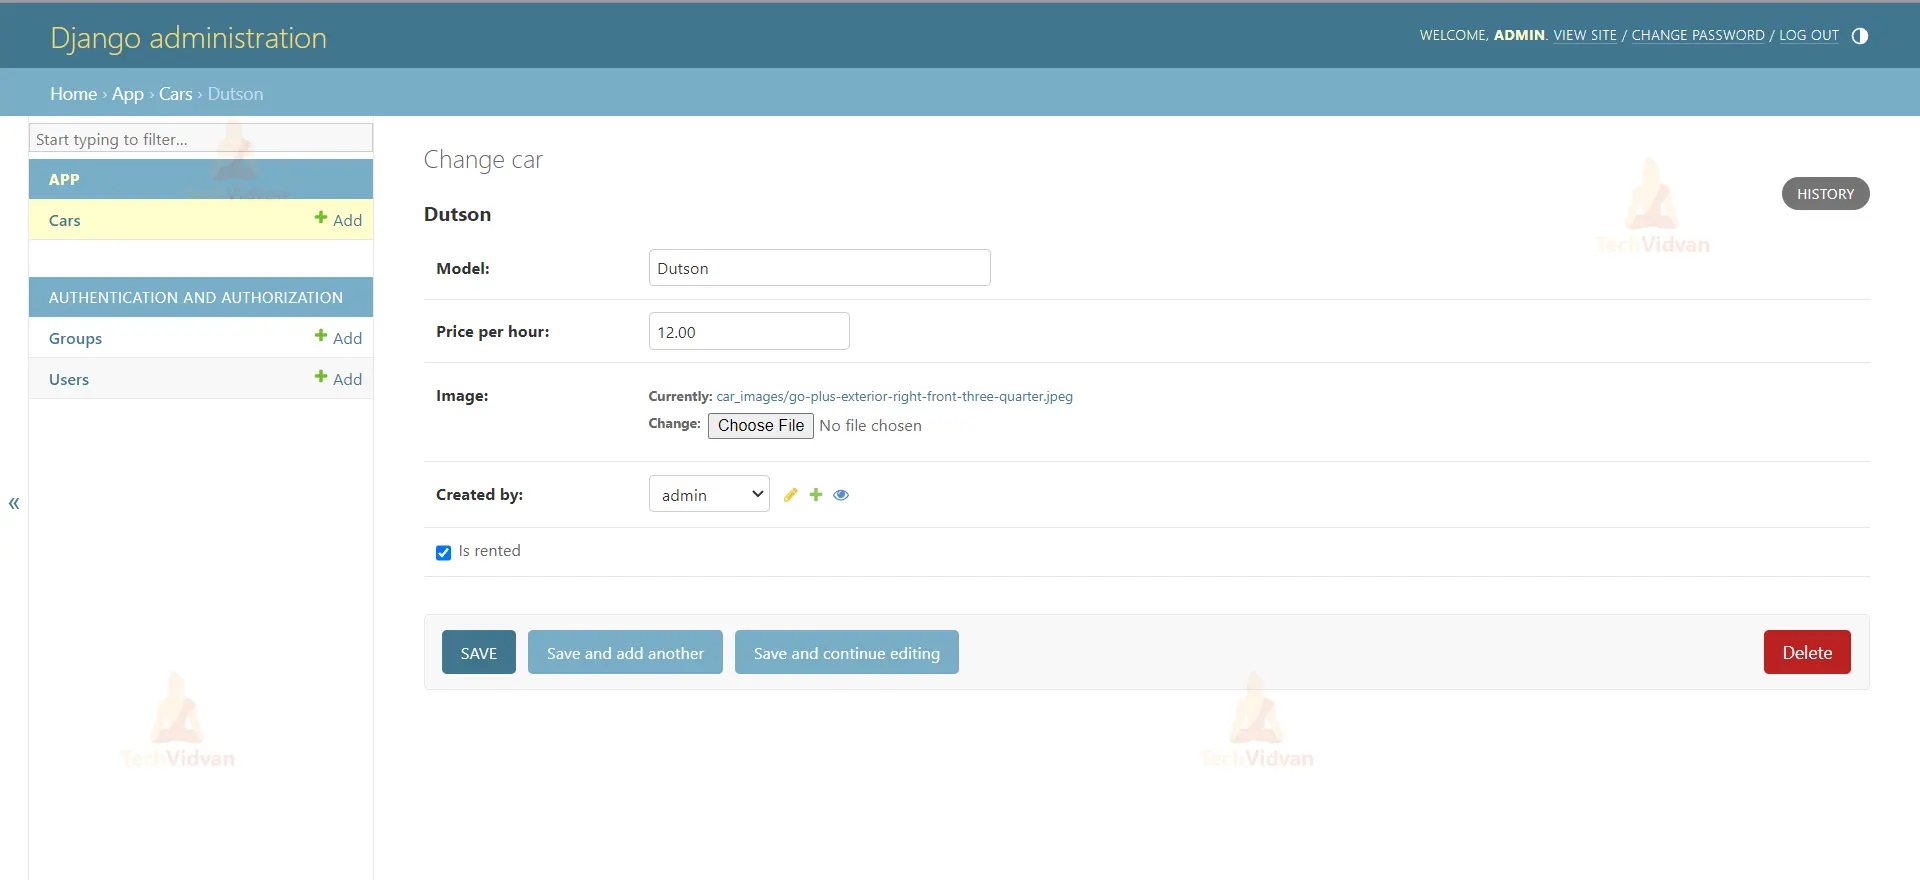
Now, how would we add data, delete, and update the user side? Let’s come to the django inbuilt admin panel.
So here are the details of the same:
1. Once you have your Django project set up and have created your models, you can use the admin panel to add data easily. Follow these steps:
2. Run python manage.py to create a superuser to create an admin user who can access the admin panel. Start the development server using python manage.py runserver. Open your browser and go to the admin panel URL (usually http://127.0.0.1:8000/admin/). Log in using the superuser credentials you created.
3. Then, Go to admin.py and add the following thing as follows:
from django.contrib import admin
from .models import YourModelName

admin.site.register(YourModelName)
Note: To display the model on the admin panel, you need to follow the third point.
Here are the images of the inbuilt admin panel of our project:

Summary
The Online Car Rental System revolutionizes the enterprise, supplying a consumer-friendly platform for clients to search, ebook, and manipulate leases. Real-time stock updates, steady payments, and automation streamline the manner. Rental companies take advantage of analytics for operational optimization and higher customer service. Integration with e-commerce systems boosts income opportunities. The system offers a continuing, efficient, and information-pushed vehicle condo experience for both customers and condominium organizations.