A Step-by-Step Guide to Using Ajax in Django
Hello and welcome to our next fascinating topic, in which we’ll look at alternative ways to use AJAX in a Django project. In this tutorial, we’ll use both class-based views and function-based views. Several frontend libraries, such as JQuery and Bootstrap4, will be used.
What is AJAX?
AJAX, or Asynchronous JavaScript And XML, is a set of web development approaches that make asynchronous web requests by employing client-side web technologies.
In other words, AJAX enables asynchronous web page updates by exchanging data with a web server behind the scenes. This means that elements of a web page can be updated without the entire page having to be reloaded.
AJAX is now an integral feature of many web applications. Django benefited greatly from AJAX in terms of increasing efficiency and saving users’ time. It’s used in some form or another by all of the prominent services.
AJAX is required for applications such as Facebook, Twitter, Instagram, Gmail, Google Maps, Spotify, and others to function.
At some time, you’ll have to deal with AJAX code. AJAX is even used by Google search. Those predictions that appear as you type into the search box are AJAX generated results.
AJAX’s Solution to the Problem (Problems it solved)
Assume you’re reading your emails. Consider that each time you receive a new email, you must refresh the entire page, which entails the following steps:
- Reload the page in your browser.
- The server receives and responds to a new email as they arrive.
- Every time you want to read a new email, you must repeat the process.
This method is both time-consuming and ineffective. When the recipient requests urgent responses, the problem gets more serious. Before 2003, it appears that this was a real problem for websites.
In late 2003, all browsers used XHR to solve the above problem. XMLHttpRequest Objects is an acronym for XHR. The XHR object is used by browsers to communicate with the server. This communication occurs without the need to reload the entire page.
The XMLHttpRequest API is in charge of handling XHR requests behind the scenes.
XMLHttpRequest APIs are now available in practically all browsers. As a result, programmes such as Gmail and Google Maps became a reality.
Why AJAX?
We frequently need to make asynchronous calls to the server to GET or POST data without having to refresh the current page.
Pre-Requirements:
I’m assuming you have a basic understanding of Django and the fundamentals of jQuery. If you’re unfamiliar with jQuery, don’t worry; we’ll only be using a tiny portion of it in this tutorial.
Django’s AJAX implementation ( How AJAX works?)
AJAX is nothing more than a hybrid of JavaScript and the XHR object. The idea is straightforward:
1. When an event occurs on the web page, JavaScript code on the client-side/browser sends a request. The JavaScript code creates an XHR object, which is then submitted to the server as a request object. Some JavaScript data/object is contained in the XHR object.
2. The URL or name of the call-back function on the server is also included in the XHR object.
3. The request is handled by the server using a callback function — the request is handled by the appropriate view function or the callback function. It will respond with either a success or failure message. The rest of the code runs uninterrupted because the request is asynchronous.
4. At that point, the request is processed by the server.
The response is split into two categories: success and failure. The success response may include server data in a variety of formats, such as:
1. Text Format
It is an Html Format. (HTML components are included)
2. JSON Format
JSON (JavaScript Object Notation) is an open standard file format and data exchange format that stores and transmits data objects consisting of attribute-value pairs and arrays using human-readable text (or other serializable values). It is a common data format with a wide range of data interchange capabilities, including communication between web applications and servers.
3. The XML File Format
A failure response can also be formatted in the same way.
The AJAX procedure will now execute according to data from the server, and the JavaScript will execute according to the response obtained. We can modify HTML components or run JavaScript. It can be used for a variety of things. The best example is the like button on Facebook.
Using jQuery in Django for AJAX:
One of the most extensively used JavaScript libraries is jQuery. jQuery is the foundation for several complex frameworks such as Angular JS, React, and others. It’s a highly helpful package that gives you access to the DOM of web pages. jQuery is required to use the JavaScript component of bootstrap.
The following are the reasons why we use jQuery:
Multiple browsers have different implementations of AJAX.
XHR APIs are used by a wide range of browsers. These APIs process request and response data in a unique way. It’s challenging to keep your code up to date while simultaneously making it platform-independent. jQuery has a built-in solution that takes care of all of these details for you.
jQuery offers a wide number of DOM-based methods, including:
Many DOM objects and related functions are included in jQuery. These objects can be utilised in whatever way you want, and jQuery makes it even easier.
jQuery is a popular scripting language:
In the IT business, jQuery is widely used. Any web developer will come across jQuery at some point. jQuery offers a lot of functionality and will be a useful skill for you in the future.
Many popular frameworks use jQuery as a foundation.
Many prominent frameworks, such as Angular Js and React Js, are based on jQuery. jQuery is also used in Bootstrap JavaScript. In JavaScript frameworks, jQuery is pretty much everywhere.
These are compelling reasons for anyone to understand and employ jQuery. There are more ways to use AJAX with Django, such as dajax, dajaxice, and so on. These programmes are designed to use as little JavaScript as possible for AJAX.
Developers like jQuery in the real world, so we’re going to build an application around it.
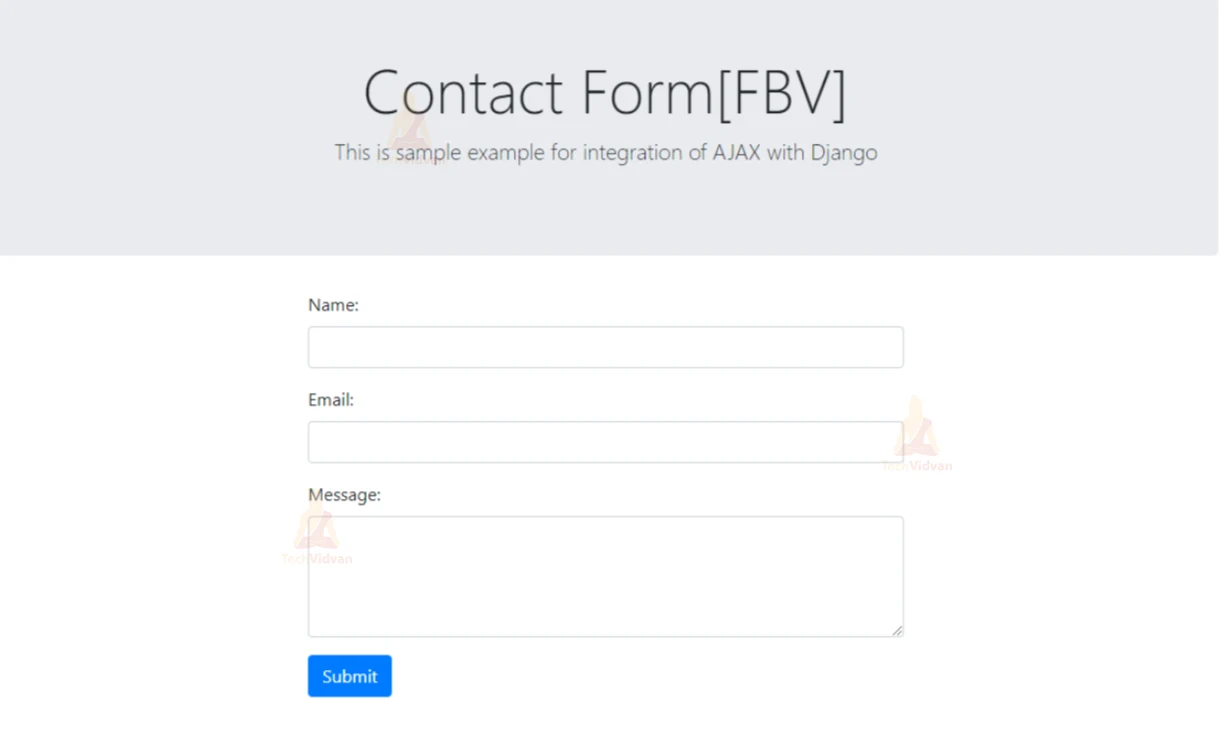
Creating a Basic Contact Form (Example)
We are going to create a basic contact form, by which a user can fill in their details for further use. This example is an easy one that a newbie can also comprehend and will also be helpful for an intermediate to follow along.
Let’s follow the following steps for the same:
Step 1: Activate your Virtual environment
Before we start working with Visual Studios, let us activate our Virtual environment.
In your command prompt or PowerShell execute the following command
(virtual-environment-name)\Scripts\activate.bat
This activates the Virtual environment.
To get to your project folder, change the directory. It’s called “TechVidvan2” in this case.
Step 2: Create a new app, “AjaxPost”:
We’ve all learned how to start a new Django application.
Run the following command in PowerShell/ Terminal:
python manage.py startapp AjaxPost
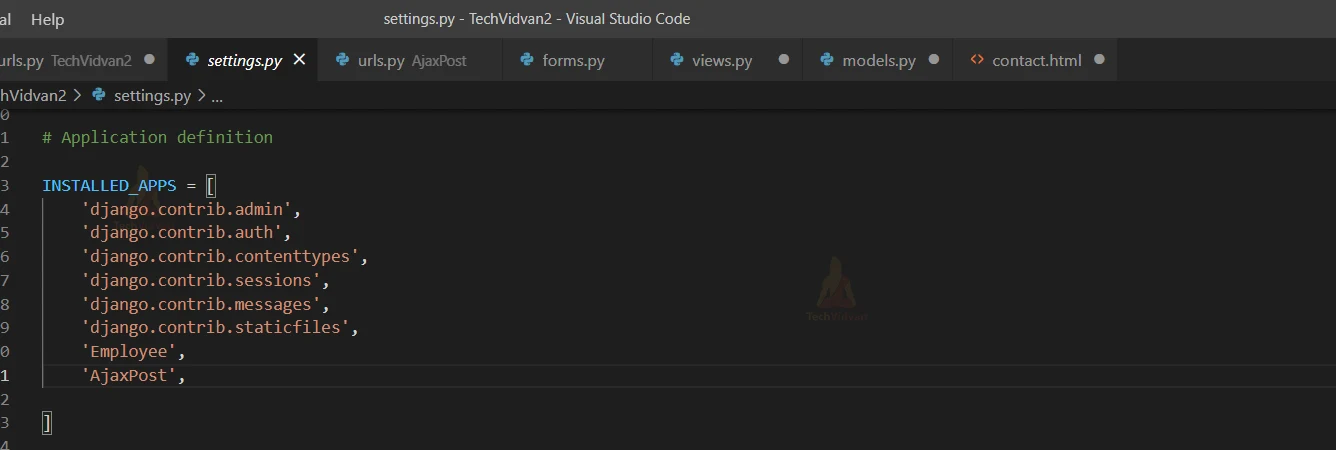
Now, in the project’s settings.py file, install the application. Add the application under the INSTALLED_APPS list.
Step 3: Creating models.
In our databases, models are the tables.
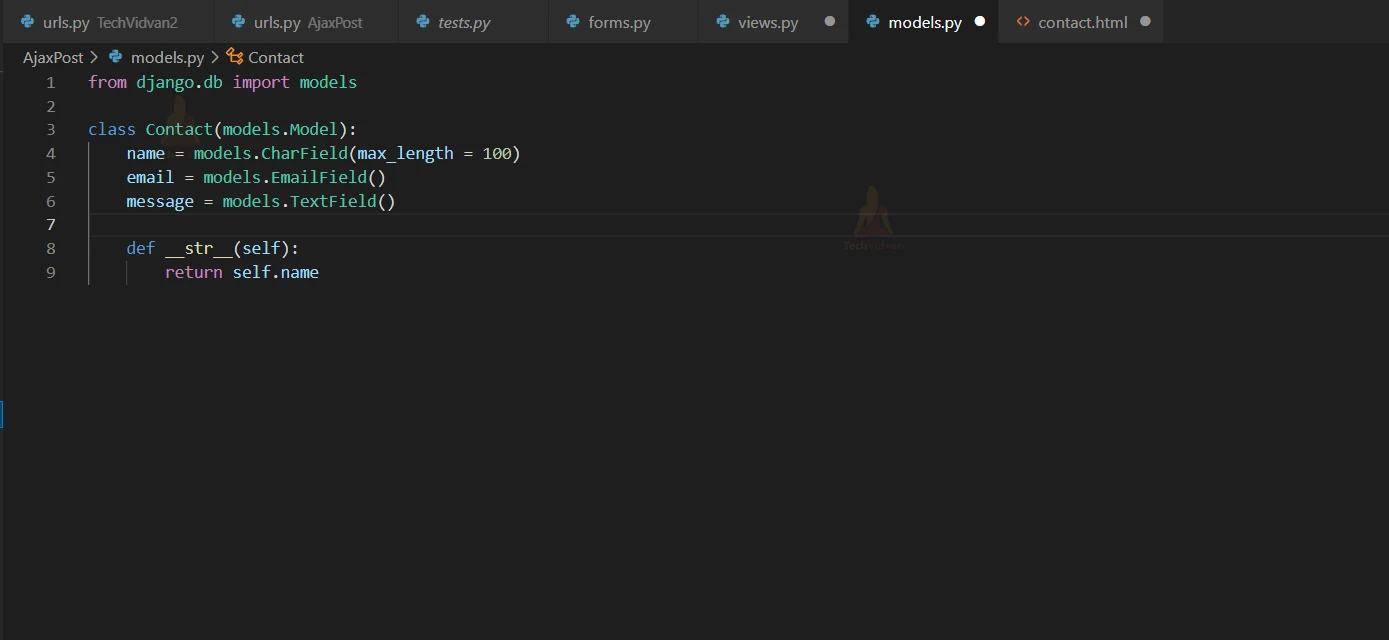
In the AjaxPost/models.py file, paste the following code.
from django.db import models

class Contact(models.Model):
name = models.CharField(max_length = 100)
email = models.EmailField()
message = models.TextField()


def __str__(self):
return self.name
Here we have created a class called “contact”. This contains the basic details of an employee, such as name, email, and message they want to write.
Step 4: Working with the views.py
Now is the time to pay close attention to this section to have a better understanding of AJAX. I’ve constructed two function-based views for GET and POST requests, respectively.
We first check whether the POST request sent is AJAX or NOT, and then we check for POST requests in the POST view function, i.e. postContact().
In the AjaxPost/views.py file, paste the following code.
# Create your views here.
from django.shortcuts import render
from django.http import JsonResponse
from .forms import EmployeeForm

#FBV

def contactPage(request):
  form = EmployeeForm
  return render(request, "contact.html", {"contactForm": form})

def postContact(request):
  if request.method == "POST" and request.is_ajax():
   form = EmployeeForm(request.POST)
   form.save()
   return JsonResponse({"success":True}, status=200)
  return JsonResponse({"success":False}, status=400)
Step 5: Create a new forms.py file
Create a new file under the application directory by simply clicking on add new file. Add a new file named “forms.py”.
I made some minor adjustments to the basic form rendering in the ContactForm class. I added the form-control class to every form input element in the __init__ method to make it Bootstrap4 compatible.
Add the following code under AjaxPost/forms.py:
from django import forms
from .models import Contact

class ContactForm(forms.ModelForm):
class Meta:
 model = Contact
 widgets = {
   'message': forms.Textarea(attrs={'rows':4, 'cols':15}),
 }

def __init__(self, *args, **kwargs):
  super(ContactForm, self).__init__(*args, **kwargs)
  for field in self.fields:
    self.fields[field].widget.attrs.update({
  'class': 'form-control'})
Step 6: Creating templates.
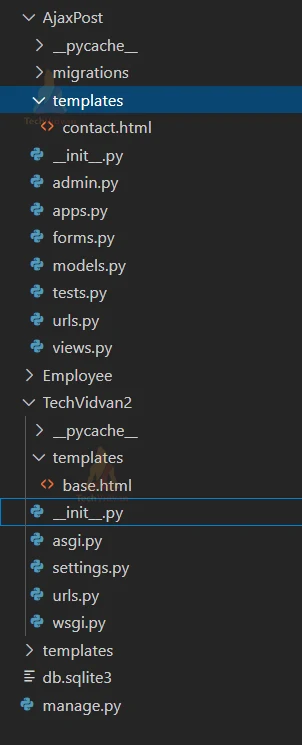
As AJAX is a front-end technology, we’ll start with the most important part: templates. To do so, you’ll need to make some directories.
1. Inside the project directory “TechVidvan2”, create a templates directory.
2. Inside the templates directory, create a “base.html” file.
3. Now inside the “AjaxPost” directory, again create a templates directory.
4. Finally inside this directory create a file “contact.html”.
It will look something like this:
Protect yourself.
Whether or not you use AJAX, forms are vulnerable to Cross-Site Request Forgeries (CSRF) attacks.
On the Coding Horror blog, you may learn more about CSRF attacks. They have a fantastic piece.
To avoid such attacks, add the {% csrf_token %}template tag to the form, which creates a hidden input field with a token that is sent with each POST request.
You can see that we have already incorporated this token in the TechVidvan2/base.html template. However, we need to add a little additional code for AJAX requests because we can’t give that token using a JavaScript object. After all, the scripts are static.
Now paste the following code under the “base.html” file.
<!DOCTYPE html>
<html>
<head>
<meta charset="utf-8">
<meta http-equiv="X-UA-Compatible" content="IE=edge">
<meta name="viewport" content="width=device-width, initial-scale=1">
{% block head %}
{% endblock %}
<link rel="stylesheet" href="https://maxcdn.bootstrapcdn.com/bootstrap/4.0.0/css/bootstrap.min.css">
{% block style %}
{% endblock %}
<script src="https://cdnjs.cloudflare.com/ajax/libs/jquery/3.3.1/jquery.min.js"></script>
<script src="https://cdnjs.cloudflare.com/ajax/libs/popper.js/1.12.9/umd/popper.min.js"></script>
<script src="https://maxcdn.bootstrapcdn.com/bootstrap/4.0.0/js/bootstrap.min.js"></script>
</head>
<body>
{% block content %}
{% endblock %}

{% block script %}
{% endblock %}
</body>
</html>
Working with the “contact.html” file.
Let’s start with the frontend part by extending the base.html file that we covered earlier.
Render the form that was built above, including the csrf_token and submit button, by enclosing it in a form tag. Take particular note of how template blocks are used.
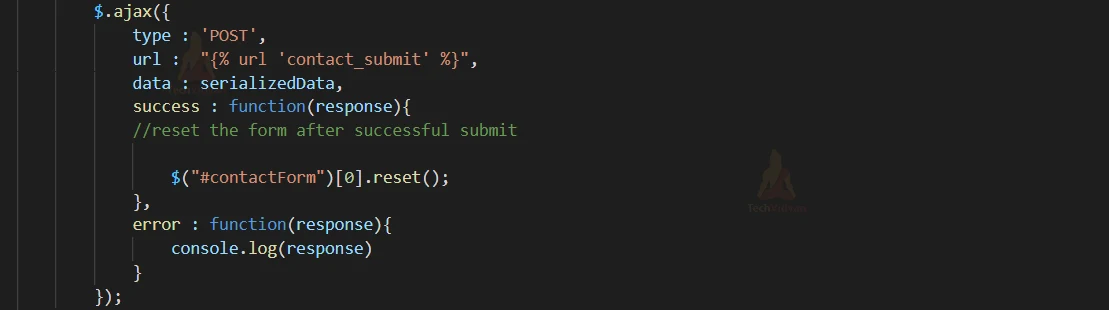
I’m referring to the javascript section, which is an important element of this tutorial. At the form submission event, I made an AJAX POST request. The URL used here is the path’s name, which is described in the urls.py file. It will reset the form after a successful submission from the backend.
Under the AjaxPost/templates/contact.html include the following code:
{% extends "base.html" %}
{% block head %}
     <title>Contact Form[FBV]</title>
{% endblock %}
{% block style %}
{% endblock %}
{% block content %}
<div class="container">
  <div class="jumbotron">
   <h1 class="text-center display-4">Contact Form[FBV]</h1>
   <p class="lead text-center">This is sample example for integration of AJAX with Django</p>
 </div>
  <div class="row justify-content-center align-items-center">
   <div class="col-sm-6 ">
    <form id = "contactForm" method= "POST">{% csrf_token %}
      {{ contactForm.as_p }}
       <input type="submit" name="contact-submit" class="btn btn-primary" />
    </form>
  </div>
 </div>
</div>
{% endblock %}
{% block script %}
<script type="text/javascript">
$(document).ready(function(){
$("#contactForm").submit(function(e){
 // prevent from normal form behaviour

 e.preventDefault();
 // serialize the form data

 var serializedData = $(this).serialize();
 $.ajax({
   type : 'POST',
   url : "{% url 'contact_submit' %}",
   data : serializedData,
   success : function(response){
 //reset the form after successful submit

  $("#contactForm")[0].reset();
 },
 error : function(response){
   console.log(response)
  }
 });
 });
});
</script>
{% endblock %}
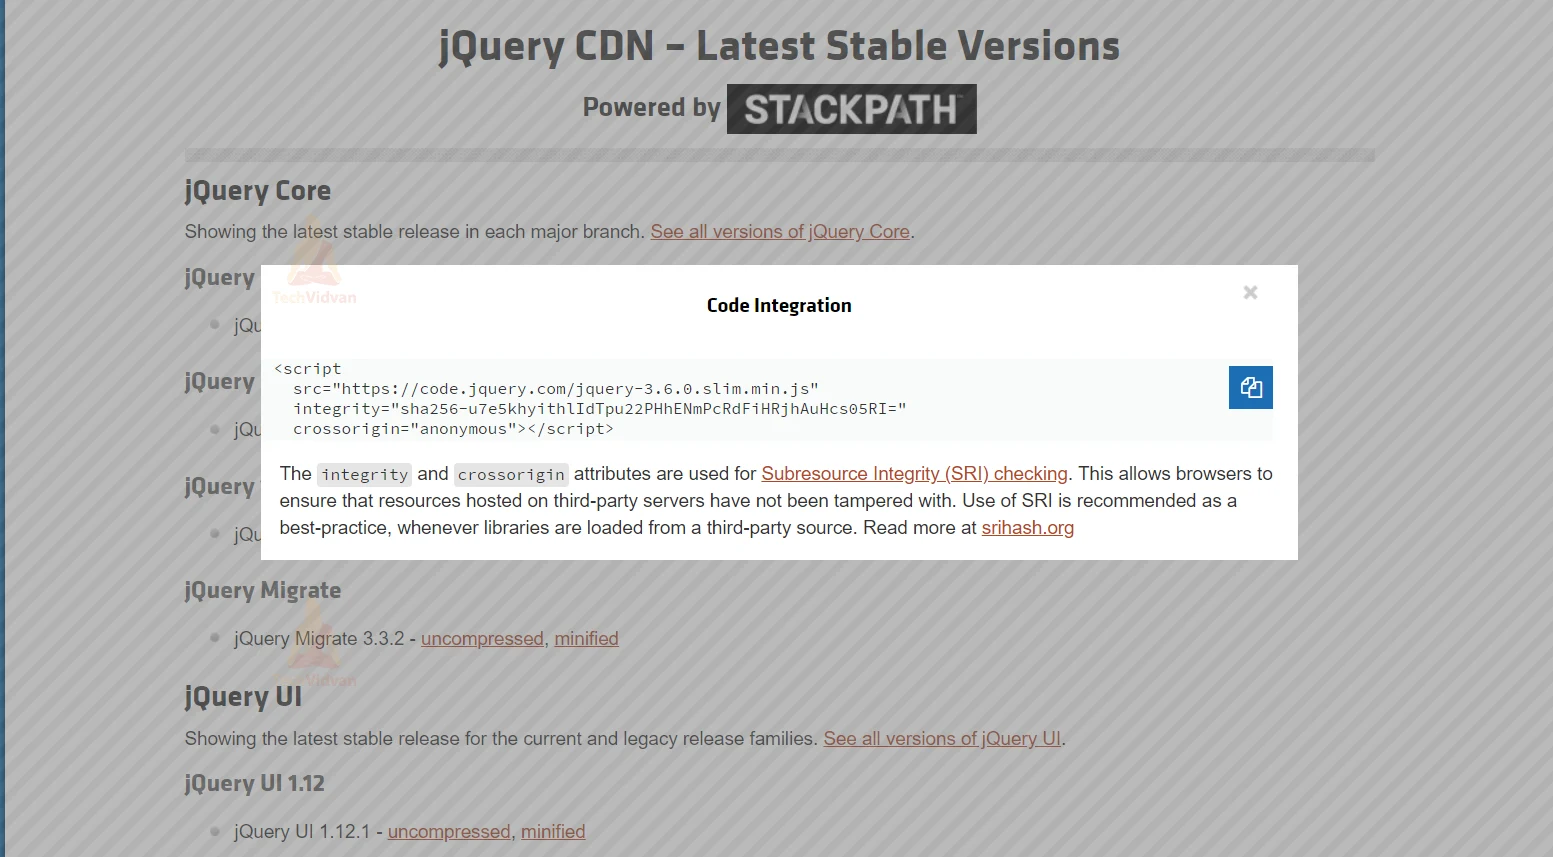
Step7: Importing the jQuery and Bootstrap
As jQuery is a JavaScript library, it is essentially a server-side static file. It’s just like bootstrap and other files in that it may be imported. We decided to use it straight from the CDN. The URL can be found on the official website of jQuery.
With bootstrap, we used the link tag in the same way.
Using JavaScript to create an AJAX request
This is the crucial portion. At the end of the document, pay attention to Script>/script>. This is where we have placed our AJAX code.
To call the object, we’re making use of several of jQuery’s properties. The class of buttons that we will click is the like button. When you click the button, the function inside it runs. There are certain objects in that function.
This is an object in the XHR format. This is, in fact, the $.ajax() method’s specialty. It’s what allows our code to work across many browsers.
There is a JavaScript Object Data Type inside of it. In Python, dictionaries are analogous to JavaScript Objects.
You can now easily relate to it.
1. Type key:
This key specifies the type of request that will be sent. The GET request is used to send XHR.
2. URL key:
This is the URL of the server’s callback function. Do you recall the view function we made? Without reloading the page, this code will call the function.
3. Data Key:
The data that we are sending to the callback function is stored in this key. It holds the post’s id in this example. It might be an object or a collection of values. You can also send it in JSON format. It is dependent on your application.
4. Success method:
JavaScript Objects, like all other objects, have methods. This type of procedure is simple to create. The techniques are referred to as Objects’ properties. The $.ajax() method has a built-in response of success. When the AJAX request returns a successful response, this function will be called. It’s one of the features that jQuery offers to developers.
5. Inside Success:
We have two techniques for achieving success on the inside. The first removes the class from within the parenthesis (). In the same way, the other will add the class.
Step 8: Using urls-config to connect it
You’ve just made a stunning app. We must now connect all of the components.
In the post directory, create a new python file.
Paste the following code into AjaxPost/urls.py:
from django.contrib import admin
from django.urls import path
from AjaxPost import views as AjaxPost

urlpatterns = [
path('', AjaxPost.contactPage), # FBV

path('ajax/contact', AjaxPost.postContact, name ='contact_submit'),
path('', AjaxPost.ContactAjax.as_view(), name = 'contact_submit')
]
Working with the Class-Based Views
To convert the following example from function-based views to class-based views (CBV), all we have to do is change the views.py file and add a route to the view in urls.py.
Add the following code in the urls.py:
from django.contrib import admin
from django.urls import path
from Employee import views
from AjaxPost import views

urlpatterns = [
 path('admin/', admin.site.urls),

 path('EmpPage', views.views.EmployeePage),
 path('PD', views.PostDetails),
 path('Get', views.Get),
 path('Post', views.Post),
We utilised two function views in the FBV, which can be wrapped in a single class with two methods, GET and POST, and a single URL route.
Add the below written code under views.py file:
from django.shortcuts import render

# Create your views here.
from django.shortcuts import render
from django.http import JsonResponse
from .forms import EmployeeForm


def Get(self, *args, **kwargs):
 form = self.form_class()
 return render(self.request, self.template_name, {"contactForm": form})

def Post(self, *args, **kwargs):
 if self.request.method == "POST" and self.request.is_ajax():
  form = self.form_class(self.request.POST)
  form.save()
  return JsonResponse({"success":True}, status=200)
return JsonResponse({"success":False}, status=400)
Step 9: Running Django application
Now, open your PowerShell, or Terminal and run the following commands in the correct order.
python manage.py makemigrations

python manage.py migrate
You will come across a new file named as 0001_initial.py under the main directory.

Now enter the following command in the terminal to run your application:
python manage.py runserver
Now add the EmpPage at the end of the search bar to execute our created page.
Now Search: http://localhost:8000/EmpPage/
This is how our final output of the Contact Form looks like.
Summary
This brings us to the end of the tutorial. On a small scale, Django AJAX is the ideal approach to accomplish asynchronous operations. If you need to conduct asynchronous operations on a large scale, however, you can use any frontend javascript framework/library, the finest of which are React, Angular, and Vue.