Android Project – Ayurvedic Remedies Application
We are going to make an Ayurvedic Remedies Application using Android. This project will showcase how to integrate Ayurvedic herbal plant remedies into a user-friendly Android application.
About Android Ayurvedic Remedies Application
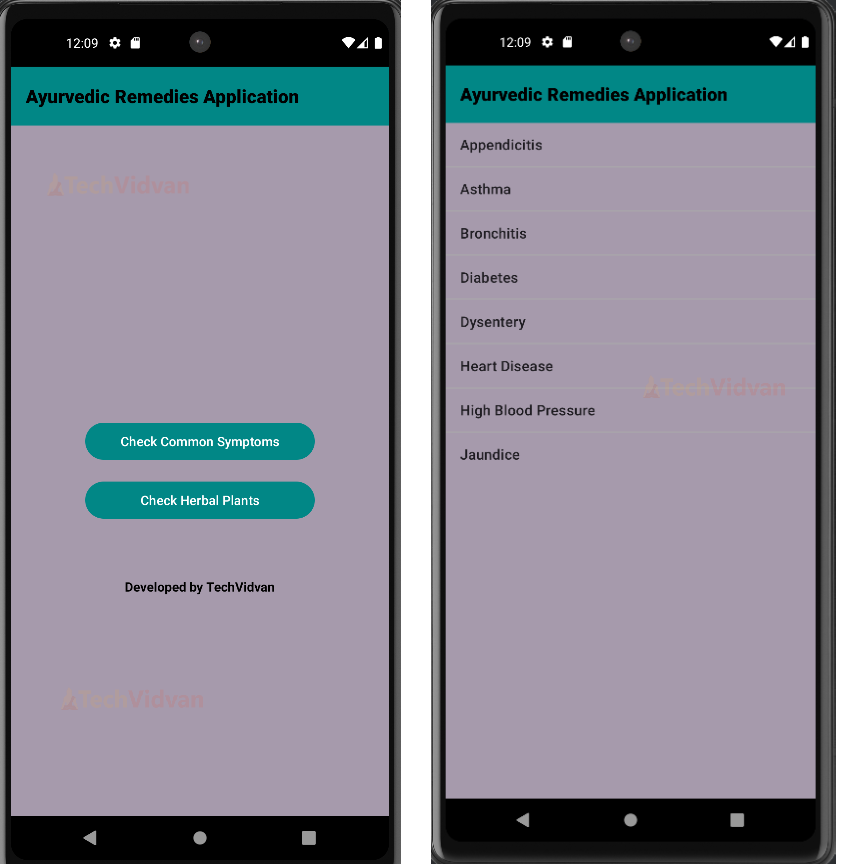
The Ayurvedic Remedies Application aims to provide users with access to various Ayurvedic remedies and health tips. It helps users manage their health by educating them on natural treatments. The application includes features such as common symptoms of diseases and contains comprehensive information on herbal plants.
Features
1. Users can browse a comprehensive list of Diseases and their Ayurvedic remedies.
2.Users can view detailed descriptions and benefits of each remedy.
Prerequisites for Android Ayurvedic Remedies Application
Let’s discuss the prerequisites required for this project. This project was made using Java and XML in Android Studio. You should know the basics of these :
1. Android Studio
2. XML Designing and Resource Files
3. Java
4. Object-Oriented Concepts
5. Strings
Download Android Ayurvedic Remedies Application Code
Please download the source code of the Android Ayurvedic Remedies Application: Android Ayurvedic Remedies Application.
Steps to implement Android Ayurvedic Remedies Project
To run the application on your device, you need to follow these steps:
1. Download the source code of the TechVidvan Ayurvedic Remedies Application from above. Now, locate the file on your system and unzip it.
2. Open Android Studio and click on Open an Existing Project.
3. The Project will be opened in Android Studio, and you will be able to see the files mentioned above.
4. Make sure to check the versions mentioned in the build.gradle file and those which are present in your System.
5. Run the App now. It will install the application on your emulator or device.
Step-by-Step Code Explanation of Android Ayurvedic Remedies Application
1. MainActivity.java
package com.example.ayurvedicremediesapplication;

import android.content.Intent;
import android.os.Bundle;
import android.view.View;
import android.widget.Button;
import androidx.appcompat.app.AppCompatActivity;
import androidx.appcompat.widget.Toolbar;

public class MainActivity extends AppCompatActivity {

   private Button checkSymptomsButton;
   private Button checkPlantsButton;

   System.out.println(“TechVidvan Ayurvedic Remedies Application”);

   @Override
   protected void onCreate(Bundle savedInstanceState) {
       super.onCreate(savedInstanceState);
       setContentView(R.layout.activity_main);

       Toolbar toolbar = findViewById(R.id.toolbar);
       setSupportActionBar(toolbar);

       checkSymptomsButton = findViewById(R.id.button_check_symptoms);
       checkPlantsButton = findViewById(R.id.button_check_plants);

       checkSymptomsButton.setOnClickListener(new View.OnClickListener() {
           @Override
           public void onClick(View v) {
               Intent intent = new Intent(MainActivity.this, CommonSymptomsActivity.class);
               startActivity(intent);
           }
       });

       checkPlantsButton.setOnClickListener(new View.OnClickListener() {
           @Override
           public void onClick(View v) {
               Intent intent = new Intent(MainActivity.this, HerbalPlantsActivity.class);
               startActivity(intent);
           }
       });
   }
}
Explanation:
- First, import all the required Android libraries, and then define MainActivity, which extends AppCompatActivity to provide backward compatibility with older Android versions.
- Declare checkSymptomsButton and checkPlantsButton. onCreate is called when the activity is first created. It sets up the initial state of the activity.
- Toolbar sets the App Bar, and we initialise buttons by finding the corresponding buttons in the XML layout. We setOnClickListener() on both buttons, navigating to different Activities on click through Intent.
2. CommonSymptomsActivity.java
package com.example.ayurvedicremediesapplication;

import android.content.Intent;
import android.os.Bundle;
import android.view.View;
import android.widget.AdapterView;
import android.widget.ArrayAdapter;
import android.widget.ListView;
import androidx.appcompat.app.AppCompatActivity;
import androidx.appcompat.widget.Toolbar;

import com.example.ayurvedicremediesapplication.disease.AppendicitisActivity;
import com.example.ayurvedicremediesapplication.disease.AsthmaActivity;
import com.example.ayurvedicremediesapplication.disease.BronchitisActivity;
import com.example.ayurvedicremediesapplication.disease.DiabetesActivity;
import com.example.ayurvedicremediesapplication.disease.DysenteryActivity;
import com.example.ayurvedicremediesapplication.disease.HeartDiseaseActivity;
import com.example.ayurvedicremediesapplication.disease.HighBloodPressureActivity;
import com.example.ayurvedicremediesapplication.disease.JaundiceActivity;

public class CommonSymptomsActivity extends AppCompatActivity {

   private ListView listSymptoms;
   private String[] diseases = {
           "Appendicitis", "Asthma", "Bronchitis", "Diabetes", "Dysentery",
           "Heart Disease", "High Blood Pressure", "Jaundice"
   };

   @Override
   protected void onCreate(Bundle savedInstanceState) {
       super.onCreate(savedInstanceState);
       setContentView(R.layout.activity_common_symptoms);

       Toolbar toolbar = findViewById(R.id.toolbar);
       setSupportActionBar(toolbar);

       listSymptoms = findViewById(R.id.list_symptoms);

       ArrayAdapter<String> adapter = new ArrayAdapter<>(this,
               android.R.layout.simple_list_item_1, diseases);
       listSymptoms.setAdapter(adapter);

       listSymptoms.setOnItemClickListener(new AdapterView.OnItemClickListener() {
           @Override
           public void onItemClick(AdapterView<?> parent, View view, int position, long id) {
               String disease = diseases[position];
               Class<?> activityClass;
               switch (disease) {
                   case "Appendicitis":
                       activityClass = AppendicitisActivity.class;
                       break;
                   case "Asthma":
                       activityClass = AsthmaActivity.class;
                       break;
                   case "Bronchitis":
                       activityClass = BronchitisActivity.class;
                       break;
                   case "Diabetes":
                       activityClass = DiabetesActivity.class;
                       break;
                   case "Dysentery":
                       activityClass = DysenteryActivity.class;
                       break;
                   case "Heart Disease":
                       activityClass = HeartDiseaseActivity.class;
                       break;
                   case "High Blood Pressure":
                       activityClass = HighBloodPressureActivity.class;
                       break;
                   case "Jaundice":
                       activityClass = JaundiceActivity.class;
                       break;
                   default:
                       activityClass = null;
                       break;
               }
               if (activityClass != null) {
                   Intent intent = new Intent(CommonSymptomsActivity.this, activityClass);
                   startActivity(intent);
               }
           }
       });
   }
}
Explanation:
- Import the necessary Android libraries, then define CommonSymptomsActivity, which extends AppCompatActivity to ensure backward compatibility with older Android versions.
- Declare a ListView to display a list of symptoms and an array of strings representing different diseases. onCreate() is called when the activity is first created. It sets up the initial state of the activity.
- Toolbar sets the app Action Bar. We initialised the ListView and created an ArrayAdapter to insert the array of disease names into it.
- We set an item click listener on each disease in the ListView. When an item is clicked, the disease variable gets the name of the clicked disease.
- The switch statement determines the appropriate activity, and an Intent is created to start the corresponding activity.
3. DiabetesActivity.java
package com.example.ayurvedicremediesapplication.disease;

import android.os.Bundle;
import androidx.appcompat.app.AppCompatActivity;
import androidx.appcompat.widget.Toolbar;

import com.example.ayurvedicremediesapplication.R;

public class DiabetesActivity extends AppCompatActivity {
   @Override
   protected void onCreate(Bundle savedInstanceState) {
       super.onCreate(savedInstanceState);
       setContentView(R.layout.activity_diabetes);

       Toolbar toolbar = findViewById(R.id.toolbar);
       toolbar.setTitle("Diabetes");
       setSupportActionBar(toolbar);

       if (getSupportActionBar() != null) {
           getSupportActionBar().setDisplayHomeAsUpEnabled(true);
           getSupportActionBar().setDisplayShowHomeEnabled(true);
       }
   }

   @Override
   public boolean onSupportNavigateUp() {
       onBackPressed();
       return true;
   }
}
Explanation:
- We imported the necessary libraries and defined DiabetesActivity, which extends AppCompatActivity, providing backward compatibility with older Android versions.
- onCreate() is called when the activity is first created. It sets up the initial state of the activity. Toolbar sets the app Action Bar.
- getSupportActionBar().setDisplayHomeAsUpEnabled() helps us navigate back to the previous activity.
- onSupportNavigateUp() is called when the up button in the toolbar is pressed. It calls onBackPressed(), which navigates the user back to the previous activity.
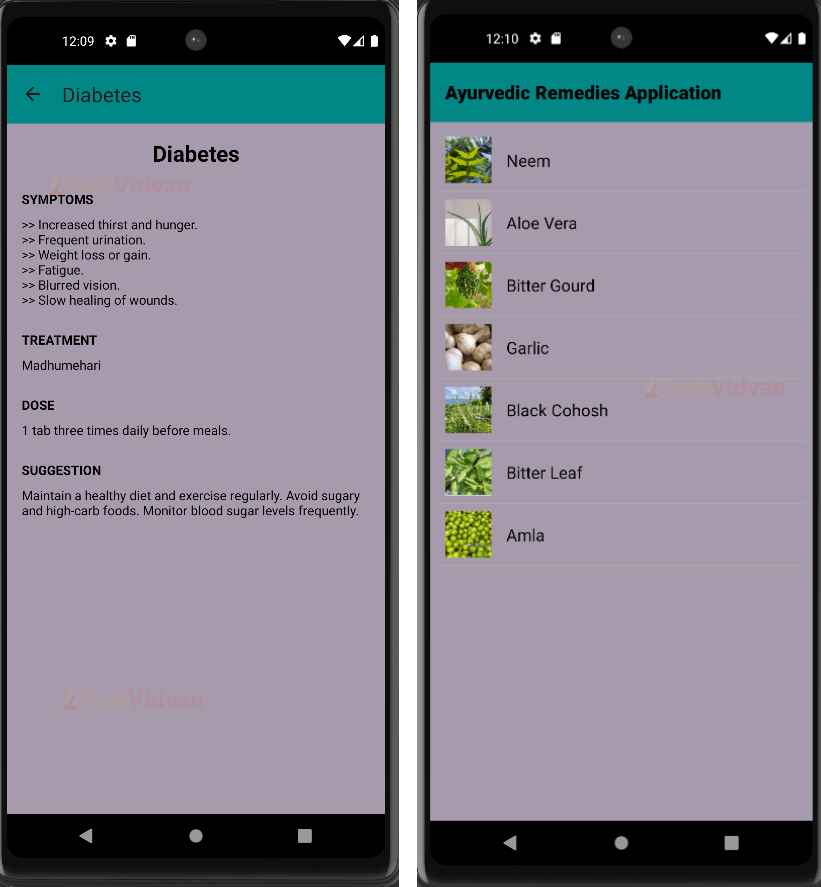
Note: We have statically declared the diabetes disease details in the XML file and did the same for every other disease.
4. HerbalPlantsActivity.java
package com.example.ayurvedicremediesapplication;
import android.os.Bundle;
import android.widget.ListView;
import androidx.appcompat.app.AppCompatActivity;
import androidx.appcompat.widget.Toolbar;
public class HerbalPlantsActivity extends AppCompatActivity {
private ListView listHerbalPlants;
private String[] plants = {
"Neem", "Aloe Vera", "Bitter Gourd", "Garlic", "Black Cohosh",
"Bitter Leaf", "Amla"
};
private int[] plantImages = {
R.drawable.neem, R.drawable.aloe_vera, R.drawable.bitter_gourd, R.drawable.garlic,
R.drawable.black_cohosh, R.drawable.bitter_leaf, R.drawable.amla
};
private String[] scientificNames = {
"Azadirachta indica", "Aloe vera", "Momordica charantia", "Allium sativum", "Actaea racemosa",
"Vernonia amygdalina", "Phyllanthus emblica"
};
private String[] descriptions = {
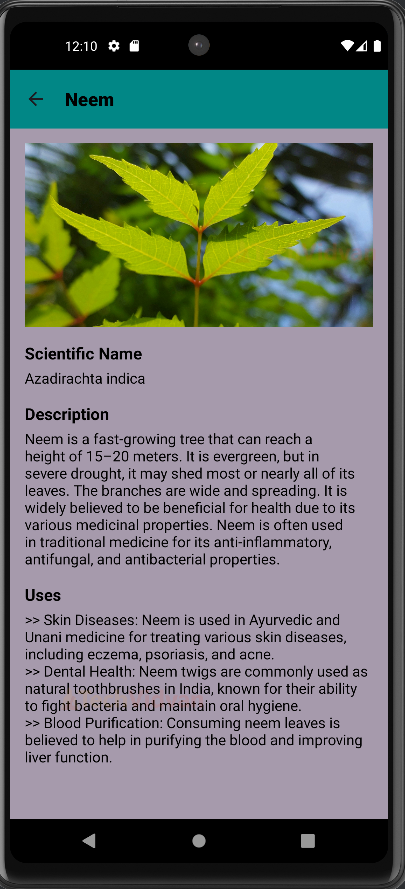
"Neem is a fast-growing tree that can reach a height of 15-20 meters. It is evergreen, but in severe drought, it may shed most or nearly all of its leaves. The branches are wide and spreading. It is widely believed to be beneficial for health due to its various medicinal properties. Neem is often used in traditional medicine for its anti-inflammatory, antifungal, and antibacterial properties.",
"Aloe Vera is a succulent plant species of the genus Aloe. It grows wild in tropical, semi-tropical, and arid climates around the world. Aloe Vera is known for its thick, fleshy leaves that contain a gel-like substance. This gel has numerous medicinal uses and is commonly found in skin care products, health drinks, and dietary supplements.",
"Bitter Gourd, also known as bitter melon, is a tropical and subtropical vine of the family Cucurbitaceae. It is widely grown in Asia, Africa, and the Caribbean. The fruit of the Bitter Gourd is edible but has a very bitter taste. It is often used in traditional medicine for its health benefits and nutritional value.",
"Garlic is a species in the onion genus, Allium. It is native to Central Asia and northeastern Iran and has been used for thousands of years for both culinary and medicinal purposes. Garlic bulbs are known for their pungent flavor and health benefits. It is rich in sulfur compounds, which are responsible for its strong odor and many of its medicinal properties.",
"Black Cohosh is a flowering plant of the buttercup family, Ranunculaceae. It is native to eastern North America and is commonly used in traditional medicine. The roots and rhizomes of Black Cohosh are used for medicinal purposes, particularly in the treatment of women's health issues.",
"Bitter Leaf is a species of shrub or small tree of the Asteraceae family. It is native to tropical Africa and is commonly used in traditional African medicine. The leaves of the Bitter Leaf plant are known for their bitter taste and are used in various dishes and medicinal preparations.",
"Amla, also known as Indian Gooseberry, is a deciduous tree of the family Phyllanthaceae. It is native to India and is valued for its edible fruit. Amla is rich in vitamin C and other antioxidants, making it a popular ingredient in traditional Indian medicine and dietary supplements."
};
private String[] uses = {
">> Skin Diseases: Neem is used in Ayurvedic and Unani medicine for treating various skin diseases, including eczema, psoriasis, and acne.\n>> Dental Health: Neem twigs are commonly used as natural toothbrushes in India, known for their ability to fight bacteria and maintain oral hygiene.\n>> Blood Purification: Consuming neem leaves is believed to help in purifying the blood and improving liver function.",
">> Skin Treatment: Aloe Vera gel is widely used to treat burns, wounds, and various skin conditions due to its soothing and healing properties.\n>> Digestive Health: Aloe Vera juice is consumed to aid digestion and relieve constipation.\n>> Immune Boosting: Regular consumption of Aloe Vera is believed to enhance the immune system and fight off infections.",
">> Diabetes Management: Bitter Gourd is known for its ability to lower blood sugar levels and is used in managing diabetes.\n>> Digestive Health: It helps in improving digestion and relieving constipation due to its high fiber content.\n>> Liver Health: Bitter Gourd is believed to detoxify the liver and improve liver function.",
">> Heart Health: Garlic is known to reduce blood pressure and cholesterol levels, promoting cardiovascular health.\n>> Immune System: It boosts the immune system and helps in fighting infections and the common cold.\n>> Antioxidant Properties: Garlic has strong antioxidant properties that help in preventing cell damage and reducing the risk of chronic diseases.",
">> Menopausal Symptoms: Black Cohosh is widely used to alleviate symptoms of menopause, such as hot flashes and mood swings.\n>> Menstrual Cramps: It helps in reducing menstrual cramps and regulating menstrual cycles.\n>> Anti-inflammatory: Black Cohosh has anti-inflammatory properties and is used to relieve muscle pain and arthritis.",
">> Malaria Treatment: Bitter Leaf is traditionally used to treat malaria and fever due to its anti-parasitic properties.\n>> Diabetes Management: It helps in managing diabetes by lowering blood sugar levels.\n>> Digestive Health: Bitter Leaf aids digestion and is used to treat gastrointestinal issues such as constipation and stomach upset.",
">> Immune Boosting: Amla is known for its high vitamin C content, which boosts the immune system and helps in fighting infections.\n>> Hair Health: Amla is used in hair care products to promote hair growth, reduce hair fall, and prevent premature graying.\n>> Digestive Health: It aids digestion, improves appetite, and helps in treating constipation and acidity."
};
@Override
protected void onCreate(Bundle savedInstanceState) {
super.onCreate(savedInstanceState);
setContentView(R.layout.activity_herbal_plants);
Toolbar toolbar = findViewById(R.id.toolbar);
setSupportActionBar(toolbar);
listHerbalPlants = findViewById(R.id.list_herbal_plants);
CustomAdapter adapter = new CustomAdapter(this, plants, plantImages, scientificNames, descriptions, uses);
listHerbalPlants.setAdapter(adapter);
}
}
Explanation:
- First, the required Android libraries are imported, and then the HerbalPlantsActivity is defined, extending AppCompatActivity.
- We defined a ListView to display a list of herbal plants, an array of strings containing the names, images, Scientific names, descriptions and uses of those herbal plants.
- onCreate method is called when the activity is first created. It sets up the initial state of the activity. Toolbar sets the app Action Bar.
- At last, we initialise the ListView and create a CustomAdapter to adapt the array of plant names, images, scientific names, descriptions, and uses into the ListView.
5. PlantDetailsActivity.java
package com.example.ayurvedicremediesapplication;

import android.content.Intent;
import android.os.Bundle;
import android.widget.ImageView;
import android.widget.TextView;
import androidx.appcompat.app.AppCompatActivity;
import androidx.appcompat.widget.Toolbar;

public class PlantDetailActivity extends AppCompatActivity {

   @Override
   protected void onCreate(Bundle savedInstanceState) {
       super.onCreate(savedInstanceState);
       setContentView(R.layout.activity_plant_detail);

       Toolbar toolbar = findViewById(R.id.toolbar);
       setSupportActionBar(toolbar);
       getSupportActionBar().setDisplayHomeAsUpEnabled(true);
       getSupportActionBar().setDisplayShowHomeEnabled(true);

       ImageView plantImage = findViewById(R.id.plant_image);
       TextView scientificName = findViewById(R.id.scientific_name);
       TextView description = findViewById(R.id.description);
       TextView uses = findViewById(R.id.uses);

       Intent intent = getIntent();
       String plantName = intent.getStringExtra("plantName");
       int imageResId = intent.getIntExtra("imageResId", 0);
       String sciName = intent.getStringExtra("scientificName");
       String desc = intent.getStringExtra("description");
       String use = intent.getStringExtra("uses");

       getSupportActionBar().setTitle(plantName);
       toolbar.setNavigationOnClickListener(v -> onBackPressed());

       plantImage.setImageResource(imageResId);
       scientificName.setText(sciName);
       description.setText(desc);
       uses.setText(use);
   }
}
Explanation:
- We imported the necessary libraries and defined PlantDetailsActivity, which extends AppCompatActivity, providing backward compatibility with older Android versions.
- onCreate() is called when the activity is first created. It sets up the initial state of the activity. Toolbar sets the app Action Bar.
- getSupportActionBar().setDisplayHomeAsUpEnabled() helps us navigate back to the previous activity.
- We initialize our UI components by finding them in the XML layout. We retrieve data passed from the previous activity using an Intent which includes the plant’s name, image, scientific name, description, and uses.
Android Ayurvedic Remedies Application Output
Conclusion
We have successfully implemented our TechVidvan Ayurvedic Remedies Application using Java and XML. We have discussed the project details, prerequisites, and code implementation for easy understanding. We can also use an API to increase our database of remedies and symptoms.
I hope you liked this project. Thank You.